

Изделия из кожи
.pdfHowever when making up belts for our shop I sometimes get bored using the same method all the time, and often switch to this one for variety. It is neither faster nor easier, just different.
Instead of counting to 6 you count l,2,3 -left-l,2,3-right.
59

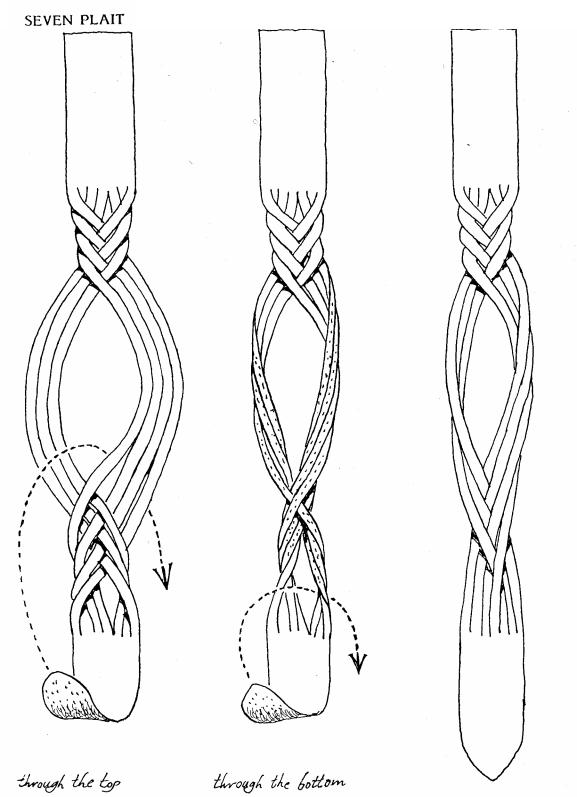
SEVEN PLAIT
The seven plait looks so like the five plait that people will often not notice the difference. It is useful for wider belts when a close plaited look is desired.
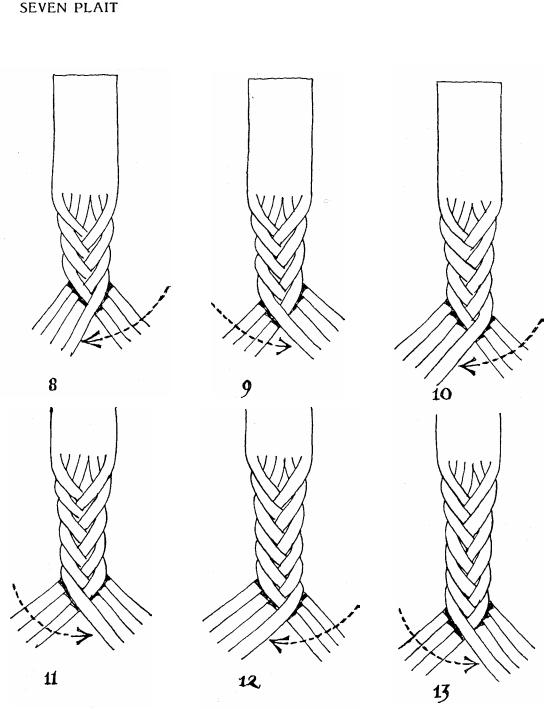
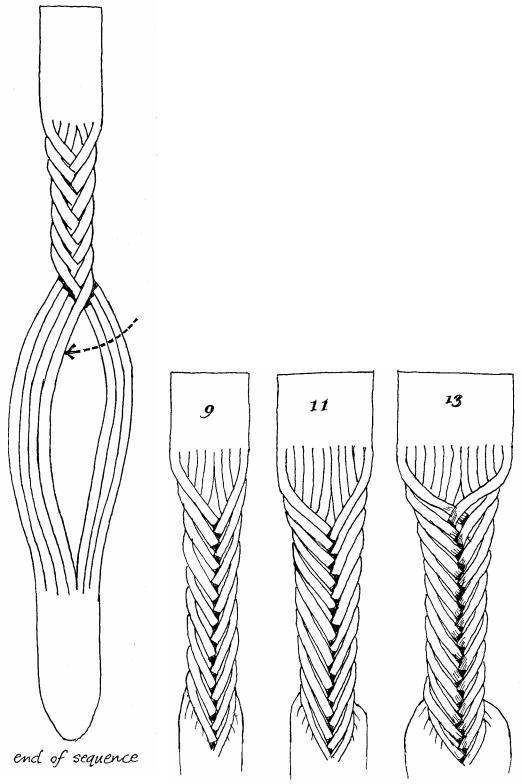
The sequence is 1, 2, 3, 4, 5, 6, 7, through the top, through the bottom, 8, 9, 1 0 , 1 1 , 1 2 , 1 3 , 1 4 . The sequence is repeated as often as necessary.
60
61
62
NINE, ELEVEN & THIRTEEN PLAIT 63
I originally worked these out to settle an argument about how many plaits were possible in the secret plait. The sketch on the cover shows a complete form of the eleven plait.
In practise these plaits are not a great deal of use because as the number of strands increase they tend to bunch up too much. However I once made a nine plait belt for a customer who wore it for years and claimed that it was very comfortable.
I n t h e o r y o n e could continue to enlarge the number of strands (always using odd numbers) until one
ran out of patience.
The plaits are all worked out in the same sequence as shown for the seven plait, except that the count is increased according to the number of strands being us ed. For instance the sequence for the nine plait is 1- 9, through the top, through the bottom, 1018. The sequence for eleven is 1- 11, through the top, through the bottom, 1222. The thirteen has a count of 26 and so on.
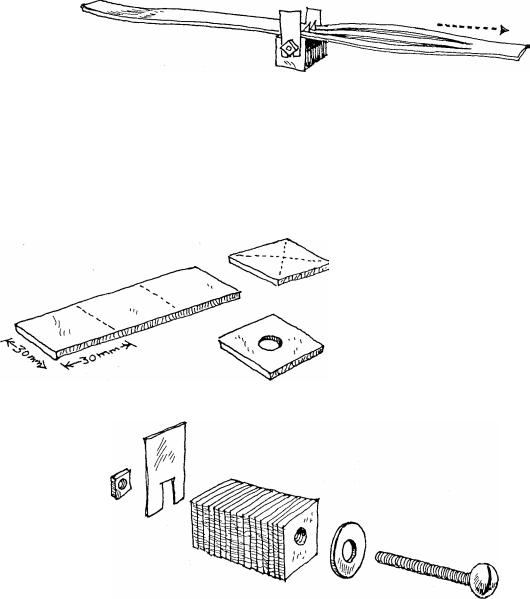
HOMEMADE GANG CUTTER
Gang cutters are small tools designed to cut a number of strands at once. Factory made ones are available to the professional leather worker who may wish to make a large number of plaited belts, but they are quite expensive.
The homemade gang cutter illustrated here costs only a couple of dollars and works just as well as the factory job. It is also easy to make.
Take a 30mm wide strap and cut off
sixteen |
or |
more |
squares. |
Draw a line |
from |
corner to |
|
corner |
to |
find the centre and |
|
punch a hole. |
|
||
|
|
T a ke |
a b o l t , |
5 0mm is long enough, and fasten all the leather washers together, put a metal washer at one end and a scrap of tin cut as shown at the other.
64

Razor blades can now be pushed in between the washers at whatever spacing is desired. Another scrap of tin is also pushed in to mark the width of the belt being cut. This helps prevent the belt w a n d e r i n g o f f line as it is being pulled through.
Begin the cuts with a knife and then put the gang cutter in a vice. Slip the belt over the blades and pull. Stanley knife blades can also be used in this cutter, and in that case the belt can simply be pushed down over the pointed ends of the blades to begin the cuts.
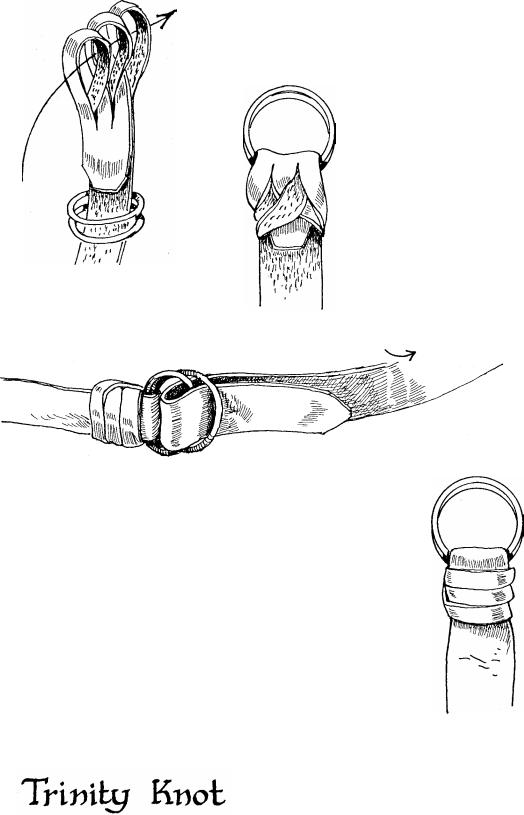
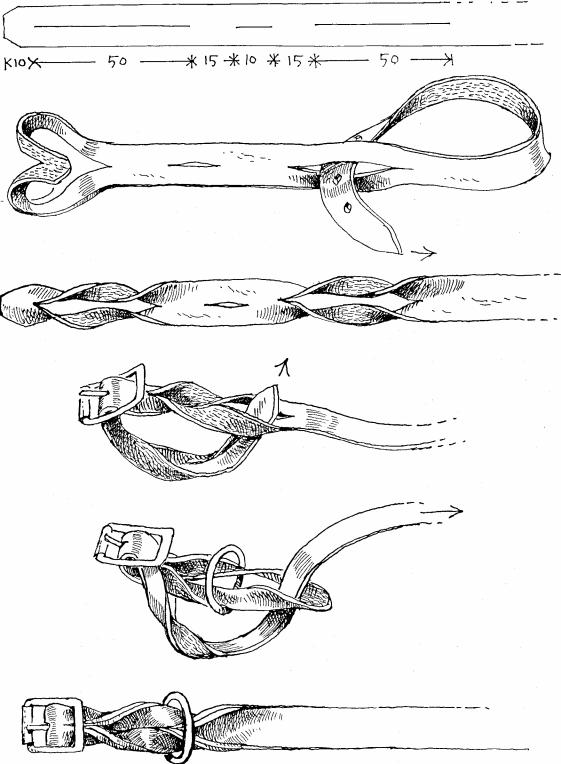
Belt buckles are usually sewn to the belt or attached by rivets. However in the outback bushmen will often improvise, using a pair of rings for a buckle and an interesting knot to hold them in place. This is known as a Gulf knot in north Queensland, a Kimberley knot in the west, and has other names in other areas.
Three or four slits are cut into the leather as shown. The actual measurements vary according to the thickness and flexibility of the leather, so it is best to first practise on a scrap if you want a neat job.
65
THE GULF KNOT
The strands are twisted to form a number of loops and the end of the belt is pulled through.
The back of the belt will now look like this.
This is how the
should look.
To fasten the belt it is passed through both loops and then back through one.
This fastening was first shown to me by Hienz Berger of Trinity Beach, north Queensland. It is not very often seen, and yet it works well. The sketches show it being used for a dog collar, and the measurements will need to be enlarged slightly when using wider leather.
When making a belt the metal ring is not needed. A pair of rings can be used instead of the buckle, and in this case only two slits need to be made in the leather.
It sometimes takes a little |
manipulation to get |
the |
two leathers locked together as shown in the last sketch. Note |
also |
|
that only the good side of the leather is |
showing when the fastening |
|
has been properly fitted together. |
|
|
66 |
|
|
67
Trinity Knot