

Изделия из кожи
.pdf1 2
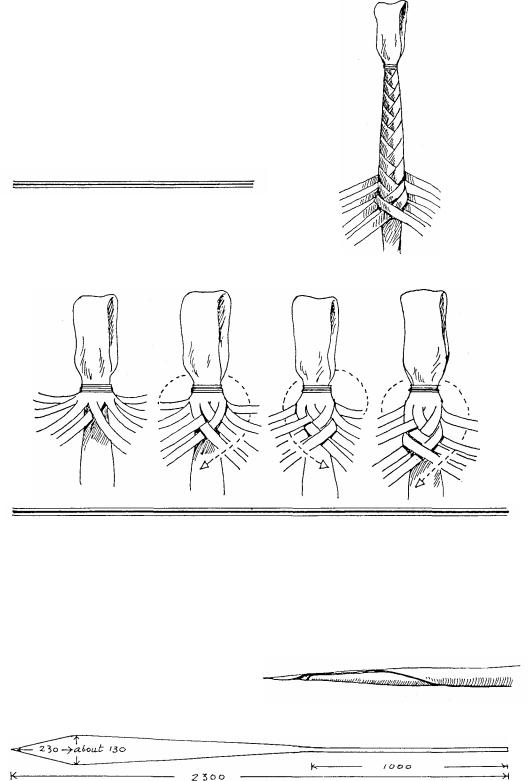
Figs 12-13. When 180mm has been
p l a i t e d c h a n g e t o a d i a m o n d p a t t e r n .
F i g . 8 . C u t a n e x t r a p i e c e o f h i d e to go as re inf orc in g insid e th e k e e p e r .
|
|
|
Figs |
14-15. When the |
split strands a r e |
r e a c h e d |
||
|
|
|
c h a n g e |
b a c k t o |
a herringbone pattern, this time of |
|||
|
|
|
16 strands. This |
makes |
a |
finely worked |
s e c t i o n |
|
|
|
|
w h e r e t h e h a n d g r a s p s t h e |
whip. |
|
|||
|
|
|
Fig . 9 . Ti e |
|
|
|
|
|
|
|
|
th e reinforcin g piec e |
|
|
|
||
o n t o t h e h a n d l e . |
a n d t h e k e e p e r f i r m l y |
|
|
|
||||
|
|
|
|
|
|
|||
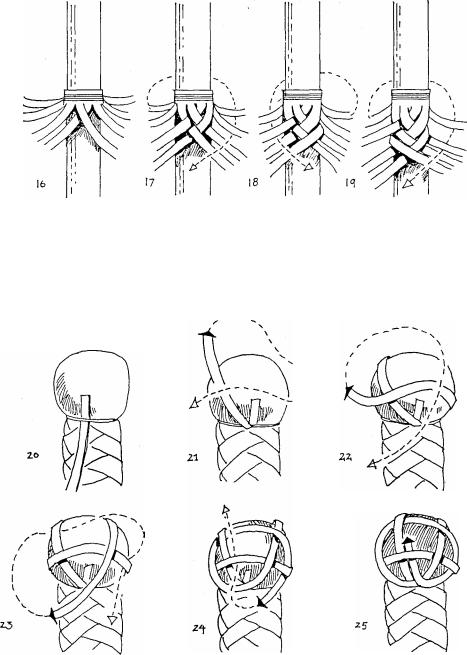
Fig. 16. |
If, when the |
|
|
|
|
|
||
end of |
the |
|
|
|
|
|
|
|
h a n d l e i s r e a c h e d , t h e r e i s |
|
|
|
|
|
|||
e x c e s s l a c e |
|
|
|
|
|
|
|
|
l e f t o v e r s o m e o f i t c a n |
|
|
|
|
|
|||
b e w r a p p e d |
|
|
|
|
|
|
|
|
F i g s 1 0- 11 . begin with an 8 |
|
|
|
|
|
|||
p lait in |
around |
the |
|
|
|
|
|
|
end |
to |
begin |
the |
|
|
|
|
|
herringbon e pattern . |
f o u n d a t i o n |
|
|
|
||||
164

17
Fig. 17. Heavy thread or
fine is used to build up the
final shape of the knob. Waxed
thread is best, and it should be a
dark colour in case there a r e
any small gaps in the final plaiting. Before the building up of
the knob is complete it is a good idea
to put three or four tacks into it as a precaution against the knob coming
loose at a later stage.
Do this before the knob has been
fully shaped as the tacking will tend to alter the shape of the knob.
Fig. 19. This is a good idea, but not essential. Take a lump of beeswax in one hand and a lighted candle in the other and let the hot wax drip down and fill any gaps that there may be between the
The knob is hung over the edge of the bench and the handle given a good, firm rolling.
Fig.18. Continue winding on thread till a good shape has been achieved.
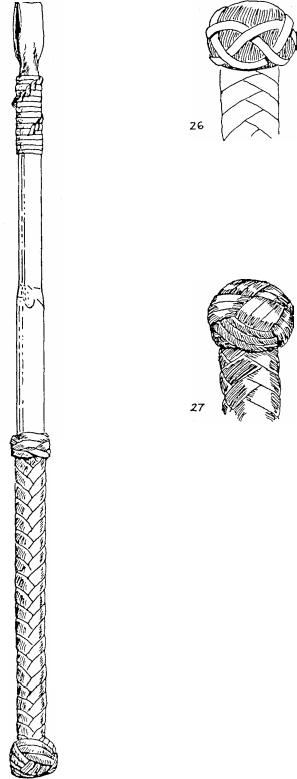
Fig.21. The same Turk's-head that goes on the keeper end of the whip also goes on the keeper end of the handle.
It can be put on flat, or the end can be built up with thread.
|
Fig.22. This is how the finished end |
22 |
should look. |
165
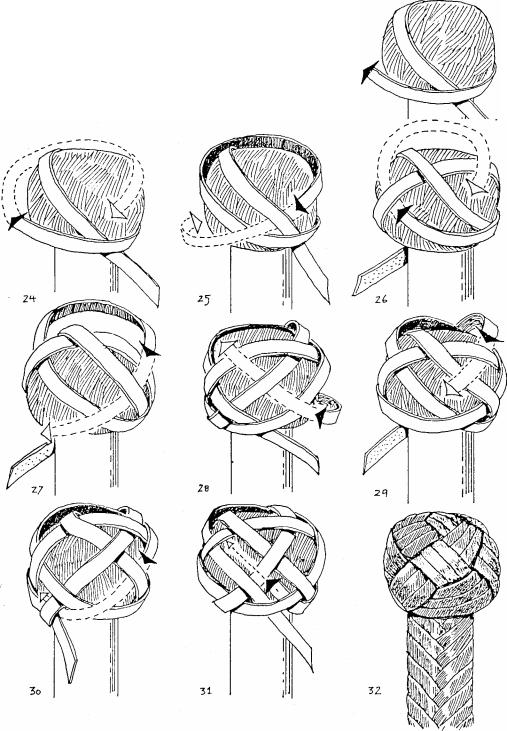
Figs 23-32. There are two popular Turk's-heads used on whip handle knobs. This is the more complicated one.
An easier one is shown a little further on, (page 170).
166
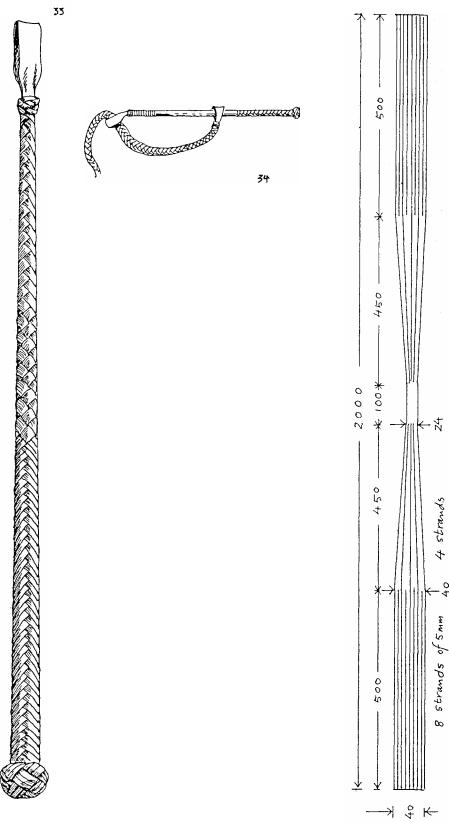
Fig.33. This is how the finished handle should look.
Fig.33. The handle is attached and the whip is complete.
Fig.7. The measurements can only be taken as a guide, as slight differences in the thickness of the handle will cause changes.
167

A HALF-PLAITED HANDLE
This type of handle is much easier and quicker to make than the previous
one, and for this reason is not so
highly regarded by skilled whipmakers, even though it can look very
attractive.
Fig. 1. A strip of heavy kangaroo hide 220x20mm is used for the keeper, or two light pieces.
The keeper is tied on with strong thread. This should be waxed to help preserve it.
In order to get a tight job one end o f t h e t h r e a d i s m a d e f i r m to something and the whipmaker winds the thread on as shown, moving forward as he winds.
Fig.2. Tuck one end of the thread under and begin winding.
Fig.3. When most of the winding has been done undo the thread from whatever it is tied to and cut it off with about 500mm left hanging.
Form a bridge, as shown by the arrow, and wind the thread back
towards the keeper.
Grasp the bridge at the point shown by the arrow and tightly wind it around the handle.
When all the thread has been wound on it will look like fig. 4.
Pull the end tight and cut it off flush.
FRENCH WHIPPING
Figs 5-9. This next part is purely for decoration. Take a length of kangaroo lace and work it as shown. It should cover all the thread below.
168
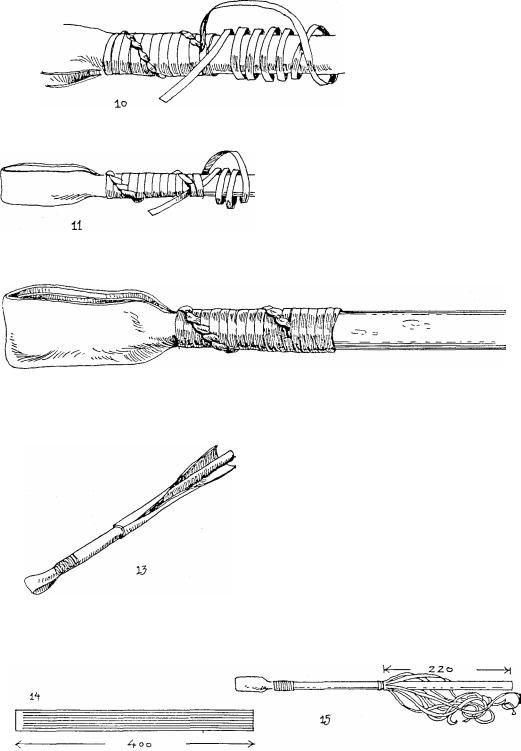
Fig. 10. The lace is finished off in the same way as the thread.
Fig. 11. The spiral pattern is lost in these few last turns.
12,
Fig.12. There is no sign of the thread in the finished job.
Fig.13. Take a strip of thin le ather, kangaroo is best but any leather can be used, and trim it so that it just wraps around the handle.
Fig.14. Cut the leather into 8 strips, leaving just a small part uncut at the end.
Whipmakers always use the best part of the hide for the whip, and
often use the thinner parts for this sort of work.
This can sometimes cause a problem if the leather has any stretch in it, for as the pla iting is pulled tight the strands will stretch and become narrower.
This should be allowed for by making the leather wider than the circumference of the handle before beginning to cut the strands.
Fig. 15. The 400mm strands should cover 220mm when plaited. Tie them on at this point.
169
Figs 16-19. An 8 plait herringbone
pattern is used. When using wide lace it is a good idea to arrange the
strands as shown in the first two figures, otherwise a hole may appear here and the wood be visible.
Figs 20-24. This is the most simple Turk's-head to cover a knob. A more elaborate one is shown earlier in the section on fully covered whip handles. The amount of lace needed will depend on the size of the knob, but is usually around a metre.
The end of the lace is shown as
170
first |
being tied |
to |
the base of |
the |
knob. |
This |
is |
helpful but |
not |
necessary. |
|
|
|
|
Fig.25. At this point the lace |
has |
|||
come around to its own beginning |
and |
|||
is now complete as far as |
the |
|||
formation goes. |
|
|
|
|
28
Before going any further try and arrange it in an even manner, as
shown in fig.26.
The lace is then taken around again following the first one. This can be done two, three or even four times, until the knob is fully covered.
Fig.27. Work the strands tight, trim o f f t h e e n d s a n d t h e k n o b i s complete.
Fig.28. This is the finished handle, in this case worked on a piece of lawyer cane.
17
1
The methods described in the first part of this section are probably the most common ones used. However there are many different ways of constructing whips, and in the following pages some other techniques are described.
I am always interested in hearing from people who may have other ideas, and can be contacted at the address at the front of this book.
APPENDIX 1
This is a slightly faster and easier way to begin plaiting a whip. However the method described earlier is still regarded as a better way to begin.
APPENDIX 2
ALL KANGAROO HIDE WHIP
It may happen that you have no other leather than kangaroo, and in that case the belly shape will have to be formed with it.
The shape is cut out as shown, the last metre does not have a taper and can be 5-10mm wide. If 10mm wide it will be folded in two. The rest is rolled as tightly as possible. If it does not roll as tightly as desired wet it first.
Although very strong, this type of belly is not quite as flexible as the one described in the first part of the book, though it will loosen up with use.
172
APPENDIX 3
COWHIDE BELLY
A full cowhide belly is faster to make than the method described earlier in the book. However it is often difficult to get a good
smooth finish on this type of belly, so it is not as popular as the first method.
Fig.3. Hang the leather on a nail, give it a good greasing and then plait it with a four plait as shown earlier.
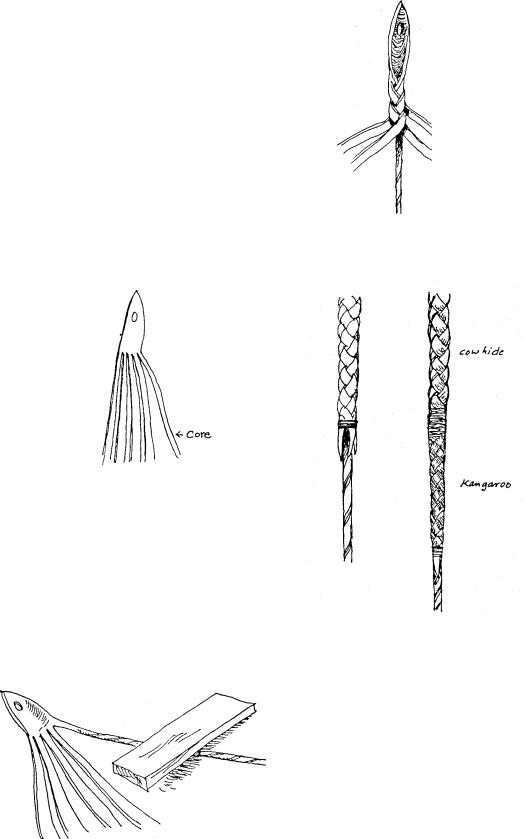
Fig. 1. Four strands are cut from the hide. They begin at about 3mm wide, taper out to 12mm after 230mm and then taper in for the rest of their length, coming to a point at 2.5 metres.
Exact measurements cannot be given as they vary according to the thickness and
fle xibility of the hide being used.
The edges are skived and the ends tapered and thinned as much as possible.
The core is also cut from the same strip of leather. This is 3mm wide and 2300 long.
Fig.4. One of the problems with this type of belly is getting a good transition at this point, the whip should end up with a smooth taper, not a step.
Fig.5. To get a good taper tie on four scraps of kangaroo lace at this
then roll it hard until it is round.
Fig.2. Soak just the core strip and point, and continue plaiting for a
short distance.
173