

Изделия из кожи
.pdfFig.2. Use a hacksaw to cut it to shape.
Fig.4. The tool is used freehand, and the designs are kept simple.
Any piece of timber will make a handle, in this case 1 used a piece that had already been shaped.
On small jobs the leather is often damped before using the crease instead of heating the crease and working on dry leather.
This is not practical on larger jobs such as saddle flaps, or on leather which stains when dampened.
Fig.3. Grind or file an edge on it. The edge is rounded, not at all sharp. Use fine wet-and-dry paper to get the edge as smooth as possible.
The various crease tools simply press a line into the leather, but the racer cuts a small strip out of the surface of the leather.
It can be used to make decorative lines, but this is not advisable as the leather is weakened. Its real use is to cut a line where stitching is to be done. The stitching will sit down snug in the groove and so be less liable to
be damaged or rubbed.
The best racer is a compass racer. This tool looks like a compass with a racer head. It can be opened out so as to cut a line at any given distance from the edge of the leather.
A compass racer would be too difficult to make, but it is possible to make a simple racer, if you have a little patience.
201

Take a good heavy 100mm nail and flatten the head. This can be done cold but it is better to heat it.
The outside shape does not matter at this stage, but the metal should be hammered until it has a smooth surface. It can also be rubbed down on a stone to get a good finish.
This is a
head.
Hold the nail with pliers and heat it over a fire or blowtorch until it is
red hot. Use another pair of pliers to bend the end
over. Hammer it lightly until the gap is just under 2mm.
Use a fine file or grindstone to shape the head. This is the part of t h e j o b t h a t n e e d s patience. The cutting edge must be sharpened until it will cut a clean groove in leather.
Fix on a handle and the racer is complete.
When using it one finger runs along the edge of the leather as a guide while the others hold the tool.
202
commercially made compass racer. The point on the right runs along
the outer edge of the leather while the cutting head on the left cuts a groove.
These tools are quite expensive.

Wheel
The marking wheel make a series of small marks on the surface of the leather, and these act as guides when stitching or punching holes.
They can be handmade by using cogwheels from old alarm clocks or other small machines, but the effort is hardly -worthwhile as they can be :. ought quite cheaply.
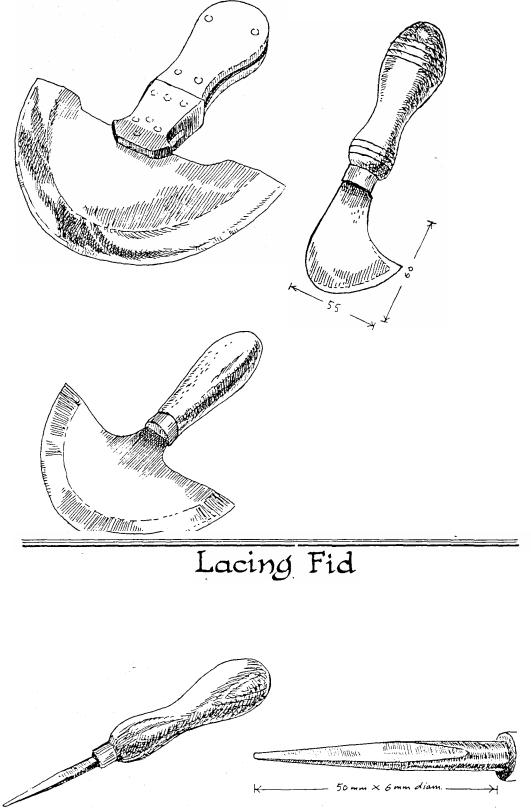
The round knife is probably the saddler's most useful tool, and he will use it far more often than any other knife.
It is ideal for cutting off straps and skiving them, but it is also used for long cuts, including curves.
Most leather can be cut by just pushing the knife forward, but with heavy leather the knife is rocked back and forth, and moves forward in this way.
It is quite possible to make a round knife, but like all edge tools the problem is to find a piece of steel that will take and retain a razor sharp edge.
My son, while working in our saddlery business, made a round knife from a section of saw blade.
The making of a round knife is straightforward enough, the main thing to watch is that at no time during the cutting out and sharpening is the steel allowed to get hot enough to change colour.
If it does so it will lose its temper and be useless (unless you are clever enough to re-temper it, usually a job for a skilled blacksmith).
Fig.l. The dimensions can vary according to taste, these are average. Timber can be glued to each side to make a handle, but it is better to drill a couple of holes and put in a couple of pieces of metal rod, then hammer the ends so as to spread them .
This must be done with care so that the wood will not split. Copper rivets and roves, such as are used in boat building, can also be used and will lessen the chance of splitting.
203
This round knife was handmade for me by the late George Lee Sye, one of Australia's greatest knife makers.
This is an ordinary commercially made round knife.
This is a head knife, a tool that was once a standard part of a saddler's tool kit but which today is almost impossible to obtain.
It was used for cutting small curves, slots in leather, and any other job which was difficult for the round knife.
It would be possible to make such a knife by hand, and it would be a u s e f u l i t e m f o r a n y s e r i o u s leatherworker.
A lacing fid is required when making
Turk's-heads or finishing up plaited belts. Its purpose is to simply open up a gap in previously plaited work.
For rope work the fid is round but a flattened one is used for leather
lace. It is made by grinding a flat onto either side of a scrap of 6mm diameter mild steel.
A fid can also be made from a small bone.
204
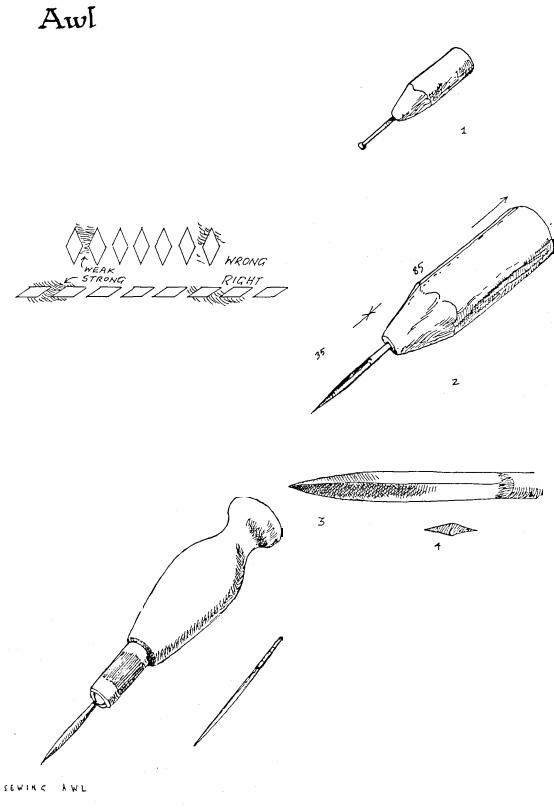
A saddler's awl is essential when sewing harness. Although it is a simple job to make one this is not a tool that I would recommend you to make unless it is a matter of necessity.
This is because a saddler's awl needs to be very well tempered in order to keep a sharp edge, and the correct tempering is usually beyond the skill of the home craftsman.
There is a special technique needed when using an awl. It is held so that it will make a row of holes as shown in the lower diagram. There is a strong strip of leather between each hole.
If the diamond shaped holes are positioned as shown in the top drawing there is a weak spot between each hole, and the leather may tear when being sewn.
A factory made awl, the blade can be removed by unscrewing the head.
However people in the bush often have to make their own awls, so here is how to do it.
Fig.l. Hammer a nail into a piece of wood that ha s been shaped as a
handle.
Fig.2. Sharpen the nail. If you want a wider awl then hammer the nail a
little to widen it before sharpening.
Figs 3 & 4. This shows the awl from one side and also the cross section. The outer edges must be made extremely sharp.
Heat it over a blowtorch or flame until it glows a pale straw colour. This will take place at around 430 degrees Fahrenheit, the correct temperature for tempering lancets.
Plunge it into water, sharpen it again and with luck you will have a usable awl. I have managed to get by with such an awl on various occasions, but have always been pleased to replace them with proper awl blades as soon as possible.
205
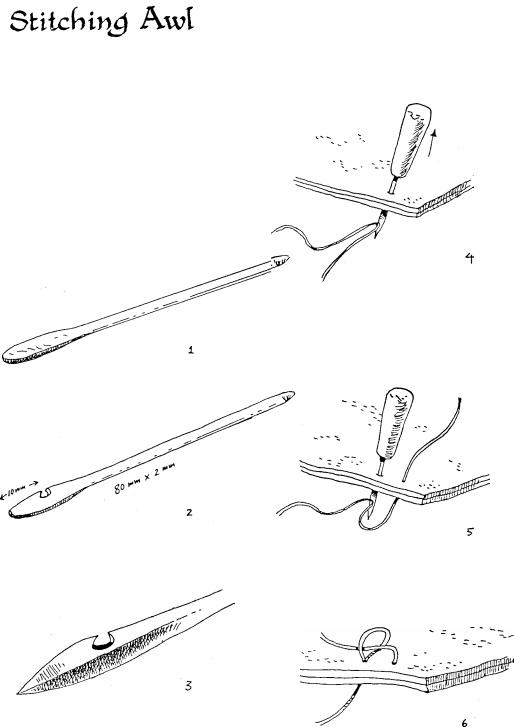
This tool is used by leatherworkers, especially street cobblers, in many parts of Asia. Craft shops here sell a much more elaborate tool, but one that only produces the same stitch as this simple device.
This stitch can be used for all sorts of general leatherwork except harness. Harness must always be stitched with two needles in the traditional manner as lives may depend upon it.
This stitching awl is quite easy to make. Its main use is with leather, but it can also be used with canvas if the edges are left blunt.
Fig . l . Take an 80mm length of fencing wire or a nail and flatten the end with a hammer.
Fig.2. Use a hacksaw or a very small file and make a couple of cuts to create a hole as shown.
Fig.3. Now grind the edge to the shape shown and sharpen it well.
If you heat it and then plunge it into water you can also harden the metal, but you may also make it too brittle, so it is a matter of choice.
Heat it over a blowtorch until it
glows a pale straw colour. This will take place at around 430 degrees Fahrenheit, the correct temperature for tempering lancets.
Plunge it into water and then give it another touch-up on the oilstone.
Fig.4. Use the awl to push a hole in the leather and then hook the thread into the slot.
Pull upwards to bring the thread through the leather.
Fig.5. Make a second hole and again put the thread into the loop and pull it upwards.
Fig.6. Put the top thread through the loop that has been formed and then pull both threads tight to form the stitch.
206
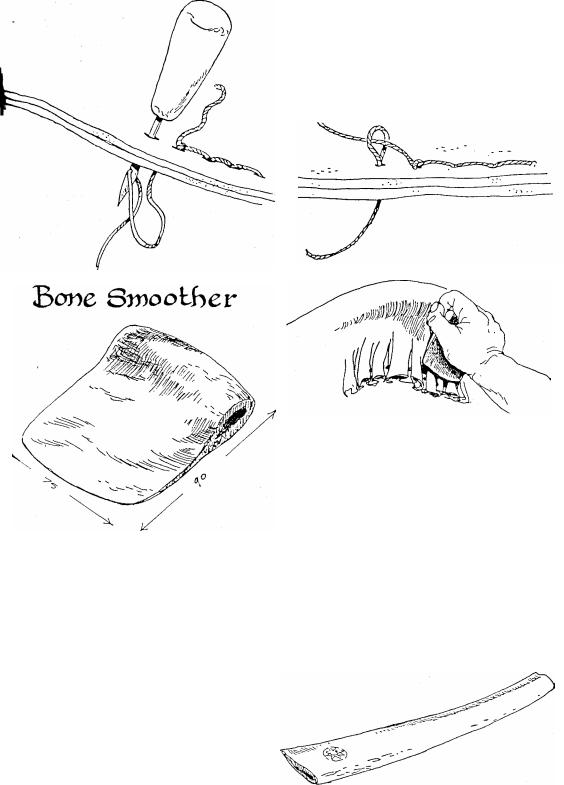
A bone can be used to get a good edge on belts, especially belts made from good heavy leather.
The edge of the leather is moistened, not soaked, and then rubbed briskly with the bone.
When dry it can then be waxed and rubbed with a piece of coarse canvas, or again polished with the bone.
The bone is also used when doing moulded leather work. When saddlers are putting the seat on a saddle they are faced with the problem of a mass of wrinkles where the leather comes over the back of the saddle seat.
By striking the dampened leather as shown in the sketch the wrinkles
Fig.7. The work progresses in the same way. Make a hole and pull the thread up through the leather.
Fig.8. Put the top thread through the loop and pull both threads tight.
In light leather quite good speeds can be attained using this form of stitching.
can be slowly worked out of the leather until it becomes quite smooth.
A heavy piece of perspex can be shaped to do the same job.
A butcher advised me not to boil bones to remove the scraps of meat that cling to them as he claimed that this weakened the bone. Instead they should be placed outside where ants can clean them up.
The bone should then be sanded down with fine paper until it is silky smooth.
The bone does not have to be the dimensions shown here, just so long as it will comfortably sit in the hand.
For smoothing belt edges a rib
bone can be used.
207
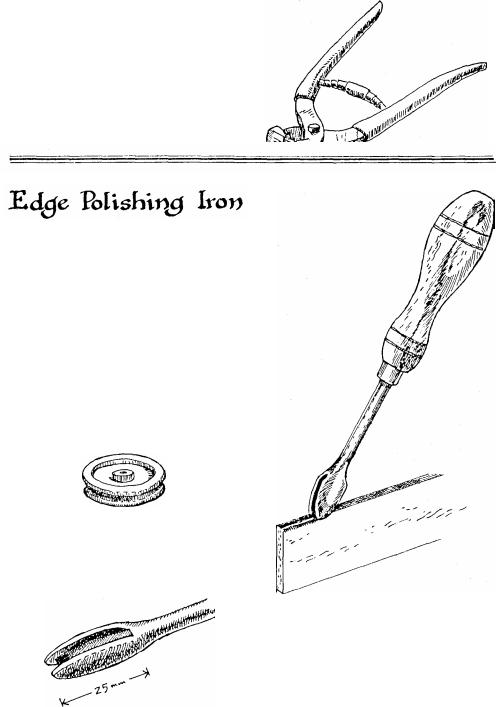
MULTIPLE SLIT PUNCH
Early in 1984 a Multiple slit punch in the shape of pliers came into our leather shop in a batch of tools from Japan. This tool has a very good action and cuts three slits at once.
A lot of otherwise well made belts are spoiled by having rough, hairy edges.
A neat finish is achieved by first using an edge crease to make an indented line close to the edge. Next an edge shave (called by Americans and edge beveler) is used to shave off a fine strip of leather and round the edges slightly.
For most leatherworkers this is enough, but old time saddlers then used another tool, called an edge polishing iron, to get a fine smooth edge.
Today a plastic tool calle d an edge slicker is available, and while this certainly does help improve the final finish it cannot do as good a job as the iron because it cannot be heated.
The head of the iron has a groove in it so that it fits around the edge of the leather.
208
The head of the tool is heated, then dipped in wax, and rubbed on the edge of the leather while still hot.
An ordinary candle can be used, with a lump of beeswax standing next to it, but an even better idea is to use one of the very large candles that are available today.
As these melt a pool of hot wax forms around the base of the wick, and the iron can be dipped into this.
We use beeswax in our saddlery business for rubbing on thread. I use this to make my own large candles, melting it into margarine containers.
A length of wire is pushed through the centre and some string threaded through. Proper candlewick would be even better, as the string smoulders after the flame has been blown out, and the end must be pinched off or dipped into the still melted wax pool.
Polishing irons are still available, but are often hard to obtain. It is quite possible to make an effective homemade iron.
A scrap of mild steel of around 6mm diameter is used, or whatever comes to hand, and the end hammered to a slight curve.
A small file is used to shape the groove. The bought tool has a groove on either side of the head, but only one side is necessary on a homemade tool.
Fix on a wooden handle as the tool gets hot during use.
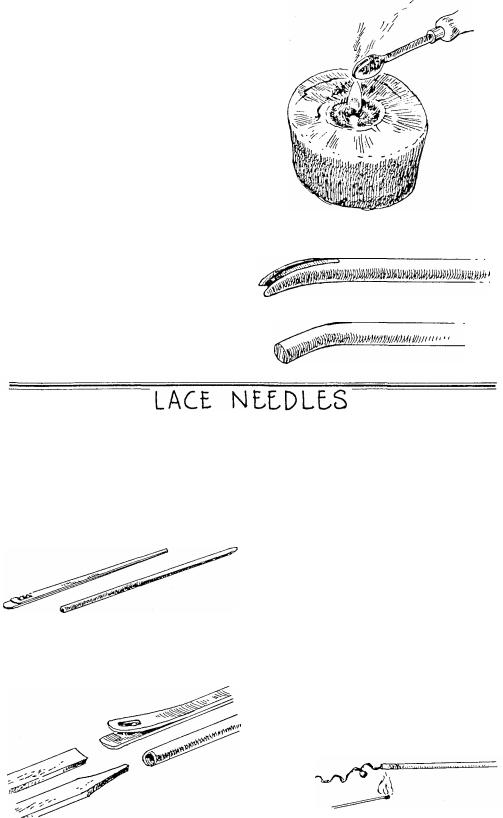
Needles are needed for complex work, although in a pinch even these can be dispensed with. Tim Chorley of Galston, NSW, told me that when caught without a needle he uses a couple of drops of quickdrying glue to stiffen the point of the lace or thread, and so aids the sewing.
There are two types of needle in common use, a flat one made from two pieces of metal and a cylindrical one.
The flat needle has two small hooks in it, and opens as shown in the top sketch to take the lace.
The cylindrical needle has a thread inside its hollow head, and the lace is cut to a point and then threaded in.
Neither type can be pulled with any force, and this is why the lacing fid is needed , to open a pathway for the needle.
I much prefer the cylindrical needle, because it seems to go through the holes much easier. The main problem with these needles is that if you do use too much force the point of the lace will break off inside the needle.
Any attempt to dig out the leather will damage the thread and spoil the needle. Hold a lighted match under the ne edle and the leather will slowly spiral its way out.
209
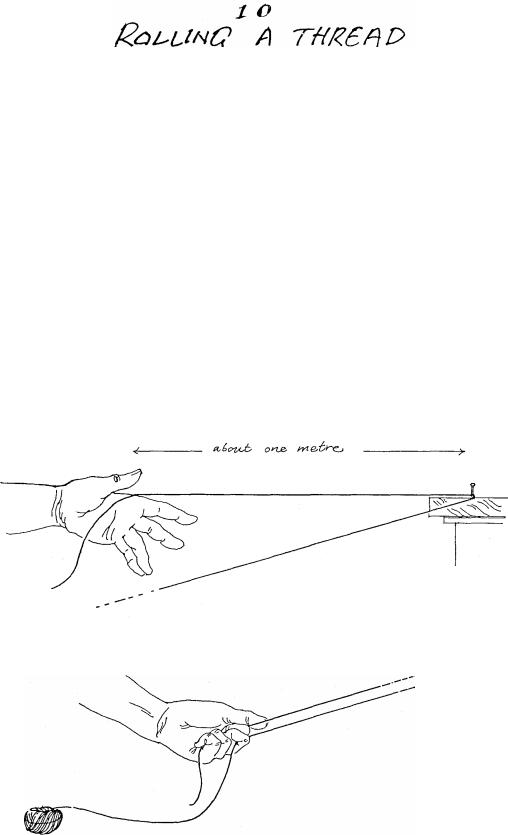
In order to properly sew leather you m u s t f i r s t l e a r n t o r o l l y o u r o w n thread and then learn to sew with two needles and a sewing awl.
The saddler makes his thread by taking a number of strands of a special thin thread, rolling them together and coating them with wax to make the thickness of thread he requires for each job.
The completed thread is about 2 metres long and has a long taper at each end. The taper is extremely important.
The great secret in thread making is in the breaking of the thread to create the longest possible taper.
The thread used by saddlers comes in two grades, "Common No 2" (sometimes simply labelled "Best Common") and "No 15". No 15 is thinner than No 2 but for all practic al purposes this does not affect the saddler who simply takes sufficient number of strands for the job.
He could, if he wished, use either of
them to make a cord as thick as his thumb . No 2 is generally used for saddle work and the most commonly used thread is one made by rolling together 3 lengths of No 2.
No 15 is a little finer and three strands of this are rolled together to make a thread for finer work, or four s t r a n d s t o m a k e t h e e q u i v a l e n t o f
three strands of No 2. |
|
TO MAKE THE THREAD. |
The |
t h r e a d c o me s i n a b a l l . T w o e n d s should be visible, one on the outside of the ball and one on the inside. Do not unwrap the outside thread but pull out the one that is in the hole in the centre of the ball. Lay it across the palm so that the last 150mm hangs out on the lower side of the hand.
(Before going any further I should
like to |
explain two things . First |
||
saddlers, |
being individuals, |
develop |
all |
sorts of |
different ways of |
holding |
the |
thread, but the one described here is p r o b a b l y t h e m o s t c o n v e n i e n t . Secondly, le f t h a n d e d p e o p l e , a s a l w a y s , m u s t r e v e r s e a l l t h e directions).
Fig . l . The thread, which comes out between thumb and first finger, is hooked around a nail on the bench 1 metre away . The thread goes from your left hand to the left side of the nail, around it and back to your hand.
Fig.2. It is then grasped by the middle finger which hooks around it holding it firm. The thread is now broken about 200mm further on.
210