

Изделия из кожи
.pdfFig.4. The thread does not come apart with a pop, or snap, or with any p r e s s u r e a t a l l . I n t h e h a n d o f a saddler it seems to float apart leaving the ends long, silky and tapered.
Only practice will bring about this magic. The secret is to know exactly when the strands of the thread are exactly unrolled and apply a gentle pull at this point. The common mistake is to roll too much so that the thread passes this point and is rolled in the reverse dire ction. The saddler rubs his hand down his thigh only once to get the thread broken.
Again I must stress that the purpose of this is to create a long taper . A roll down the thigh accompanied by a sharp jerk will break the thread each time but will not creat e a u s a b l e taper. You might as well use a pair of scissors.
It is also impossible to create a long taper on a piece of machine made thread, though plenty of lazy leatherworkers have tried.
The saddler always rolls his own.
Fig.3. It is broken by the right hand rolling it downwards against the thigh so that the strands of twisted thread are untwisted.
Fig.5. Three lengths of thread are t a k e n f r o m t h e p a l m o f t h e h a n d around the nail and back to the middle finger. More are taken if heavy work is being done and a thick thread is needed.
211
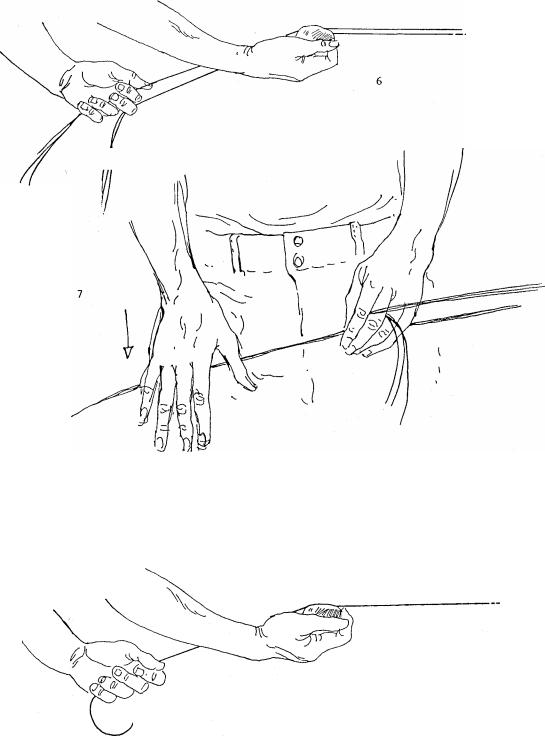
Fig.6. A piece of beeswax is now rubbed on the thread. Do not let the threads go slack whi le doing this, at all times they should be under slight tension around the nail.
Fig . 7 . The thread is now rolled d o w n t h e t h i g h . T r y a n d a v o i d crouching like a nervous kangaroo while doing this. The saddler remains upright and relaxed.
Fig.8. When the thread has been rolled wax is again rubbed along the whole length of it . The amount of r o l l i n g r e q u i r e d c a n b e j u d g e d b y l o o k i n g a t t h e t w i s t i n a n y manufactured rope. Most beginners do not roll their threads enough.
The waxing has to be done fast and with vigor so that friction is generated
and the heat drives the wax into the t h r e a d . W h e n t h e w a x i n g h a s b e e n done the saddler again runs the thread vigorously through his hand to rub off surplus wax and get a smooth finish.
Rather than use the bare hands you might find it better to use a piece of bag or coarse canvas.
212

SINGLE ENDED THREAD
Fig.9. Most saddlery work is done w i t h t w o n e e d l e s , b u t t h e r e a r e certain jobs, such as sewing the panel to the seat, where only a single needle is used. In this case the thread need only have a taper at one end.
To make this type of thread pass the strands around the nail as before and wax them, but this time roll them
Saddlery work is sewn with harness needles. These are similar to ordinary needles but have blunt points. The r e a s o n f o r t h e b l u n t p o i n t s w i l l become obvious when you ram one under your fingernail.
If they are not available you can make your own by simply blunting ordinary needles. The points are not needed as the holes in the leather are made before t he needle is used.
Fig.11. The needle must be firmly fixed to the thread. Push the needle through the middle of the thread as shown in the first sketch, and do it as close to the end as possible.
all together. In this case instead of making a long 3 strand thread it is roiled into a thread of 6 strands.
Any number of strands may be rolled like this to make quite heavy cords.
Fig.10. When the thread is lifted from the nail you will find that there is a loop in the end as shown. This can be utilized in certain jobs by passing the needle t hrough it after the first stitch to anchor the thread.
Otherwise the normal way to hold the thread is to tie a simple knot in the end as shown.
The end of the thread will terminate with a very fine whisker and it is a good idea to just trim this very end to make it easier when threading the needle.
Continue pushing the needle through the thread two or three times.
Thread the needle. When this is done begin pulling the thread so that i t s l i d e s u p t h e n e e d le towards the eye . Keep pulling and it will slip right off the end of the needle. You will now find that the thread is locked on to the needle.
213
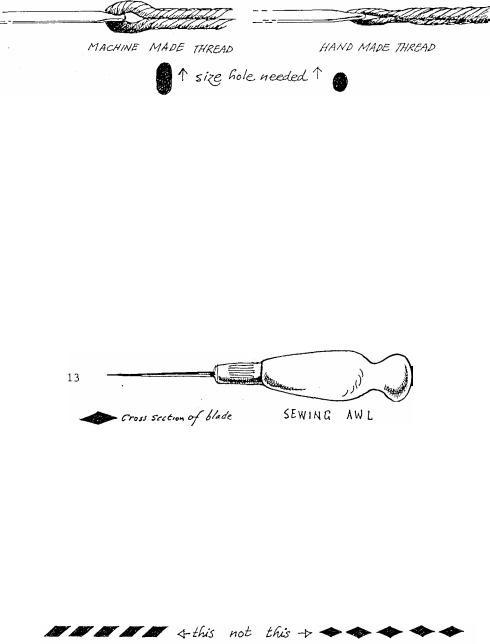
Fig.12. Having now threaded the harness needle onto the tapered thread I will explain why the saddl er goes to all this trouble instead of just cutting a piece from a roll of machine made thread.
The reason is quite simple and is explained in the left sketch. The machine made thread makes a double thickness where it goes through the eye of the needle. In o r d e r t o g e t this through the leather you would need to make a large hole, and later the thread would be loose in the hole. On the other hand the hand-made
Fig.13. A sewing awl is needed to make holes in the leather for the needles to pass through. The blade has a diamond cross section. When bought the blades are not usually very sharp and it is a good idea to touch up the edges with a file . The blade should go through the leather without having to push too hard.
In the bush an awl can be made by hammering a nail into a piece of wood
tapered thread puts the smallest possible bulk through the eye of the needle. This means that a sm aller hole is needed and the thread remains always firm in the leather. It is
actually quicker to make a thread and sew with it than it is to cut off a length of machine made thread and sew with it. The reason is that a well tapered thread will pass throug h the leather with ease but the machine made thread will be forever jamming and need pulling through with pliers because of the double thickness at the eye.
and filing it to the correct shape, but this will not hold its edge for long.
You should have two or three different size awl blades to suit different jobs. You should not need pliers to pull the needle through, if there are problems like this then either the thread has not been tapered well enough or you are using too small an awl blade.
Fig.14. The awl blade makes a diamond shaped hole in the leather. Hold the blade at an angle so that the holes are placed as shown on the left. This gives the maximum strength of leather between each hole. If the blade is held to make holes as shown on the right there is a weak spot between each stitch.
214
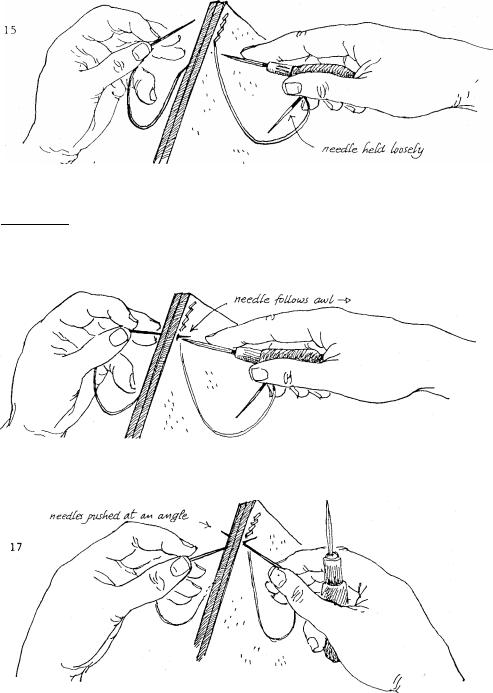
Fig.15. To begin stitching place the job in the saddler's clamp. In my book Australian Traditional Bush Crafts t h e r e a r e d i r e c t i o n s f o r making a good home made clamp.
The clamp is held between the knees, it is not held upright but leans over to the left so that you see only
16
Fig.16. The needle in the left hand rests on the top of the awl blade for
Fig.17. Now the needle in the right hand is also pushed through the hole. The needles are pushed through at an angle to avoid pushing the needle under ones fingernail.
The needles are pulled out and the stitch is complete.
Notice that in this sketch the
one side of the job, and this is always the best side.
A hole is made with the awl, one needle passed through and sewing begins. In your left hand you hold one needle, and in your right hand the sewing awl and the other needle. The needles are held at all times.
Push the awl through the leather.
guidance and follows the awl blade through as it is withdrawn from the leather.
sewing is coming towards the saddler. There is a great deal of argument amongst saddlers about this, some insist on sewing toward themselves and others always sew away. For a beginner I would suggest that you can m a k e n e a t e r s t i t c h e s b y s e w i n g towards yourself.
215
SEWING THICK LEATHER
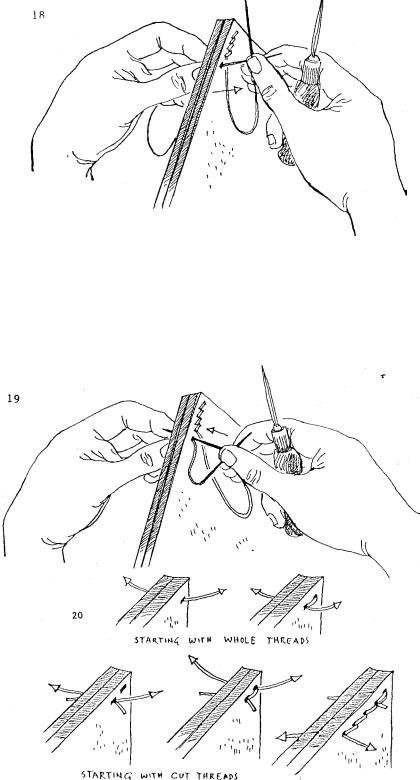
Fig.18. It sometimes happens when sewing thick leather that it is too difficult to pass both needles through the leather at the one time . In this case make the awl hole and bring the left needle through. Cross the needles as shown with the right hand needle behind the left hand needle and pull the left hand needle through.
216
Fig.19. Once it is clear of the leather push the right hand needle into the hole. As you do this give the left hand thread a little tug with the left hand to make sure that the right hand needle has not perforated the thread, then pull the needle through.
F i g . 2 0 . T h e t o p s k e t c h e s s h o w h o w t o b e g i n s e w i n g u s i n g a n e w l y m a d e t h r e a d . H o w e v e r n o t a l l j o b s w i l l u s e u p a w h o l e l e n g t h o f t h r e a d a n d s o y o u w i l l e n d u p w i t h a n u m b e r o f l e n g t h s o f c u t t h r e a d , e a c h w i t h a n e e d l e o n o n e e n d . T h e s e a r e u s e d a s
shown in the bottom row of sketches. Begin sewing on the second or even
the third hole down, sew away from yourself for a stitch and then come back and continue. This will lock the thread permanently in place.
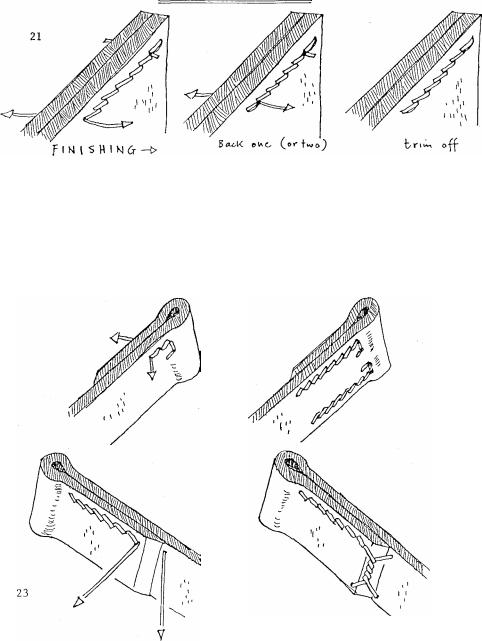
Fig . 21 . To complete sewing go back one or two stitches and cut off flush. This is all that is needed.
ANOTHER WAY OF BEGINNING
Fig.22. This is a common way of starting and finishing when sewing bridles and similar work. It is easier than sewing twice thr ough the one
hole. Short lengths of thread can be used for this work, the ends left sticking out at the beginning and trimmed off later.
22
Fig . 23 . This shows the back of the job to show how the thread is taken from one side to the other. A row of s titches across would weaken the leather so it is twisted as shown.
217

BACK STITCHING WITH ONE NEEDLE
Fig.24. It is sometimes convenient to sew with only one needle, and in
t h a t |
c a s e |
t h i s |
t e c h n i q u e i s u s e d . |
|
|
However it uses one third more thread and the back of the job does not look
as neat.
LAC
21
8
219

The contents of this part originally appeared as one of the sections in the first edition of my book on making a stock saddle.
Special thanks are due to saddler Lew Haines of Townsville who taught me many of the techniques described here.
SIMPLE SADDLE REPAIRS
The important thing to understand about saddles is that no one ever thinks of getting them repaired until they are almost past the point of bein g repairable. Because of this it may be of some interest to note the common faults found in old saddles and some of the remedies. The first thing to look for is a broken tree. A badly broken tree can make an otherwise good saddle useless. The
220
tree and the points at which it is commonly broken are discussed later in this section.
Fig.l. Having established that the tree is sound the saddle can be examined for general damage. The most common damage points are shown in the sketch. The top of the knee pads get worn and the leather cover torn. The dees at the back of the saddle to hold the saddle bags become damaged or fall off and the inner and outer saddle flaps get torn at the back. The forepart begins to come loose and tears appear along the
edge of the seat.
All these points can be repaired. Lifting the flap it may also be found that the girth straps are badly worn or damaged. The usual remedy is to cut them away entirely and use a Bates rig that goes over the top of the saddle. However it is not a hard job to replace the straps if they are required.