

Изделия из кожи
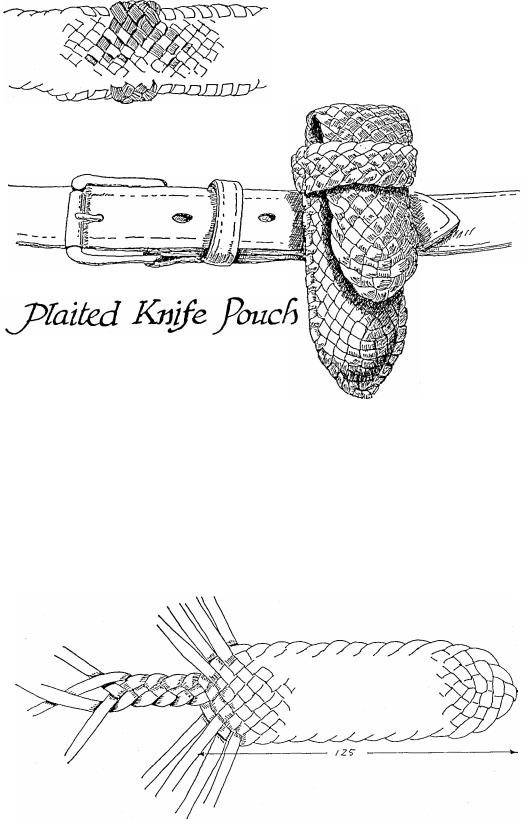
.pdfBegin an ordinary belt plait, but before going too far try it over your knife for size. Some knives, such as the 'Old Timer', are wider than normal and may need an 18 plait to cover them.
Complete 110mm of plaiting.
Turn the end over and fix the first few strands. As before try and not work strands across to the very edge.
The shaded section shows the good side of the leather after it has been worked into the back and trimmed off flush, note how the edge has been kept clear.
The front of the pouch is now complete.
76
SEWING FRONT TO BELT
Take 8OOmm of 4.5mm lace and fix a needle to it, or use a lacing fid to open up the strands.
Work the lace into the back of the belt as shown. This will stop the lace pulling out under pressure.
Lace the outer edge of the front to the outer edge of the belt. This is a straight forward job along the edges, but care is needed when going around the bottom of the pouch to get a neat row of lacing
If done carefully the lacing will appear to be part of the plaiting.
T he lacing is finished off by doubling it over in the same way that it was started.
THE KEEPER
The keeper needs 3 strands of 4.5mm lace, each 350mm long. It is set 25mm from the opening of the pouch.
Work the three strands into the back of the belt as illustrated and begin plaiting an ordinary 6 plait.
77
MATERIALS NEEDED
All 4.5mm lace; Front, 9 at
500mm = 4500mm Back, 6 at
650mm = 3900mm Keeper, 3 at 400mm = 1200mm Lace for
sewing = 900mm TOTAL = 10.5metres
This pouch looks very fine, and should present no problems to anyone
who can already plait a belt.
The front part is plaited in the same way as described for the previous pouch.
In this case the knife was 100mm long, but wider than the previous
78
Put your knife into the pouch and
keep plaiting until the keeper is long enough to cover it and come around
to the back of the belt.
Work the ends into the back of
the belt and cut off flush. pouch is now complete.
knife, and so the front was made with an 18 plait, using 9 strands each 4500mm long.
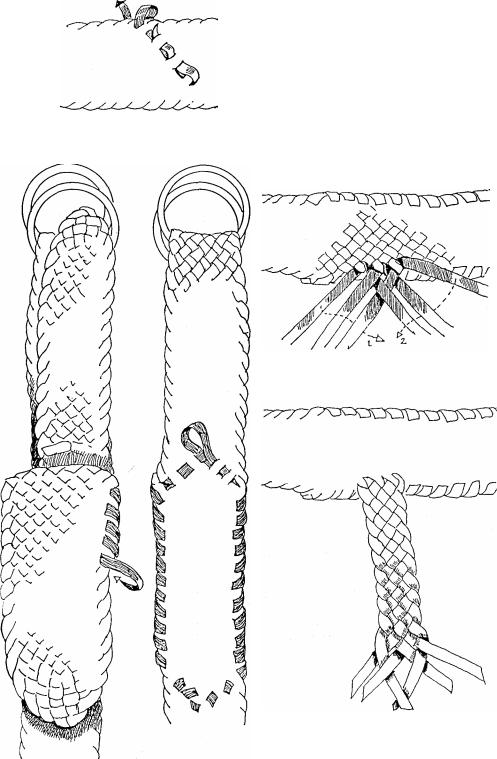
PLAITING THE BACK
The back uses 6 strands, each 650mm long, and is worked as a 12 plait. It begins as for a normal belt, and is plaited for 125mm.
The centre four strands are worked into a 4 plait.
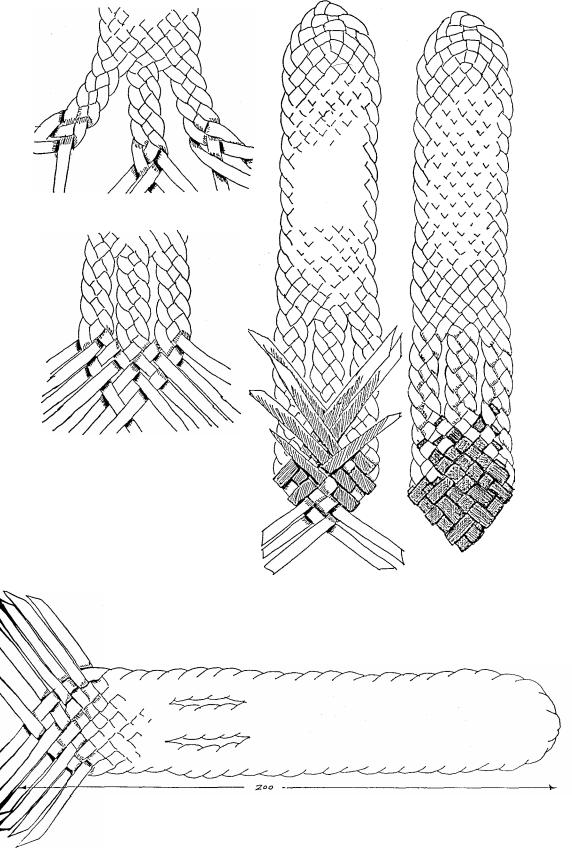
The outer strands are also worked with a 4 plait.
The strands are joined once more into a 12 plait, leaving two slits in the plaiting through which the belt will fit.
Try and make the slits just long enough to make a neat fit around the belt you intend to hang the pouch from.
Continue plaiting until the total length is 200mm.
Begin tucking in the loose ends. This will be out of sight inside the pouch on the finished job.
Work all the ends in as neatly as possible and trim off flush. The back
79
is now complete.
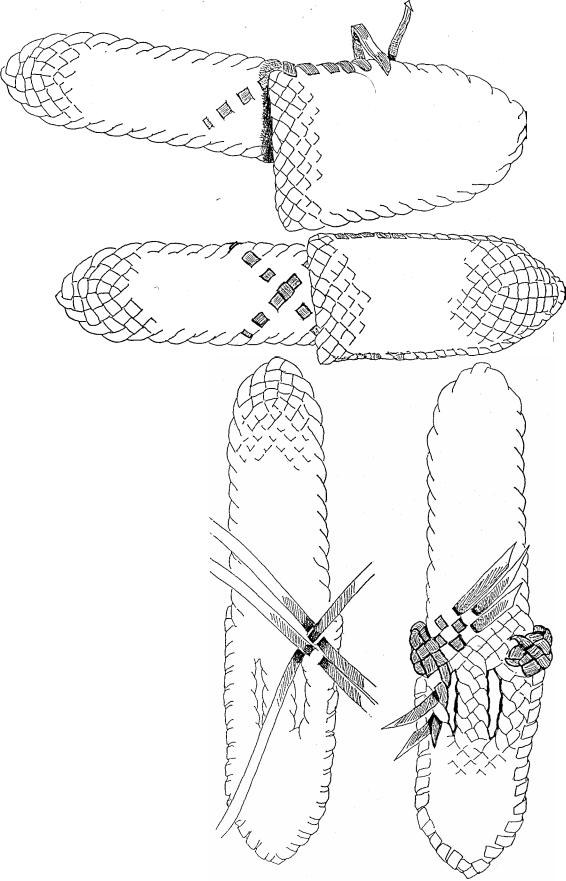
Place the front on the back and begin sewing with 900mm of
lace. Note how the beginning of the lace is
worked into the flap.
When the sewing is completed the end of the lace is worked into
the flap in the same way as the beginning.
THE KEEPER
Take 3 strands each
400 mm long and tuck them under strands at
the back of the pouch. Plait a 6 plait right
around the front of the pouch.
Plait the ends into
the back of the pouch to secure them and
trim them off flush. The pouch is now complete.
NOTE. You may find it more convenient to use press studs on this pouch instead of a keeper.
80
This is the most common knife pouch found in the bush, and is also the easiest to make.
It is open at the bottom as well as t h e t o p , a n d t h i s i s n e c e s s a r y because the pouch is made such a snug fit that the knife usually has to be pushed up from below to release it.
Being such a tight fit the belt can be thrown on the ground with the pouches attached and the knife will never slip out.
However, strange things can happen under pressure. I was talking to a stockman friend recently about knife pouches and he said that they used to sew the pouches on the back of the belt, but slip the belt around when wearing it so that the pouches were at the front and easy to get at.
One day he was manhandling a very large and heavy pole into a hole, and in the course of this the three knives that he was wearing must have been forced through the bottom holes in their pouches and dropped into the hole.
He did not notice them missing until he had filled and rammed the post in place, and he said that as far as he was concerned they could stay there.
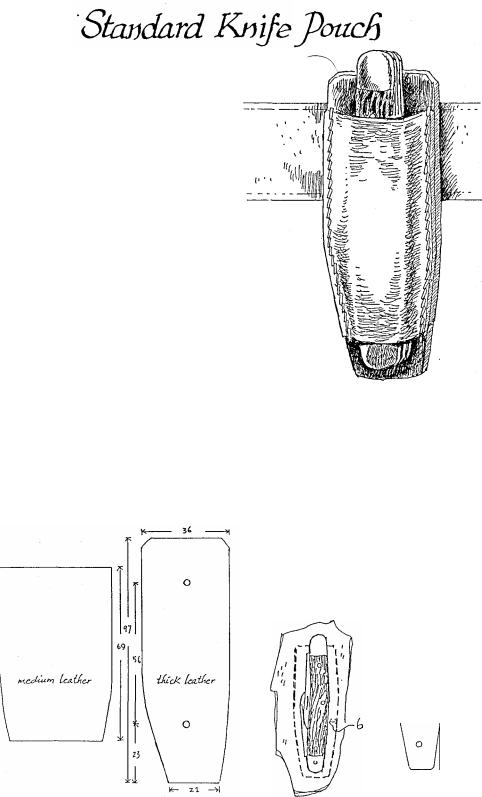
Saddlers make pouches like this from whatever scraps of leather they have laying around. The back is best made from thick leather of around 4mm or more, while the front and flap are usually of 3mm leather.
Even if you only have one side of leather to work from it is still possible to select a heavy scrap from the shoulder and lighter leather on the belly.
The dimensions given here are only a rough guide as each pouch is made to fit a particular knife.
Lay the knife on the heavy scrap of leather and mark around it leaving a space of 6mm all around, but
8
1
remember that the pouch cannot
taper in at the top or it will be impossible to remove the knife.
Cut out the piece and punch two holes in it.
The knife is put in place and the
moistened leather is shaped over it and held down with tacks.
Saddle rs use a piece of bone for
this work, but any smooth object will do the job.
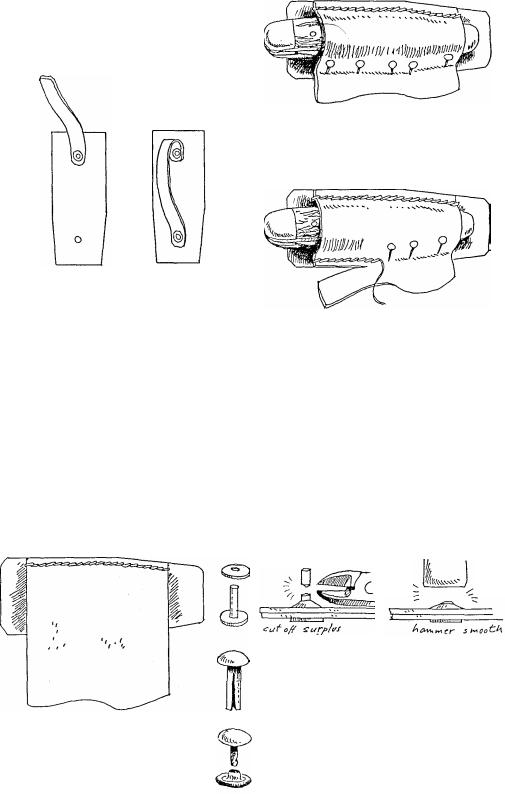
Attach the belt loop to
the top. Either sew it on or use copper rivets. These drawings were made from
a pouch that I have had for 24 years, and it is still in perfect condition. If
it had been made with steel rivets it would have lasted only two years in
our humid north Queensland climate.
If copper rivets are not obtainable it is possible to burr over both ends
of heavy copper wire to make a rivet or, better still, use copper nails and
roves of the type used in boat building.
It is also possible to simply cut two slits in the leather to take the
belt, but this is not as good as having a separate loop.
The top leather is
thoroughly soaked in water and then sewn onto the thick
leather. The thick leather is left dry.
As this side is sewn the tacks are removed as the stitching progresses.
The waste leather is trimmed over and the pouch is complete.
FASTENING LEATHER.
SEWING. This is the best method.
Use waxed linen thread and two blunt harness needles. An awl is used
to make the holes.
COPPER RIVETS. These are the only rivets worth bothering about as they
are strong, long lasting and do not
rot or stain the leather. They are also expensive and often hard to
obtain.
BIFURICATED RIVETS.
We seldom use these in our saddlery business, they break, twist, pull out and rust.
SPEEDY RIVETS. These are cheap, strong and easy to fit. However we find that in our humid climate they eventually rust and finally rot out.
82
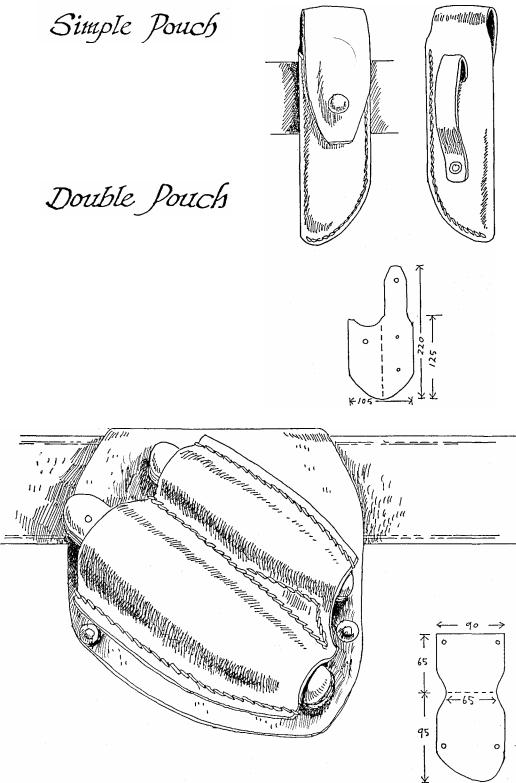
This simple pouch will fit any size pocket knife and is easy to make.
However most bushmen prefer a
pouch made specially to fit a particular knife.
They claim, quite correctly, that if the press stud comes loose it is
very easy to lose a knife from this type of pouch.
Noted horseman Brian Taylor once
pointed out to me that when in the saddle all day a knife pouch worn on
the front becomes twisted at an angle.
Some stockmen solve this problem by setting the pouches at an angle when making them.
In this case a double knife pouch has been sewn onto a piece of heavier leather, and this has been folded over and riveted to make a loop for the belt.
83
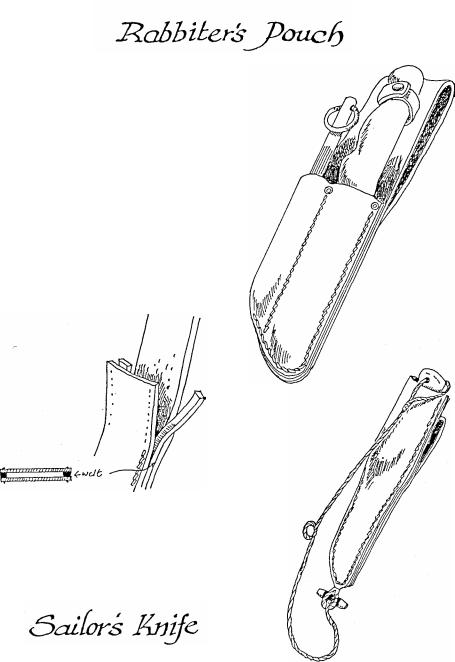
Rabbiters, and other people who skin a lot of animals, need to keep their knives very sharp, and this
sheath carries a separate pocket for a steel.
Note the copper (not steel) rivets at the top of the sheath. The soft
copper will not harm the edge of the
knife, but will prevent it cutting into the leather of the welt, and also
prevent the stitching pulling apart at
this point of strain.
Sheaths should always be made with a welt. This is a strip of leather which goes between the two main pieces.
The stitching passes through it, and in this way the edge of the knife will not cut the stitching.
Sheaths should also have a small strap around the handle to prevent the knife accidentally slipping out.
In the old days of the sailing ships sailors used to have very deep sheaths, because a dropped knife could easily be lost overboard.
This one also had a cord with a toggle attached to the sheath to prevent it getting lost. When working in the rigging the knife could be fastened to the wrist by means of the toggle and the loop in the cord.
84
( By an odd coincidence while I was preparing this section a young RAN rating came into our saddlery business and asked me to make him a sheath, having just lost his knife, marlin spike and sheath overboard. No matter how deep the sheath, if your belt breaks you still lose the lot!)
This simple looking pouch is the most complicated of all, and is
capable of turning the calmest of plaiters into a twitc hing wreck.
Although the finished pouch will only measure about 60mm wide by 70mm deep it will take at least one full day to plait, and may even take
more!
Don't attempt this one unless you
can already plait belts.
The pouch is made in three parts, the pouch section, the flap (which also forms the wide keeper for the
belt), and the small keeper.
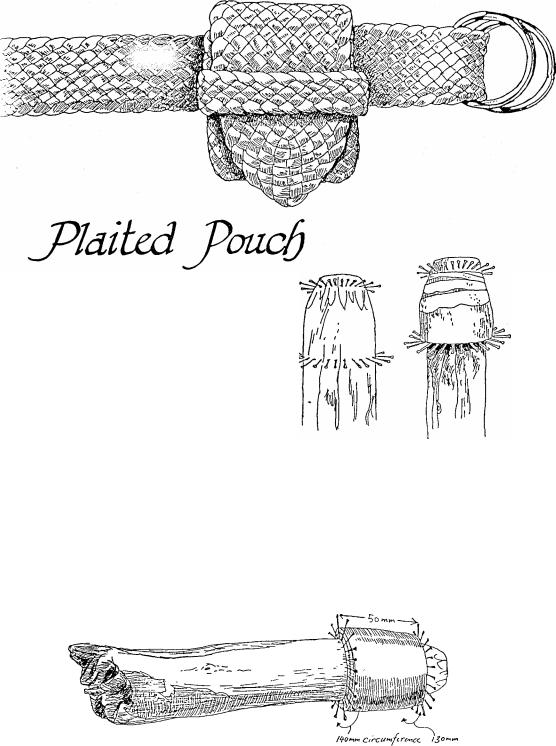
The pouch section is formed with a Turk's-head. This has to be formed
around a cylinder which is called a mandrel.
This can be made from a bush stick. If it is not the exact size it
can be built up by wrapping a strip of leather or paper around it.
This is the mandrel that I use, made from rough bush timber and leather. One end is left longer and is used as a handle.
The working surface of the stick is 50mm long. It has a circumference
of 140mm at one end and 130mm at the other.
18 small tacks are hammered around one end of the working part, and another 18 at the other end.
It is best to make the working surface as smooth as possible, this can be done by wrapping a a couple of layers of sticky tape around it.
8
5