

Изделия из кожи
.pdfFig.3. To allow for this the serge now has a tuck taken in it at the front and the back, and a tiny tuck just down from the front. The two main tucks are around 12 mm at their deepest, and a few tacks sometimes are used to hold them in place while the rest of the stitching continues.
The reason that this part of the job c a l l s f o r s o m e s k i l l i s t h a t i t i s impossible to give accurate dimensions for the length and depth of these tucks as each saddle is slightly different from the next in both length and width.
The saddler who is continually doing counter-lining will tell at a glance the amount of tuck needed, but the person
who is doing his first saddle really cannot tell whether a 12 mm tuck will give his particular saddle the fullness of panel that he desires.
For ins tance if the filling in the original panel has settled down to only a thin layer then much more filling will be needed than for the saddle that has only compressed a little. So a larger tuck will be needed for a saddle that is very worn to allow for more filling, and a smaller tuck will do for a relatively good saddle because less new filling will be needed.
The saddle that I used for the sketches was about average, that is to say it had been left too long before being brought in for counter-lining.
Fig.4. Fold the serge under to make a neat edge across the sweat flap and hold it in place with a few tacks. The serge can exactly follow the line of the panel underneath or it can be a little larger if so desired.
251

Fig.5. Using the concealed stitch shown in figs 6 and 7 sew the new serge to the old serge. Place the stitches as close to the leather of the back facing as possible so that only a tiny strip of the old serge will show. Remember that the stitching goes through the serge underneath, no t through the leather.
This is why the old serge must be in good order. If it is at all rotten then a patch must be put over it as described earlier.
Stitching begins at the back of the panel next to the channel. Because of the shape of the saddle the new serge will pucker a bit around the back . Organize your stitching so that you take up a little of the pucker at each stitch, in this way all the pucker will have gone by the time you reach the sweat flap.
Stitching then begins at the front, again next to the channel, and continues until the other side of the gap is reached. As before puckering takes place at the beginning.
252
This puckering is needed in order to make the new serge fit onto the old serge without folds and creases.
If you are following the line of the old serge when sewing the new serge across the sweat flap then the concealed stitch can be used, but do not forget to leave a gap as shown.
If you are placing the new serge in a different position on the sweat flap then it will have to be sewn down through the flap using ordinary stitches.
There is no real need to use the concealed stitch when going across the sweat flap area. The final job will look just as neat with a row of well placed in and out stitches going through the sweat flap. Do what you find easiest as long as the serge is firmly sewn down.
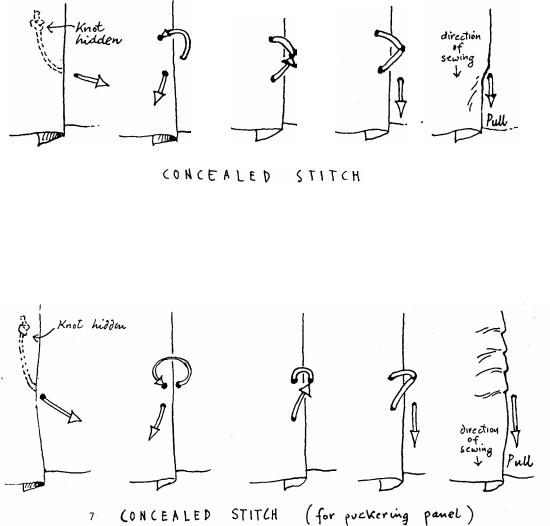
Fig.6. There is a special concealed stitch used in counter-lining, and though it - may take a few minutes to understand it is simple to do once the idea has been grasped. A sin gle thread is used and a curved needle known as a counter-lining needle . This needle has a diamond
cross -section at the working end just like a sewing awl, and can be between 50 and 70 mm long. Stitching begins by putting a knot in the end of the thread and passing the needle through a part of the old panel underneath where the knot will be hidden from sight.
THE CONCEALED STITCH USED FOR PUCKERING THE PANEL
Fig.7. The concealed stitch can be formed in two ways. By doing it one w a y t h e t o p l a y e r o f m a t e r i a l i s puckered up, and in the other way it will remain flat. The puckered stitch is used at both the back and the front of the saddle, and this gradually changes to the unpuckered one as the row of stitching approaches the middle. I should not really say 'row of stitching' as the stitching will be invisible if done properly.
In both series of sketches the stitching is proceeding downwards. Both types of stitching will be seen to be following the same pattern, the only
difference is the way that the holes are lined up.
If the saddle has not been counterlined for a long time then the counter-lining will need to be thick because the old lining will have been ridden flat. This means that large tucks will need to be taken in the serge, as illustrated on page 250.
When you come to sew on the new serge it will be found that the material will not lay flat unless it is puckered. This must be done around both the back and front of the panel.
Less puckering is needed on a panel that has not been ridden flat. You can judge by eye how much puckering is needed in each case and adjust your stitching accordingly.
253
SERGE SEWN AND FILLING BEGUN
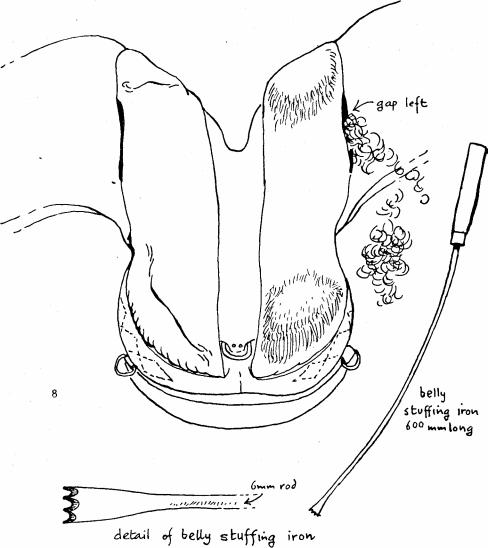
Fig 8. Once the stitching is completed the tacks are removed from the tucks and the filling can begin. If the curled hair has been bought in the form of a rope it will need to be teased out first, taking care to remove any burrs or knots.
To get the hair packed down to the far end of the panel a special tool is needed called a belly stuffing iron. These are hardly worth purchasing as they can be made so easily. A piece of 6 mm or thereabouts steel rod is used with an overall length of 600 mm. I put
254
a wooden handle on mine, but even this is not necessary.
The end of the rod is hammered flat and a number of grooves filed into it so that a row of teeth are formed after the style of the detail in the sketch. These small teeth aid in pushing the hair down inside the panel.
Care must be taken to ensure that these teeth are not sharp as one sharp edge is enough to tear through the serge and ruin the whole job. It is a good idea t o j a b t h e t o o l i n t o t h e g r o u n d repeatedly to take off any burrs or sharp edges.
FILLING TOP AND BOTTOM
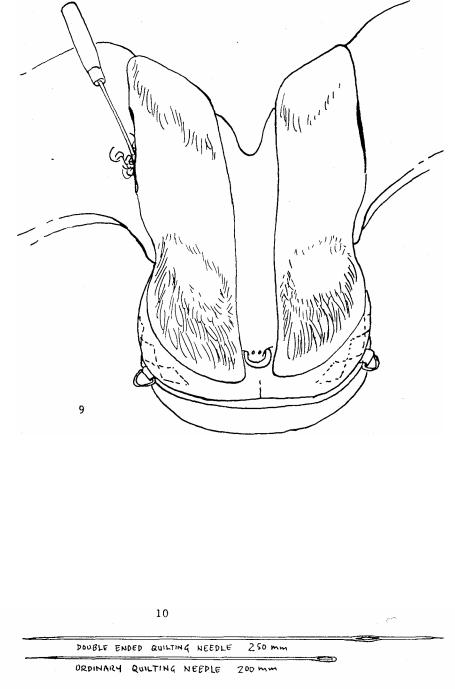
Fig.9. Both the top and bottom of the saddle are filled at first using the b e lly stuffing iron to get the panels to t h e r i g h t s h a p e a t e i t h e r e n d . Hammering with the fist will also help shape the panels.
It is best to try and get the curled hair as firmly pushed in as possible and get the panel to the correct shape at this stage. Put in a handful of hair at a time and use the end of the tool to compress it.
Fig.10. When the ends have been filled and shaped as much as possible the quilting can take place . Very long needles are needed for this job. They are known as quilting or mattress needles and are obtained through people who deal in canvas if they cannot be bought from a saddler. There are two
types, one shaped like an extra long ordinary needle and the other sharpened at both ends. They come in various lengths from 2 00 to 250 mm. The double ended needle is the best to use if it is available as the needle does not have to be reversed at the end of each stroke.
255

START OF QUILTING.
Fig. 11. To begin, the end of the thread is knotted and put through the panel at a place where it will not pull through. With this in mind it will help if it goes through some of the old doehair.
The end of the needle comes out through the serge as shown. If a double ended needle is being used the whole needle need not come through the serge, once the eye of the needle is seen it can be pushed back again as explained in
13
Fig. 16. If an ordinary type of needle is used then it must be pulled right through and great care taken to see that it goes back into the same hole that it came through.
Fig. 12. The idea is that the stitches do not have any connection with the top layer of serge. What they actually do is go in and out of the panel and as they do so they get wrapped around a big lump of curled hair inside. As they are pulled tight so the curled hair is pulled tight against the back of the panel.
Fig. 13. When the needle comes through as shown in Fig. 12. 4 or 5 strands of wool are taken and placed against the thread. The needle is then pushed back into the panel 3 mm from where it came out wrapping around the
256
wool as it does so.
The same sort of stitching continues, and each time it comes out at the back of the panel a stitch goes around the strands of wool. The stitches have to be p u l l e d i n q u i t e t i g h t a s t h e w o r k

progresses otherwise the wool will fall out later.
This wool is not just for ornament, its job is to prevent the stitch pulling through the serge as it is tightened up.
Fig. 14. When the stitching is finished a knot is tied in the thread somewhere up under the flap where it will be out of
sight, and the strands of wool are all firmly in place as shown in the right hand side of the sketch.
Now the wool is trimmed with a pair of scissors and forms a decorative row a s s h o w n i n t h e l e f t o f t h e sa m e sketch.
The front of the saddle is quilted in the same way.
Fig. 15. This is a closeup to show h o w t h e w o o l i s c a u g h t u p b y t h e thread.
USING THE DOUBLE ENDED NEEDLE
Fig. 16. This is how to use the type of needle that has a point at each end. It is quicker to use this for the job than the ordinary type of long needle.
Notice that the direction of the needle is reversed just before the eye of the needle comes to the top surface.
When the needle is pulled back as in the third sketch it is completely removed from the serge and makes a new hole when it goes in again, about 3 mm from the previous one. The wool is caught up in the loop that is thus formed.
257
USING THE SEAT AWL
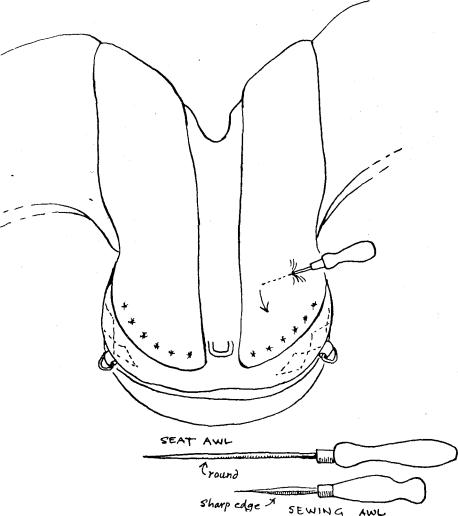
Fig. 17. When the quilting has
been completed it will have pulled a quantity of the curled hair into a "wall" at the back and front of the panel. Now the rest of the panel is filled with hair, trying to get it correctly into place with the stuffing iron.
Inevitably there will be a few lumps, i n t h e p a n e l s a n d t h e s e m u s t b e removed. A certain amount can be removed by thumping with the fist. Saddlers sometimes used a domed piece of wood to help with this job, called a leather smasher, but they do not seem t o b e a vailable any more. Luckily you can get along without it.
To get the final smooth surface the panel is gone over with a tool known as a Seat awl. This has a smooth round shaft which can be pushed into the serge without damaging it in any way. It must not be confused with a sewing awl. The sewing awl has sharp edges, and if one was used for this job it would cut
threads of the serge as it was pushed in and out.
The seat awl is used to push the curled hair wherever it is needed and so pack it firmly and remove all the lumps. The awl is simply pushed through the serge and the point moved around. It is surprising how the hair can be moved around in this manner.
The panel is carefully awled smooth, working from each end towards the gap. When all the filling is in place the gap is then sewn up.
If the gap has been a large one it is sometimes desirable to pause just before the gap is completely closed up and put in the very last bit of hair along this area.
258
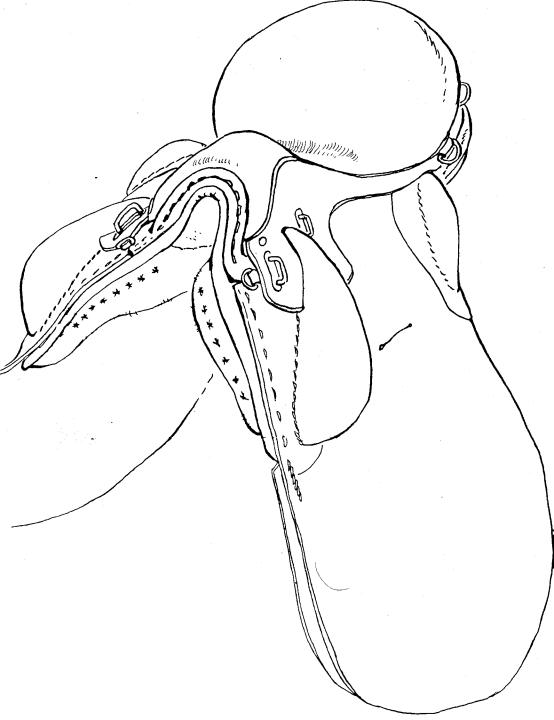
Fig. 18. This shows the row of woollen pompoms on the front of the newly counterlined panel.
The secret of good counter-lining is in placing the hair just where you want it with the belly stuffing iron and then working it smooth with the seat awl. The seat awl should always have a well polished smooth round shaft so as not to damage the threads of the serge .
The most common mistake in counter -lining is to not pack the hair in firmly enough. The finished job should be firm and springy, not soft.
259
ABOUT THIS BOOK
This book deals with a wide variety of the traditional leather crafts that are still practised today in the Australian bush. It covers a wide field, from the kangaroo hide plaited belt and the pouches that are worn on it to stockwhips and saddle repairs.
All the common plaits, braids and lacing techniques are also described as well as instructions for making a wide variety of leather tools.
The book is well illustrated, with over 1200 drawings by the author.
THE AUTHOR
Ron Edwards lives in Kuranda, far north Queensland. The Craft Shop Saddlery in Cairns is a family business, but he devotes most of his time to writing books on traditional bush crafts and folklore.
He began practising leatherwork in 1940 at the age of ten in a small country town ship near Geelong, Victoria, and still makes his own saddles.