

Изделия из кожи
.pdfI have found the main thing is to get the end of the belt fixed
firmly to something while you are plaiting.
Some people put a wire hook through the belt to hold it, but I do
not like this as it can stretch the belt at this point and leave a hole.
It is also possible to put the end of the belt in a drawer and close the
drawer. This jams the end of the belt and holds it firm.
I prefer to hold the end of the belt
with a length of soft cord. This can be moved down as work proceeds and
does not mark the leather in any way.
Lindsay Whiteman, a plaiting expert from Townsville, Qld, also
passed on a couple of hints for tting an even tension.
First, he rubs the lace with mutton
fat or leather dressing before working with it, and says that this helps get a
tighter plait.
He also tightens up the strands as
illustrated. The top strand is pulled tight only when you are about to work
with it , but the working through is left loose. He claims that this gives a
much more even finish. pull
tight then work
through loosely
REVERSING THE FACE
The twin ring belt is fastened as is shown in fig.36. If special steps were not taken then the point of the belt would now be showing the rough side of the leather facing outwards. To avoid this the whole face of the belt is reversed. This is illustrated in fig. 37, the shaded section representing the rough side of the leather.
37
20
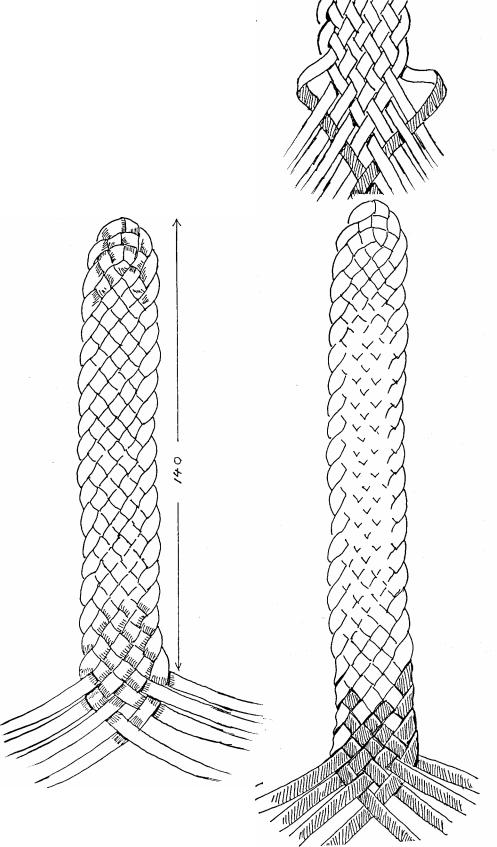
Reversing begins when 140 mm of belt has been plaited.
There is no change in the plaiting sequence, but as each strand is picked up it is given a twist as shown in fig. 38 so that the rough side of the leather is now showing.
Once all the strands have been reversed plaiting continues as before until the belt is completed.
38
21
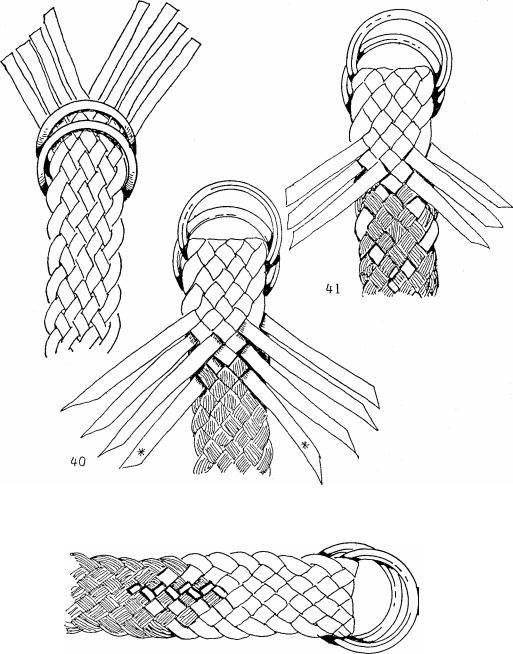
FINISHING OFF
When the wanted length has been plaited, slip a pair of rings over the end of the belt. Solid brass rings look better than plated ones, and they look better if they
make a neat fit and are not too large in diameter.
Turn the belt over and tuck in the two ends as shown in fig 40* Now the remaining loose strands can also be tucked in, following
the pattern of the strands below.
39
When sufficient length has been plaited back to firmly secure the rings the ends are trimmed off.
22
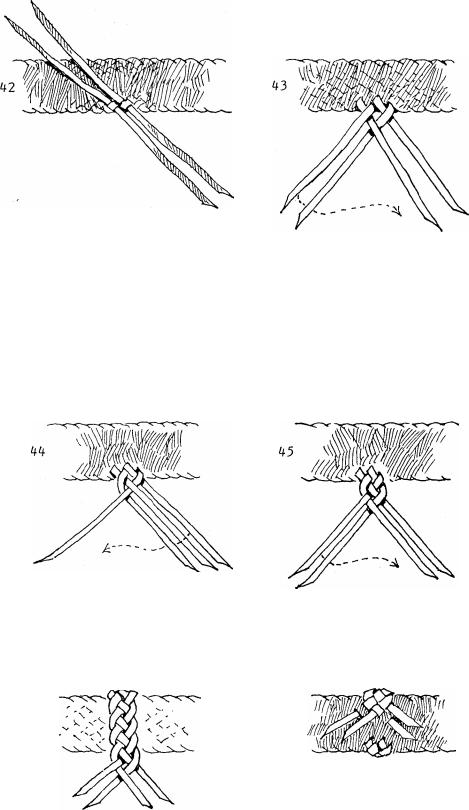
THE KEEPER
A keeper is now needed to hold the loose end of the belt neatly in place. The keeper can be loose or plaited permanently into the belt. The latter is best as loose keepers are easy to lose.
A fixed keeper is made by slipping two scraps of lace into the belt about 190mm from the point. This is done on the back of the belt. These are then folded as in fig. 43 so that the good side of the lace is facing you.
An ordinary 4 plait is commenced as shown in the sketches.
The belt is turned over so that the keeper goes across the front of the belt as in fig. 46 .
The end is plaited into the back of the belt as shown in fig.47, and plaited in far enough to make it firm.
4
6
23
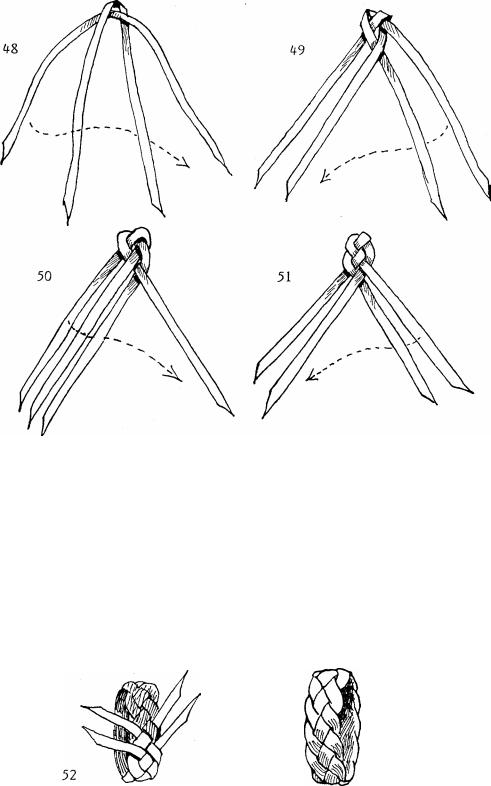
LOOSE KEEPER
A loose keeper can be made in a few minutes if these steps are followed. Take two scraps of lace and fold them together as shown in fig. 48. The good side of the lace is facing up.
Now follow the sequence shown by the dotted lines. When sufficient length has been plaited form a loop and work the strands in as shown in fig. 52. Work the strands in far enough to make them firm then cut off the surplus.
If the beginning of the plaiting forms an undesirable lump inside the loop then this can be trimmed off as well, but this is not usually necessary.
There are other methods of beginning a loop, but this is the quickest and easiest.
53
24

SMOOTHING AND STRETCHING
The final step in making a belt is to stretch and smooth it. This is done by rubbing the face of the belt ove r a smooth edge, a broom handle or the edge of a table or chair are the most commonly used.
The
belt |
is stretched at |
' |
the same time, and this |
|
treatment tightens up the |
|
plaiting and smooths down the |
|
surface at the same time. |
If the belt needs polish then Dubbin or boot polish are best. However in the bush saddle dressing is more usually applied, and this is quite satisfactory, though it does not bring up a high polish.
While the twin ring belt is the most characteristically Austral ian style of belt the use of buckles is also common. Plain brass full swage bridle buckles are often used, or any other readily available harness buckle, such as brass girth buckles.
Holes are not punched in the belt to take the tongue of the buckle, it is simply pushed through the weave. However some commercially made belts do have eyelets fitted to them, a quite unnecessary feature.
The belt is plaited in the same way as described earlier, except that the lace is not reversed at the point end. The good side of the lace faces upwards for the whole length of the belt.
25
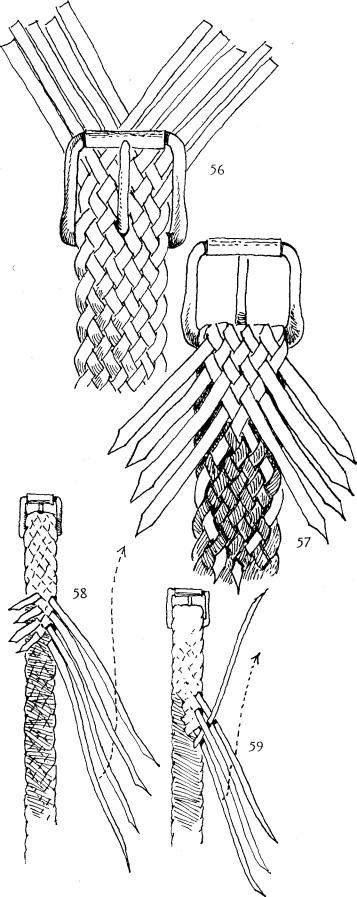
When the end of the belt is reached the buckle is slipped in place as shown in fig.56, the belt turned and plaited back as described earlier . Fig. 57 shows
the |
first |
two laces |
plaited |
bac k, |
||
and |
the |
other |
strands are |
worked |
||
the same way. FIXED KEEPER |
|
|||||
The |
keeper for |
a buckle belt can |
||||
be made as described earlier, |
or it |
|||||
can be worked up from |
the |
|
surplus |
|||
lace |
left when |
plaiting |
has |
|||
been completed. |
When |
|
skilled |
|||
plaiters |
use |
this |
method they |
|||
begin the |
plaiting of |
the belt with |
||||
four |
strands about 150mm longer |
|||||
than the rest. By |
doing this they |
|||||
end up with four long strands all |
||||||
ready to use for a keeper when the
belt has |
been |
completed, as shown |
||||
in fig. |
58. This |
an |
is |
not |
so |
|
important |
on |
8 plait |
belt, |
|||
but on a 16 plait it means a |
||||||
saving |
of |
nearly |
|
2 metres of |
||
lace. |
|
|
|
|
|
|
When this type of keeper is made the plaiting back from the buckle extends a little further than usual so that the keeper will be about 80 mm from the buckle.
All the other unwanted ends of lace are trimmed flush and then the four remaining strands are placed as shown by the dotted lines. Once this has been done plaiting continues. (see figs. 46-47 for method of finishing).
26
PLAITING PATTERNS
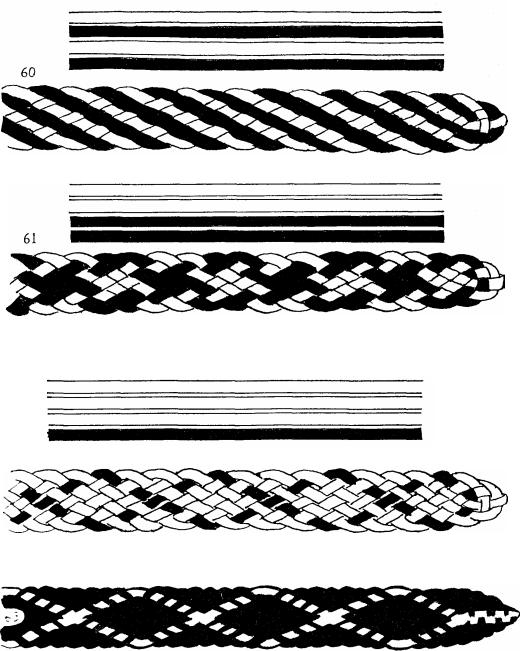
The majority of stockmen prefer a plain belt, but patterned belts are not uncommon. Some plaiters prefer a subtle effect, using light tan and mid tan lace, while others strive for a more dramatic effect using the lightest colours against the darkest available. The sketches show the most popular patterns.
Fig. 60. By alternating the strands a striped effect is created.
Fig. 61. By dividing the colours into two bunches a broken pattern is created. On a 12 plait belt using light tan and mid tan a pattern is produced that looks something like snake skin.
62
Fig. 62. When only a single coloured strand is used a diamond pattern runs the length of the belt. In this case the single strand is dark.
Fig. 63. When the single strand is light a more striking pattern of diamonds is created.
27

Fig.64. The more strands used in the belt the more the pattern can be altered, as in this example of a 12 plait.
Fig.65. It is possible to alter the pattern in the course of plaiting, but this is not often done as there is usually a rather messy section where the patterns change over. In this case the belt has begun as in fig.60.
Then gradually as plaiting continues one strand is crossed over the other until all the light strands are in one hand and all the dark ones in the other. Now a totally different pattern is created.
In order to avoid the confused area where the patterns change some plaiters cut the strands and glue on strands of the desired colour, and can thus change the pattern instantly. Whip makers often use this technique.
PATTERNS IN GENERAL
Although a variety of patterns can be created by changing the colour of the lace as work proceeds most plaiters prefer to use the basic patterns given above. In general they use subdued colours, usually light, middle and dark tan.
When brighter colours are chosen they are almost always on the warm side of the spectrum, dark red, warm yellow and so on. Blues and greens are avoided.
The mixing of three or more colours is also frowned on, unless they happen to be all shades of tan.
28
66
Fig.66. This pattern is created by making one half of the lace a darker colour than the other or by joining together dark and light lace. The glue used for joining the lace does not have to be anything special as long as plenty of overlap is used, for the plaiting will hold the lace firmly in place.
If the lace is glued it is a good idea to do the gluing off centre, (the dotted line represents the centre). Not only does this allow the point of the belt to be a solid colour but it avoids the likelihood of a glued section getting scuffed apart at the point of the belt.
Beginning with all the dark strands in one hand and all the light ones in the other an interesting pattern is created.
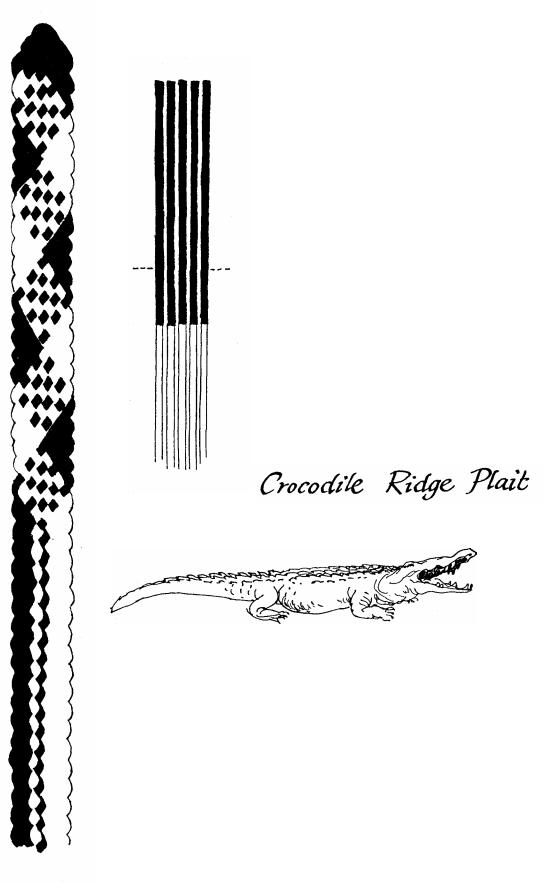
By changing to a crocodile ridge plait, as described in the following section, the belt will be divided into two bands of solid colour as shown.
The crocodile ridge is a distinctive form of
plaiting in which a ridge is formed down the centre of the belt. When this is well done it resembles the ridges along the back of a crocodile.
There are a number of ways of forming this ridge, but I will describe the one most commonly used by bush plaiters.
29