

Изделия из кожи
.pdfuntil the seat and the panel have been pulled apart it is not worth trying to repair them until other work is needed on the saddle.
Once the panel has been removed it is a simple job to replace the straps that hold the dees. It will be seen from my sketch that the dees are held by strips of leather nailed into the tree
with
20mm cut tacks. It will be
noticed that the two ends of the strap are not laid exactly one on top of the other but are slightly out of line. This is so that they do not make a lump where they press into the panel.
As it is such a simple job to replace the dee straps at this stage it is advisable to do the lot if they look at all worn.
I |
Fig.5. As noted earlier the flaps |
usually get worn and torn at the back |
|
of the saddle. To repair them two |
|
|
strips of leather are taken, each about |
|
140 x 80mm though the extent of the |
|
damage and the type of saddle will |
|
h a v e a b e a r i n g o n t h e e x a c t |
One piece of leather is shaped to fit around the thigh pads, if the saddle has any, and the other piece goes under the flap. The two pieces of leather are then sewn together with the flap in between as shown in the
231
dimensions. |
sketch. |

Fig.6. Turning the saddle onto its b a c k t h e t w o s t r i p s o f l e a t h e r a r e then tacked onto the tree with 20mm cut tacks as shown. Take care before tacking to see that the flap is going to hang correctly.
Worn and torn girth straps can be replaced, but the more usual practise is to discard them entirely and change to using a Bates fastener that goes over the saddle and does not need the girth straps.
However, as the replacement of the s t r a p s i s a s i m p l e j o b i t m a y b e d e s i r e d t o u n d e r t a k e i t w h i l e t h e saddle is apart.
Fig.7. The first step is to remove the old straps and also the strip of webbing to which they were originally attached. This strip of webbing goes right across the tree from one side to
another. It may be possible to fit a new piece of webbing in the same place, and hold it with a few tacks into the edge of the tree.
However, it is not always possible to do this and so the repairs are done in a different way.
Having cut away the old webbing some time must now be taken using a tack puller or a screwdriver, poking around under the tree to remove the old tacks that held the webbing in place. When this has been done the tree at this point should be free of tacks and clear to take the new strip of webbing.
232
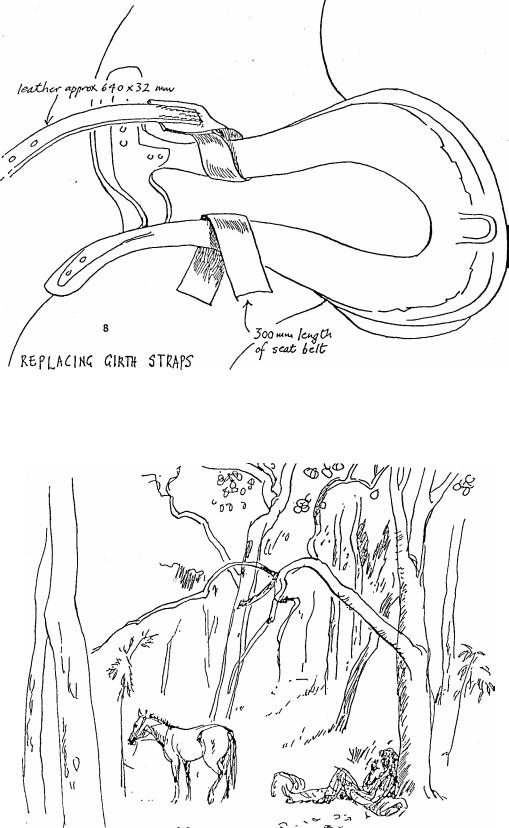
Fig.8. Instead of using saddler's webbing the modern practise is to use old pieces of seat belt as these are far stronger than the original material. A section of around 300 mm long is slipped under the tree as
shown and the new leathers sewn onto it with stout thread.
For convenience I have given a length for the leathers but the usual practise is to make them 100 mm longer than the flaps.
233
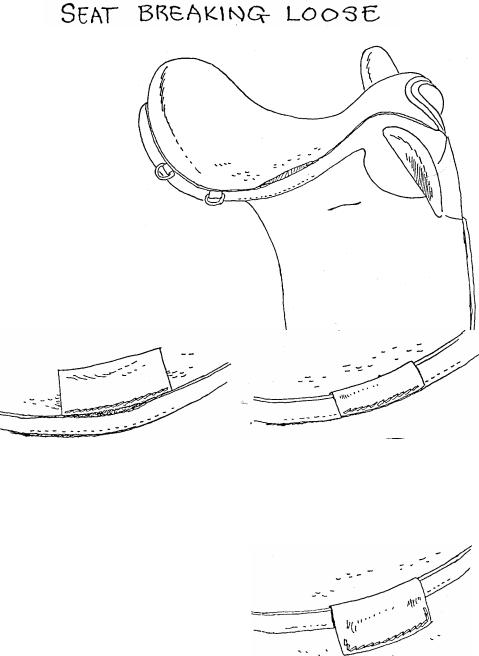
The saddle gets a lot of wear under the rider's legs and on very old saddles the seat will sometimes come loose along the welt at this point. It is little use trying to sew the two edges together again for the leather will invaria bly be very thin by this stage.
The only permanent answer short of putting a new seat on is a patch.
A scrap of thin strong flexible leather is used such as Kangaroo skin. This is cut to follow the curve of the seat and then sewn on as shown in the lower left hand sketch.
It is then turned over and sewn down in whatever way seems convenient. It will look best if the patch finishes flush with the edge of the skirt as shown at right, above. The stitches however should not go only through the skirt but should go right through the flap as well, otherwise the patch will simply lift up the edge of the skirt without holding the split together.
If you do not wish to remove the panel from the seat then it may not be possible to sew the patch down as shown. In this case the patch will need to be brought further down the flap in order to get the needles through, as shown below.
234
If the seat gets damaged around the cantle a patch can be sewn on, but if it is damaged in the middle area there is nothing for it but to put on a new seat. It is not feasible to put on a patch on a seat where the rider will sit, for his movement will soon roll
the edges |
of the |
patch and |
it |
will |
g e n e r a l l y |
b e |
f o u n d |
t o |
b e |
uncomfortable.
In any case when dealing with an old saddle a split in the seat is usually a sign that the whole seat is on the way out, so there is no point in trying to patch it, for as soon as one part is fixed another will split.
A saddler will usually recommend buying a new saddle rather than mending one that has become so old, but people become attached to their old saddle, so if you want to put on a new seat here is how to go about it.
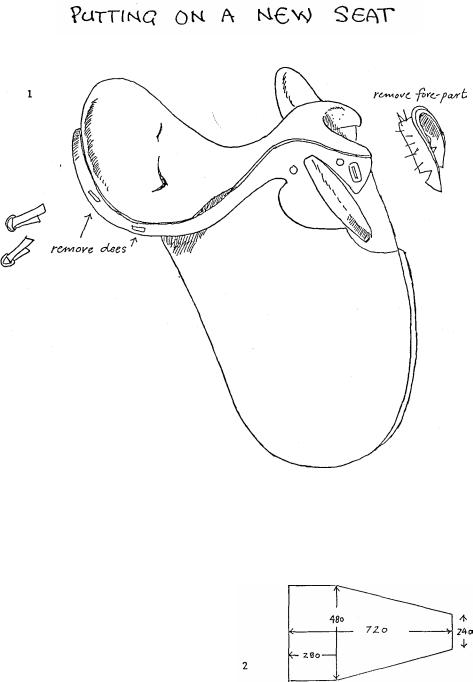
Fig.l. First remove the panel from the seat, as explained at the start of this section. Carefully remove the forepart, as this will have to be replaced later. Remove the dees, they are probably in need of replacing and this can be done as part of the job.
Any good quality soft, flexible yet strong, leather can be used for the job. Saddler's bag leather is good or plain 3 mm leather of the type used for carving. It may be better to take it from the belly area of the side where the leather is the most flexible.
Fig.2. Measure the maximum width, including the skirt, and also the length and cut out the leather. The dimensions given here were the ones used for this particular job and are only included as a rough guide. Give the leather a good soaking.
23
5
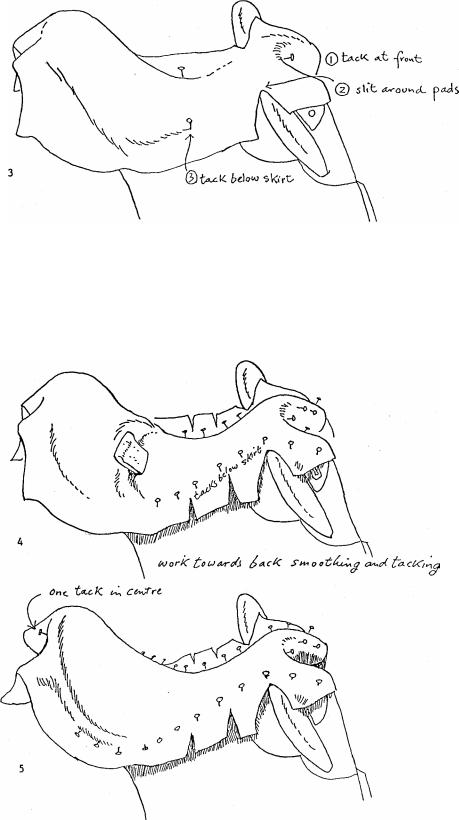
Fig.3. When the leather has been well soaked place it on the saddle and tack it at the front. Carefully cut a slit so that it will sit around the knee pads. Press down firmly and smooth it towards the waist and then place a couple of tacks just below the skirt to hold it.
Fig.4. Take your piece of bone, or rectangle of plastic and begin smoothing down the leather working from the front and tacking as you go. It may be necessary to make a few nicks in the leather so that it will lay down flat. Place all the tacks below the skirt. The bone is constantly used to smooth down the seat as shown.
236
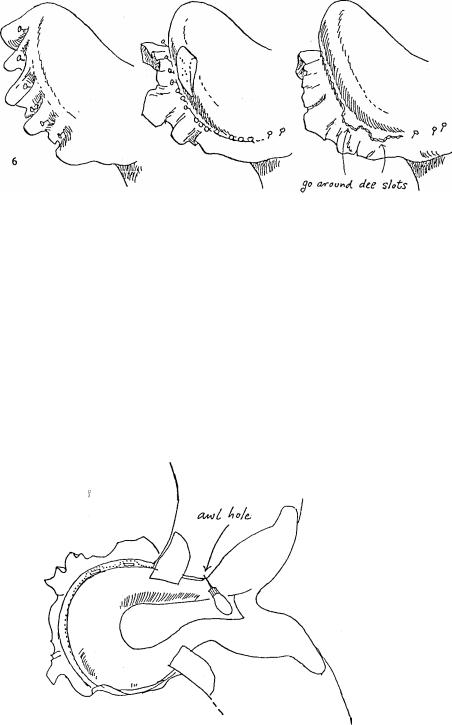
Fig.5. After some work with the bone the top part of the seat will be worked out smooth. Now put a tack at the back in the centre where the skirt joins the seat.
Fig.6. This part of the job is similar to fitting a seat to a new saddle. You divide the wrinkled s ection into two parts and put a tack in the centre, then you divide these parts into two smaller wrinkles and put in more tacks and so on.
While doing this you constantly work over the wrinkles with your bone. With patience all the wrinkles will be worked out and you will have a line of tacks where the skirt joins the seat as shown in the centre sketch.
Sewing from just outside one flap to the other you go around the back stitching as close to the inside of the skirt as possible. The stitching goes on the outside of the slots for the dees.
Fig.7. Turn the saddle over and see how far along you will be able to continue sewing. In this case the saddle that I was using for the sketches was one of the old Syd Hill ones with the so-called unbreakable tree. This had the unusual shape shown at the right, a wide steel plate over the wood of the tree.
In this case I could only sew to the point shown, so an awl hole was pricked through.
Common sense is required for this part of the job, different saddles can be sewn in different ways. In this case I would have to sew right through the flap in order to hold the seat at this point. In the case of a saddle with a wide skirt it may be possible to just continue sewing to the skirt as has been done around the back section.
237
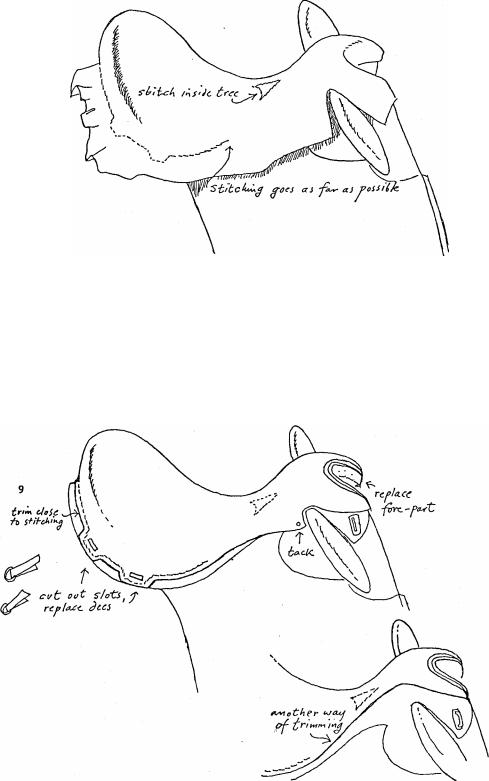
Fig.8. Stitching now goes as far as possible, in this case as far as the awl hole. A part is then sewn inside the tree to hold the leather in place at this point. This can be sewn in a decorative pattern if desire, and to any desired dimensions.
Fig.9. The leather is now trimmed off close to the skirt at the back. At the front it can be trimmed as desired
238
to whatever looks best. Cut out the slots for the dees and replace them. Replace the forepart and the new seat is complete.
Now it only requires the panel to be sewn back as described elsewhere.
(As a matter of interest this saddle had very high knee pads of 5.5" (140 mm). Such pads are not made today.)
239
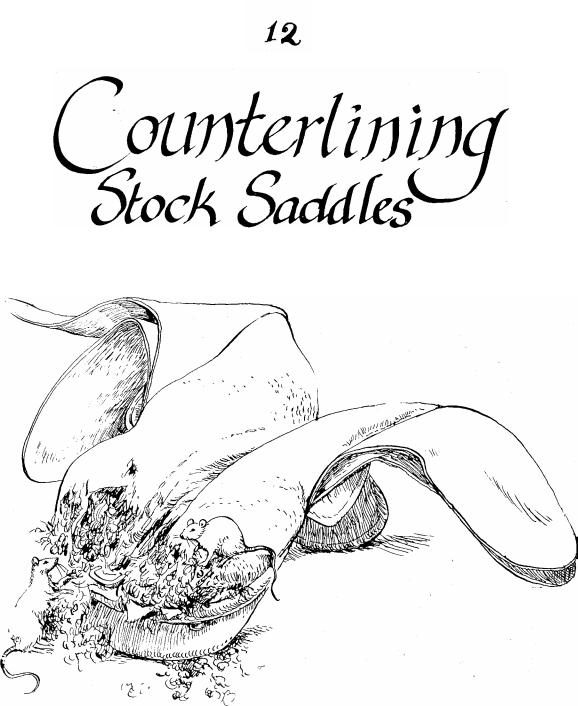
This traditional method was originally taught to me by saddler Lew Haines of Townsville, and is the one that we use in our saddlery business.
Counterlining by itself is a relatively simple job and one that does not take very long. What does take up the time
are repairs that may have to be done
The traditional Australian stock saddle is the best saddle in the world for a working horse as its thick padded panel protects the back of the horse.
Many modern stock saddles are lined with felt, and while this may be easier to replace it soon packs down hard and can then cause saddle sores.
The only disadvantage of the padded panel is that it needs to be regularly counterlined.
This information on counter-lining was originally included in my book on saddle making. However a lot of outback people said that they would never get around to making a saddle, but they did want to learn about counter-lining so how about printing the counter-lining section as a separate section.
240