

Изделия из кожи
.pdfAll the cordover stitches follow the same basic pattern, the only difference is the number of layers under which they are passed before going on to the next hole.
The triple cordover ta kes no l o n g e r t o d o t h a n t h e d o u b l e cordover. It uses a little more lace but covers a wider edge.
AMOUNT OF LACE NEEDED. 9 to 10 times the length to be covered.
Fig. 1. Hide the end between the two
layers |
of |
leather |
and come |
out |
|||
through the first hole at the back. |
the |
||||||
Fig.2. |
Go |
in |
the |
first |
hole |
at |
|
front. |
|
|
|
|
|
|
|
Fig. 3. |
Come |
out |
the |
back |
and |
pull |
|
firm.
Fig. 4. Go in the second hole. Fig.5. Go under the first lace.
Fig.7. Go under as shown.
Fig.6. Go into the third hole.
Fig.8. Into the fourth hole.
105

Fig.9. Go back two holes and under three layers of lace.
Fig.10. Into the fifth hole.
Fig.11. Go back two holes and under three layers of lace. Continue in this manner.
Fig. 12. Go |
Fig.13. Finishing off. Go back under |
through the corner hole a few loops. three times to get a good |
|
coverage. |
Fig.14. Pull tight and cut off flush. |
This stitch differs from the previous stitches in that it does not go over the edge of the leather.
For this reason it is used for such jobs as sewing pockets on the outside of handbags, or dividing a knife pouch into two parts to make a place for a sharpening steel.
It is worth experimenting with scraps of lace and leather in order to find the distance between holes that will give the most decorative finish. Too far apart and the
stitch will look weak, too close together and you will lose the "S" effect.
106

AMOUNT OF LACE NEEDED. 5 times the length to be covered, but as always this will vary according to the thickness of lace and leather.
Fig.2 Come out the first hole and go in the third.
Fig. 3. Return through the second
hole.
Fig. 1. Conceal the end between the two layers of leather. Bend it as shown so that it will be gripped when the leather is sewn together.
Fig. 5. Return through the third hole.
The |
sequence |
continues |
in this |
way, |
|
going |
forward |
two |
holes |
and |
|
returning one. |
|
|
|
|
|
Fig. 4. Go in the fourth hole.
Fig. 6. Corners do not present any problems when doing this stitch.
Fig. 7. Finishing off. Move forward only one hole.
Fig. 8. Repeat the stitch but this time come out between the two layers of leather. This should make the lacing firm.
107
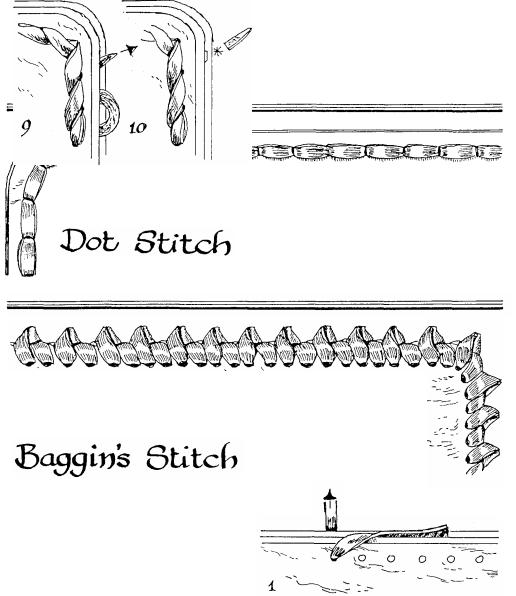
Fig. 9. Go down inside the job, around some lace and come out again.
Fig. 10. Cut off flush.
is desired. |
similar jobs where a very neat finish |
|
||||
This stitch is much more regular |
It is actually the r |
|||||
in |
||||||
appearance |
than the Lazy S, |
and |
|
|||
the |
Lazy S stitch, |
and so is done in can |
|
|||
be |
used on |
tool |
holders and |
the |
|
|
same way. |
|
|
|
|
|
|
This is a stitch that I invented some years ago, and which I named after my granddaughter. It is a purely decorative stitch, and takes about as long to do as the Cordover stitch.
AMOUNT OF LACE NEEDED. times the length to be covered.
Fig, 1. The holes should be placed just double the width of the lace
108
apart. In this way a good cover is obtained.
Go through the first hole and then tuck the end out of sight between the two layers of leather.

Fig.2. Come back through the second hole bending the lace as shown.
Fig.3. Wrap the lace around and through the previous loop.
Fig. 4. Tighten up the lace gently. As you proceed you will find that the peaks can be formed best by using your finger from behind to push the back loop forward so that it sits right on the edge of the leather.
Fig. 6. Again form a loop behind.
Fig. 8. Corners present no problems with this stitch.
Fig.9. Finishing off. Take the end back under a few stitches.
Fig.5. Having formed the point take the lace through the third hole.
Fig. 7. Wrap the front lace around the back loop as shown.
Fig. 10. Pull up firm and cut off flush.
109
110
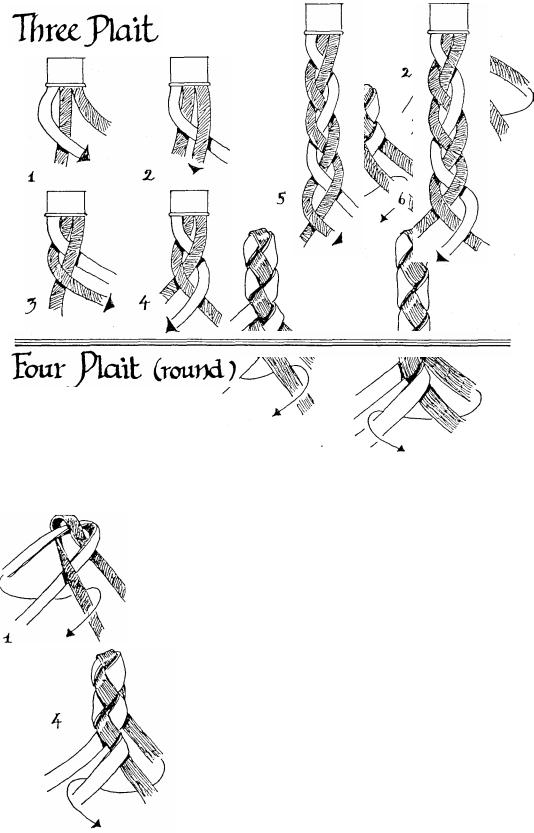
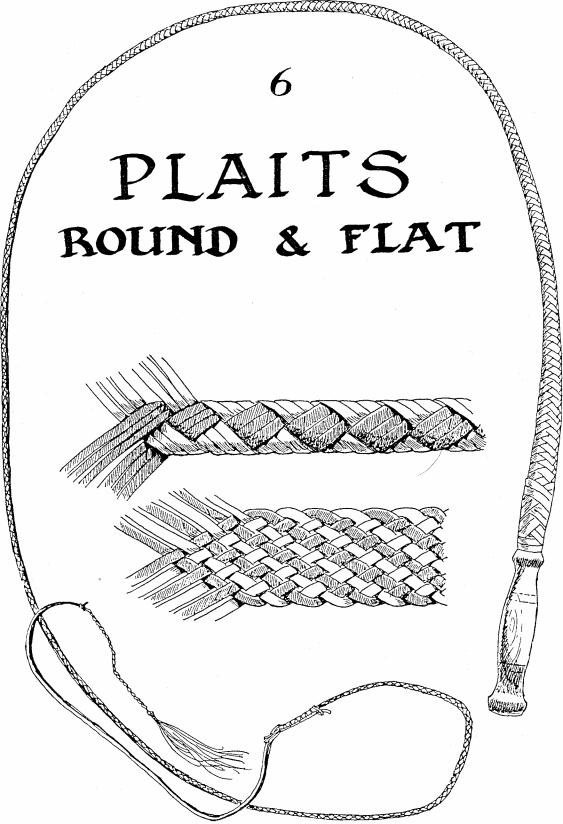
I think that everyone in the world must know the three plait, but I have included it to make the book complete. It is worked the same way
|
|
|
|
|
whether flat or round. |
|||||
|
|
|
|
|
Fig.2. Take the top |
|||||
|
|
|
|
|
right |
strand, |
bring it |
|||
The four |
plait is |
the |
around |
the |
back |
and |
||||
between |
the |
opposite |
||||||||
most useful |
of all plaits, with |
|||||||||
pair. |
Continue |
this |
||||||||
it you can make a collar for a |
||||||||||
same sequence. |
|
|||||||||
bandicoot |
or |
a |
rope |
thick |
|
|||||
enough to hold an ocean |
|
|
|
|
|
|||||
liner. |
|
|
|
|
|
|
|
|
|
|
It is worked the same way |
|
|
|
|
|
|||||
whether you are |
using flat lace or |
|
|
|
|
|
||||
Fig. 1. To begin either t i e f o u r s t r a n d s together or use two lengths and double them over as shown.
Take the top left strand around the back and bring it through the opposite pair.
111
c o r d .
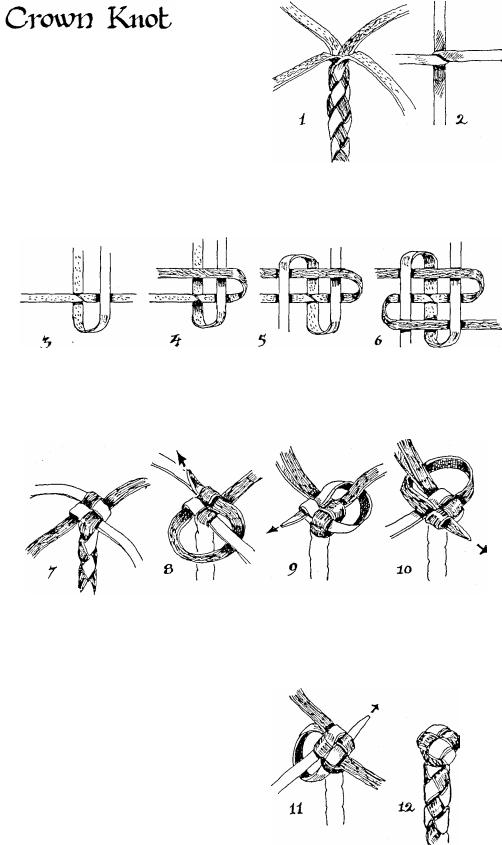
FINISHING THE ENDS |
|
|
|
|
||
When plaiting is completed the |
|
|||||
ends can be whipped, as described |
|
|||||
elsewhere, or they can be |
finished |
|
||||
with |
a decorative |
crown |
knot. |
|
||
The crown knot is not limited |
to |
|
||||
use with only a four plait, it can be |
|
|||||
used for other plaits as well. |
|
so that the rough side of the lace is |
||||
Fig. 1. |
When |
plaiting |
has |
been |
showing. |
|
Fig. 2 |
This is how it looks |
|||||
from completed |
hold the |
end |
up like this |
above. |
||
Fig.3 . Now begin bending each strand tucked
over the one next to it.
Fig. 6.. The fourth strand is
under the first one and the crown knot is complete.
Fig. 7. When worked tight it will look Fig. 8. Take a strand under its like this. However in this state it is neighbour and then tuck it back likely to work loose and so some under itself.
Do this with each strand in turn.
Some extra work must be done to make it firm.
There are various ways of doing this but the one described here is an easy one to remember.
Fig. 11. When you come to the last strand you must put the strand under two layers as shown. If this is not done the knot will be uneven. Fig. 12. Work the lace as tight as possible and trim it off flush.
112
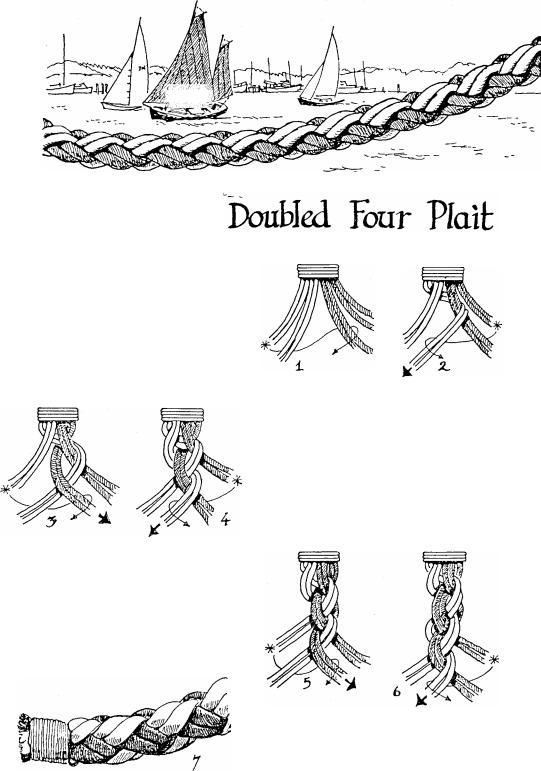
Ship's hawsers used to be of plain-laid rope, but these days they are more often a doubled four plait.
The sketch shows a typical one noted in Cairns Harbour, using contrasting colours. This technique enables one to build a heavy rope f r o m w h a t e v e r l i g h t r o p e i s available.
Fig. 3. Come around the back and between the opposite pairs. Take up the pair marked *.
Fig. 4. Come around the back and between the opposite pairs. Take up the pair marked *.
Fig. 1. Take eight
lengths of rope and put a whipping on the end. Short whipping is illustrated on page 118 and long whipping on page 121 , either can be used.
The plaiting system is ordinary four plait, but taking up the ropes in pairs. Take the pair marked *.
Fig. 2. Come around the back and between the opposite pair. Take up the pair marked *.
Figs 5 & 6. Continue following the same sequence.
Fig.7. When all the rope is used up put a whipping on the end.
113
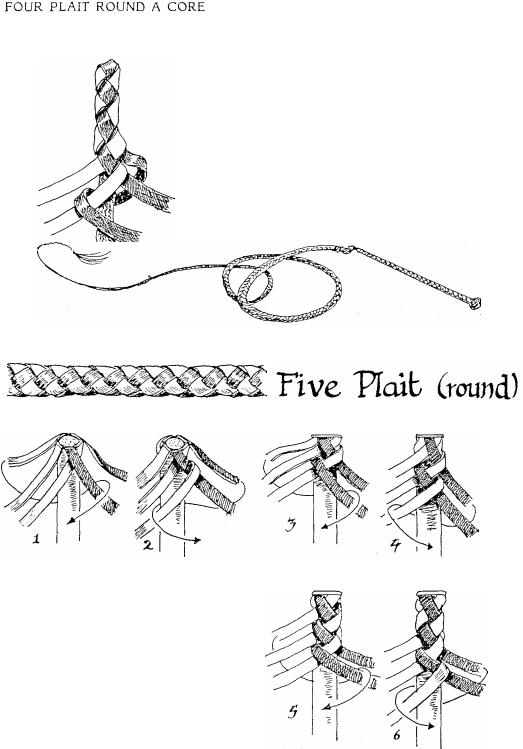
The four plait can be worked as shown above, or it can be worked around some sort of core.
The core can be solid, or it can be something like a length of rope. From the five plait upwards it is usual to always work the plait around some sort of core.
When you arrange the lace around the core the strands should always just touch each othe r. If they do not then select a narrower core or wider lace, otherwise the finished job will probably show gaps in it.
Whips are always plaited around a tapered core which is called the belly of the whip.
Fig. 1. Tie the five strands to the core, crossing two of them as shown. Bring the upper left strand around as shown by the arrow. Fig.2. Bring the upper right strand around as shown by the arrow, and continue this sequence.
ANOTHER METHOD. The above method is the easiest to remember but there is another method. It f o l l o w s t h e s a m e g e n e r a l i d e a except that on the left side you come through between the top and middle strands instead of between the top and lower strands.
114