

Изделия из кожи
.pdfFig.9. Trim the end off neatly.
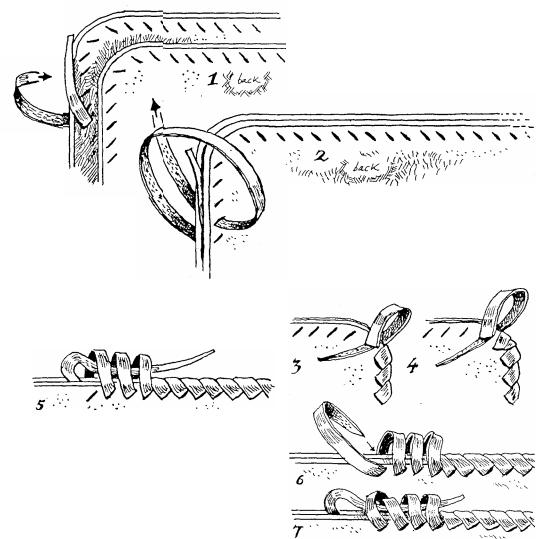
Fig. 10. WHEN THE LACE BREAKS. When you run out of lace before the job is completed this method is used so that the join will not be visible.
The end is brought up between the two pieces of leather and taken back under a few loops.
Fig. 11. The loops are tightened and the end pulled firm. It can be trimmed flush or pushed down between the two pieces of leather.
The new piece of leather has its end concealed between the two pieces of leather in the same way, and then lacing continues.
Fig. 12. If this is done neatly there will be no sign of where the old lace finishes and the new lace begins.
The Wide Whip is a very simple style, but one that looks good because it covers the whole edge of the leather. It is also the most
Fig. 7. Take the end back though a few loops. It can either remain in sight as shown, or you can follow the dotted line and push it down inside the job between the two pieces of leather.
Fig.8. Tighten up the lacing and then pull the end tight. If you have pushed
the end between the two pieces of
leather then pull it tight from the inside.
economical stitch for a complete edge cover.
95
For the best effect all the holes should be made with a slit punch, and put in at an angle as shown.
A slit punch can be made by flattening and sharpening a nail as mentioned on the front inside cover.
Figs. 3 & 4. When going
around a corner
go through the holes twice in
order to get a
good cover over the leather.
Fig. 5. This is how to finish off if you have run out of lace. The end comes up between the two pieces of leather and is taken back under a few loops. The lace is then pulled up tight.
The end can be trimmed off flush or is pushed down between the two pieces of leather out of sight.
This is also the way to finish when you have gone right around a job and come to the beginning again. You will, find that you now fill the hole that was left empty in Fig.l.
AMOUNT OF LACE NEEDED. Around five times the length to be covered.
The distance between the holes is calculated according to the width of the lace being used. Remember that when lace is being pulled tight it tends to become a little narrower, so allow for this when marking out.
Fig. 1. This shows the job from the back. The end comes in from the bottom hole at the front and sits
between the two pieces of leather.
Fig.2. Now begin lacing. Note that the bottom slit at the back has no
lace through it.
The end will be hidden between the two pieces of leather.
Fig. 6. This is the way to finish when you wish to fill all the holes. The lace is taken through the final hole twice at the back.
Fig.7. Now bring it up between the layers of leather and take it back under a few loops.
Tighten up the lace and cut the end off flush.
96
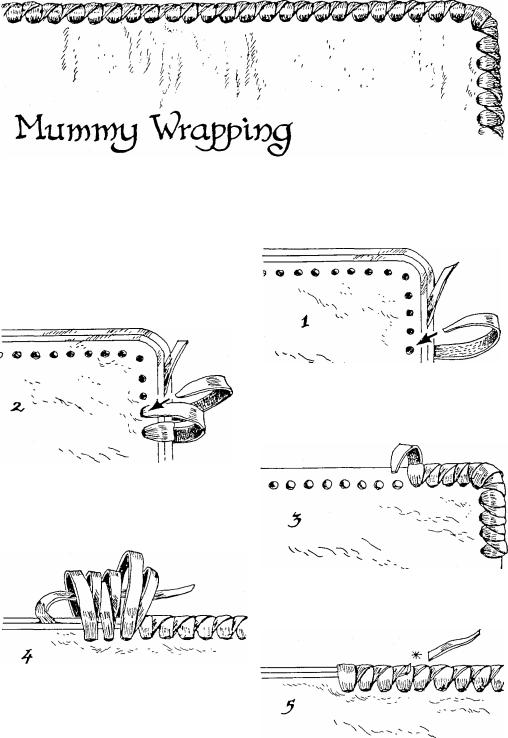
This stitch gets its name from a fancied resemblance to the wrappings of Egyptian mummies.
It is a useful stitch for change purses as it completely closes up the seam so that small coins cannot slip out.
Wide lace is used and goes through each hole twice.
AMOUNT OF LACE NEEDED. 8 times the length to be covered (on small jobs allow 10 times so as to have enough spare when finishing up.)
Fig. 1. The lace goes through the bottom hole at the back, and the end sits between the two pieces of leather.
Fig.2. The lace now goes through each hole twice. It may help to use the lacing fid to clear the hole each time.
Fig. 3. When going around corners take the lace through 3 times.
Fig. 4. When finishing up take the |
|
lace through the last hole at the |
|
back and then bring it up between |
|
the two pieces of leather. |
Fig. 5. Tighten up the last stitches, |
The last few stitches are |
|
loosened and the end goes through |
pull the end firm and then trim it |
them. |
flush. |
|
97 |
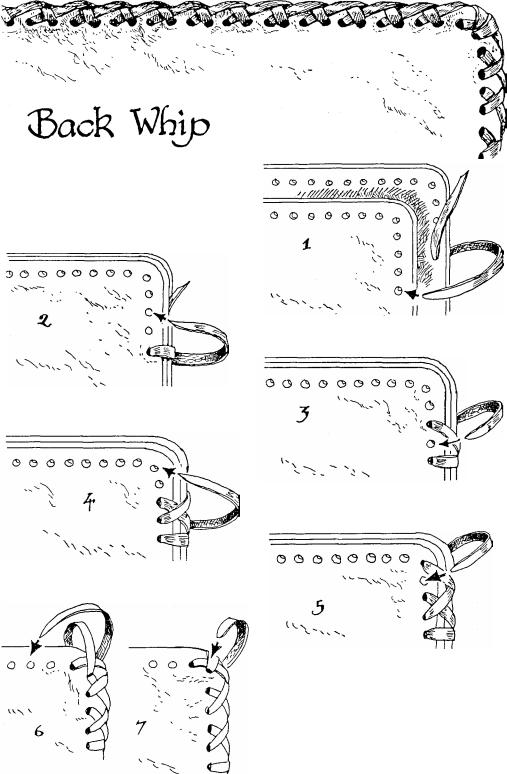
This is not a particularly attractive stitch, but it is a quick way to get a strong edge on a job.
AMOUNT OF LACE NEEDED. Nine times the length to be covered.
Fig.1. The end is hidden between the two pieces of le ather.
Fig. 2. Miss one hole and go in the next.
Fig. 3. Come back and go through the empty hole.
Fig. 4. Miss one hole and go in the next.
Fig.5. Come back and go in the empty hole.
Figs. 6 & 7. One peculiarity about this stitch is that there are two ways of rounding a corner, depending on what part of the stitch is being done when the corner is reached.
In both cases the lace goes through one hole twice. The sketches show the two methods.
98
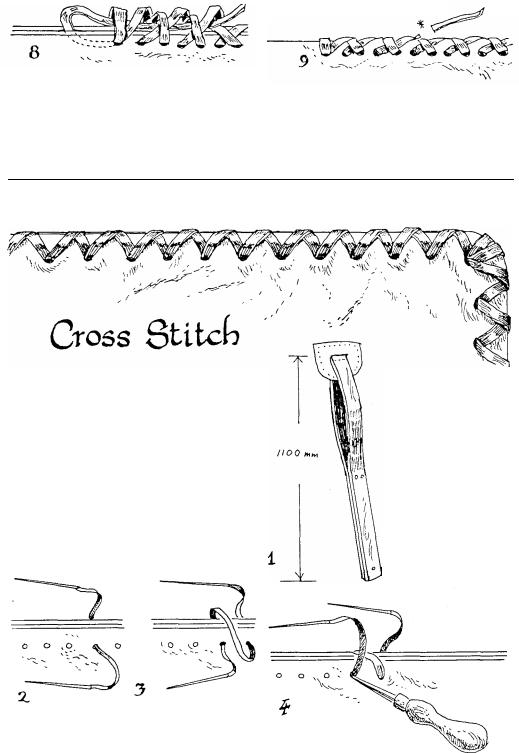
Fig. 8 When finishing go through the last hole twice at the front and bring the end up between the two pieces of leather.
Take it back through a few loops, then work the loops tight.
Fig.9. Pull the end firm and cut if off flush.
A mildly decorative stitch with limited applications.To achieve the best effect the holes are spaced further apart than norma l, and also brought in further from the edge.
For this reason this stitch can be used with very soft leathers that tend to tear easily, such as the belly parts of basil.
However it is not suitable for very thin skins.
AMOUNT OF LACE NEEDED. 5 or 6 times the length to be covered.
Fig.2. Have half the lace on either side of the job.
Fig. 3. Bring one end through.
Fig. 4. The needle will pull away from the lace if any pressure is applied.
Fig.1. This stitch can be done using a
single |
length |
of |
l a c e |
w i t h |
a |
needle |
at |
each |
end. |
|
|
When using a needle in each h a n d t h e j o b should be held in a saddler's clamp to keep the hands free.
To avoid this use the lacing fid to open up the hole before putting the needle through.
99
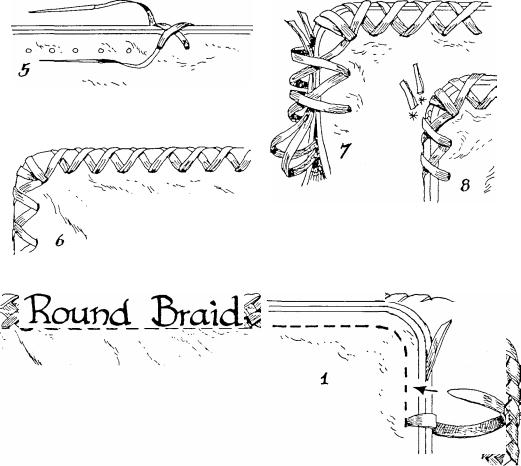
Fig. 5. Stitching continues in this manner.
ig. 7. When finishing up |
|
|
|
bring the |
two ends up between the layers of leather and take |
||
them back a few loops. |
holes |
a |
|
Fig 6 Go |
through corner |
||
couple of extra times for added |
Fig. 8. |
Tighten the loops, pull the |
|
strength. |
|
ends firm and cut them off flush. |
|
This is an attractive braid, easy to remember and simple to do. It is very strong and completely covers the edge of the job.
The finished job looks better if the holes are punched with a slit punch rather than with a hole punch, but either method can be used.
It is best to use a needle when doing this braid, especially if the holes have been made with a slit punch, though I have done it without when I have mislaid the needle, using a lacing fid or similar small tool to open up the holes.
AMOUNT OF LACE NEEDED. times the length to be covered.
100
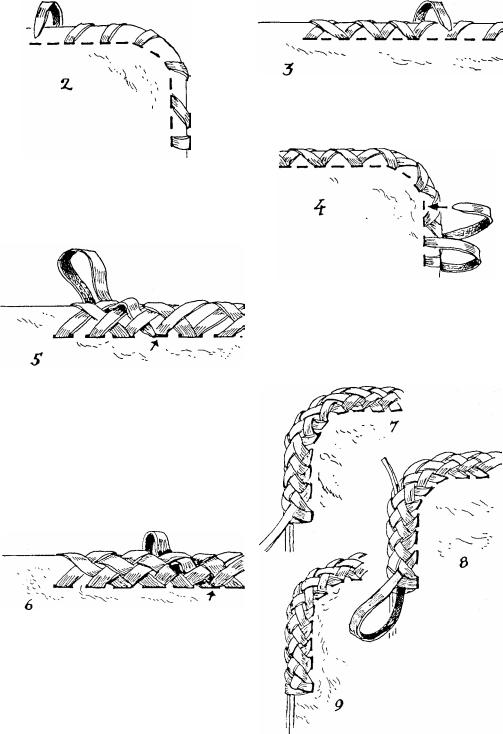
Fig. 2. Round the corners off as much as possible, and in this way you will get a better cover than with a sharp corner.
Fig. 5. Having reached the end begin the final return. This part of the job
takes time as the lace must be taken under one strand, over one and under one before going into the hole.
It is best to use a lacing fid or
similar tool to open the lace a little before you bring the end through.
Fig. 6. Again showing how the lace is brought back.
Fig. 7. This shows the job from the ba ck when the stitching has been completed.
Fig.3. When the end of the job is reached come back to the beginning, going through the same holes.
Fig. 4. Having reached the beginning set off again, this time going into the empty holes.
Fig. 8. Feed the end through |
under |
the stitching and bring it out a |
little Fig 9. Pull the end up tight and trim |
further back along the job. |
it off flush. |
|
101 |
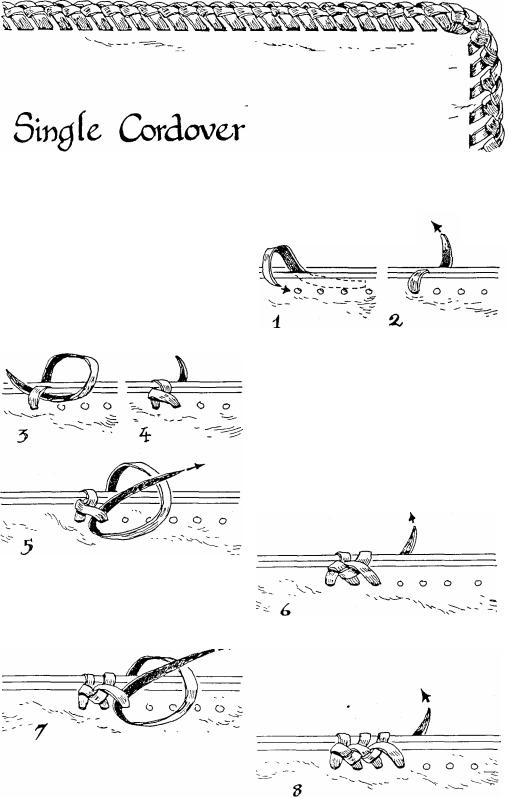
This is a popular and ancient stitch which may have originated in the Spanish province now known as Cordoba.
Cordoba was once famous for its leather work, and the stitch is also known as Spanish Edging.
It is not as complicated as it may look at first, but it is a slow stitch to work.
This is the most simple form of the stitch.
Fig. 5. Bring the end through as shown. Make sure that the loop is formed as illustrated.
AMOUNT OF LACE NEEDED. 6 or 7 times the length to be covered.
Figs 1 & 2. Begin with the end tucked between the two layers of leather. Take the lace through the first hole.
Fig. 3. Pass the lace under the first strand. It is best to use a lacing needle for this stitch. Fig. 4. Go into the second hole.
Fig. 6. Take the lace through the third hole.
Figs 7 & 8. Stitching continues in this manner.
102
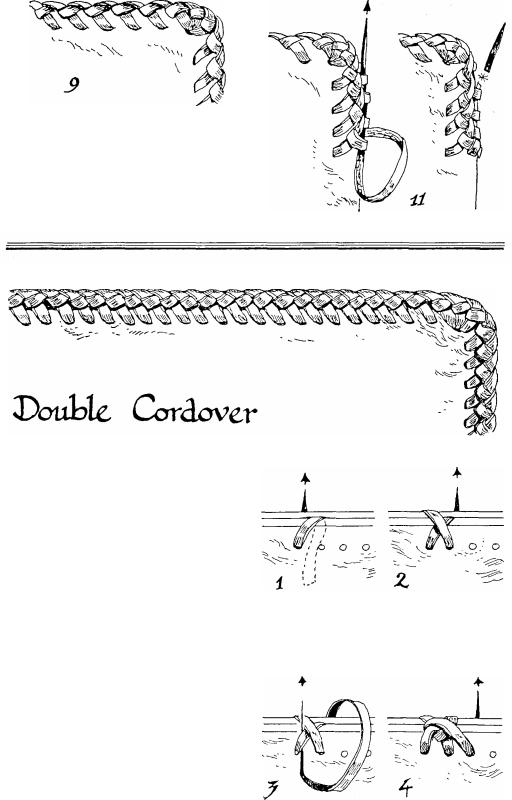
Fig. 9. When going round a corner go through the same hole 2 or 3 times to get a good cover. Remember that corners get the most wear.
Figs 10 & 11. To finish take the end back under a few strands. Pull firm and cut off flush.
Once begun this is as simple to do as the single loop Cordover, and though it takes a little longer to do it covers the edge more efficiently and so looks much better.
By the same token the triple loop Cordover covers a wider edge than the double loop, so the best plan is to use the single loop stitch when dealing with thin leather, the double for medium and the triple for thick leather.
For a very neat job use a slit punch to make the holes, for a quicker lacing job use a hole punch.
A needle on the lace makes the job much easier.
AMOUNT OF LACE NEEDED. 7 to 8 times the length to be covered.
Fig 3. Go back under one strand of lace.
Fig. 4. Go into the third hole.
10
Fig. 1. Hide the end between the layers of leather.
Fig. 2. Go through the second hole.
103
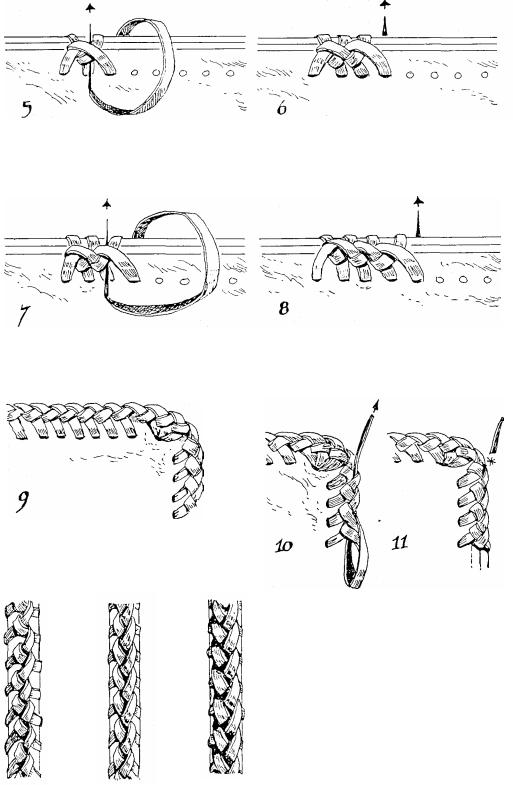
Fig. 5. For the rest of the sequence you take the end under two strands of lace each time.
Fig. 7. Back under two strands.
Fig.9. To get a well covered corner go through the corner hole three
times.
single |
double |
triple |
104
Fig.6. Go into the fourth hole.
Fig.8. Into the fifth hole and so on.
Figs 10 & 11. To finish take the end back under a few strands. Pull up firm and cut off flush.
Although all the cordover stitches may look somewhat similar from the side the difference can be easily seen when they are looked at from the edge.
I prepared these three samples using the same thickness of leather for each and the same width of lace.