


System Settings (Menu)
Device Parameters
Here you can change the following equipment settings and update the software.
All settings are user-independent.
–Balance parameters
–Data output
–Device ID
–Date and time
–Display and control unit properties
–Touch screen adjustment
–Interfaces
–Alibi memory
–Load a software update
–Software activation codes (e.g., for “Q-Apps” software options)
–Restore factory settings
–Motorized draft shield (optional)
–Ionizer (optional)
Configuring Balance Parameters
hFactory settings are marked with an *.
General Weighing Settings
Here you can configure the standard settings for the general weighing functions.
These settings can be changed for a specific task whenever a new task is created.
hThese settings can only be changed when the balance is set to “Weighing” in the operating mode. If General weighing settings cannot be selected, you can touch TASK D to toggle to Task Management and select Weighing.
In order to receive detailed information on the individual setting options, touch
Info.
Adapt filter: This setting defines the measuring time of the balance to filter out the effects of unfavorable weighing conditions such as drafts or vibration. Options: Very stable/*stable/unstable/very unstable conditions
Application filter: Equalizing the load deviations in the display. Options: *Final readout/Filling mode/Low filtering/W/o filtering
Stability range: The stability indicator lights up when the weight results are constant within a defined range. Options: Maximum precision/very precise/*precise/ fast/very fast/maximum speed.
Stability delay: This setting lets you compensate for slowly abating disturbances, such as turbulence in the weighing chamber of an analytical balance). Options: *Very short/short/medium/long delay.
Zero/tare function: Conditions for carrying out the tare function. Options: Without/*after/at stability.
Auto zeroing: When this option is turned on, changes of a set fraction of scale intervals per second from the display zero point are tared automatically.
Options: On/*Off
Base unit: Weight unit to be used for this task. Options: All available weight units, *gram.
Display accuracy: A lower display accuracy results in a faster display. Options: *All places on/Last place off
Tare/zero at Power: Automatic taring when the balance is switched on. Options: *On/Off
46 Cubis MSA User Manual
System Settings (Menu)
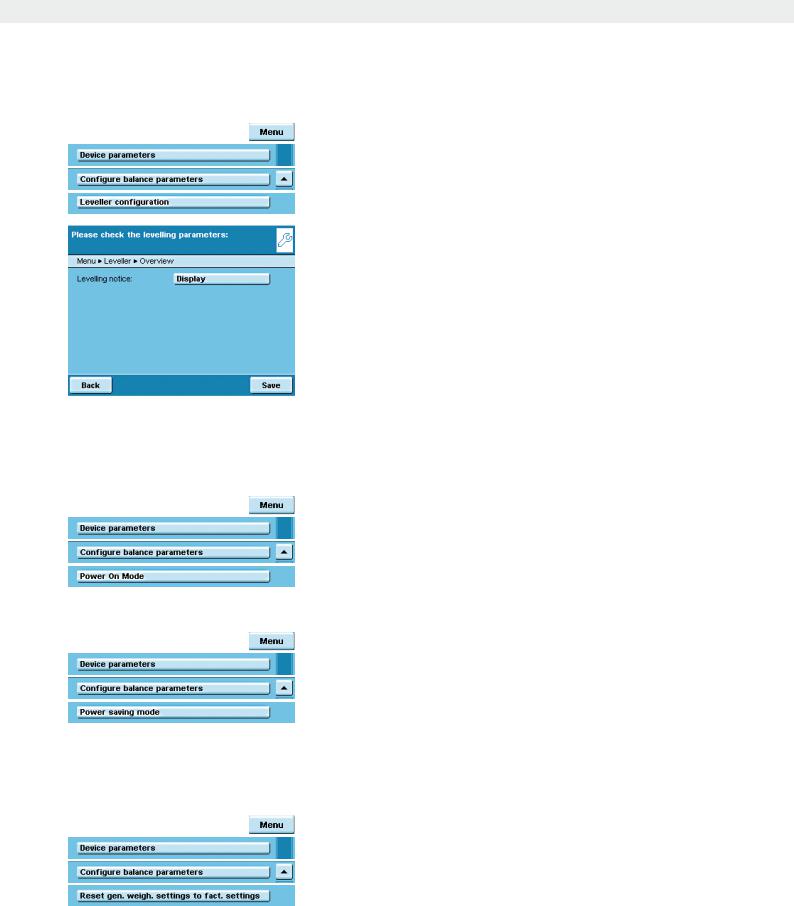
Setting Up Q-Level Leveling Function
You can configure the leveling function here.
Leveling Notice
Off, no notice: The prompt to perform leveling is omitted.
Status display: As soon as leveling is required, the tag Level me appears and flashes.
Alarm message, leveling mandatory: As soon as leveling is required, the tag Level me appears and flashes. If this notice is ignored, an alarm message appears after 5 minutes. In that case, you can only continue working after you have performed leveling.
Automatic Leveling (Balances with Motorized Leveling Feet Only)
Off, start by touching: To activate automatic leveling, touch Start. Activate the fully automatic function: Before every calibration/adjustment routing, the balance will be leveled automatically.
t To save settings, touch Save.
Defining the Startup Mode of the Balance
tYou can select the mode that is used when the balance is turned on and when you touch the A operating key repeatedly.
Options: On/standby or Always on
t To save settings, touch Save.
Defining the Power Saving Mode of the Balance
t
Switch the power saving mode of the balance on or off.
Off, no function:
The power saving mode is not in use.
Auto shutoff after 2 minutes: The backlighting of the display and control unit switches off if the device is not operated for 2 minutes.
t To save settings, touch Save.
Resetting General Weighing Settings to Default
You can reset all balance settings back to the default delivery status (after a security prompt).
Cubis MSA User Manual |
47 |
|
|

System Settings (Menu)
Configuring Data Output (Print Parameters)
Here you can configure all settings for printing and data output. Several of these settings depend on the interface configuration (see chapter Interfaces).
hFactory settings are marked with an *.
In order to receive detailed information on the individual setting options, touch
Info.
Interface to the print output: Options: COM port (peripheral), Port A PC (USB), Port B
Optional, Port C
Network, Port D Print to file
Protocol: Options: Print/SBI/XBPI/Web service/SICS/Remote display. This setting cannot be changed here, but is defined when configuring the interfaces.
The parameters and settings displayed here depend on the configured protocol. GLP standard print: When should the ISO/GLP output be possible? Options: *Off/enabled for cal.-adjustment/always enabled.
Taring after printout: Automatic tare after printing? Options: *Off/on. Print event: What event should trigger printing? Options: *PRINT key/Start of
task/Initialization of application/Result of application/Printing component/Evaluation of application/Exit task/Calibration - adjustment.
Print key elements: Which elements should be printed?
hFor further information, please refer to the chapter Interfaces, in the section
Configuring a Printout.
Entering the Device ID
These two IDs can be added to the printout.
tSelect the entry for both IDs.
tEnter the desired value (text) for each ID.
tTo save settings, touch Save.
For related input and output commands for the printout, see chapter “Interfaces: SBI Commands” on page 156.
48 Cubis MSA User Manual

System Settings (Menu)
Setting the Date and Time
t Enter the current date and time in the prescribed format.
Configuring Display and Control Unit Properties
The following properties of the display and control unit can be changed,
as necessary: Language, background colors, brightness, acoustic signal.
These general properties are applied to all user profiles, are also used when no user is logged in, and serve as a template when a new user profile is created.
Adjusting the TouchScreen
Here you can customize the marker button on the touch screen (finger pressure, angle of touch, etc.)
t Follow the instructions on the display.
Configuring Interfaces and Network Settings
Here you can configure the serial interfaces and define settings for the network.
There are also settings for:
–Control inputs/outputs
–Print to file
–FTP server settings
A detailed description of the connection options and data interface ports can be found in the chapter Interfaces.
Cubis MSA User Manual |
49 |
|
|

System Settings (Menu)
Configuring Serial Ports
y The available interfaces are displayed.
tSelect the interface you want to configure.
tDetermine all settings for this interface.
tTo save settings, touch Save.
Configuring the Network Interface (Ethernet)
For more information on network operation, see chapter Interfaces, section Network Interface.
t Select operating mode for the network interface.
No function/xBPI (extended Sartorius communication) SBI (Sartorius standard protocol)/Printer output/SICS Protocol
tSelect connection type.
Server or client connection
tConfigure the local TCP port.
tTo save settings, touch Save.
Configuring Network Settings (Ethernet)
t Define the settings for network operation.
The device name (max. 24 characters) that you define here can be printed on logs. The IP address can be entered as default or obtained automatically.
t To save settings, touch Save.
50 Cubis MSA User Manual
System Settings (Menu)
Configuring Control Inputs/Outputs (e.g., for Remote Switch)
If you have connected a remote switch, for example, via the peripheral or optional port, you can define its function here.
t Define the setting for each ported interface.
t Select the ported hardware device or control function.
hDuring checkweighing, the control outputs have no function when set to:
–Foot switch YPE01RC
–Control inputs
tDefine the settings for the control inputs/outputs.
Off, no function/TARE key/PRINT key/Cal./adj. key/Zeroing/taring
tTo save the settings, touch Save.
Cubis MSA User Manual |
51 |
|
|

System Settings (Menu)
Configuring “Print to file”
Purpose:
–Transferring a print file in TXT or CSV format to a SD card or FTP server.
–Viewing a print file directly in an internet browser.
tSelect Off.
tSpecify the file format. Print to CSV file:
In addition to the SBI output (like in the TXT file), three additional columns are also written to the file: ID, Value and Unit. The 4 columns are separated by
the “;” character. The “+” sign has also been removed in the third column and the decimal point has been replaced by a decimal comma (because of Excel).
tTouch Off to specify the settings for automatic or manual data transfer.
yThe data is deleted from the balance after the automatic or manual transfer so that only the new data is transmitted the next time there is an automatic transfer.
yManual transfer:
Touch Trans.SD or Trans.FTP during operation to transfer data to the SD card in the balance or to the FTP server.
yThe transfer takes place in the data/print directory.
t Select the output medium for the file.
yThis file can be transferred manually or automatically to the SD card of the FTP server. Combinations are also possible, e.g., manual transfer to the SD card and automatic transfer to the FTP server.
“To SD card:”
yWhen exporting, print files can also be exported to the SD card independent of the transfer. This will create a copy (backup) of the file to the SD card. This does not delete the file from the balance. After the export, the files are located in the directory data/all/EXPORTxxxx/print.
“To FTP server:”
yIf you use the FTP server option for the transfer, the parameters for the
FTP server must be entered in the menu (see next section). The user must have the rights to create subdirectories on the FTP server.
tSelect the desired interval, the date and the time of the first transfer.
tTo save settings, touch Save.
52 Cubis MSA User Manual

System Settings (Menu)
Configuring Data Transfer Setting for an FTP Server
tSpecify the data transfer settings to an FTP server.
tEnter the following parameters for the FTP server:
IP address, port, FTP user name, FTP password, subdirectory also optional. The user must have the rights to create directories on the FTP server
tFor more information about displaying a print record via an internet browser, go to chapter Interfaces, section “Remote Control of the Balance from a PC via Ethernet.”
Configuring the Alibi Memory
Here you can switch on the alibi memory, delete the recorded data and set the interval for automatic deleting.
tSlide the right scroll bar in the submenu Device parameters downward to the menu item Alibi memory configuration.
Turning the Alibi Memory On/Off
t Select whether you want to have the alibi memory switched on or off.
Automatic Deletion
tDefine whether the data stored in the alibi memory should be deleted automatically at regular intervals after a pre-specified time.
tAs appropriate, enter the desired interval (in days).
Resetting and Initializing the Alibi Memory
You can delete the alibi memory immediately. The settings for the alibi memory (On/Off, automatic deletion) will remain stored.
t To delete data in the alibi memory, confirm the security prompt.
Loading a Software Update
Cubis software is updated at regular intervals. A detailed description of how to perform a software update on your balance can be found in chapter Updating the Software.
Cubis MSA User Manual |
53 |
|
|

System Settings (Menu)
Restoring Factory Settings
You can reset all settings individually to the factory settings at any time.
t Use the cursor softkeys to navigate through the Device parameters submenu to Restore factory settings.
tMark any settings you want to reset and select Next.
tConfirm the reset when prompted.
Installing the Motorized Draft Shield (Optional)
OOn balances equipped with a motorized draft shield, the control unit has buttons on the right and left sides. These buttons can be used for motor-driven opening and closing of the draft shield doors. You can configure the functionality of these keys in the menu.
Models with the analytical draft shield:
For example, you can configure the left key to open and close the right and upper door (for right-handed users) and the right key to open and close the left door (for left-handed users). The opening width (entirely or partially) of the sliding panels can also be defined. You can configure these settings manually on the draft shield itself (see “Learning Function” below).
t Check and correct all settings as required. t To save settings, touch Save.
t Define the functions for the left and right keys: Off , no function: The keys have no function. Same function: Both keys have identical functions.
*Separate function: The left and right keys are configured with different functions.
54 Cubis MSA User Manual
System Settings (Menu)
Models with a rotation draft shield (MSx6.6S/3.6P/2.7S):
|
Same function |
Separate function |
||
|
(one opening angle) |
(2 opening angles) |
||
|
|
|
|
|
Define the open- |
Manually select the |
– |
|
|
ing width |
desired opening angle |
|
|
|
|
|
|
|
|
Touch the O key |
1) |
Open to the previously |
1) |
Touch the left O key: |
|
|
selected opening angle |
|
Opens 260° clockwise |
|
2) |
Close |
|
Right O key: |
|
|
|
|
Opens 100° counterclockwise |
|
|
|
2) |
Close |
|
|
|
|
|
0°
100°
260°
180°
Cubis MSA User Manual |
55 |
|
|

System Settings (Menu)
t Configure the automatic mode for the draft shield. *Off, no function: Automatic mode is off.
Close > function > open: The draft shield doors are closed in automatic mode while the function is executed, and then the doors re-open.
Close > function: The draft shield doors are closed in automatic mode while the function is executed.
Automatic mode can be executed using the following keys:
–TARE key
–PRINT key
–Cal./Adj. key
–or can be executed when a component is saved for logging applications (statistics, formulation, totalization)
hIf automatic mode is on, the draft shield doors automatically close when the balance is switched to standby.
Assigning Opening Functions to Keys (Learning Function)
Example: The keys should be cross-configured (left key opens/closes right door and vice versa).
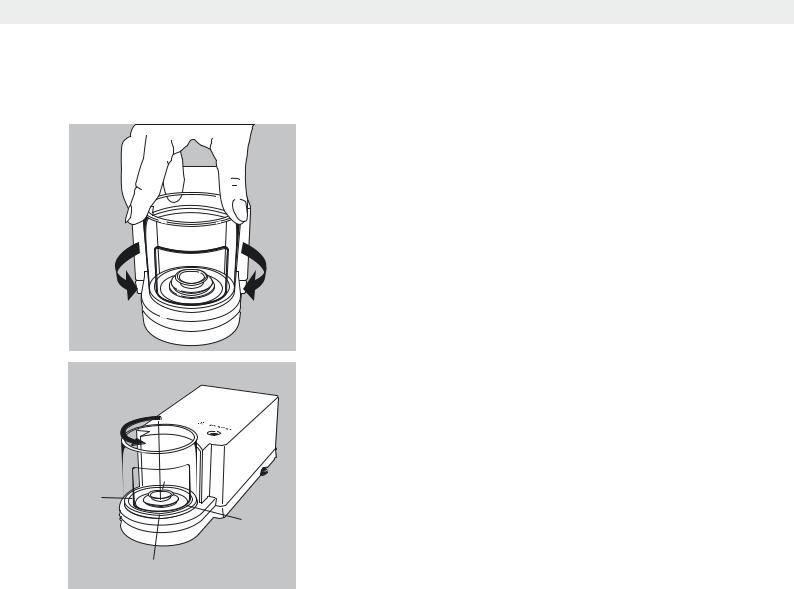
The balance must be turned on. t Close all draft shield doors.
t Manually operate the door you want to assign to the left key: Push the right
door open to the extent you want it to be opened (entirely or partially). t Press the left key O.
y The door will close again. Now you have configured the left key so that when pressed, it opens or closes the right door.
t Proceed accordingly to configure the left door/right key.
hAccording to the same pattern, you can assign operation of the upper door to one of the keys. You can also configure one key to move both doors by manually opening both doors during set up before you press the desired key.
Installing the Ionizer (Optional)
If your balance is equipped with an ionizer module, you can configure the basic settings for the ionizer module here. During any task, you can change these settings as needed.
tDefine the ionizer function.
Switch off ionizer: The ionizer is switched off.
Manualactivation: Ionization can be turned on at any time by pressing the Ion key.
*Automatic execution after closing of ws: Ionization is executed automatically, as soon as the draft shield is closed.
56 Cubis MSA User Manual

System Settings (Menu)
tDefine how long an ionization routine should take. Operating time in seconds: 3 to 15 sec, *8 sec.
tDefine the intensity level at which the ionizer operates.
Soft, *Normal, Strong
tCheck and correct all settings as required.
tTo save settings, touch Save.
Cubis MSA User Manual |
57 |
|
|