

User Management
User Management
You can configure the following settings in this menu:
–Create new user profiles (only possible as administrator)
–Edit user profiles (modify, copy, delete, change and delete passwords, depending on user rights)
–Activate users
User Management
The user administration allows for defining of users with distinct sets of rights: the Administrator and multiple users.
The Administrator can use all functions (except those in Service) and he has all user rights. Only he can create new user profiles and assign individual rights. There is only one administrator.
A user, on the other hand, cannot use all functions. He has limited rights. Rights that are defined in the user profile. A max. of 15 user profiles can be created.
When the balance is first delivered, there are no user profiles, all settings can be carried out. The first user profile that is created is automatically an administrator. He can then create additional user profiles.
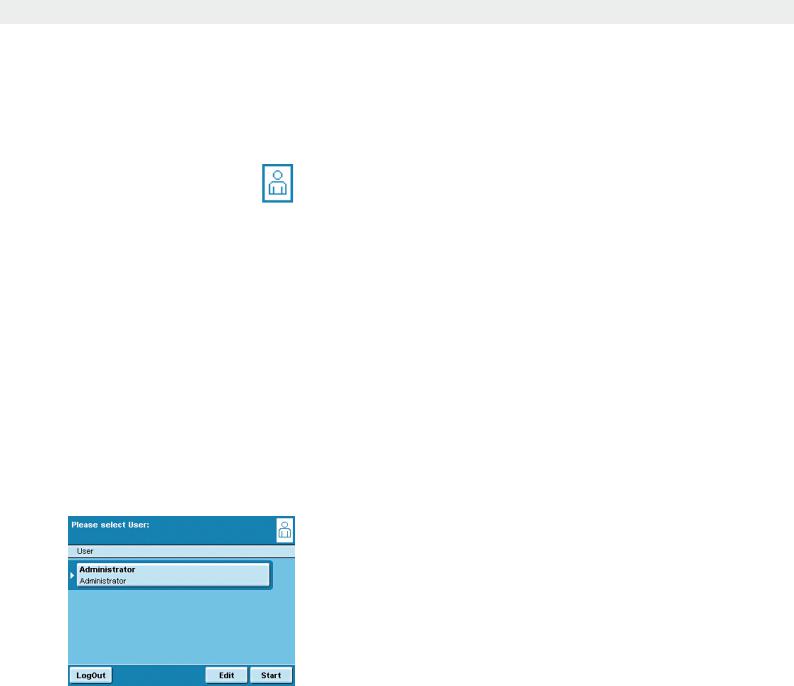
Ht To open the User Management menu, touch the USER H key. y The menu opens and the selection of user profiles is displayed.
Creating User Profiles
hThis function is only available to an Administrator.
The following settings can be made in the user profile, they are only valid for that user:
–Language
–Display settings (color, brightness)
–Volume and acoustical signal on/off
–User rights
–Password protection
–User name and description
Cubis MSA User Manual |
129 |
|
|
User Management
H |
t |
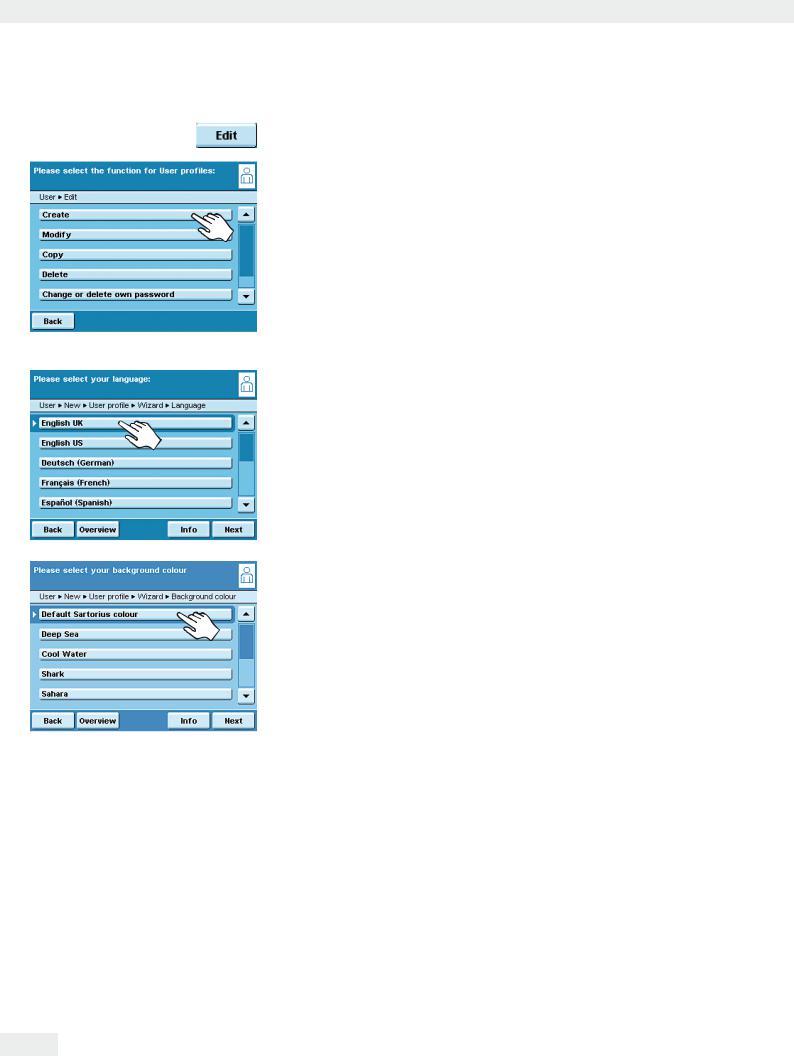
To create a new user profile, touch Edit. |
|
t |
Touch Create. |
The program now automatically guides you through the menu. Make your selections by touching the desired option, the program then takes you to the next prompt.
or
If the desired option is already selected (dark background), touch Next, to go to the next prompt.
If more than one option can be selected for a single setting, press Next after making your selection(s) to proceed to the next prompt.
Step 1: Select language
t Touch the desired language.
Steps 2 to 4: Set the color and brightness of the display
tTo select the background color, touch the desired color.
The standard Sartorius factory setting for the background color is blue.
y The display changes to the color selection for the user field (see “Display in Operating Mode”).
tTouch the desired color for the user field.
The standard Sartorius factory setting for user fields is dark blue.
y The display changes to the brightness setting.
t To change the brightness of the display, touch the desired setting.
Step 5: Assign user rights
tSelect the corresponding options to define which functions the user can access. The following rights can be assigned individually:
–Creating, copying, modifying and deleting tasks
–Importing data
–Modifying the calibration and adjustment settings
–Modifying the balance settings
–Creating, modiying and deleting timer-controlled actions
–Exporting file
–Displaying device information
Administrators can access all functions.
t To move to the next menu item, press Next.
130 Cubis MSA User Manual
User Management
Step 6: Define password protection
If you assign a password, this profile cannot be used until the password has been entered.
tSelect the corresponding option to define whether the user profile is password-protected or not.
The password will be defined in the step after next.
Only the Administrator can open the user profile without the password
(for example, if the user forgets the password) and assign a different password. The Administrator can remove the password protection so that a new password can be set, if desired.
If the administrator forgets the password: Please contact your Sartorius Service Center
Step 7: Check all settings
tUse the scroll bar or press the down arrow to view all settings.
tTo modify a setting, press the corresponding button. This opens a screen showing the options for that setting.
tIf the settings are correct, press Next.
Step 8: Define the password (if password protection enabled)
yIf you selected the option for password protection, you are now prompted to enter the desired password twice.
tPress the upper button.
tEnter the desired password (minimum 4 characters, maximum 8; only numbers and uppercase letters are permitted).
tPress the lower button, and enter the password again.
tTouch Next.
Step 9: Enter user names and descriptions
tTo enter a name for the user profile, touch the User button.
The user name is shown on the top right of the display during operation as long as the respective user profile is active.
tEnter the name (max. 40 characters) and touch OK.
tTo enter a description of the user profile, touch the Userdescription button. The user description can be viewed at any time during operation of the balance by pressing the user info area in the display (see “User Interface (Touch Screen)”).
tEnter the description and touch OK.
tTo complete the process, touch Save.
Cubis MSA User Manual |
131 |
|
|
User Management
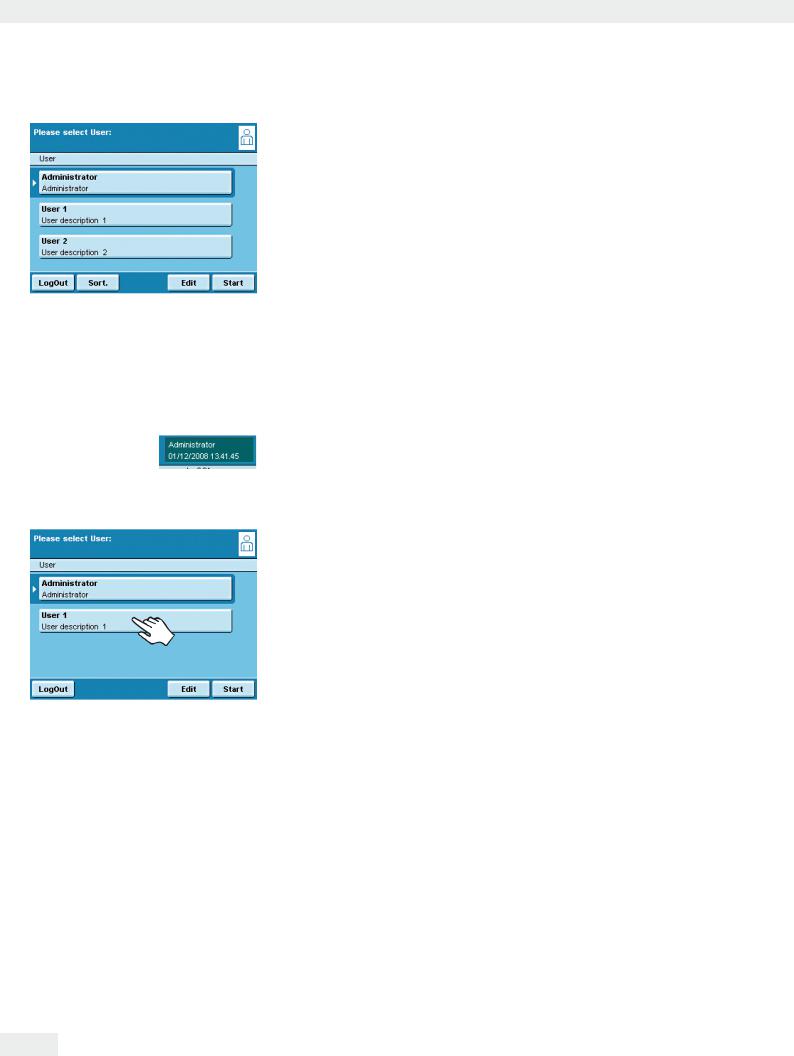
yThe program switches to user selection. The newly created user profile is placed at the end of the list.
t When you want to activate a new user, just touch the button with his name.
yThe program switches to the operating mode and the selected user is activated.
or
tIf you want to set up additional user profiles, touch Edit and repeat the steps described.
or
tWhen you want to switch to operating mode without switching the user, touch Start.
Activating Users
With the balance in the operating mode, the active user is displayed in the user field at the top right of the screen.
To activate another user, you must switch to the User Management menu.
Ht Press the USER key H.
y The user selection is displayed. The current, active user can be recognized by the small arrow and the dark background.
t Touch the user you want to activate.
t If the user is password-protected, enter the password and confirm the entry. y The program switches back to operating mode with the selected user activated
and displayed at the top right of the user field.
132 Cubis MSA User Manual