

Weighing in Percent
Weighing in Percent
Purpose: This application is used to determine the percentage share or the percentage difference of the sample related to a reference weight.
Options: You can enter a fixed reference weight or a reference percentage. Combination options: Checkweighing, timer controlled functions, totalizing, statistics, formulation,
second tare, individual identifiers, (SQmin function, DKD measurement uncertainty)
Configure Task: Weighing in Percent
D 
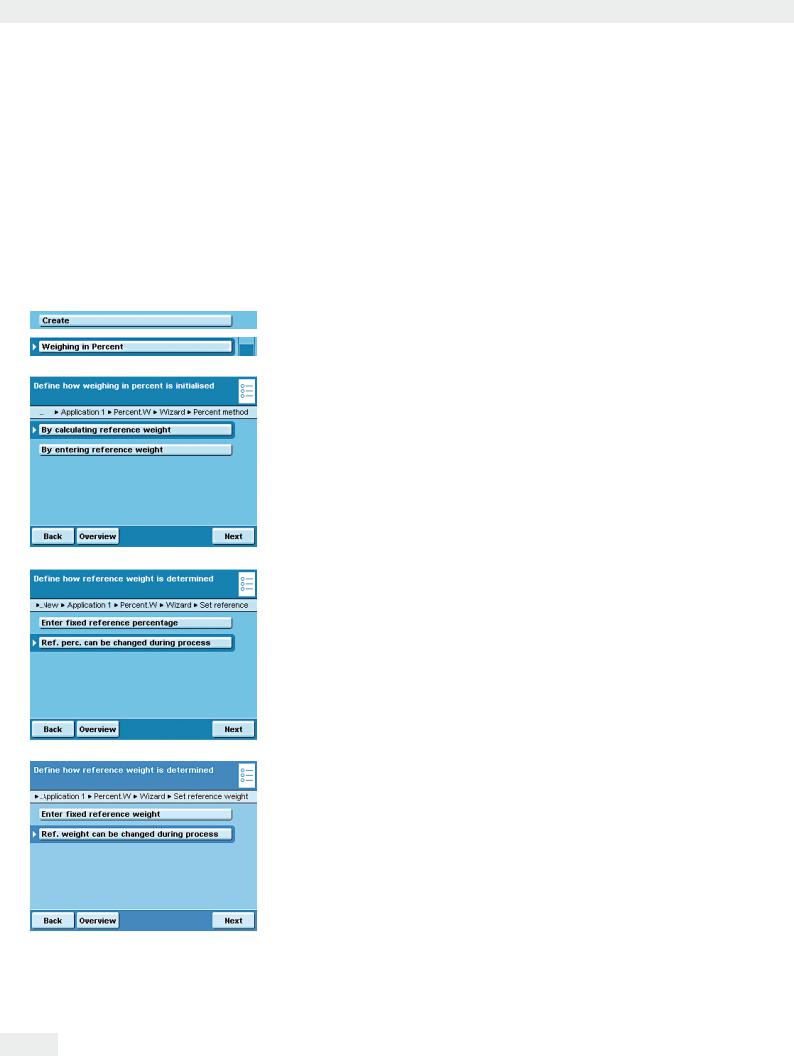
t Define how the weighing in percent will be initialized.
By calculating reference weight: The reference weight is determined by weighing a reference object.
By entering reference weight: The reference weight is entered as a numerical value.
If the reference weight should be calculated.
t Define whether the reference percentage should be fixed or variable.
Enter fixed reference percentage: You must now enter the reference percentage.
*Ref. perc. can be changed during process: You can enter this when carrying out the task.
If the reference weight should be fixed:
Enter fixed reference weight: You must enter this now.
*Reference weight can be changed during process: You can enter this when carrying out the task.
104 Cubis MSA User Manual
Weighing in Percent
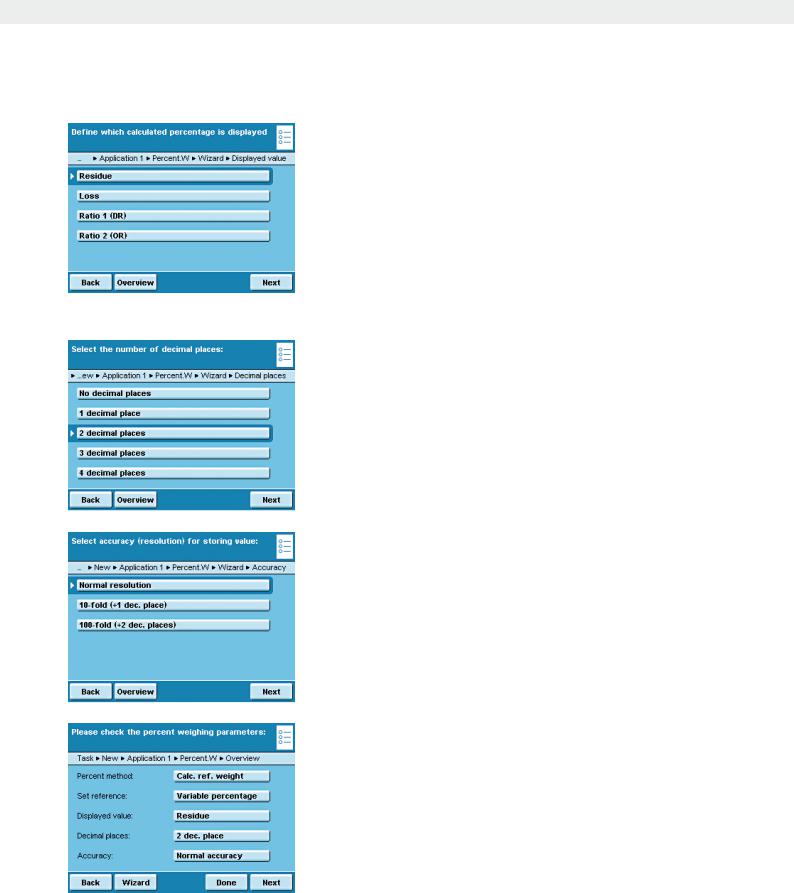
t Define which percent calculation should be used. Example: Weight value = 10 g, reference weight = 50 g
*Residue: The result is the percentage share of the weight value of the reference weight (residue: weight value/reference weight* 100%; in the example: 20%) Loss: The result is the percentage loss between the weight value and the reference weight (loss: weight value - reference weight / reference weight * 100%; in the example: –80%)
Ratio 1 (DR): The result is the percentage ratio of the difference to the weight value (ratio 1: reference weight - weight value / weight value * 100%; in the example: 400%)
Ratio2(OR): The result is the percentage ratio of the reference weight to the weight value (ratio 2: reference weight / weight value * 100%; in the example: 500%)
t Define the number of decimal places to be used for the display of the percentage.
No decimal places ... 1, *2 , 3, 4
tDefine the accuracy to be used to apply the weight value for the reference weight.
*Normal resolution 10-fold (+ 1 dec. place) 100-fold (+2 dec. places)
yAn overview of all settings is displayed. t Check all settings and change as required.
yA message asks whether you would like to add another application. t If required, select additional applications to be combined.
yPrompts for configuring weighing and printing appear.
tCheck all settings and change as required.
tEnter a short name and a description for the new task.
tTo save the new task, touch Save.
Cubis MSA User Manual |
105 |
|
|
Weighing in Percent
Execute Task: Weighing in Percent
Dt If you haven’t already done so, go to Application Management. y The task selection is displayed.
t Touch the desired task. or
t If the desired task is already selected, touch Start.
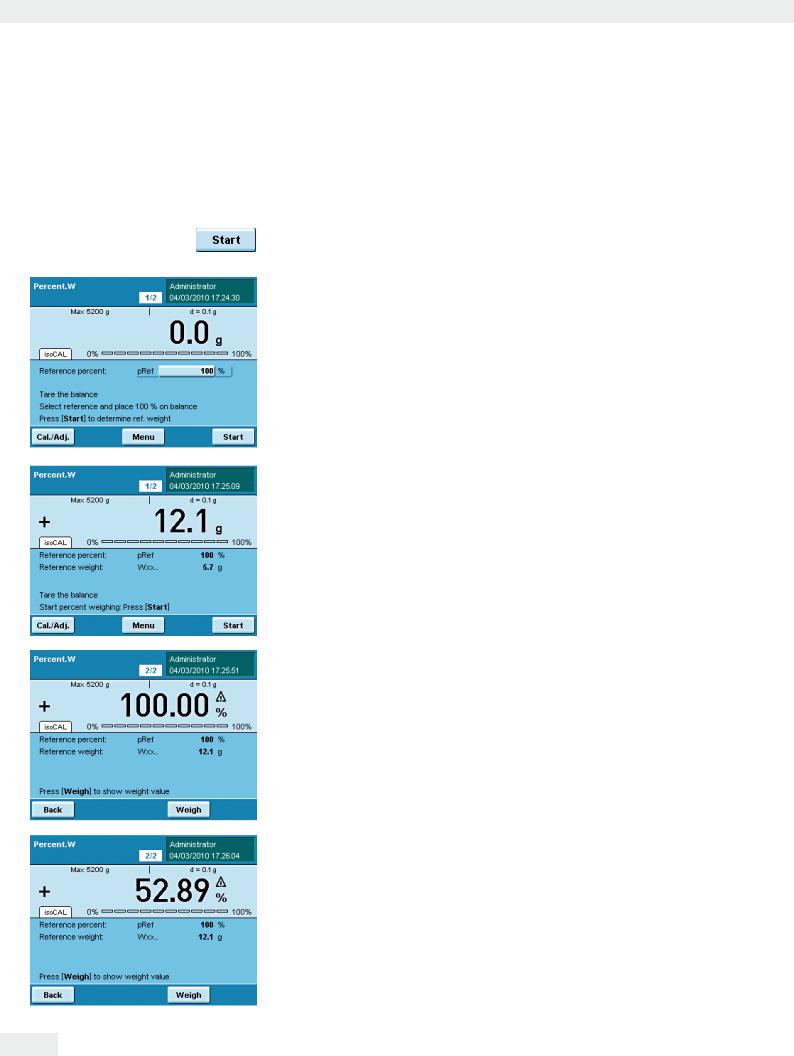
tIf required, enter the reference percentage (e.g., 100%) or the reference weight.
tPlace the sample on the weighing pan.
In the example it is the reference sample.
y The weight value of the reference is displayed. t To begin the Weighing in percent, touch Start.
yThe values for the reference percentage and the reference weight are displayed.
t Place the next sample on the weighing pan and touch Weigh.
y The weight value is displayed.
tTo toggle between the display of weight and percent, touch Percent or Weigh.
106 Cubis MSA User Manual
Timer-controlled Functions
Timer-controlled Functions
Purpose: This application is used to trigger individual balance functions automatically at a specific time or after specific time intervals. The time or interval must be within 24 hours (1 day).
Options: You can select the following functions:
-Acoustic signal
-Lock in readout
-Automatical printout of the display value
-Transfer of components for totalizing, formulation or statistics
Example: In order to determine the amount of evaporation of a sample over time, you can place the sample on the weighing pan and print out the weight value at fixed intervals (e.g., every two minutes).
Combination options: Totalizing, statistics, formulation, mass unit conversion, second tare, memory, individual identifiers (SQmin function, DKD measurement uncertainty)
Configure Task: Timer-controlled Functions
D
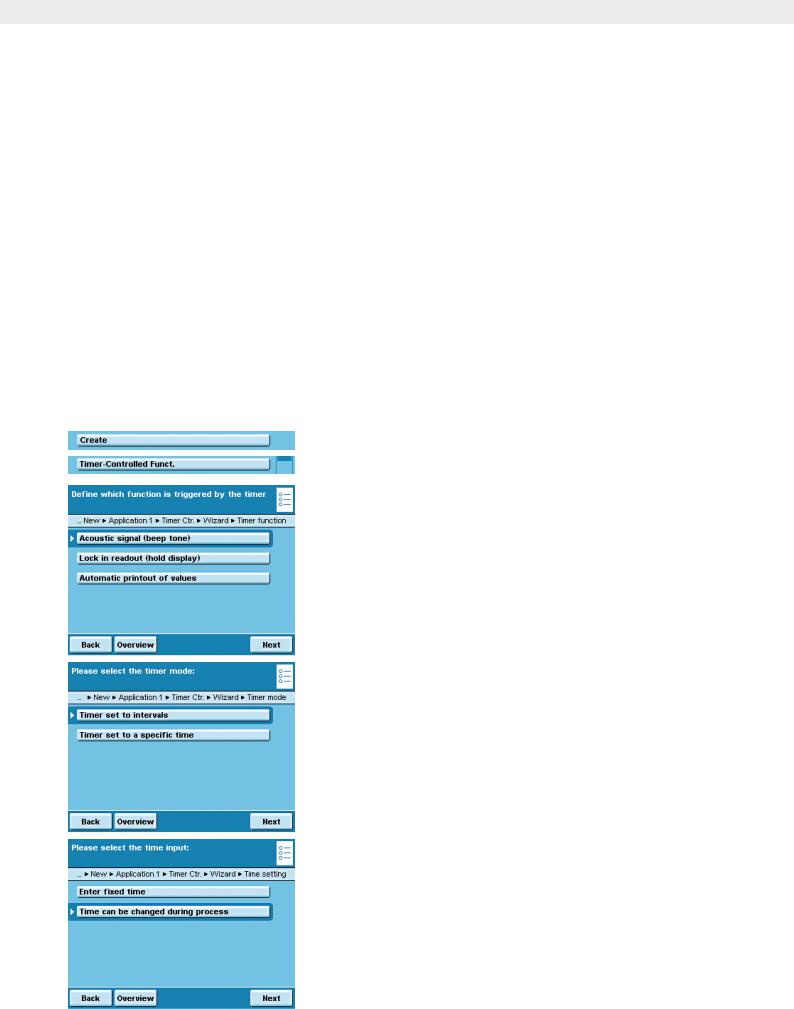
t Define which function should be timer controlled.
*Acoustic signal (beep tone) The balance makes a beeping sound. Lock in readout: The measured weight value remains on the display for the defined time period.
Automatic printout of values: The displayed value is printed at the defined time.
t Select the mode.
*Timer set to intervals: The function is triggered at regular intervals (e.g., every 30 sec.).
Timer set to a specific time: The function is triggered at the fixed time (after the start of the application) (e.g., at 08:00:00).
t Specify when the time and/or interval should be entered. Enter fixed time: You must enter this time and/or interval now.
*Time can be changed during process: The time and/or interval is only entered when the task is carried out.
Cubis MSA User Manual |
107 |
|
|

Timer-controlled Functions
t Specify whether or not there should be an automatic restart of the timer-controlled function after it has been triggered.
*Off, no restart
On (restart automatically): The timer is restarted as soon as the timer-controlled function has been carried out.
yAn overview of all settings is displayed. t Check all settings and change as required.
yA message asks whether you would like to add another application. t If required, select additional applications to be combined.
yNow you will be prompted to configure the weighing and printing functions. t Check all settings and change as required.
t Enter a short name and a description for the new task. t To save the new task, touch Save.
Execute Task: Timer-controlled Functions
Dt If you haven’t already done so, go to Application Management. y The task selection is displayed.
t Touch the desired task. or
t If the desired task is already selected, press Start.
tIf required, enter the time or interval.
(Enter hh:mm:ss, e.g., 00:00:30 for the 30-second interval)
tFollow the instructions on the display.
108 Cubis MSA User Manual