

Изделия из кожи
.pdfThis simple type of bridle i s k n o w n t o m o s t b u s h workers. It can be made with a pair of belts as shown in the small sketch , or a third belt can be used to act as brow band and cheek strap. Rope is used for reins. I have made a bridle in this manner, and it is quite practical with a quiet
horse, |
though |
not |
recommended for extended use.
10
SELECTING THE LACE
Kangaroo lace is usually sold by the hank, and at the present time is generally found to be labelled in a rather odd way, with the length being given in metric measurements but the width in Imperial. The average hank is either 11 or 23 metres long and comes in three widths, 1/8", 3/16" and 1/4". In time these will doubtless become 3mm, 4.5mm and 6mm.
The widest lace is not generally used for belts, being considered too wide, while the narrowest is only used by people with plenty of time on their hands. The middle width is generally chosen by people who have to do a lot of plaiting, though they concede that the narrow lace looks the best.
When choosing lace look for a good finish, uniform width and smooth edges. Reject lace that has a rough hairy back as this is inferior quality.
Without taking the wrapper off the hank locate one of the ends of the lace and give it a gentle tug. If you have selected the right end the lace will pull out from the hank in a continuous flow, and the whole hank can be used up without the wrapper being removed.
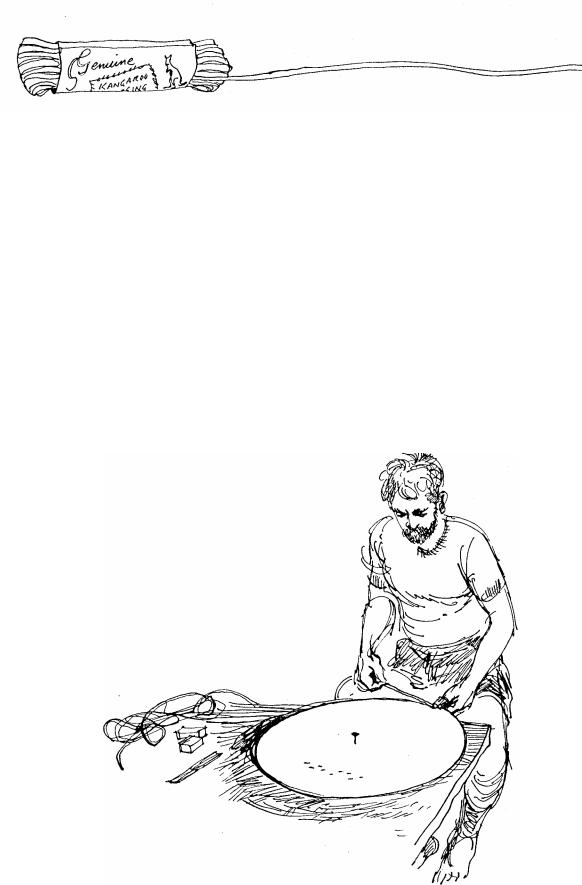
CUTTING LACE BY HAND
In the bush most lace is still cut by hand, often using skins that have been tanned on the property .
The skin is laid on a bench and a circle is drawn on it, using a compass quickly made up with a nail, a piece of string and a pencil. The circle is then cut out.
11
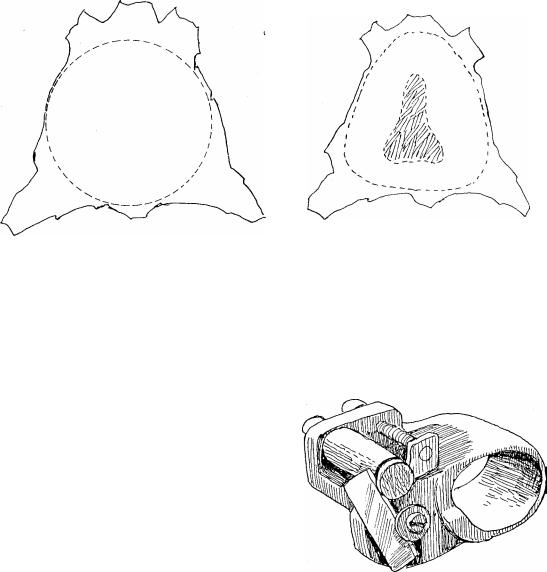
Experience has shown that the circle is the only practical shape from which to cut lace. If for instance a shape is cut such as that shown on the right in order to use up the maximum area of skin, then it will be found that a certain amount of distortion will take place on each revolution of the skin until one is left with a shape something like the shaded area in the centre which is quite impossible to work.
A circle however can be cut until only a coin sized piece remains. The trimmed parts are also not wasted, short lengths of lace can be cut from them, and items
such as watch bands made from the smaller pieces.
The most convenient way to cut lace is with a special lace cutter made for the job. The only good lace cutter that I know of is distributed by stockmens' outfitters, R. M. Williams.
This ingenious small tool is made from iron and fits on the left thumb.
A piece of razor blade is used as a
cutter, and a small screw on the top allows one to adjust the width to be cut, while the roller next to the blade is adjusted according to the thickness of the leather.
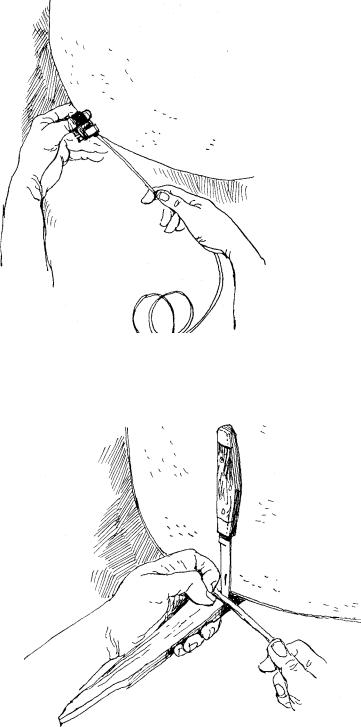
The circle of leather is fixed to the bench with a tack in the centre with the edge overhanging the bench a little on the operator's side. The first couple of centimetres of lace are cut with a knife and fed into the lace cutter.
As the newly cut lace is pulled from the cutter the leather circle revolves rather like a gramophone record. As the circle gets smaller it is necessary to re -position it from time to time.
The sharper the blade the e asier it is to use, and we find it best to change the position of the blade or replace it after each skin.
12
a skin will vary, but we often obtain
100 - 200 metres of 3mm lace from a single hide.
One secret when cutting with this tool is to pull the lace slightly away f r o m t h e c i r c l e , t h i s l e s s e n s t h e chance of the blade running off and cutting uneven widths.
I n t h e o u t b a c k l a c e i s frequently cut entirely by hand or with a simple home made cutting guide. The essentials fo r this work are steady hands and a very sharp knife. I have watched a stockman sitting under a tree during the dinner break spend a full hour putting a good edge on his penknife, and my old ringer mate
'Slippery Sam' Callope would think nothing of spending two hours
to sharpen a round knife.
For cutting lace the knife must be
sharp enough to readily
shave the hairs on the arms, anything less and it is not worth beginning .
THE STABBED BLOCK GUIDE The knife point is driven into a block of wood, the dimensions of the wood are not important, just as long as it can be held in the hand. The thumb nail is pressed on the wood to act as a guide and the first finger curled over to keep the leather flat against the surface o f the wood.
13
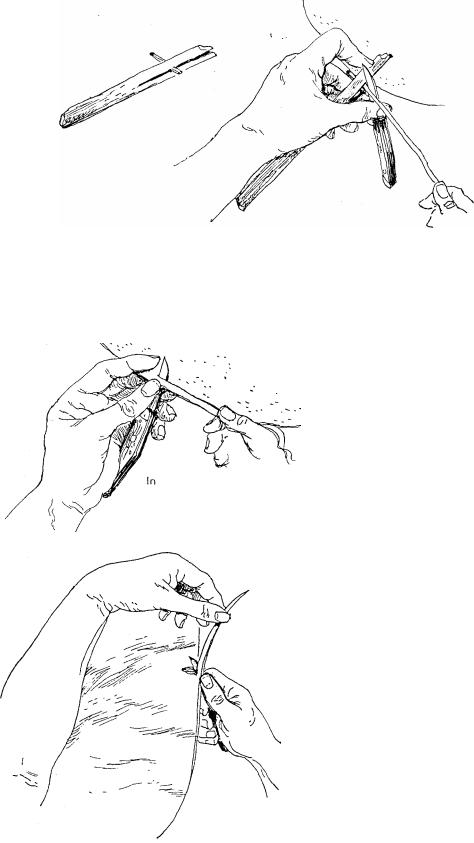
THE SPLIT TWIG GUIDE
A stout twig is split and a matchstick put in to keep the split open. The match is trimmed down to the thickness of the leather to
be used. The knife is held as shown in the sketch, this takes some practise, and the base of the handle is usually kept steady by resting it
on the knee. The lace passes between the blade and the matchstick.
FINGERS ONLY METHOD
Whip makers often trim leather entirely by hand
without any form of guide, and each man evolves his
own style. One man's technique may be of no use to another.
the sketch the inside edge of the thumb nail is being used as the guide
while the first finger sits on top of the leather and holds it in place. The other fingers hold the knife.
In this case the lace is not pulled away from the circle, instead it is held close against it. This is not an
easy style to master.
This is the cutting method shown to me by Lindsay Whiteman of Townsville. Sit down and put the hide on the bench. The thumbnail of the knife hand acts as a gauge while the other hand pulls the lace.
The knife needs to be extremely sharp to use this technique.
1
4
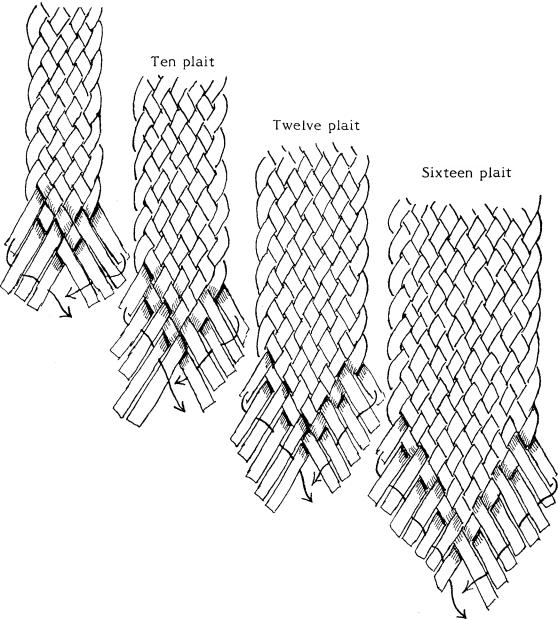
STANDARD FLAT PLAITING TECHNIQUE
Many beginners do not realize that the standard flat plait technique is the same whether it be a 4 plait or a 24 plait. This is illustrated in the sketch which shows the most common plaits used in belts, 8, 10, 12 and 16. Note that each is formed in the same manner.
|
It is best to develop the |
Eight plait |
habit of always beginning on |
|
o ne side - left or right as you |
|
prefer. The main thing is to establish a |
|
regular working pattern. I always begin on |
|
the left. |
|
15 |
Notice that in every case the left hand lace goes under-over- underover and so on until the middle is reached. The right hand lace is then brought across in an over- under-over- under sequence.
LOSING THE SEQUENCE
If a belt has been put aside for some time you will have forgotten which strand is the next to be worked, and this is where the practise of always beginning from the left pays dividends.
Count the strands in each hand, if they are equal then begin by bringing the left strand across. If there are more in the right hand than the left then bring one across from the right.
If there are more in the left hand than the right then you have got out of sequence somewhere. Keep on bringing strands down from the left until you have the same number in each hand. Now begin the sequence by bringing down one from the left and then one from the right.
CALCULATING THE AMOUNT OF
LACE NEEDED
|
There |
are a number of |
|
t h i n g s |
t o |
c o n s i d e r |
w h e n |
calculating the length of lace needed for a belt. Beside the waist measurement there is extra lace needed for fastening on the rings or buckles, and there is also the question of how much length is going to be lost in the actual plaiting.
Also remember that you double your lace, in other words you use 5 strands to make a 10 strand belt.
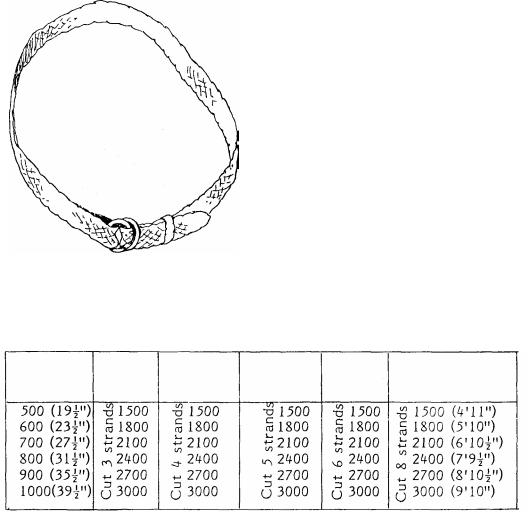
There is a simple method of working out the length of lace needed. Take the person's waist measurement and multiply it by 3. The scale below gives the person's waist measurement , the number of strands to cut and the length of the strands.
Waist |
6 plait |
8 plait |
10 plait 12 plait 16 plait |
measure |
|
|
|
This calculation takes care of the extra lace needed for the three points listed above. Measurements in millimetres.
16

The twin ring belt is a real bushman's belt. Instead of using a buckle it is fastened with a pair of rings, usually brass rings from a bridle.
The first step in making a belt is to calculate the length r e q uired as explained above. Let us suppose that you have measured the waist as one metre and you wish to make an 8 plait belt. To do this you will need 4 lengths of lace each 3 metres long.
|
F o r t h e b e g i n n e r t h e |
|
||||
best plan is to put a nail into t h e |
|
|||||
t o p |
o f a bench or |
table |
and |
|
||
form the point of the belt around |
|
|||||
this. Once you have |
made a few |
|
||||
belts |
you will find t h a t |
t h i s |
i s |
|
||
n o |
l o n g e r |
necessary, |
and |
the |
|
|
point of the b e l t c a n b e f o r m e d |
|
|||||
while holding all the lace |
in |
16 |
||||
the hand. |
|
|
|
|
|
|
|
The |
sketches |
show |
the |
beginning of an 8 plait |
|
belt. To do a 10, 12 or 16 simply add in more strands as desired. The first strand of lace is looped around the nail, making sure that the good side of the leather is facing upwards all the way around. If the leather is very thick it may help to thin it a little just at the point as shown in t he sketch, but this is not generally necessary.
1
9
The other strands are now added in as shown.
17

21
Beginning on the left side at the top turn down all the strands in an underoverunder sequence.
The right side is then turned down in the same way. Now the centre left strand is moved across as shown by the dotted line, then the right side inner strand is brought across as shown in the next drawing.
30
Each strand is brought over in sequence. Once this has been done the w o r k c a n b e r e m o v e d f r o m t h e n a i l a n d carefully pulled firm to make the point of the belt.
18
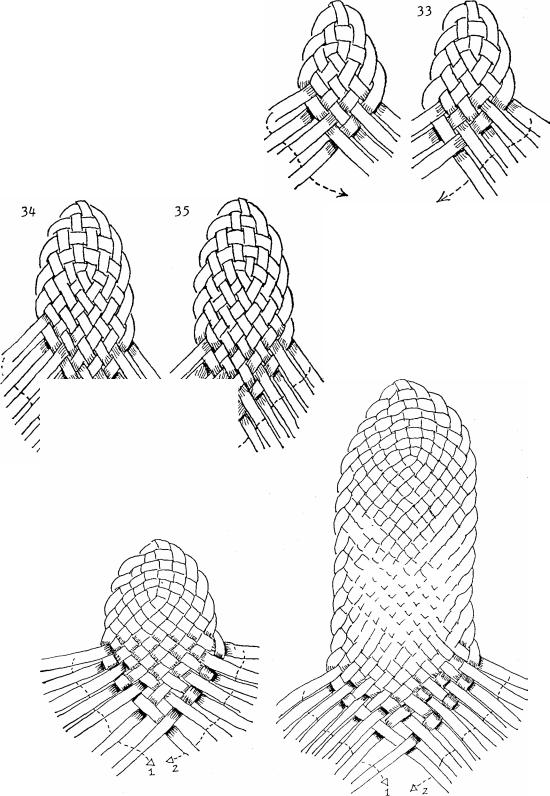
Once |
the point has been |
32 |
shaped the plaiting of the belt |
|
|
can go ahead. Beginning on the |
|
|
l e f t t h e o u t s i d e s t r a n d i s |
|
|
b r o u g h t t o t h e c e n t r e a s |
|
|
indicated by the dotted line. |
|
|
Then the |
right hand outside |
|
s t r a n d i s b r o u g h t t o t h e centre.
Here is a sketch of a 12 s t r a n d p l a i t i n g s e q u e n c e t o show that the same basic steps are followed no matter ho w many strands are used.
FOURTEEN STRANDS
EIGHTEEN STRANDS
19