

PC Recording Studios for Dummies (Jeff Strong)
.pdf282 Part IV: Revving Up the Recording Process
Using a mastering pro
Mastering your music is no mystery, but often the fresh perspective and top-notch gear that a professional mastering engineer has can take your final product from good to truly stellar. If you want to hire a pro to master your music, here are some suggestions that can help the process along:
Ask around for referrals. If you know local bands or musicians whose music you like and whose CDs sound great, ask them who mastered their music. Call local studios and find out whom they recommend for mastering in your area. Also check out resources on the Internet. Two great Internet forums are www.musicplayer.com/cgi-bin/ ultimatebb.cgi and http://rec forums.prosoundweb.com. In a forum, do a search for the term mastering or post a new topic and ask your question. Try to get referrals from people who work with your type of music.
Listen to other recordings that the mastering house has done in a style of music similar to yours. If you’re entrusting your artistic vision to someone else, make sure that this person is the right person for the job. If you like what the prospective mastering engineer has done on other people’s music, you’ll probably like what he or she does with yours. If this person has never worked with music similar to yours — or has mastered someone else’s music but you don’t like the way it came out — you’d probably better keep looking.
Clarify the fee for your project before you actually start working together. Most mastering engineers charge by the hour and can give you a pretty good estimate of how many hours they’ll need to do the job. You’ll also be expected to pay for materials (reference CDs, for example).
Tip: Many mastering engineers will do a demo for you, tooling up one or two songs so you can hear what kind of job they can do for your music before you hire them. Ask whether the mastering engineer you’re interested in offers this service. This simple step can save both you and the engineer a lot of time and energy if he or she isn’t right for the job. It can also help you determine whether your mixed music is ready for mastering — if you need to go back and make adjustments, now’s the time to find out.
After you choose the mastering engineer that you think will work well for you and your music, you can make the process much easier and less stressful (for both you and the engineer) if you follow a few guidelines:
Discuss your expectations and desires.
This is the best way to ensure that your mastered music turns out the way you want. People who are unhappy with the job that the mastering engineer does usually aren’t clear about what they want or don’t understand what is possible in the mastering process.
Take a few CDs whose sound you like with you to the mastering session. Talk with the engineer about how you can get your music to sound similar. A skilled engineer can let you know right away whether the sound you want is possible.
Try to be present at the mastering session.
Many people send their music to a mastering engineer and expect him or her to do the job without their presence in the studio. Try to go to the studio, but if you can’t, be sure that the engineer clearly understands your desires and expectations.
TEAM LinG - Live, Informative, Non-cost and Genuine !

Chapter 14: Mixing and Mastering Your Music 283
Finally, place your audio regions into the tracks in the session:
1.Click and drag the region from the Audio Regions list into the playlist of the track you want the song in.
2.Repeat Step 1 for each of your songs.
You end up with only one song in each of the available tracks.
You now have a session that contains all the songs for your project. Having them all in one session allows you to switch from one song to the next as you master your tunes and makes it easy to check loudness levels and EQ balancing as you work. (See the “Perfecting tonal balance” and “Balancing levels” sections later in this chapter.)
Optimizing dynamics
Okay, this is where the magic in mastering happens. This is where you can make your music shine or where you can royally mess it up. (How’s that for adding a little pressure?) Before you get tense (okay, breathe), remember that you can always go back and try again. Oh, did I mention that you should make backup copies of your individual tracks and your final mix? Well, if you haven’t already done the backing up business, now would be a good time to do that. I’ll wait.
You done? Okay, now to the job at hand — getting your music to be as loud as possible. (I’m just kidding; see the sidebar “Turn it up!” to see why.) Seriously, optimizing the dynamics of your songs doesn’t mean getting it loud enough to level a city block, but rather getting it to have life and emotion. And, yes, this also means getting it to be loud enough to sound good.
The style of your music and the arrangements that you use determine how you optimize the dynamics of your music. For example, classical music has a much broader dynamic range than rock music, and the infamous “wall of sound” type of arrangement (producer Phil Spector’s approach to mixing) has a narrower dynamic range than a song with sparse verses and thicker choruses.
When you’re optimizing the dynamics of your music, be sensitive to the song and try not to get sucked into the idea that you need to get the most volume out of your music. I know I’m beating this volume thing into the ground, but you’d be surprised how seductive the lure of Big Volume can be. (“C’mon, let’s get just a few more decibels out of the song . . .” Trust me, you’ll soon find out.)
You have two main types of tools to use when you work on the dynamics during mastering in your computer — compressor plug-ins and limiter plug-ins — and each has its purpose. For the most part, if you’re trying to
TEAM LinG - Live, Informative, Non-cost and Genuine !
284 Part IV: Revving Up the Recording Process
add punch or smoothness to your music, a compressor plug-in does the job nicely. On the other hand, if you’re trying to squeeze a little more volume out of a song and you don’t want to change the song’s sound quality, a limiter plug-in is your best choice.
Here are suggestions that might help you to use compression and limiting most effectively during mastering:
Use a low ratio. A compression ratio between 1.1:1 and 2:1 keeps you from over-compressing your music. Too high of a ratio increases the chances that you’ll end up with artifacts that will mess with the sound of your pristine music.
Go easy. Apply only 1 or 2dB of compression or limiting at one time. If you need more than that, chain more than one compressor together by inserting more than one compressor plug-in in your track and use these small amounts on each. If you compress or limit more than 1 or 2dB at a time, you end up with artifacts (audible changes to your music caused by the compressor or limiter).
Spend time tweaking. Work with your attack and release times. An attack that’s too short takes the punch out of your music by cutting off the initial transients. Likewise, a release time that’s too long doesn’t recover quickly enough, and the dynamics of the vocal disappear. In contrast, if the release time is too short, you hear distortion.
Make your meters dance. Set the threshold so your compressor’s meters dance (bounce) to the rhythm of the music. The meter you want to watch in your compressor plug-in is the one labeled “reduction” located below the input and output meters. Only the loudest notes (snare drum or lead vocal accents, for example) should trigger the meters — and then only by 1 or 2dB.
Split the frequency spectrum. Use a multiband compressor to apply different amounts of compression to specific frequency ranges to bring out individual instruments in the mix. For example, if the bass drum seems to be getting lost, you can apply mild compression to the lower frequencies (around 80 to 100 Hz). This brings the instrument forward in the mix slightly.
Some audio recording programs, such as Pro Tools LE, come with a multiband compressor plug-in. If you want to use one on your music and your audio recording program doesn’t come with such a plug-in, you’ll need to go the third-party route. A quick search on the Internet for “multiband compressor plug-in” should give you some options.
Lay off. When you’re not sure whether what you’re doing actually sounds better, don’t use the processor. Any dynamics processing is going to affect the quality of your song’s sound to some extent. If adding this processing doesn’t improve the overall sound, you’re better off not using it.
You can find out more about compression and limiting in Chapter 18.
TEAM LinG - Live, Informative, Non-cost and Genuine !

Chapter 14: Mixing and Mastering Your Music 285
Turn it up!
Everyone wants his or her music to be as loud as possible. Louder sounds better. In fact, test after test has shown that when people listen to two versions of a song, they nearly always prefer the louder one (whether or not it actually sounds better).
Musicians, producers, and engineers seem to be in the middle of a competition to see who can make the loudest CD. If you compare a CD made about ten years ago with one made this year, you’ll notice that the newer one is much louder. Give them both a good listen, though. Does the louder one really sound better?
You can test this by setting them both to play at the same volume and switching back and forth. (You need to turn the volume up a bit on the older CD to match the volume of the newer one.)
One way to do this is to record both songs into your audio recording program and set the levels of each so that they’re the same. At the same volume, which song sounds better to you? I’m willing to bet that, nine out of ten times, you’ll prefer the older song. This is because older recordings have more dynamic range than newer ones. The variety is pleasing to listen to, whereas the song with only a small dynamic range quickly becomes tiring.
Do yourself and your listeners a favor and resist the temptation to compress the dynamic variability out of your music. It will be much easier to listen to and have a lot more life and excitement. You can always turn the volume up on your stereo if it’s not loud enough, but you can’t add dynamic range after you’ve squashed it out.
When you’re testing your compressor plug-in or limiter plug-in settings (you do this by comparing the processed and unprocessed versions), be sure to have the volume of both versions exactly the same. Any difference in volume defeats the purpose of a side-by-side comparison because you’re going to think that the louder one sounds better even if it doesn’t. (See the “Turn it up!” sidebar.)
Perfecting tonal balance
The tonal balance of a song is how the various frequencies of the music relate to one another. You’re not concerned with how each individual instrument sounds in the mix (that’s the job for the mixing stage); instead, what you’re looking for is an overall balance of frequencies within the hearing spectrum.
For the most part, a tonal balance consists of an even distribution of frequencies from 20 to 10 kHz with a slight drop-off (1 or 2dB) from 10 to 20 kHz or higher. “That’s great,” you say, “but what does that sound like?” Well, listen to any number of great CDs, and you’ll hear it.
When you master your music, you want to constantly compare what your song sounds like to other CDs whose sound you like. Do this by switching
TEAM LinG - Live, Informative, Non-cost and Genuine !

286 Part IV: Revving Up the Recording Process
between your song and someone else’s while you work. The easiest way to do this is to import the song you want to compare your music to into your audio recording program along with your songs.
When you work on adjusting the overall tonal balance of your songs, listen carefully for any frequencies that seem too loud or too soft. You can find these by listening to particular instruments in the mix or by using the parametric EQ plug-in and sweeping the frequency spectrum. To do this, set your Q fairly wide (0.6, for instance) and move the Gain slider all the way to the right. Start with the lowest frequency and slowly raise the frequency as the song plays by moving the Freq slider from left to right. Adjust any annoying frequencies by cutting them by a couple decibels to see whether your overall mix improves.
As far as general EQ guidelines go, try these suggestions:
If your mix sounds muddy, add high frequencies (above 10 kHz) or cut low ones (200 to 400 Hz). Likewise, if your mix is too bright (common with digital recording), try reducing the frequencies above 10 kHz by using a shelf EQ or a Baxandall curve.
(To use a Baxandall curve, use a parametric EQ and set the threshold at 20 kHz with a Q setting around 1. This gradually cuts frequencies above around 10 kHz. You can adjust the Q to reach as far down as you want.
Your EQ graph shows you what’s happening.)
Use the same EQ adjustments for both the right and left channels because this keeps the stereo balance intact and doesn’t alter the relative phase between the channels. For example, if you add some bass frequencies (100 Hz, for example) to the one channel and not the other, you might hear a wavering or pulsating sound around this frequency go back and forth between the speakers.
If you used a multiband compressor on any specific frequencies, you might need to adjust the EQ for those frequencies; compression tends to mess with frequency response.
If you need to adjust the EQ of certain instruments in the mix (the snare drum is buried, for example), be careful and notice the overall effect of your adjustments on the rest of the mix. If your adjustments aren’t fixing the problem, go back to the mixing process and make your adjustments there. You’ll be glad you took the time to do that.
Any adjustments you make to the EQ during mastering impact more than just those frequencies. Such adjustments alter the entire frequency spectrum — and the relationship between all the instruments. So listen carefully as you make adjustments and back off on the additional EQ if you don’t like what you hear.
TEAM LinG - Live, Informative, Non-cost and Genuine !

Chapter 14: Mixing and Mastering Your Music 287
For more specific information on EQ and inserting EQ in your tracks, go to Chapter 16.
Some people employ some pretty sophisticated technology to check the tonal balance of their songs against that of their favorite CDs. They do this by recording a song into their mastering program and taking a look at its frequency response by using a spectral analyzer. Not all audio recording programs come with a spectral analyzer. For example, Logic comes with one in their Channel EQ plug-in but Pro Tools doesn’t — you need to find a thirdparty plug-in in this case. (Chapter 15 has more about finding third-party plug-ins.) Then do an analysis of your song and compare it to the spectral analysis of a CD you like. This technique seems to work for many people. (Not me — I like using my ears instead — but alas, I’m old-fashioned.)
Balancing levels
For a truly professional-sounding CD, you want all your songs to be at nearly the same relative level so your listeners (I hope you have more than one) don’t have to adjust the volume on their stereos from song to song.
Balancing the levels of your songs to one another is pretty easy. In fact, in most cases, you have very little to do after you EQ and optimize the dynamics of each song. You balance the levels from one song to the next in your audio recording program by putting each track’s fader up to 0dB — this puts them at the level you mixed them to — and then soloing (silencing all other tracks in your song) Track 1 and comparing the level to Track 2 by soloing back and forth.
If you use a mouse to mix, this can be kinda tricky because you can’t press more than one button at a time. The best way I’ve found to deal with this situation — at least the best way in Pro Tools — is to follow these steps:
1.In the Track Controls section of Track 1, click the Solo button to solo the track.
You hear only Track 1 in your monitors.
2.In the Track Controls section of Track 1, click the Mute button so both the Solo and Mute buttons for Track 1 are engaged.
Track 1 is silent.
3.In the Track Controls section of Track 2, quickly click the Solo button.
You now hear Track 2.
TEAM LinG - Live, Informative, Non-cost and Genuine !
288 Part IV: Revving Up the Recording Process
4.To switch back to hearing Track 1, click Track 2’s Solo button (disengage it) and — as quickly as possible — click Track 1’s Mute button (disengaging the Mute button and engaging the Solo button).
You hear Track 1 again.
You get a short bit of silence when following this procedure, but you can still hear the relative volumes of the two.
Do this procedure for each of the tracks (Track 1 to Track 2, Track 2 to Track 3, and so on) until you’ve checked all the tracks in your mastering session.
If you miss one of the buttons while you’re doing this quick-switch procedure, you might end up with both tracks playing at the same time. This will be very loud because the tracks are summed together in the mix bus. To avoid damaging your speakers — and ears — keep your monitoring (speaker) volume down pretty low.
If you notice any differences, just raise (or better yet, lower) the levels until they are all roughly the same. Don’t get too finicky. Some variation from song to song is okay. In fact, minor differences can help to make your CD more interesting to listen to. When you’re balancing levels, just make sure that any differences aren’t enough to make the listener run to his or her stereo to adjust the volume knob. If one or two songs seem much lower in volume than the rest, you might want to go back to the volume-optimizing stage and raise those songs up a bit to make them more consistent with the rest of the songs on the CD. That way you don’t lower the volume of the entire CD because one or two songs are too quiet.
Mastering your mix
When you have all your songs dynamically optimized, EQed, and level-balanced (see the preceding sections) you’re ready to record your final master. This process is essentially the same as making your final mix, so check out the “Making Your Mix” section earlier in this chapter for details on how to do this. You need to do one more thing when mastering, however — this involves getting your songs to the CD format.
Most likely, your session’s songs are recorded at 24 bits, using any number of possible sample rates (44.1, 48, 88.2, or 96 kHz) — and your final master should be 16 bit at 44.1 kHz. Making this change can reduce the sound quality of your music if it’s not done right. This section details how to change the sample rate and bit depth as you create a final master version of your music.
TEAM LinG - Live, Informative, Non-cost and Genuine !

Chapter 14: Mixing and Mastering Your Music 289
Making the most of your bits
Getting your music from 24 bit to 16 bit means dithering or truncating your files. This section explains how these processes differ, and gives you pointers on which one to use so your music sounds as good as possible.
Dithering is the process of adding random noise to your music when 8 bits get cut from your pristine 24-bit files. This random noise helps keep the quiet sections of your song (fade-outs, for instance) from sounding grainy when those 8 bits are removed. Several types of dithering exist — each produces a slightly different result in a piece of music.
The process of dithering is done differently in each audio recording program. For example, in Logic you can choose the Dither option within the Bounce dialog box when you make your bounce. Pro Tools, on the other hand, requires that you use a dithering plug-in and insert it into the master fader for your song. You do this by inserting one of the two dithering plug-ins into one of the inserts in your master fader, and then following the steps for mixing your music (which I detail in the “Making Your Mix” section earlier in this chapter). The dithering happens automatically as your song is mixed (or, in this case, mastered).
Truncation involves simply cutting off the last 8 bits of information. This option works well for material that doesn’t have quiet sections (for example, hard rock with punchy endings that don’t fade out).
To master your music using truncation in Pro Tools, for example, follow the steps in the “Making Your Mix” section earlier in this chapter for mixing your song and choose 16-bit as your Bounce to Disk resolution. This cuts off the last 8 bits without otherwise processing the signal (which makes this process different from dithering).
To dither or not to dither (and which dithering option to use)? That is the question. No universal answer exists. The only way to know which sounds better on your music is to try mastering with dithering and without it (in which case your file is truncated instead). For the most part, songs with quiet passages and fade-outs often sound better if you dither ’em.
Mastering to 16 bits
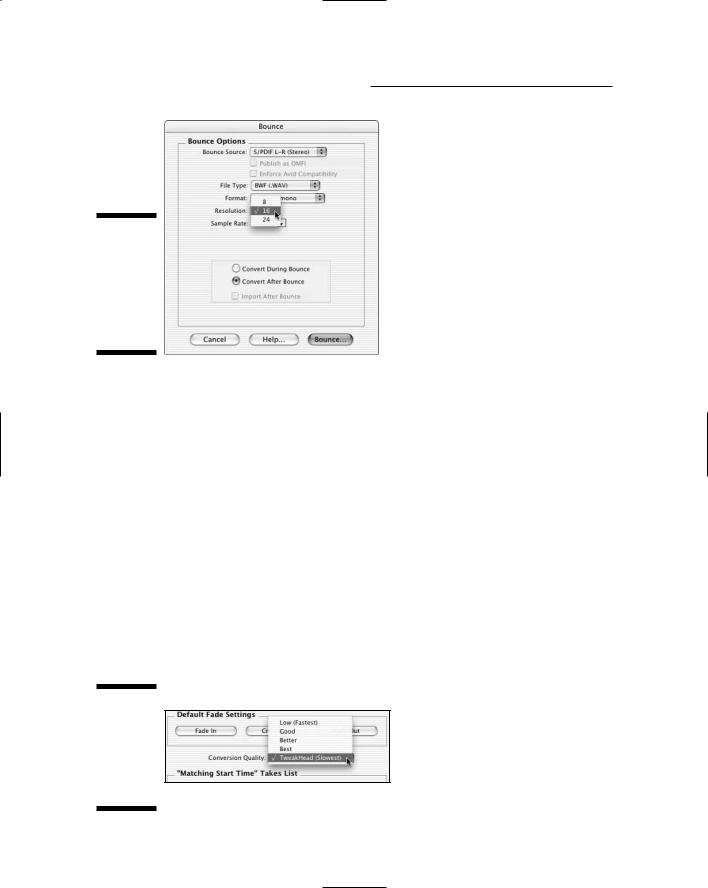
When you master — regardless of whether you’re using the dithering or the truncating approach — make sure you select the 16-bit option under the Resolution drop-down list. (In Pro Tools, for example, it’s located in the Bounce dialog box, as shown in Figure 14-6.) If you have a dithering plug-in inserted into your master fader, your music is dithered while it’s being bounced; if you don’t use a dithering plug-in, your music is truncated.
TEAM LinG - Live, Informative, Non-cost and Genuine !
290 Part IV: Revving Up the Recording Process
Figure 14-6:
Select 16 in the Resolution drop-down list to bounce to 16 bits.
Settling on a sample rate
If you recorded at any sample rate other than 44.1 kHz, you need to do a sample rate conversion (SRC) process. SRC can change the sound of your song (and not for the better). Your best bet when bouncing from one sample rate to another is to set the conversion quality as high as possible if your audio recording program offers you the choice. The following steps show how to do this in Pro Tools:
1.Choose Setups Preferences.
The Preferences dialog box appears.
2.Click the Edit tab of the Preferences dialog box.
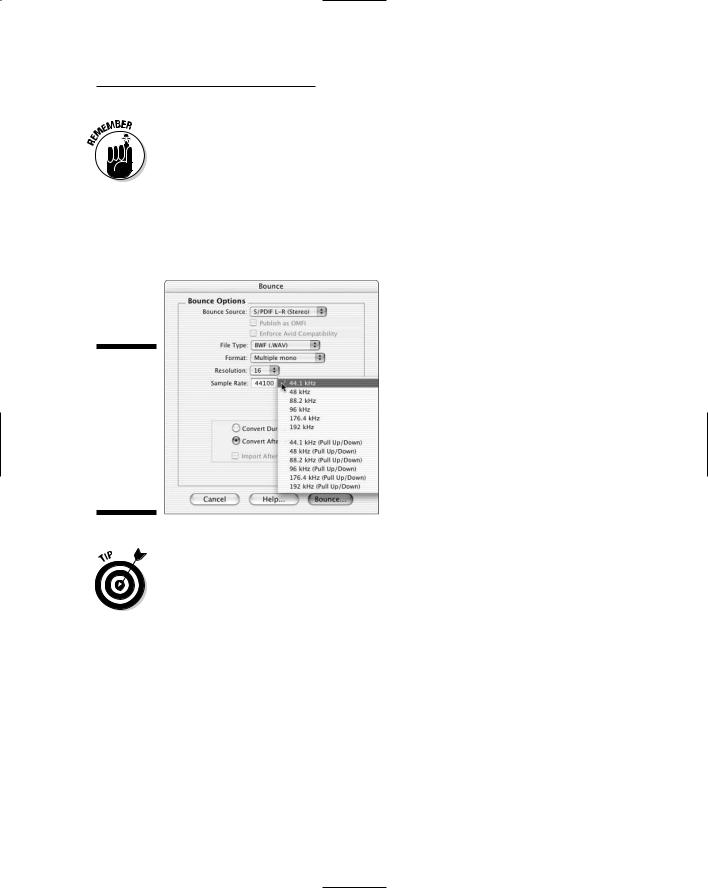
3.Click the Conversion Quality drop-down list in the center of the Edit tab, as shown in Figure 14-7, and select TweakHead if you want the highest quality possible.
It takes a while to process (go get a cup of coffee or read your favorite gear magazine while you wait), but I think it’s worth it.
Figure 14-7:
You can select the quality of your sample rate conversion.
TEAM LinG - Live, Informative, Non-cost and Genuine !
Chapter 14: Mixing and Mastering Your Music 291
You have several options for sample rate conversion quality. Don’t take my anal-retentive word for which works best for your music. Do some experimenting on your own. One of the lower-quality conversion settings might work just fine (and you won’t have to wait so long while your song is being processed).
When you actually bounce your song to disk, you need to choose 44.1 kHz from the Sample Rate drop-down list. In Pro Tools, it’s located in the center of the Bounce dialog box, as shown in Figure 14-8.
Figure 14-8:
You select your final sample rate from the Sample Rate dropdown list in the Bounce dialog box.
I might sound a bit old-fashioned here, but I’m a big fan of recording all my music to 44.1 kHz so I don’t have to do a sample rate conversion when I master my music (assuming I’m mastering for CD release). To my ears, the loss in quality is significant. The only time I ever record at a higher rate is if I know I’ll be sending my music to be mastered by a professional. Most topnotch mastering houses have top-notch sample rate conversion gear.
Burning Your CD Master
When you have your mastered mixes all done (see the mastering sections earlier in this chapter), your last step in the process is burning all your songs on a CD so that you can make the number of copies that you need. This process involves sequencing your songs and burning them onto a blank CD in the proper format. The following sections show you the way.
TEAM LinG - Live, Informative, Non-cost and Genuine !