

PC Recording Studios for Dummies (Jeff Strong)
.pdf342 Part V: Playing with Plug-Ins
record drums. You can set the gate to filter any sound (other drums, for instance) except for the sounds resulting from the hits to the particular drum that you have miked.
Getting to know gate parameters
Almost all gates use the same basic controls. Figure 18-4 shows the gate plugin that you get when you buy Pro Tools. As you can see, the various settings that you get to play with are similar to the ones for compressors and limiters. Insert a gate into a track by following the procedures in the “Connecting Dynamics Processors” section at the beginning of this chapter and then play around with the following parameters:
Figure 18-4:
The gate plug-in lets you filter out noise below a certain level.
Threshold: The Threshold slider sets the level (in decibels) at which the gate opens (stops filtering the signal). The gate allows all signals above the Threshold setting to pass through unaffected, whereas any signals below the Threshold setting are reduced by the amount set by the Range control.
Attack: Like with the compressor and limiter, the Attack slider sets the rate at which the gate opens (in milliseconds). Fast attacks work well for instruments with, well, fast attacks, such as drums, whereas slow attacks are better suited for instruments with slow attacks, like vocals.
For the most part, try to match the speed of the gate’s Attack setting with the attack speed of the instrument that you’re gating. If you don’t do this well, you might hear a click when the signal crosses the gate’s threshold. This generally happens because the attack is set too slow for the instrument. Adjust the attack until this click goes away.
Hold: The Hold setting controls the amount of time that the gate stays open after the signal drops below the threshold. When the hold time is reached, the gate closes abruptly. This parameter is listed in milliseconds
TEAM LinG - Live, Informative, Non-cost and Genuine !

Chapter 18: Digging into Dynamics Processors 343
(ms). The Hold parameter allows you to get the gated drum sound that was so popular in the 1980s. (Phil Collins, anyone?)
Decay: The Decay setting dictates the rate at which the gate closes after the signal hits the threshold (listed in milliseconds). Unlike the Hold feature, the Decay setting doesn’t close abruptly; rather, it slowly (according to the Decay setting) closes, which produces a more natural sound. You want to try to set the release time so that it matches the natural decay time of the instrument. Otherwise you can get a clipped-off sound. (If you want the clipped-off sound, use the Hold feature.)
Range: The Range setting is similar to the Ratio setting on the compressor except that you choose the decibels amount by which the gate attenuates (reduces) the signal. For example, a setting of 40dB drops any signal below the Threshold setting by 40dB.
Getting started using gates
Noise gates can be extremely useful for getting rid of unwanted noise. The most common use for a gate is to eliminate bleeding from drum mics. For example, you might get bleed from your snare drum into your tom-toms mics. When using noise gates, keep the following in mind:
When the threshold is reached, the gate allows the signal through. If your background noise level is high enough, when the gate opens you still hear not only the intended sound but the background noise as well. This can be a problem if you’re using gates to eliminate the noise of your hard drive fan or other room noise. Your best bet is to use acoustic panels (rather than gates) to eliminate the noise.
When gating drums, be sure to set the attack very fast. Otherwise, the initial transient is lost, and you end up with mushy-sounding drums.
When setting the release time of the gate, adjust it until it sounds natural and doesn’t clip off the end of your instrument’s sound.
Set the range just high enough to mask any unwanted noise. If you set it too high, the sound becomes unnatural because the natural resonance of the instrument is filtered out.
Examining the Expander
The expander is the gate’s diminutive cousin — instead of reducing the volume of notes below the set threshold by a specified amount, the expander reduces them by a ratio. In other words, with the gate, you set a certain decibel amount by which a signal is reduced, and with the expander, you reduce the signal by setting a ratio. The ratio changes the signal gradually, making the affected signals sound more natural.
TEAM LinG - Live, Informative, Non-cost and Genuine !
344 Part V: Playing with Plug-Ins
You use an expander when you want to subtly reduce noise from a track rather than just filtering it out completely. A classic example is when you deal with breath from a singer. If you use a gate, you get an unnatural-sounding track because the breaths are filtered out completely. With the expander, you can set it to reduce the breath just enough so that it’s less noticeable, but you can leave a little of the sound in to make the singer sound normal. (I mean, everyone has to breathe, right?) This is such a common use of an expander that I explain this process in detail in the “Getting started using an expander” section later in this chapter.
Playing with expander parameters
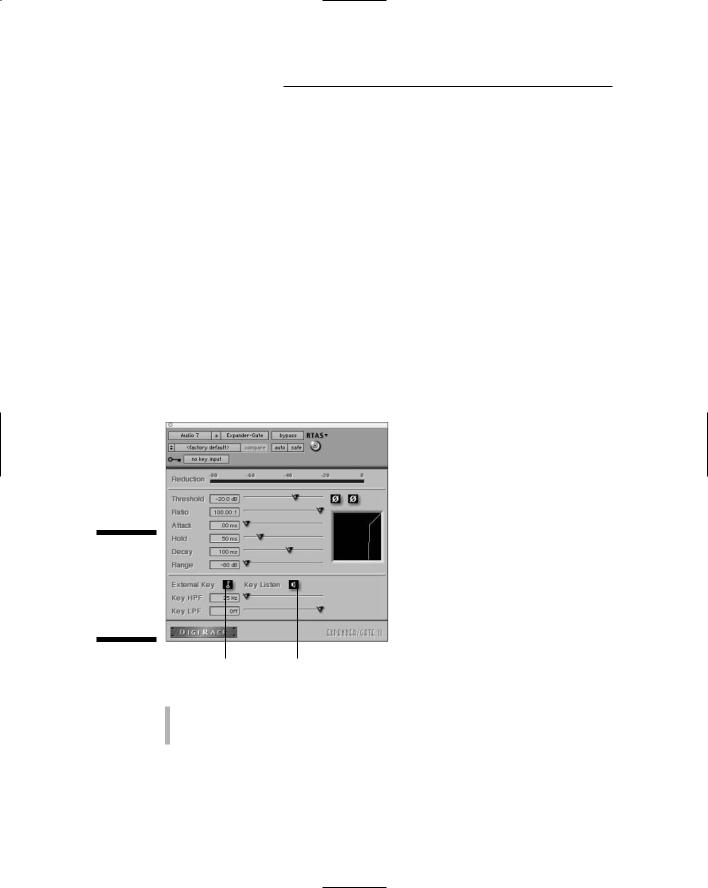
Given that Expander plug-ins usually contain similar parameters, the Expander plug-in shown in Figure 18-5 should give you a good sense of what such a plugin looks like. (If you guessed that this expander is part of the Pro Tools package, you guessed right.) You can see pretty much the same basic controls as you find on the compressors, limiter, and gates. They are as follows:
Figure 18-5:
The expander has several parameters to set.
External Key button |
Key Listen button |
Threshold: The Threshold setting in an expander works the same way as with the gate — anything below the threshold is affected, and any signal above the threshold passes through unaffected.
TEAM LinG - Live, Informative, Non-cost and Genuine !
Chapter 18: Digging into Dynamics Processors 345
Ratio: The ratio dictates how much the signal is attenuated by the expander. When using a ratio of 2:1, for instance, the expander reduces any signal below the threshold by two times. In this case, a signal that is 10dB below the threshold is reduced to 20dB below it; likewise, a signal that’s 2dB below the threshold is reduced to 4dB below it.
Attack: As with the compressor and limiter, the Attack slider sets the rate at which the expander opens (in milliseconds). Fast attacks work well for instruments with fast attacks, such as an acoustic piano, whereas slow attacks are better suited for instruments with slow attacks, such as a bass guitar.
Hold: The Hold setting controls the amount of time that the expander stays open after the signal drops below the threshold. The hold time is listed in milliseconds (ms).
Decay: The Decay setting dictates the rate at which the expander closes after the signal hits the threshold (listed in milliseconds). Unlike the Hold feature, the Decay setting doesn’t close abruptly; rather it slowly (according to the Decay setting) closes. This produces a more natural sound. I recommend setting the release time so that it matches the natural decay time of your instrument.
Range: The Range setting is similar to the Ratio setting on the compressor except that you choose the decibel amount by which you want the expander to be attenuate (reduce) the signal. For example, a setting of 30dB drops any signal below the threshold setting by 30dB.
You also have two settings that you can make if you use an external key to trigger the expander. (I discuss external keys in the “Signing On to Side-Chains” section at the end of this chapter.) These settings include
Key HPF (High-Pass Filter): This setting allows you to choose the lowest frequency that can affect the expander. Setting this parameter at 50 Hz, for example, keeps any frequencies lower than that from triggering the expander.
Key LPF (Low-Pass Filter): This setting lets you determine the highest frequency that can trigger the expander when you use a key input to trigger the expander.
Getting started using an expander
Because the expander works much like a gate, you can use the same basic starting points. Choose between a gate or an expander based on the type of overall attenuation that you want of the signal. For example, the expander is
TEAM LinG - Live, Informative, Non-cost and Genuine !

346 Part V: Playing with Plug-Ins
a good choice if you have an instrument that contains sounds that are too loud but you don’t want to get rid of them completely — you just want to reduce them a little.
Adjusting for a vocalist’s breath is the perfect situation for using an expander rather than a gate. In this case, you can set the expander’s threshold just below the singer’s softest note and start with a low ratio (1.5:1 or 2:1, for instance). See whether the breathiness improves, and if it doesn’t, slowly move the Ratio slider until you get the effect that you want. Be careful not to overdo it, though. If the breath is too quiet compared to the vocal, the vocal sounds unnatural.
If you use a high ratio in your expander (6:1 or above), the effect that you get is similar in sound to the gate, but you end up having less control over the sound because you don’t have the Hold or Release settings to adjust. So if you find yourself using a high ratio on a signal, a gate might be a better choice for that situation.
Signing On to Side-Chains
A side-chain is a mixing technique where you trigger your dynamics processor with another device such as an EQ. Using a side-chain means that the signal from another track (through one of the buses) or from one of your interface inputs triggers your dynamics processor into action. The signal that you choose to do the triggering is called the key input in Pro Tools and a sidechain in Logic.
Side-chains are great for de-essing (getting rid of “s” sounds) a vocal track, making tracks fit together better in a dense mix, or letting a kick drum be heard when it plays at the same time as the bass guitar. Not sure how to do this? Don’t worry; I provide some examples later in this section.
Setting up a side-chain
Setting up a side-chain in an audio recording program involves some simple steps. To illustrate, here’s how you do it in Pro Tools:
1.Using the Key Input pop-up menu (click the drop-down list located next to the little Key icon at the top of the Plug-In window to get there), choose the interface input or bus that has the signal that you want to use to trigger the dynamics processor.
This step routes the signal from that input or bus to the processor.
TEAM LinG - Live, Informative, Non-cost and Genuine !

Chapter 18: Digging into Dynamics Processors 347
2.Click the External Key button to engage the side-chain.
The External Key button is located near the bottom-left corner of the various plug-in windows. (Refer to Figure 18-5.)
3.Click the Key Listen button — located to the right of the External Key button — to hear the signal coming through your selected key input.
The side-chain is now happily set up and minding its side-chain business.
4.Play your session and adjust the processor’s parameters until you get the sound that you want.
A couple common side-chains
The uses for side-chains are numerous, and only your creativity limits how you end up using your side-chain. In the following two step lists, I give just a couple examples of using a side-chain.
The most common use for side-chains is to create more room for your instruments in the mix. You do this by EQing (see Chapter 16) the Key Input signal and letting that EQed signal trigger a compressor or limiter. To make room for a vocal in a dense mix, follow these steps (when you use Pro Tools):
1.Route all your instruments in the mix (except the vocal) to Bus 15 and 16.
2.Insert the Compressor plug-in in this bus and set the Key Input to Bus 14.
3.Make a copy of your vocal tracks and assign their outputs to Bus 14.
4.Shift the copied vocal tracks ahead (to the right) a few milliseconds.
For example, in Pro Tools, you do this by choosing the Slip edit mode from the upper-left corner of the Edit window. Then you click and drag the audio region in your track.
5.Adjust the settings on the compressor so that the volume of the instruments drops slightly whenever the vocals come in.
You can also use a special trick to make the bass guitar drop slightly in the mix whenever the kick drum is played. This helps you hear the kick drum when the bass guitar and kick drum occupy the same basic frequencies. Follow these steps:
1.Insert the compressor plug-in into the bass guitar track and set the Key Input to Bus 16.
TEAM LinG - Live, Informative, Non-cost and Genuine !

348 Part V: Playing with Plug-Ins
2.Make a copy of the kick drum track and set the output for the copied track to Bus 16.
The kick drum signal will trigger the compressor that’s assigned to the bass guitar track.
3.Use fast Attack and Release settings on the compressor.
You want the compressor to activate only when the initial strike of the kick drum happens. The bass guitar drops in volume when the kick drum plays. This means that the kick drum creates the attack, and the bass guitar produces the sustain.
This trick works really well for music that has a kick drum and bass guitar that play similar patterns.
TEAM LinG - Live, Informative, Non-cost and Genuine !
Part VI
The Part of Tens
TEAM LinG - Live, Informative, Non-cost and Genuine !

In this part . . .
Part VI contains some chapters to help you add to your knowledge-base (and hard drive). Chapter 19 contains
ten terrific tips to help you improve the performance of your system and keep it running smoothly. Chapter 20 has a handful of great Internet resources that can help you discover new techniques and tools. Chapter 21 finishes this book off with a awesome list of free (or really cheap) software that can add to your music without subtracting from your bank account (too much anyway).
TEAM LinG - Live, Informative, Non-cost and Genuine !
Chapter 19
Ten Tips for Improving the Performance of Your System
In This Chapter
Speeding up your system
Working effectively in your audio programs
Computer-based recording systems can be finicky. If you’re not diligent about taking some basic precautions, your system will get sluggish and
eventually become unstable. This gradual slow-down doesn’t have to happen, however. With some simple housekeeping tasks and system tweaks, you can keep your computer running without a hitch. (Okay, so it actually runs without as many hitches as you might otherwise encounter — how’s that for a disclaimer?)
This chapter contains ten simple tasks that you can do to make and keep your system running as smoothly as possible, regardless of the platform — Mac or Windows — that you use.
Keep Your Drives Clean
Hard drives can get sluggish after you’ve recorded heaps of data on them, erased some of it, edited still other parts, and recorded more. Over time, as you write and rewrite, your system writes the new data on the drive inefficiently, and your system might slow down a bit, or you might experience audio problems such as dropouts, clicks, or pops.
The best and easiest solution is to occasionally wipe your drives clean. You can do this in several ways. Here’s one:
1.Back up all your files.
You should be doing this regularly anyway.
TEAM LinG - Live, Informative, Non-cost and Genuine !