

PC Recording Studios for Dummies (Jeff Strong)
.pdf182 Part IV: Revving Up the Recording Process
You have a lot of options for miking vocals. The type of mic that you use dictates where you place it. The following bullet list gives you the gist. (Need a refresher on the different types of mics out there? Check out Chapter 4.)
Dynamic mic: Dynamic mics sound best when you place them close to the singer’s mouth. The effect that you get is gritty. (Huh? Okay, by gritty, I mean dirty. That’s no help either? Let me see. . . .)
Dynamic mics produce a midrange-dominated sound because the high frequencies aren’t reproduced well. When a singer sings with the mic right in front of his or her mouth, the sound has even fewer high frequencies due to the proximity effect — the close range enhances the low-frequency response. What you get is a deep, bass-heavy sound that’s often described as gritty or dirty. This type of sound can be great for matching the mood of some styles of rock and blues music.
Large-diaphragm condenser mic: Large-diaphragm condenser mics are those most commonly used for vocals. These mics can clearly reproduce the entire audible frequency spectrum, emphasizing the low mids slightly at the same time. What you get is a nice, warm, full-bodied sound (that sounds like I’m describing a wine). The proximity effect (how close the singer is to the mic) determines how nice and warm-bodied the sound is. The closer the singer is, the deeper and richer the tone can be.
When you set up a large-diaphragm condenser mic for vocals, place the mic in such a way that the spiteful sibilants (the sound from singing s and t sounds) and pesky plosives (the pops from singing p syllables) don’t mess up your recordings. To deal with plosives and sibilants, you can use a pop filter (a screen that reduces the impact of sibilants and plosives going to your mic) or have the singer sing past the mic instead of right into it. If you want the singer to sing past the mic, you can
•Place the mic above the singer and set it at an angle pointing away from him or her (Figure 9-2, left).
•Put the mic off to the side and face it toward the singer (Figure 9-2, center), but not squarely in the path of the vocal.
•Set up the mic below the singer and angle it away from him or her (Figure 9-2, right).
Figure 9-2: |
Place the |
mic at |
different |
angles to |
control |
sibilance |
and plosives. |
mic
Singer
TEAM LinG - Live, Informative, Non-cost and Genuine !

Chapter 9: Getting a Great Source Sound 183
Small-diaphragm condenser mic: Small-diaphragm condenser mics create a much brighter, airier sound than their large-diaphragm cousins. You don’t get the low-mid warmth of the large-diaphragm beast, so the small-diaphragm mic probably won’t be your first choice as a vocal mic — unless (for example) you’re recording a female vocalist with a soprano voice and you want to catch the more ethereal quality of her higher frequencies.
Ribbon mic: The ribbon mic is a good choice if you’re looking for an intimate, crooner-type sound. (Think Frank Sinatra.) The ribbon mic is thought to add a silky sound to the singer’s voice — produced by a slight drop-off in the high frequencies (which aren’t as severe as you’d get from a dynamic mic). To my drum-abused ears, ribbon mics have a kind of softness that large-diaphragm condenser mics don’t have. The sound is more even, without the pronounced low-mid effect.
Electric guitar
Miking your electric guitar is a personal thing. Every guitar player, it seems to me (although I don’t play guitar, so what do I know?), spends an awful lot of time getting his or her “sound.” If you’re a real guitar player, you undoubtedly take great pride in getting your sound exactly right on tape, er, disc. You likely spend countless hours tweaking your amp and adjusting the mic to get it just right. On the other hand, if you’re not a (harrumph) real guitar player, you might just want to record the part and get it over with. Either way, you can start looking for that perfect guitar sound by placing your mics in one (or more) of the ways that I outline later in this chapter.
The actual type of mic you choose depends largely on the type of sound you’re looking for. For example, if you’re looking for a distorted rock guitar sound with effects, you can get by just fine with a dynamic mic. If you favor a clean sound, a small-diaphragm condenser mic might work better for you. If you’re going for a warm, full-bodied sound, try using a large-diaphragm condenser mic.
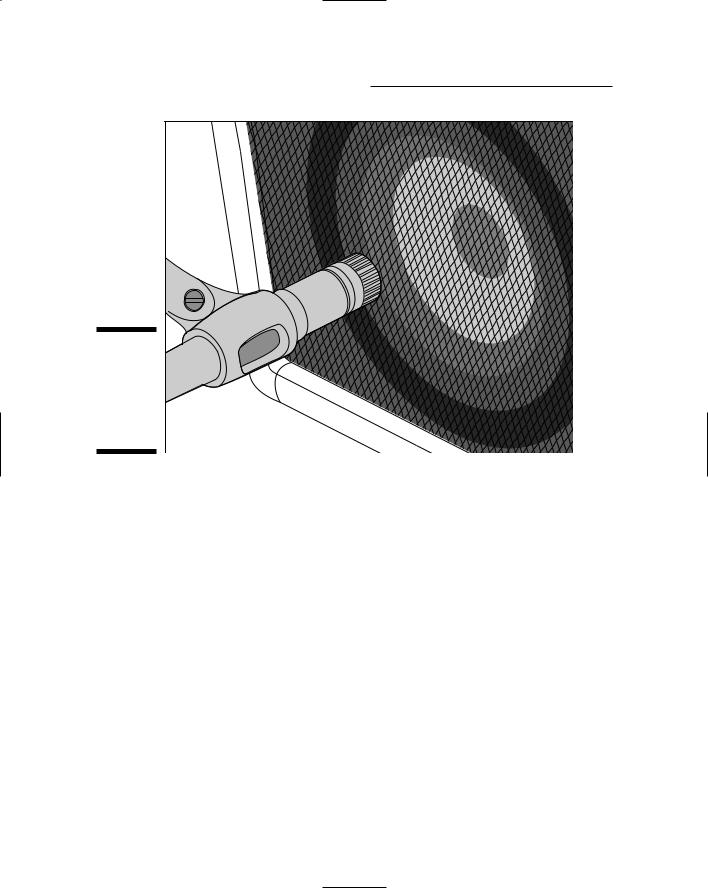
No matter which type of mic you use, you get the best sound from your amp speakers by putting the mic about 2 to 12 inches away from the cabinet, pointing the mic directly at the cone of one of the amp speakers (specifically, the center of the speaker, which is that cone-shaped thing in the box). You can see this positioning in Figure 9-3.
If you can’t quite get the sound that you want from your amp with the one mic pointed at the speaker cone, try adding a second mic about 3 or 4 feet away — also pointed directly at the speaker cone — to get a more ambient sound. This arrangement might also give your sound more life, especially if you have a room with natural reverberation.
TEAM LinG - Live, Informative, Non-cost and Genuine !
184 Part IV: Revving Up the Recording Process
Figure 9-3:
Start by placing a mic near the cone of a speaker in your amp.
Electric bass
When you mic an electric bass, getting a good sound can be a real bear. Your two adversaries are muddiness (lack of definition) and thinness (a pronounced midrange tone). These seem almost polar-opposite characteristics, but they can both exist at the same time. Don’t be afraid to be creative. Try recording your bass in different rooms or with different mic combinations. Look for a room with a warm sound to it.
Because the bass guitar produces low frequencies, a dynamic mic or a largediaphragm condenser mic works well. I personally avoid small-diaphragm condensers and ribbon mics for the electric bass, but try them if you want. Who knows — you might end up with an awesome bass track.
Mic placement for the electric bass is similar to the guitar; you place a single mic 2 to 12 inches away from one of the speakers. Sometimes, with bass, you can angle the mic and let the speaker’s sound kind of drift past the diaphragm. Potentially it’s a great sound. For a bass, skip the distant mic (which generally just adds muddiness to the sound).
TEAM LinG - Live, Informative, Non-cost and Genuine !

Chapter 9: Getting a Great Source Sound 185
Acoustic guitars and such
At the risk of offending banjo, dobro, or ukulele players, I’m lumping all guitar-like (strummed or picked) acoustic string instruments together. I know, they all sound and play differently, but the microphone-placement techniques are similar for all these instruments. Allow me to explain.
Because all these instruments have a resonating chamber and are played with the instrument facing forward, you can pretty much use the same mic placement for any of them. You use different types of mics for different instruments, and I get to that in a minute.
I prefer to use condenser mics when recording acoustic instruments. The type of condenser mic you use depends on the overall tonal quality that you want to capture or emphasize. For example, if a guitar has a nice woody sound that you want to bring out in the recording, a large-diaphragm condenser mic is a good choice. On the other hand, if you’re trying to capture the brightness of a banjo, a small-diaphragm mic is a better choice.
You can position your microphone in a variety of ways, and each accents certain aspects of the instrument’s sound. Even a slight adjustment to the mic can have a significant impact on the sound. You might have to experiment quite a bit to figure out exactly where to put a mic.
To help with your experimentation, listen to the guitar carefully and move the mic around (closer in and farther out, to the left and right) until you find a spot that sounds particularly good. You need to get your ears close to the guitar to do this. After some experimenting — and a great deal of patience — you should be able to get the sound you want.
Drum set
If you’re like most musicians, getting great-sounding drums seems like one of the world’s great mysteries. (You know, along the lines of how the pyramids were built or how to cure noise hangover.) You can hear big, fat drums on great albums, but when you try to record your drums, they always end up sounding more like cardboard boxes than drums. Fret not (hey, at least I don’t say that in the guitar section), for I have solutions for you.
First things first: Tuning your drums
The single most important part of getting killer drum sounds is to make sure your drums are tuned properly and that they have good heads on them (okay, that’s two things). Seriously, if you spend some time getting the drums
TEAM LinG - Live, Informative, Non-cost and Genuine !

186 Part IV: Revving Up the Recording Process
to sound good in your room, you’re already halfway to the drum sound of your dreams. There isn’t space to go into detail here (especially if you play a large kit), but if you want specific drum-tuning guidance, you can do a search on the Internet or (ahem) check out a copy of my book, Drums For Dummies (Wiley Publishing, Inc.).
When the tuning of your drums is perfect, you’re ready to start placing some microphones. You can choose from an unlimited number of miking configurations, only a few of which I can cover here. (It would take a whole book to cover them all.)
The room and the drums
The room influences the sound of the drums more than it influences that of other instruments. If you’re looking for a big drum sound, you need a fairly live room (one with lots of reflection).
I know you’re thinking, “But all I have to work with is a bedroom for a studio, and it’s carpeted.” No worries — you can work with that. Remember, if you have a home studio, potentially you have your whole home to work with. Here are a couple ideas to spark your imagination:
Buy three or four 4-x-10-foot sheets of plywood and lean them up against the walls of your room. Also place one on the floor just in front of the kick drum. This adds some reflective surfaces to the room.
Put the drums in your garage (or living room, or any other room with a reverberating sound) and run long mic cords to your mixer. If you have a laptop-based system, you can just throw it under your arm and move everything into your garage or, better yet, take all this stuff to a room with great acoustics and record.
Set up your drums in a great recording room and place an additional mic just outside the door to catch some additional ambient sound. You can then mix this in with the other drum tracks to add a different quality of reverberation to the drums.
Kick (bass) drum
The mic of choice for most recording engineers when recording a kick drum is a dynamic mic. In fact, you can find some large-diaphragm dynamic mics specifically designed to record kick drums.
No matter where you place the mic, you can reduce the amount of boominess that you get from the drum by placing a pillow or blanket inside the drum. Some people choose to let the pillow or blanket touch the inside head. I prefer to keep it a couple inches away from the inside head, but sometimes it’s okay to let it touch the outside head.
TEAM LinG - Live, Informative, Non-cost and Genuine !

Chapter 9: Getting a Great Source Sound 187
That said, you can place your mic in several ways:
Near the inside head: This produces a sharper sound with more of the instrument’s initial attack.
Halfway inside the drum. This works if you have just one head on your drum and you want less attack and more of the body of the drum’s sound.
Near the outside head: This is preferable if you have both heads on your drum and you want a full-bodied sound.
Try all three ways and see what fits best with the kind of musical mood you want to call up.
Snare drum considerations
The snare drum is probably the most important drum in popular music. The bass guitar can cover the kick drum’s rhythm, and the rest of the drums aren’t part of the main groove. A good, punchy snare drum can make a track, whereas a weak, thin one can eliminate the drive that most popular music needs.
Because the snare drum is located so close to the other drums (especially the hi-hats), a cardioid pattern mic is a must. The most common mic for a snare drum is the trusty Shure SM57. The mic is generally placed between the hi-hats and the small tom-tom about 1 or 2 inches from the snare drum head. Point the diaphragm directly at the head. You might need to make some minor adjustments to eliminate any bleed (sound) from the hi-hats. This position gives you a nice punchy sound.
If you want a crisper tone, you can add a second mic under the drum. Place this mic about 1 or 2 inches from the head with the diaphragm pointing at the snares. Make minor adjustments to minimize any leakage from the hi-hats.
Tom-toms
The tom-toms sound best when you use a dynamic mic. For the mounted toms (the ones above the kick drum), you can use one or two mics. If you use one mic, place it between the two drums about 4 to 6 inches away from the heads. If you use two mics, place one above each drum about 1 to 3 inches above the head.
If you want a boomy sound with less attack, you can place a mic inside the shell with the bottom head off the drum.
Floor toms are miked the same way as the mounted tom-toms:
Place a single mic a couple inches away from the head near the rim.
If you have more than one floor tom, you can place one mic between them or mic them individually.
TEAM LinG - Live, Informative, Non-cost and Genuine !

188 Part IV: Revving Up the Recording Process
Hi-hats
The hi-hats are generally part of the main groove — as such, they’re important enough that you want to spend some time getting a good sound. You’ll probably have problems with a few other mics on the drum set picking up the hi-hats, particularly the snare drum mic and overhead mics. (Some people don’t even bother miking the hi-hats for this reason.)
You can use either a dynamic mic or, better yet, a small-diaphragm condenser mic for the hi-hats. The dynamic mic gives you a trashier sound, and the small-diaphragm condenser mic produces a bright sound. Place the mic about 3 to 4 inches above the hi-hats and point it down. The exact placement of the mic is less important than the placement of the other instrument mics because of the hi-hats’ tone. Just make sure your mic isn’t so close that you hit it instead of the cymbal.
Cymbals
Small-diaphragm condenser mics capture the cymbals’ high frequencies well. You can mic the cymbals by placing mics about 6 inches above each cymbal or by using overhead mics set 1 to 3 feet above the cymbals. (See the next section for more on mic placement.)
The whole kit
Most of the time, you want to have at least one (but preferably two) ambient mics on the drums — if for no other reason than to pick up the cymbals. These (assuming you use two mics) are called overhead mics, and (as the name implies) you place them above the drum set (usually by means of a boom stand). The most common types of mics to use for overheads are largeand small-diaphragm condenser mics because they pick up the high frequencies in the cymbals and give the drum set’s sound a nice sheen (brightness).
To mic the drum set with overhead mics, do one of the following:
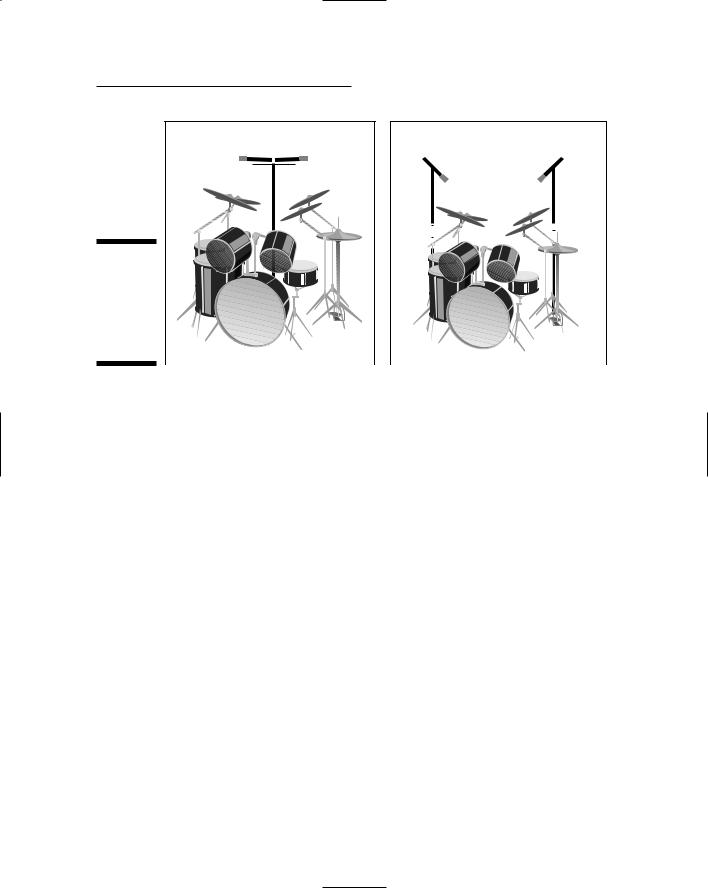
Use X-Y mics. Place two mics right next to each other so that the diaphragms are at almost right angles about 2 feet above the drummer’s head.
Use a spaced pair. Place the two mics so that they’re 3 feet apart (if 1 foot above the cymbals) or 6 feet apart (if 2 feet above the cym-
bals). Point the spaced mics down toward the drums, and you’re ready to record.
Figure 9-4 shows both of these setups.
TEAM LinG - Live, Informative, Non-cost and Genuine !
Chapter 9: Getting a Great Source Sound 189
X-Ymics 1-2 feet above cymbals
Figure 9-4:
Overhead mics capture the cymbals and the drums.
Spaced mics 1-2 feet above cymbals and 3-6 feet apart
TEAM LinG - Live, Informative, Non-cost and Genuine !

190 Part IV: Revving Up the Recording Process
TEAM LinG - Live, Informative, Non-cost and Genuine !

Chapter 10
Recording and Editing Audio
In This Chapter
Setting up a song to record
Recording your first track
Adding more tracks to your song
Editing your takes
I’m sure you remember how to record to a regular tape deck: Turn it on, plug everything in, and click the Record button. One of the problems with
computer-based recording is that nothing is as simple as recording to a tape deck. (Of course, the advantages far outweigh the disadvantages here.) For many musicians (and I don’t necessarily mean you) the added complexity of recording to a computer can end up pushing the limits of what they feel comfortable doing when trying to get their ideas down on tape (oops, I mean disc).
What could be a problem for others isn’t going to be problem for you for one simple reason — you have this book (and this chapter, in particular) to help you out. In this chapter, I walk you through the process of getting a song up and going in your audio program and I help you perform the necessary steps to turn your ideas into finely shaped bits of digital information.
Each recording program has its own way of working, and each has its own set of quirks and features. Because I can’t possibly detail how to carry out every task possible in each program on the market, I concentrate on Logic and Pro Tools, two popular programs that put their own distinctive spin on the recording and editing processes. The examples I use should give you a general idea of the range of approaches out there when it comes to using recording software. You still might find that the program you use requires a look-see into the manual for specifics.
TEAM LinG - Live, Informative, Non-cost and Genuine !