

PC Recording Studios for Dummies (Jeff Strong)
.pdf192 Part IV: Revving Up the Recording Process
Setting Up a Song to Record
The first step in the recording process is to create a new song file in which to record. This is a pretty simple process in both Logic and Pro Tools — all you really have to do is open a new song file and adjust your hardware settings for your interface.
Creating a new song file
To open a new song file in Pro Tools, do the following:
1.Double-click the Pro Tools icon to boot up the software.
The main menu appears.
2.Choose File New Session.
This opens the New Session dialog box, as shown in Figure 10-1.
From this dialog box you have a bunch of settings to make for your song file. Here’s a rundown of the different parameters and what they mean:
Figure 10-1:
The New
Session menu is where you set up a new song file.
TEAM LinG - Live, Informative, Non-cost and Genuine !
Chapter 10: Recording and Editing Audio 193
Save As: This is where you type the name of this new song.
Where: You can use this drop-down list to choose where you want to save the file on your hard drive. I recommend that you use the handy New Folder button to create a new folder for storing the session file and that you name the folder the same as your session file. This makes your session file easy to find on your hard drive — especially if you haven’t worked on the session for a while.
Audio File Type: This drop-down list lets you choose among BWF (Broadcast WAV File), AIFF, or SD2 file types. Choose the one that works best for you. (I always use BWF files because they’re compatible with other software I use. Your needs might be different.) If you aren’t transferring your files from one program to another, I suggest using the default BWF option.
Sample Rate: Here you choose the sample rate of your session. In Pro Tools, your options depend on the Digidesign hardware you have. For example, if you have the Digi 001 or Mbox, your choice is between 44.1 kHz and 48 kHz, whereas if you have a Digi 002 or 002R, you can choose among 44.1 kHz, 48 kHz, 88.2 kHz, and 96 kHz.
The higher the sample rate, the more work your computer’s processor has to do. Often you have to balance your desire for the highest-resolution music possible against the capabilities of your system.
I recommend getting to know your system before you record a lot of music with it. Experiment with different sample rates and track counts to see what your computer can handle. With this information, you can get a good sense of how hard you can push your system before you reach the limits of its performance.
Bit Depth: In this area, you can choose between 16and 24-bit rates. Choose 24 bit.
I/O Settings: In this drop-down list, you can choose between the most recently used setting or a stereo-mix setting of the physical inputs and outputs of your interface.
Enforce Mac/PC Compatibility: Selecting this check box ensures that if you transfer your session from a Mac computer to a PC, you can still open the session and work in it. Leave this check box selected.
After you make all your choices and click the Save button, a new song file (session) opens in Pro Tools. This session doesn’t have any tracks yet for recording your music, so before you actually start to record you need to create some tracks. I describe this procedure — along with all the intricacies associated with the various kinds of tracks — in the “Taking a look at tracks” section, later in this chapter.
TEAM LinG - Live, Informative, Non-cost and Genuine !

194 Part IV: Revving Up the Recording Process
In contrast to Pro Tools, opening a new song file in Logic Pro (choose File New) automatically opens the Autoload song. The Autoload song is a song template you can create that already has the number of the various track types embedded in it that you want in your song. (If you haven’t created an Autoload song, don’t worry; Logic Pro opens a basic song file with a bunch of tracks in it to get you started.) You can still make changes to these tracks, but it saves you time from having to put them in your new song manually. You also don’t have to choose the settings that Pro Tools offers in its New Session dialog box. These settings are scattered throughout a variety of menus. For example, you set the sample rate by choosing Audio Sample Rate.
Logic Pro also doesn’t force you to immediately name and choose a location for your new song. If your program takes this live-and-let-live approach, I highly recommend that you immediately save your new song right away so that if something happens and your program shuts down on you nothing gets lost. It also gets the whole song-naming thing out of the way because the first time you click Save, you’ll be asked to type in a name and file location. If you’re in a groove recording, the last thing you want to do is stop and think about what to call your song and where to put it.
Each audio recording program has its own peculiarities when you open and work with a song, so check your manual to find out the exact procedures for your software.
Taking a look at tracks
Within your song file, all your work is done with tracks. Tracks are like the channels in your mixer or physical tracks on a tape deck. These tracks represent your audio data in your song. The one big advantage with computerbased recording is that you can choose how many and what kind of tracks you want in your song.
Understanding track types
To repeat the mantra throughout the book, every program is different (is there an echo in here?), but many programs use certain basic types of tracks. The basic track types include the following:
Audio Instrument Tracks: These are like MIDI tracks — they record MIDI data — but they don’t send the MIDI signal back out of your system again. Instead you route the signal to a software synthesizer. These tracks can be mono or stereo.
Audio Tracks: An audio track contains audio files and can be mono or stereo.
TEAM LinG - Live, Informative, Non-cost and Genuine !

Chapter 10: Recording and Editing Audio 195
Bus, Aux, or Auxiliary Input Tracks: Tracks with these names are used as effects sends, for submixes, or for other routing purposes. These can be mono or stereo.
Master or Master Fader Tracks: This track type contains the summed output for all the tracks routed to it or that are in your song, depending on your audio recording application. Master Fader tracks can be mono or stereo, although stereo is most common.
MIDI Tracks: MIDI and audio instrument tracks contain MIDI data — instructions to MIDI devices on how to create specific digital sounds. (For more on MIDI, check out Chapters 4 and 11.) These tracks are available only in mono.
Output Tracks: These tracks control the signals that are routed to the physical outputs of your interface. In Pro Tools, this can also be the Master Fader track. Output tracks can be either mono or stereo.
Creating tracks
If you use Pro Tools to record your music, you first need to create some tracks in a new song because no tracks were included by default when it was created. (Non-Pro Tools users shouldn’t skip over this section. Even if your song opens with some tracks already in it, as with Logic Pro, you might want to create some new tracks in your song. This section explains how to do this.)
To create a new track in Pro Tools:
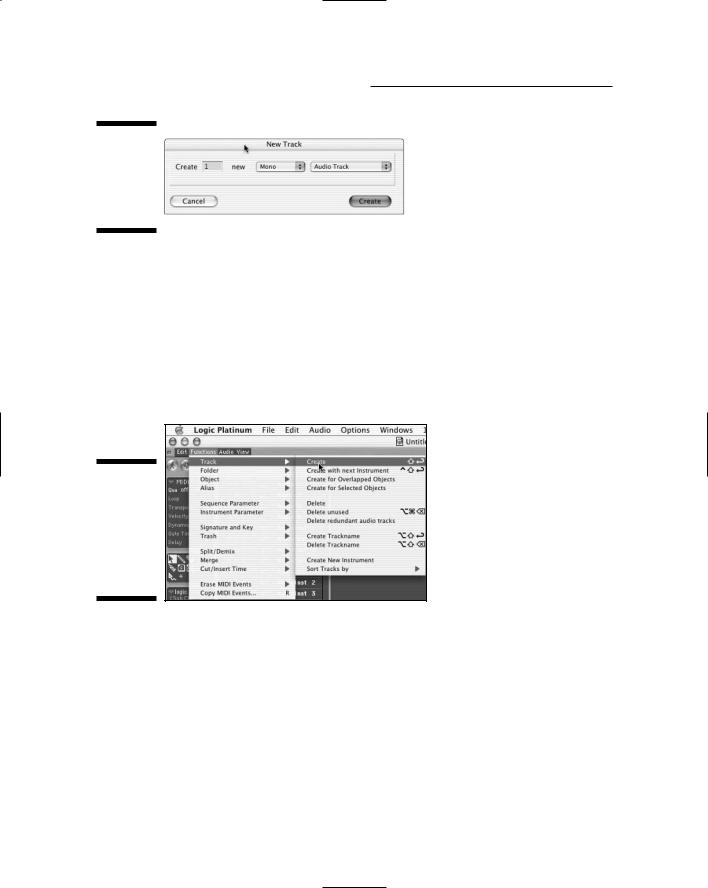
1.Choose File New Track or press Ô+Shift+N on a Mac (or Ctrl+Shift+N on a PC).
The New Track dialog box opens, as shown in Figure 10-2.
2.Select the number, format, and type for your track.
These options include:
•Number of new tracks: The default here is 1, but you can pretty much create as many new tracks as you like. Just keep in mind that you can have only 32 voices playing at one time in your session.
•Track format: Here you choose stereo or mono.
•Track type: Clicking the arrows opens a menu that lets you choose between an Audio, Auxiliary Input, Master Fader, or MIDI track.
3.Click the Create button to create your new track.
This track then appears in your screen.
TEAM LinG - Live, Informative, Non-cost and Genuine !
196 Part IV: Revving Up the Recording Process
Figure 10-2:
The New Track dialog box awaits your command.
Creating a new track in Logic Pro is almost as easy:
1.Choose Functions Track Create from the menu at the top of the
Arrange window, as shown in Figure 10-3.
A new track appears in your song in the same format (and with the same name) as the track directly before it.
Note: If the Arrange window isn’t showing, choose Windows Open Arrange to make it appear.
Figure 10-3:
Creating a track in Logic Pro starts with this menu in the Arrange window.
2.To assign an audio object to the new track, click and hold on the track name in the Arrange window.
A pop-up menu appears, as shown in Figure 10-4.
3.Drag your mouse to the Audio menu option and then to the type of audio object you want.
Your choices here are Audio Instrument or Audio Track. Choose Audio Track if you want to record a miked instrument that’s plugged in to your audio interface, and choose Audio Instrument if you want to use a softsynth. Select one of the options from your audio object list to assign an audio object.
TEAM LinG - Live, Informative, Non-cost and Genuine !

Chapter 10: Recording and Editing Audio 197
Figure 10-4:
Assign an audio object to your new track from the pop-up menu located under the track icon.
4.Release the mouse.
Your new track is assigned to the selected audio object.
You can change the type of any new track you create by clicking and holding over the track name in the Arrange window until the Track Type Selector pop-up menu appears. Then just drag your mouse to the track type that you want and release.
Naming tracks
As you start recording your ideas — and as you build up a pretty impressive list of tracks — you have to find a way to keep (ahem) track of what you recorded on each of them. The best way to do this is to give each of your tracks a unique name — something that gives you some idea of what exactly you recorded (lead guitar, kick drum or whatever). Naming tracks is essential for a multitracking musician. It’s also very easy.
In Pro Tools, follow this simple procedure:
1.Double-click the track name within either of the main windows in your session.
The Name Track dialog box opens, as shown in Figure 10-5.
2.Type the name of your track in the Name the Track text box.
If you want, you can also use the Comments text box to type in any notes that might help you later on.
3.Click OK to close the dialog box and accept the name and notes.
TEAM LinG - Live, Informative, Non-cost and Genuine !

198 Part IV: Revving Up the Recording Process
Figure 10-5:
The Name
the Track dialog box in Pro Tools lets you create a unique name for your tracks.
In Logic Pro, the track-naming procedure differs (as usual):
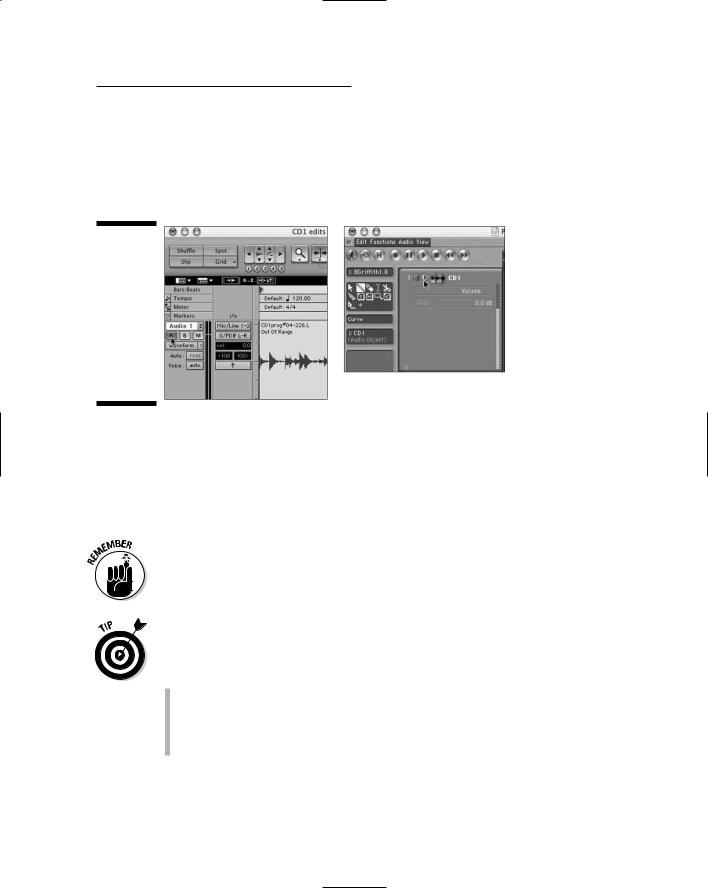
1.In the Arrange window, click the track you want to rename.
The track becomes highlighted, and the track’s fader and name appear on the left side of the window.
2.Click the track name on the far-left side of the Arrange window.
The track name becomes highlighted, as shown in Figure 10-6.
3.Type in your new name in the Name text box and press Return or Enter to accept it.
Your new name appears for your track.
Figure 10-6:
Logic also lets you name your tracks with unique names.
Routing your input and output signals
With a new song file and a bunch of tracks to work with, you’re ready to route the inputs from your audio or MIDI interface into the tracks that you want to record into. This process is pretty simple and is similar for most programs. Here’s how you do it in Pro Tools:
TEAM LinG - Live, Informative, Non-cost and Genuine !

Chapter 10: Recording and Editing Audio 199
1.Choose Display Edit Window Shows I/O View to open the I/O section of the Edit window.
The I/O section of the Edit window shows the inputs and outputs for each of your tracks.
2.Within the I/O section of your track in the Edit window, click and hold on the Input selector until the Input contextual menu pops up.
3.While still holding down your mouse button, move the mouse over the Input menu until it rests on the input listing you want, as shown in Figure 10-7.
4.Release the mouse button to select the input listing.
This menu closes, and the input you’ve selected appears in the Input selector.
Choosing your outputs requires pretty much the same procedure, although now you start things off by clicking and holding the Output selector instead.
Figure 10-7:
You assign an input (or output) in Pro Tools by clicking and holding the Input or Output selector to open a menu.
Logic Pro has slightly different procedures for assigning your inputs and outputs:
1.In the Arrange window, click the track whose inputs and outputs you want to assign.
The track becomes highlighted, and the track’s channel strip appears on the left side of the window.
2.Within the I/O section of the track’s channel strip (located directly above the track’s fader on the left side of the Arrange window), click and hold on the Input selector until the Input contextual menu pops up.
TEAM LinG - Live, Informative, Non-cost and Genuine !

200 Part IV: Revving Up the Recording Process
3.While still holding down your mouse button, move the mouse over the Input menu until it rests on the input listing you want, as shown in Figure 10-8.
4.Release the mouse button to select the input listing.
The Input menu closes, and the input you’ve selected appears in the Input selector.
Assigning your track’s output follows the same basic procedure, although now you click and hold the Output selector in Step 2 instead.
Figure 10-8:
Assigning an input (or output) in Logic Pro is done by clicking and holding the Input or Output selector.
Preparing to Record
I’m sure you’re just itchin’ to click the Record button and start getting your ideas into your computer. Before you can do this, however, you need to cover some basics, such as enabling your tracks to record and setting proper levels. There’s also a few more things you can do to make sure that you not only get your best possible performance, but also make the inevitable editing and mixing easier — things like creating a monitor mix and developing a song map. This section covers these details.
Enabling recording
For many computer audio applications, you need to enable recording in a track before you can hear the input source through your system.
Make sure that your instruments are plugged into your interface before you enable recording. I like to keep the volume off or set very low before enabling recording so that when I play my instrument it doesn’t overload the system. You can turn up the volume when you have your track enabled.
TEAM LinG - Live, Informative, Non-cost and Genuine !
Chapter 10: Recording and Editing Audio 201
Enabling a track for recording (the audio buzzword is record-enabling) is usually pretty easy: In Pro Tools and Logic Pro, for example, all you need to do is click the handy Record Enable button (labeled R) for that track. Figure 10-9 shows the Record Enable button in Pro Tools (left) and Logic Pro (right). After clicking, the button blinks a nice shade of red.
Figure 10-9:
Click the track’s Record Enable button (in Pro Tools or Logic) to enable the track for recording.
Depending on your recording application, your track will either stay enabled for recording when you click another track’s Record Enable button (in Logic Pro, for example) or it won’t stay enabled (enable will turn off) when you click the Record Enable button on another track. (Pro Tools takes the “enable will turn off” route unless you hold down Shift as you enable additional tracks for recording.)
Make sure that you understand how this whole enabling business works in your particular recording program. Check (and double-check) your application’s manual to see how it treats this process. I can’t tell you how depressing it is when you think you’ve recorded a track only to discover that, in fact, it wasn’t enabled. I’ve lost some really good takes (performances) this way.
When your track is enabled for recording, you should be able to hear (and see in your track’s channel strip window) a signal when you play your instrument. If you can’t see or hear anything, you need to check the following:
Is your instrument plugged in?
Is the track you’ve record-enabled set for the correct input and output?
Are the volume controls on each of your pieces of gear (the guitar and the interface, for example) turned on at least a little?
TEAM LinG - Live, Informative, Non-cost and Genuine !