

PC Recording Studios for Dummies (Jeff Strong)
.pdf202 Part IV: Revving Up the Recording Process
If you’re recording with a condenser mic, is the phantom power — the low level of current necessary to get the microphone to produce a signal — turned on in your interface or external preamp?
Are your monitors or headphones plugged in and the monitor or main output level on your interface turned up?
If you don’t get a signal even after making sure that these conditions are met, go to the Hardware Setup window and make sure that your interface is displayed in the window and is selected. (In Logic Pro, choose Audio Audio Hardware and Drivers, and in Pro Tools choose Setups Hardware Setup.)
Setting recording levels
Setting the proper levels for recording is crucial if you want to record your music successfully. If you set your level too high, you get distortion; too low and you might end up with a weak signal that lacks fidelity. I discuss how to get your instrument levels into and through all your hardware at their proper levels in Chapter 9, so if you’re not sure how to get your levels right, check back there. I’ll wait here.
Hardware levels all set up? Now you need to adjust the most important level of all — the level going into your software. This level is displayed in the channel strip of your record-enabled track. (Figure 10-10 shows this channel strip in Pro Tools (left) and Logic Pro (right) when a level is coming into your system.)
For most computer-based recording systems, this is the only level that you can actually see as well as hear because most interfaces don’t have input meters on them.
After you can both hear your instrument’s signal and see it in the channel strip, you can make the final adjustments to your level until you get a good, hot (substantial) level without going over. This level is adjusted from outside the computer. That means tweaking your interface and messing with your other hardware — you know, twirling the knobs on the electric guitar, experimenting with mic placement, playing with your external preamp level, and so on. The fader in your software on your computer controls only the output volume of the track. Turning it up or down affects how loud the signal is to your ears, but it doesn’t change the level going into your system.
Make your level adjustments on your hardware and leave the fader in your software set at unity gain (0 on some systems). (Refer to Figure 10-10 to see a fader set at this level in both Pro Tools (left) and Logic Pro (right) if you’re not sure where unity gain is.)
TEAM LinG - Live, Informative, Non-cost and Genuine !

Chapter 10: Recording and Editing Audio 203
Figure 10-10:
Your track’s channel strip (in Pro Tools, left, or Logic, right) shows the level of your signal coming into your system.
The meter in your enabled track’s channel strip should peak at –12dB to –10dB. Many programs — Logic Pro, for example — have a Peak Level display at the top of the meter that shows you the highest level achieved by the meter. Keep an eye on this as you set you levels. If your level gets too high and you reduce the gain into your system to compensate for that, you can then click the Peak Level display to zero it out again.
When you set your levels, set them a little on the low side because the tendency when recording is to get slightly nervous (okay, some people get really nervous), and this often results in playing that’s a little louder. This is especially the case with vocalists. It’s not uncommon for me to set the level as low as –18dB to –20dB for vocalists to start with.
Monitoring your inputs
The difference between a decent performance and a truly stellar one is based on inspiration. An inspired artist can perform at a level beyond his or her imagination. This is when magic happens. Well, when you have a set of headphones on and you’re trying to record your ideas, you sometimes need a
TEAM LinG - Live, Informative, Non-cost and Genuine !

204 Part IV: Revving Up the Recording Process
little extra push to get the inspiration faucet turned on. The best way to do this is to make sure that what you hear in your headphones as you play actually makes you want to play — and play better. You need to confront two issues when using a computer-based system:
Getting the latency down to a manageable size.
Creating an inspirational monitor mix.
The following two sections lay out how to accomplish both of these goals.
Getting a handle on latency
Latency, as I say a few times in this book, is the delay caused by the analog signal turning into digital bits and back into an analog signal so you can hear it. If your latency levels are high, what you hear in your headphones is going to sound out of sync with what you want to play — which can really mess up your mind (and more than likely your ability to play well). Latency is the Achilles heel of computer-based recording for many people.
Because this has been an area of concern, makers of both the hardware and software used for computer recording have spent a lot of time trying to fix this problem. Because of this, several approaches exist for reducing the latency in your system — each with its own advantages and disadvantages. These approaches are
Get a faster computer. A fast computer allows you to use the lowest possible I/O or Hardware buffer settings. Lower buffer settings mean lower latency. (Chapter 8 has more on buffer settings).
Record at a higher sampling rate. Because latency is determined by the total number of samples taken, increasing the sample rate of your recordings reduces that actual time of the latency. For example, when you use a 64-sample buffer setting and record at 96 kHz (the highest rate many interfaces can handle right now), your latency within your system drops in half.
Use the software’s Low Latency or Software monitoring options. Using one of these options can reduce latency a bit because you’re monitoring off the software and not the hard drive. This can reduce latency to pretty low levels. One disadvantage with this option is that you might not be able to add any effects to your tracks and hear them while you record. This can make for a less-than-inspiring monitor mix.
Use the hardware’s Direct Monitoring option. Most audio interfaces have some sort of direct-monitoring option. That is, they split the incoming signal so that it is sent through the converters and on to the computer while sending the signal at the same time to the output monitor of the
TEAM LinG - Live, Informative, Non-cost and Genuine !

Chapter 10: Recording and Editing Audio 205
interface. While this is happening, the previously recorded tracks in your system are sent to your monitors with the unconverted signal, giving you a mix of the input signal and the previously recorded tracks in your headphones. This reduces the latency of your input signal down to effectively zero.
One problem with this approach is that you can’t add any effects to the instrument that you’re recording. (You can hear any effects placed on previously recorded tracks, though.) You can fix this by using an external effects box for monitoring purposes.
Use an external mixer or monitoring unit. This approach is similar to using the direct monitoring option available on most interfaces. The only problem beyond those that come standard with direct monitoring is that you add another piece of hardware to your signal chain that, if it’s not of high quality, will compromise the sound of your instrument. Also, if you use any of the preamps and such in your audio interface for your instruments, it’s all but impossible to insert one of these units in the signal chain. To be honest, I recommend skipping the external mix/monitoring unit and going with one of the other options instead. It’s just not worth the hassle.
Creating an inspirational monitoring mix
A monitor mix refers to an initial mix of tracks that you use as the foundation for adding more tracks. You could keep a monitor mix pretty bare bones — no effects, no prettifying whatsoever — but I recommend putting some effort into creating a monitor mix that actually sounds good.
To me, a good monitoring mix is one of the most important parts of the recording process. If you can make your voice, for instance, sound like you can actually sing (I know this is a stretch for many people), you’ll be more likely to give the vocal a little extra and maybe end up surprising yourself when you listen to your performance. Here are some things you can do to make a monitor mix that encourages you to sound your best:
Add some effects. Most vocalists love to hear some reverb on their vocals when they sing. Depending on the monitoring scheme you choose (see the preceding section), you might be able to do this within your software program. (Chapter 15 explains how to insert an effects plug-in into a track.)
Create a pleasing balance. Take a few minutes to get a good mix of the tracks that you already have recorded so that it sounds as much like a complete song as possible. If you don’t take the time to get a good monitor mix up front, you might end up wasting time when you have to rerecord an uninspired part.
TEAM LinG - Live, Informative, Non-cost and Genuine !

206 Part IV: Revving Up the Recording Process
Mute distracting parts. If any instruments distract you from the part you’re trying to record (a counter melody to your guitar solo, for example), don’t be afraid to turn them down or off in your mix. Use only the parts that make you play better.
Get quality headphones. Because you’ll often be wearing headphones when you record, I highly recommend that you get a decent pair — ones that you like the sound of because yucky-sounding headphones aren’t very inspiring.
Following these tips will make the recording process much more enjoyable for you (and for your listeners when they finally hear your music).
Creating a click track
A click track is a metronome that you can listen to while you record — it ensures that you stay in time with the session. Recording to a click track can have many advantages, including being able to match the song’s sections to particular bars or beats within the session. It also makes finding edit points and performing certain edits much easier. I always spend a few minutes setting up a click track for my songs, and I recommend that you give it a try, too.
All audio recording programs have some sort of metronome function. And all these programs have a way to create a click track within your system. Some are easy and some are, well, less intuitive. To help you out, I offer the basic steps for creating a click track and getting it to sound right in the two popular programs that I detail throughout this book — Pro Tools and Logic Pro.
The first thing you need to do before setting up your click track is open the dialog box that has the tempo/time signature data on it. Here’s how you do it:
1.Make sure the Transport window is showing in your song.
In Pro Tools, choose Windows Show Transport; in Logic Pro, choose Windows Open Transport if the Transport window isn’t already showing.
2.Open the MIDI/Time signature section of the Transport window.
In Pro Tools, choose Display Transport Window Shows MIDI Controls. In Logic, click the drop-down list arrow on the far-right side of the Transport window to open the Transport View Options menu. Select Tempo/Signature Display from the list. The tempo/time signature is displayed, as shown in Figure 10-11.
You’re ready to start setting up your click track.
TEAM LinG - Live, Informative, Non-cost and Genuine !
Chapter 10: Recording and Editing Audio 207
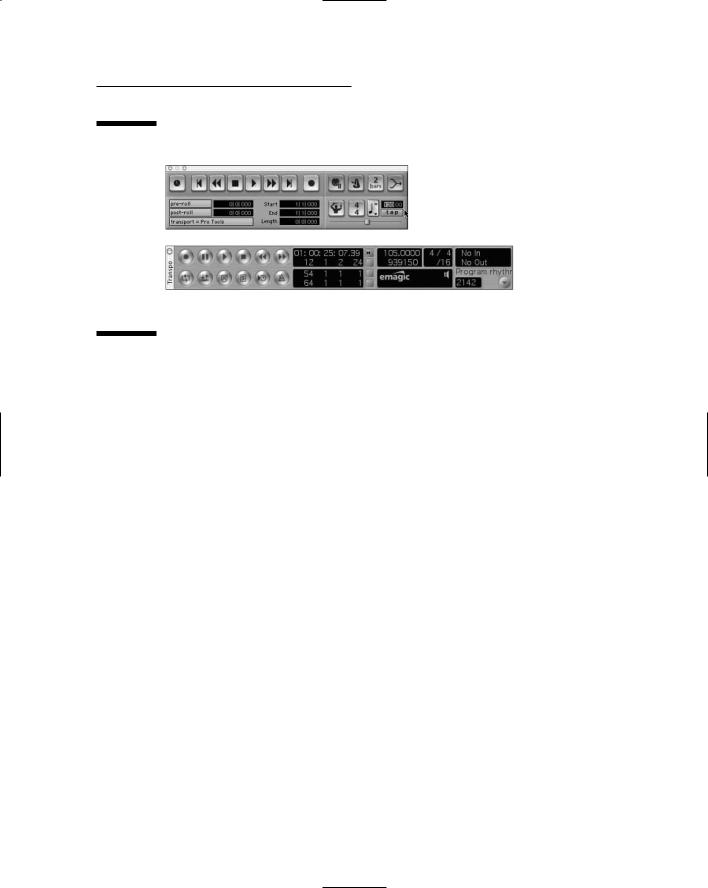
Figure 10-11:
The Tempo
and Time
Signature fields are located in the Transport
window of Pro Tools (top) and Logic Pro (bottom).
Setting the tempo
To set the tempo in these programs, follow these steps:
In Pro Tools:
1.With the little Conductor icon engaged — it’s blue — double-click the Time Signature icon (labeled 4⁄4, as shown in Figure 10-11) or choose Windows Show Tempo/Meter.
The Tempo/Meter Change dialog box appears.
2.Select Tempo Change from the drop-down list.
The Tempo tab of the Tempo/Meter Change dialog box appears.
3.On the Tempo tab, enter the data you want for your tempo.
This includes the location (enter 1/1/000 to set it at the beginning of the song), the tempo, the resolution (the note duration getting one beat, such as 1⁄4 note), and whether the tempo starts at the beginning of the bar (called Snap to Bar).
4.Click the Apply button to accept these settings and close the dialog box.
You now have a tempo for your song.
In Logic Pro:
1.Use the Transport window or the Timeline to go to the location in your song where you want the tempo to begin.
Double-click the Stop button in the Transport window to get to the start of your song or click and drag along the Timeline (the numbers at the top of the Arrange window) to go to another location. You can also let
TEAM LinG - Live, Informative, Non-cost and Genuine !

208 Part IV: Revving Up the Recording Process
the song play until it reaches the point where you want the tempo change to start and just stop the song there. Logic Pro puts the starting point for the tempo change wherever your song cursor is located, so make sure it’s where you want it before you set the tempo.
2.Double-click the Tempo field in the Transport window to highlight it.
In Figure 10-11, shown earlier, the Tempo field in Logic Pro’s Transport window is showing 120.
3.Type in the tempo value you want for your song and press Return or Enter to accept it.
Choosing the time signature
Setting up a time signature (meter) for your click track is similar to setting the tempo. The basic steps are outlined in this section.
In Pro Tools:
1.Double-click the time signature icon (labeled 4⁄4, as shown earlier in Figure 10-11) or choose Windows Show Tempo/Meter.
The Tempo/Meter Change dialog box appears.
2.Select Meter Change from the drop-down list.
The Meter Change tab of the Tempo/Meter Change dialog box appears.
3.On the Meter Change tab, enter the data you want for your time signature.
This includes the location (enter 1/1/000 to set it at the beginning of the song), the meter, the click (the note duration getting the click from the metronome, such as 1⁄4 note), and whether the meter change starts at the beginning of the bar (called Snap to Bar).
4.Click the Apply button to accept these settings and close the window.
You now have a time signature for your song.
In Logic Pro:
1.Use the Transport window or the Timeline to go to the location in your song where you want the meter change to begin.
Click the Stop button in the Transport window twice to get to the start of your song or click-drag along the Timeline (the numbers at the top of the Arrange window) to go to another location. You can also let the song play until it reaches the point where you want the meter change to start and just stop the song there. Logic puts the starting point of the meter change wherever your song cursor is located so make sure it’s where you want it before you set the meter change.
TEAM LinG - Live, Informative, Non-cost and Genuine !

Chapter 10: Recording and Editing Audio 209
2.Double-click the numerator (top number) of the time signature in the Transport window to highlight it.
In Figure 10-11, the time signature in Logic’s Transport window is showing 4/4.
3.Type in the beats per measure value you want for your song and press Return or Enter to accept it.
4.Double-click the denominator (bottom number) of the time signature in the Transport window to highlight it.
5.Type in the note division for the measure you want for your song and press Return or Enter to accept it.
6.Double-click the subdivision value (the note value that the measure is divided into) of the time signature (this is marked as 16 in Figure 10-11, shown earlier) in the Transport window to highlight it.
7.Type in the subdivision value you want for the measure.
This tells the click how many times each measure to play. For example, entering 16 tells the click track to play at 16th note intervals.
You now have your time signature set up for your click track.
Getting your click track to play
If you want to get your click track rolling and you’re working with Logic Pro, just do the following:
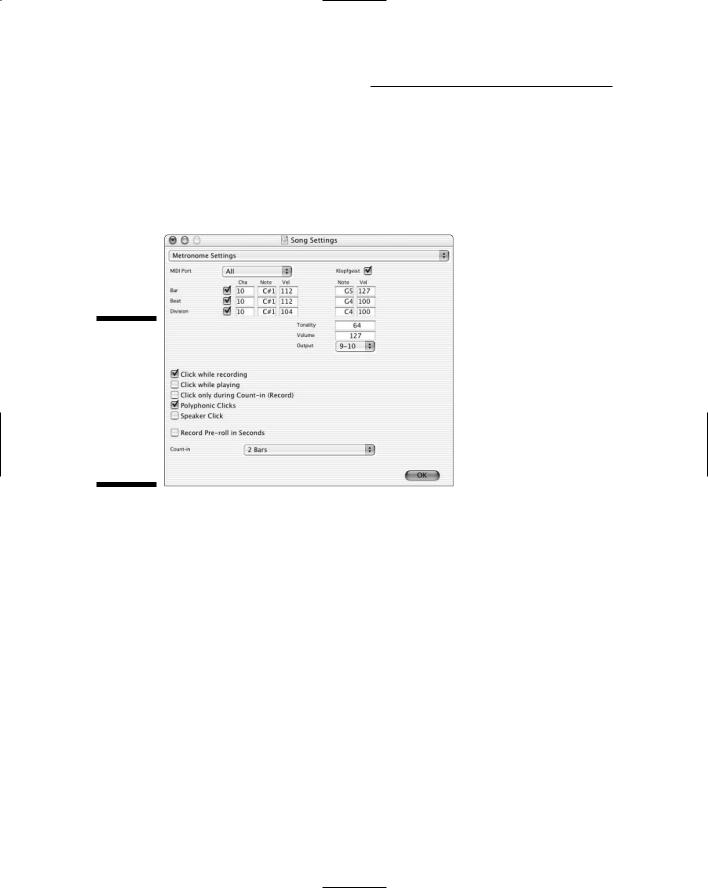
1.In the Transport window, click and hold the little Metronome icon and choose Metronome Settings from the pop-up menu that appears.
The Metronome Settings section of the Song Settings dialog box opens up, as shown in Figure 10-12, where you can choose various settings for your click track.
2.Select the Klopfgeist check box (located in the upper-right corner on the Metronome Settings tab) to enable the internal metronome.
Note: You have to enable the internal metronome before you can actually use it.
3.Close the dialog box by clicking OK.
Your metronome settings are saved.
4.In the Transport window, click once again on the Metronome icon to highlight it (it glows blue).
Your metronome is turned on and will play when your song starts.
TEAM LinG - Live, Informative, Non-cost and Genuine !
210 Part IV: Revving Up the Recording Process
To turn off the metronome, click the Metronome icon to deselect it.
Contrast this relatively simple procedure with the way you get a click track going in Pro Tools.
Start by configuring your click track device. Follow these steps:
Figure 10-12:
The Metronome Settings section lets you choose how your click track plays in Logic Pro.
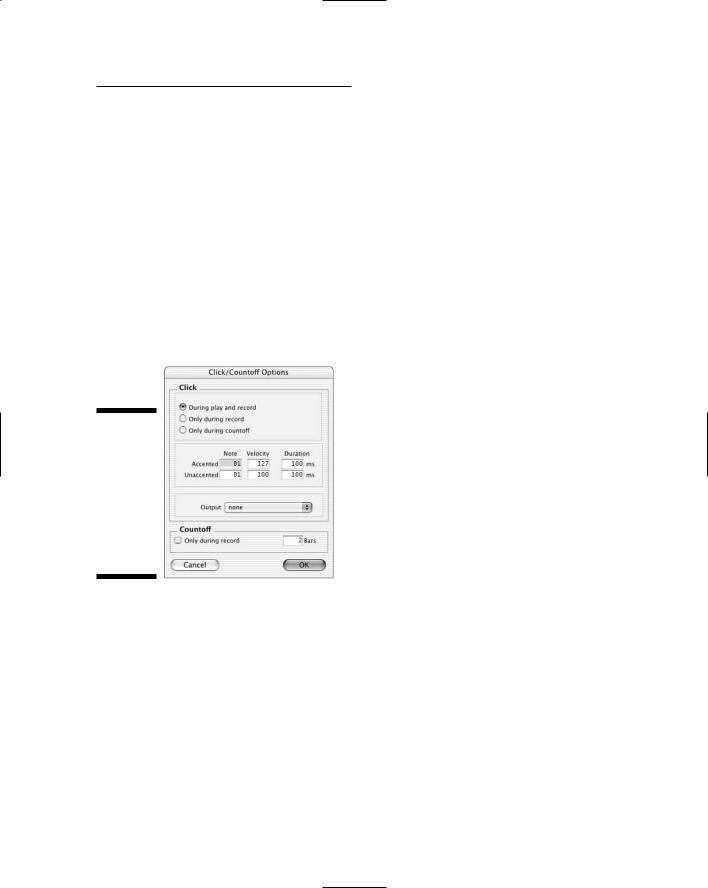
1.Choose MIDI Click Options or double-click the Click button or the
Countoff button in the Transport window.
The Click/Countoff Options dialog box appears, as shown in Figure 10-13.
2.Set when your click track plays by selecting one of the three options at the top of the dialog box.
The default is During Play and Record. This is usually where I leave it. However, if the click track is distracting when you play back your track, you might prefer the Only During Record option.
3.In the Click/Countoff Options dialog box, click the Output drop-down list to select the device that will play your click track.
Choose None to use the click plug-in. The alternative is to select a MIDI device such as a drum machine. I’d go with the click plug-in because it’s simple and it’s included with Pro Tools so you don’t have to buy any separate gear in order to use it.
TEAM LinG - Live, Informative, Non-cost and Genuine !
Chapter 10: Recording and Editing Audio 211
4.Adjust the pitch and/or the volume of your click by filling in the note (for pitch) and/or velocity (for volume) fields in the middle of the window.
5.Designate the duration of each click in the Duration field.
Increasing or decreasing the duration of the click can be helpful if you use a different sound (such as an external keyboard or a soft-synth) that’s hard to hear with the default setting. If you use the click plug-in, the default setting works just fine.
6.Enter the countoff amount in the Countoff field at the bottom of the dialog box and select or deselect the check box to the left.
If you want the countoff to play only when you record, select the check box. If you want the countoff to play during both record and playback, make sure that the check box is deselected.
Figure 10-13:
The Click/Count off Options menu lets you configure your click track device.
Next you need to insert the click plug-in into an Auxiliary Input track. Follow these steps:
1.Create a new auxiliary track by choosing File New Track or by pressing Shift+Ô+N (on a Mac) or Shift+Control+N (on a PC).
The New Track dialog box makes an appearance.
2.Use the three drop-down lists to set up a single Mono Aux Input track.
3.Click the Create button.
Your track appears in the Edit and Mix windows.
TEAM LinG - Live, Informative, Non-cost and Genuine !