

PC Recording Studios for Dummies (Jeff Strong)
.pdf242 Part IV: Revving Up the Recording Process
Matrix: No, not that Matrix. This Matrix is the basic window that shows MIDI data in a piano roll format. (See Figure 11-10.) The MIDI notes show up as blocks in a timeline that rolls across the screen as your song plays. This is a standard format for MIDI editing; you find it in most recording programs.
Score: The Score window shows your MIDI data in the form of a musical score. You see the notes laid out as if they were written on paper. The window is great for people who like to see their music in written form, but this window isn’t available on all recording programs. (Pro Tools, for instance, doesn’t yet offer this window in version 6.) Figure 11-11 shows Logic’s version of this window.
Hyper Edit: The Hyper Edit window shows your MIDI data in separate rows, making it easy to adjust parameters such as velocity, modulation, pan, and others. This window — see Figure 11-12 — is handy for making more involved changes to your MIDI data — changes other than those involving pitch, duration, or location. Not all programs have a window like this.
Figure 11-10:
The Matrix window in Logic shows MIDI data in the piano roll format.
Adding MIDI events
You can add MIDI notes or controller data (collectively called MIDI events) to a MIDI track by using one of your program’s editing tools. In Pro Tools, for example, the editing tool of choice is called the Pencil tool.
TEAM LinG - Live, Informative, Non-cost and Genuine !

Chapter 11: Using MIDI 243
Figure 11-11:
The Score window looks like a sheet of music.
Figure 11-12:
The Hyper Edit window is actually pretty calm.
To insert a note using the handy Pro Tools Pencil, do the following:
1.Click and hold the Track View button in the Track Controls section of the Edit Window to access the pop-up menu and then drag to the Notes view. Release your mouse button to accept this view.
2.Click and hold the Pencil button, and then select the Freehand Pencil tool from the Pencil Tool pop-up menu that appears.
3.Locate the place in the track’s playlist area where you want to add your MIDI note.
TEAM LinG - Live, Informative, Non-cost and Genuine !

244 Part IV: Revving Up the Recording Process
4.By using the Pencil tool that you selected in Step 2, click and drag in the playlist to insert a note.
You determine the pitch of this note by where you place it (from top to bottom). You can use the small keyboard display on the left side of the playlist to see what pitch relates to which location in the playlist. To determine the note’s duration, drag to the right as you draw it. The velocity of the note defaults to the maximum of 127. (You can change the velocity later if you choose.)
Because MIDI performance data has no sound, most MIDI-capable recording programs allow you to add MIDI program change information, which tells your MIDI instrument to change the sound that it plays. This is called inserting a MIDI program change. Here’s how you do it in a program like Pro Tools:
1.Click and hold the Track View button and select Program Change view from the menu that appears.
2.Click and hold the Pencil button, and then select the Freehand Pencil tool from the menu that appears.
3.Click in the track’s playlist at the location you want the change to occur.
The Patch Select dialog box opens. This dialog box lets you select the sound (called the patch) that your MIDI data plays in your sound module (soft-synth or external keyboard).
4.Select the patch number or name in the main section of the dialog box.
5.Click Done.
The program change is inserted, as shown in Figure 11-13.
Figure 11-13:
View Program Changes for your track.
Deleting a MIDI note
To delete a MIDI note in Pro Tools, do the following:
1.Click and hold the Track View button and select Notes from the menu that appears.
2.Using either the Grabber tool or the Selector tool, select the note in the playlist you want to delete.
TEAM LinG - Live, Informative, Non-cost and Genuine !
Chapter 11: Using MIDI 245
3. Press Delete on your keyboard or choose Edit Clear.
Instead of Steps 2 and 3 in the preceding list, start out with the Pencil tool. Then press Alt (on a PC) or Option (on a Mac) to change the pencil into an eraser, and then click the note to delete it.
Changing a note’s pitch
To change a note’s pitch in Pro Tools, do the following:
1.Click and hold the Track View button and select Notes from the menu that appears.
2.Select the Pencil or Grabber tool.
3.Press Shift to keep the note’s start point from changing as you move it.
4.Click the note and drag it up (higher pitch) or down (lower pitch) in the playlist.
5.Release the mouse button when the note is where you want it.
Changing a note’s duration
To change a note’s duration — its Start or End points — in Pro Tools do the following:
1.Click and hold the Track View pop-up menu and select Notes from the menu that appears.
2.Select the Shuffle edit mode by clicking the Shuffle button on the upper-left side of the Edit window.
3.Select the Pencil tool.
4.Using the Pencil tool, click the note you want to change.
Press Shift as you click to select more than one note.
5.Click the Start or End point of the note and drag it left or right.
6.Release the mouse button when the note is where you want it.
Changing a note’s velocity
In the MIDI world, velocity means volume. To change a note’s velocity in Pro Tools, do the following:
1.Click and hold the Track View pop-up menu and select Velocity from the menu that appears.
2.Select the Grabber tool.
TEAM LinG - Live, Informative, Non-cost and Genuine !

246 Part IV: Revving Up the Recording Process
3.Click the diamond-shaped icon at the top of the velocity stalk (the vertical line with a diamond at the top representing the velocity level) in the track’s playlist and drag it up or down.
4.Release the mouse button when the velocity is where you want it.
Changing time locations
Time locations are where the start points of your notes are placed within your session. To change a note’s time location in Pro Tools, do the following:
1.Click and hold the Track View pop-up menu and select Notes from the menu that appears.
2.Select the Slip edit mode by clicking the Slip button on the upper-left side of the Edit window.
3.Select the Pencil or Grabber tool.
4.Press Shift to keep the note’s pitch from changing as you move it.
5.Click the note and drag it left or right.
6.Release the mouse button when the note is where you want it.
Performing MIDI operations/ editing functions
Most recording programs offer a host of operations you can perform on your MIDI data to make it sound the way you want it to sound. These functions vary from program to program, and I can’t list them all here. As an example, though, a program with arguably the slimmest MIDI capabilities (Pro Tools) offers the following MIDI operations (Figure 11-14 shows the MIDI Operations window in Pro Tools):
Figure 11-14:
This pop-up menu lets you select your MIDI operation.
TEAM LinG - Live, Informative, Non-cost and Genuine !

Chapter 11: Using MIDI 247
Quantize: Lets you adjust the timing of your selected notes.
Groove Quantize: Similar to the Quantize operation, except you use a groove template (a file that contains timing data with a specific feel) to create a grid to quantize to.
Restore Performance: Lets you return to previously saved performance settings.
Flatten Performance: Lets you tweak performance data and lock it in before you do any more tweaking.
Change Velocity: Lets you adjust the volume of the attack or the release of selected MIDI notes.
Change Duration: Lets you alter the length of recorded MIDI notes.
Transpose: Lets you change the pitch of selected notes.
Select Notes: Lets you choose specific MIDI notes or a range of notes in a selection.
Split Notes: Lets you select a note or range of notes — but also lets you copy or cut the selected notes.
Input Quantize: Lets you set a Quantize value that your recorded performance is adjusted to automatically as you record it.
TEAM LinG - Live, Informative, Non-cost and Genuine !

248 Part IV: Revving Up the Recording Process
TEAM LinG - Live, Informative, Non-cost and Genuine !

Chapter 12
Using Loops
In This Chapter
Understanding loops
Incorporating loops in your music
Creating loops
Finding loop libraries
Loops are pre-recorded musical snippets that you can put in your song and manipulate to create your music. Looping has become very popular
because it makes composing music easy and saves you from having to learn to play an instrument well or hire a professional to play for you. (Purists take note: Looping is here to stay.)
In this chapter, you discover the role of loops in composing music and find out how to get decent loops to work with. This chapter also shows you how to create your own unique loops.
Not all recording programs have looping capabilities, and not all those that do have them offer ways to manipulate the loops in your program the way you might want. If this function is important to you, make sure that the program you buy has the capabilities that you want. Chapter 6 has more about how programs work with loops, and Chapter 7 looks at the looping capabilities of some of the major recording programs out there.
Understanding Loops
Loops really aren’t that complicated. Think of them as short musical snippets that you can line up in various ways, and then you have them play in your song. A typical loop is a drum pattern that plays during the verse of your song or serves as the bass line of your chorus. In the simplest form of looping, you assemble your loops — one after another — to fill up the section you want them to play in. And you can often change the tempo and pitch of your loops to fit your vision of your song.
TEAM LinG - Live, Informative, Non-cost and Genuine !
250 Part IV: Revving Up the Recording Process
On a more sophisticated level, you can manipulate, edit, and create loops in a variety of ways, depending on the capabilities of your particular recording program (another reason to investigate the looping capabilities of your program before buying).
Loops come in two formats:
MIDI-based loops are recorded as MIDI data by using soft-synths or general MIDI instruments. These loops appear as MIDI data in your track and can be edited like any other MIDI performance. (Chapter 4 has more on general MIDI stuff, and Chapter 11 has more about actually editing MIDI data.)
Audio-based loops are created from audio files and are seen as waveform displays of the audio data. They act just like any other audio file except that they have a tempo grid and a key signature attached to them. This means that when you place them in a song, they conform to the song’s tempo as well as to the designated key signature (if your song has one).
Not all looping programs can handle MIDI-based loops as MIDI data. Instead, these loops are treated as audio-based loops. If you’re working with such a program, you’ll find that the editing capabilities of the loops conform to the audio format — you can’t change the pitch of individual notes that are part of a group of notes (a chord, for instance).
Using Loops in Your Song
Using loops is easy — which is why they’re so commonly used. This section describes how to use them in your song.
Creating a loop track
The type of track you create for your loops depends on the type of loop you want to use. If you want to use a MIDI-based loop, you need a MIDI track (or audio instrument track if you use Logic). If you intend to use an audio-based track, you need to create an audio track. This section describes how to set up each of these track types.
Making a MIDI-based loop track
In Logic — one of the more robust recording programs in terms of looping capabilities — the easiest way to make a MIDI-based loop track is to use an
TEAM LinG - Live, Informative, Non-cost and Genuine !
Chapter 12: Using Loops 251
audio instrument track. This way you can use a soft-synth to play the loop and not have to hook up an external MIDI sound module. This is how you make one:
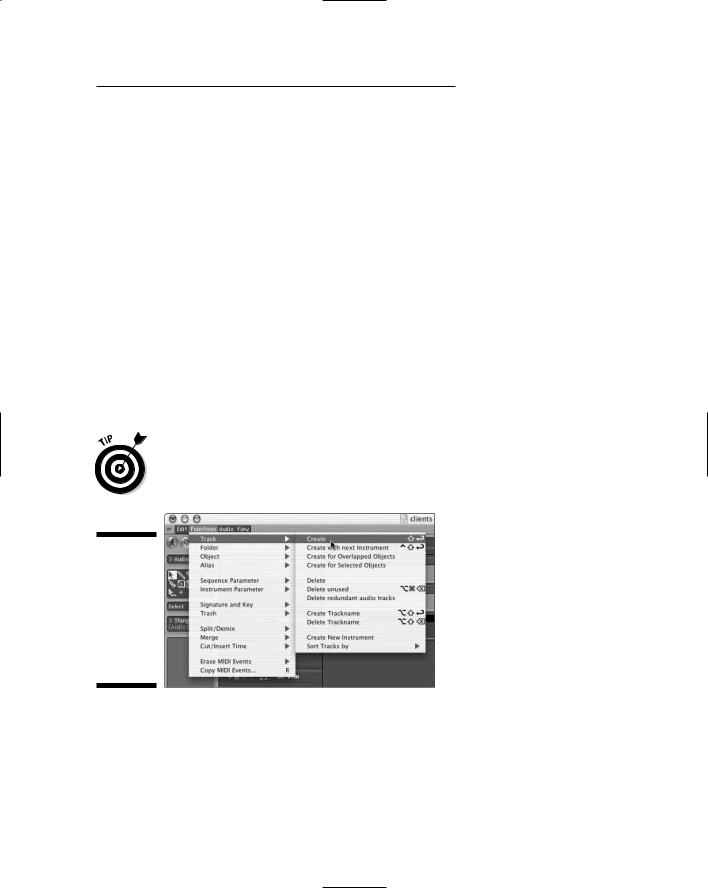
1.Choose Functions Track Create from the menu at the top of the
Arrange window, as shown in Figure 12-1. (If the Arrange window isn’t showing, choose Windows Open Arrange.)
A new track appears in your song in the same format (and with the same name) as the track directly before it.
2.To distinguish the new track from the track above it, assign an audio instrument to the new track by first clicking and holding the track name in the Arrange window.
A pop-up menu appears, as shown in Figure 12-2.
3.Drag your mouse to one of the audio instruments in the list.
4.Release the mouse.
Your new track is assigned to the selected audio instrument.
You now have a track for your MIDI-based loops.
In Logic, you can drag a MIDI-based loop into an audio track. If you take this route, it acts like an audio-based loop instead of a MIDI-based loop. That is, you aren’t able to edit the individual notes as MIDI data.
Figure 12-1:
Creating a track for your MIDIbased loop in Logic starts in the Arrange window.
Adding an audio-based loop track
The process for creating a new audio track in Logic is the same as for creating a new audio instrument, except you choose an audio track instead of an audio instrument (duh).
TEAM LinG - Live, Informative, Non-cost and Genuine !