322 Part V: Playing with Plug-Ins
TEAM LinG - Live, Informative, Non-cost and Genuine !
Chapter 17
Using Effects Effectively
In This Chapter
Understanding and using effects
Getting to know reverb
Introducing delays
Examining offline effects processing
Unless you record your songs using a live band in a perfect acoustic environment, your music is going to sound a little flat without the addi-
tion of some type of effects. Effects allow you to make your music sound like you recorded it in just about any environment possible. You can make your drums sound as if they were recorded in a cathedral or your vocals sound as if you were singing underwater. Effects also have the ability to make you sound better than the real you. For example, you can add harmony parts
to your lead or backup vocals, or you can make your guitar sound like you played it through any number of great amplifiers.
In this chapter, you discover many of the most common effects processors used in recording studios. (Signal processors are the neat software plug-ins behind all the effects you can achieve in your computer-based studio.) You discern the difference between Insert (that is, line) effects and Send/Return effects. You also get a chance to explore ways of using these processors, and I make recommendations for using reverb, delay, and chorus. To top it off, you get a glimpse into offline effects processing, such as pitch-shifting.
The best way to find out how to use effects on your music is to experiment. The more you play around with the different settings, the more familiar you become with how each effect operates. Then you can get creative and come up with the best ways to use effects for your music.
The Bypass button in your effects-processor Plug-In window is your friend. With a click of the Bypass button, you can quickly turn off any effect in use with your signal. Use this button to check your effect settings against your original signal. Sometimes you’ll like the original sound better.
TEAM LinG - Live, Informative, Non-cost and Genuine !
324 Part V: Playing with Plug-Ins
Routing Your Effects
Effects processors can be used as either Send effects, where you send part of your track’s signal through the effect, or Insert effects, where you affect the entire signal from your track. In both cases, you can work with the dry (unaffected) signal and the wet (affected) signals separately. If you use the effect in a Send/Return routing, you can adjust the wet and dry signals with two track faders: Aux Send (opened by clicking the effect’s name in the Send list), and Auxiliary. If you use the effect in a line configuration, the Plug-In window displays a Mix parameter where you can adjust the wet/dry balance.
You choose whether to insert an effect in a track or to use the Send function based on what you intend to do. For example, if you insert the effect into a track as I describe in the next section, that effect alters only the signal that exists on the track it’s inserted into. On the other hand, using an effect send for your effect allows you to route more than one track through that effect. (You can adjust the individual levels going to the Send at each track so you still have control over how much effect is applied to each track going to the Send.) In addition, inserting an effect always puts the effect before the fader in the track (pre-fader); if you use a Send, you can choose whether the effect does its magic before (pre-fader) or after (post-fader) the signal enters the fader that controls the track’s output. If you use a Send to apply the effect to more than one track at a time, you also reduce the amount of processing power the effect has to use. (Inserting the same effect into each track you want to alter ends up using more processing power.)
Inserting effects
If you want to use an effect on only one specific track, you can insert it into the track by using the Insert function. The procedure for inserting plug-ins into a track is common among many, if not all, audio recording programs.
Here are the basic steps for Pro Tools and Logic:
1.Make sure that the Inserts section is showing in the Mixer window. In Pro Tools, you do this by choosing Display Mix Window Shows Inserts. In Logic, choose Windows Show Environment.
2.Click the top arrow on the left side of the Inserts section of the track’s channel strip.
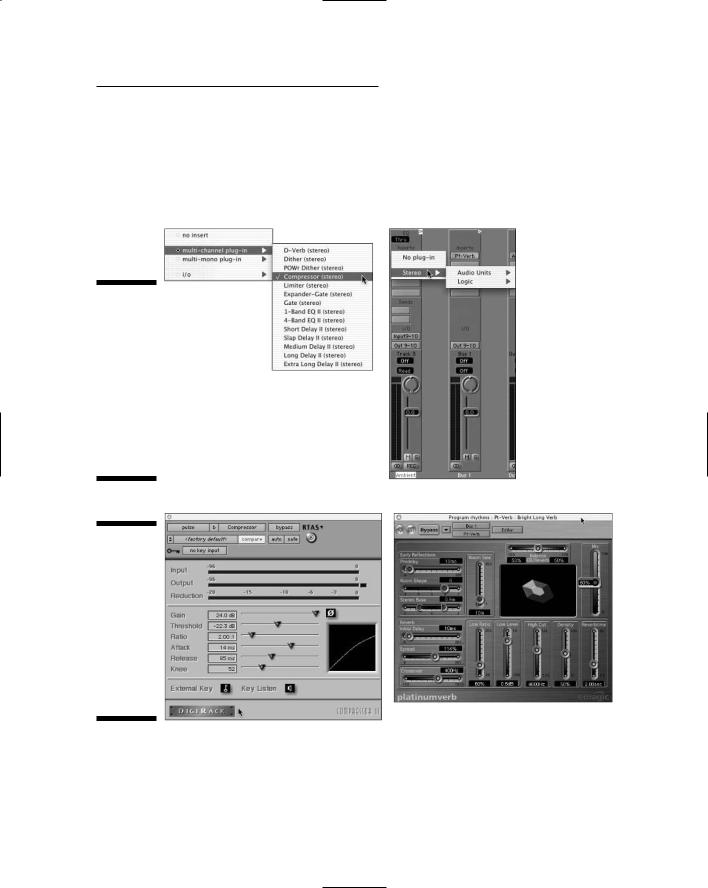
The Insert pop-up menu appears, as shown in Figure 17-1. Pro Tools is on the left, and Logic is on the right.
TEAM LinG - Live, Informative, Non-cost and Genuine !
Chapter 17: Using Effects Effectively 325
3.Choose your desired plug-in — D-Verb, Platinum Verb, Long Delay, whatever — from the menu.
The Plug-In window opens, as shown in Figure 17-2. Here you can set your parameters. (My professional advice on what settings to actually tweak comes later in this chapter, when I cover the individual effects.)
Figure 17-1:
The Insert pop-up menu opens when you press the Insert input selector. Pro Tools (Left) and Logic (Right) are shown.
Figure 17-2:
The Plug-In window (Pro Tools on the left, Logic on the right) opens when you select your effect from the Insert menu.
TEAM LinG - Live, Informative, Non-cost and Genuine !
326 Part V: Playing with Plug-Ins
Sending signals to effects
Sometimes you want to route a bunch of tracks to a single effect (in the case of reverbs, for instance). This involves using the Send in your track’s channel strip and routing it to an auxiliary bus. The process for doing this is pretty similar in most programs; here’s how you do it in Pro Tools:
1.Select one of the buses from the Send selector in the upper section of each track’s channel strip that you want to route to the effect.
The Send Output window appears, as shown in Figure 17-3. The window contains a handy channel strip for controlling the signal being sent to the selected bus.
2.Choose File New Track.
The New Track dialog box appears.
3.Use the drop-down lists to enter the number of tracks you want (1), the type (Auxiliary Input), and whether you want your track in mono or stereo.
4.Using the Input selector pop-up menu, select the bus (the pathway used for Send effects) you used for the Send of the tracks in Step 1 as the input for this auxiliary track.
Figure 17-3:
The Send Output window in Pro Tools lets you control the signal going to the effect.
TEAM LinG - Live, Informative, Non-cost and Genuine !

Chapter 17: Using Effects Effectively 327
5.Select one of the effects plug-ins from the Inserts pop-up menu and insert it into this auxiliary track.
The Effect Plug-In window opens.
6.Adjust the effect settings to get the sound you want.
Pro Tools makes it pretty easy to route a bunch of tracks to a single effect;
Logic takes a slightly different approach, but it’s just as easy:
1.Select one of the buses from the Send selector in the upper section of each track’s channel strip that you want to route to the effect.
When you release your mouse after selecting the bus, the bus is listed, and a trim pot (knob) appears next to the bus number in the track’s channel strip, as shown in Figure 17-4.
2.Adjust the trim pot to a moderate level.
I usually start with about –15dB.
3.Double-click the bus number.
This takes you to the Bus channel strip in the Environment window, where you can choose the effect to insert into the bus.
4.Using the Input selector pop-up menu, select the effects plug-in you want to use from the Inserts pop-up menu.
The Effect Plug-In window opens.
5.Adjust the effect settings to get the sound you want.
Figure 17-4:
With a bus chosen in a track’s Send in Logic, the bus becomes highlighted, and a trim knob appears to control the Send level.
TEAM LinG - Live, Informative, Non-cost and Genuine !
328 Part V: Playing with Plug-Ins
The “Inserting effects” section, earlier in this chapter, gives you the gory details on inserting effects.
Chapter 16 further details plug-ins and how to route signals through your system to them.
Rolling Out the Reverb
Reverb is undoubtedly the most commonly used effects processor. Reverb, short for reverberation, is the natural reflection of sound, which occurs in any enclosed room and is the result of sound waves bouncing off the walls, floor, and ceiling. A small room produces reflections that start quickly and end soon; in larger rooms, halls, or cathedrals, the sound has farther to travel, so you get slower start times and a longer-lasting reverberation.
This room effect enables you to place your track closer to the imaginary “front” or “back” of the mix. You do this by varying how much of the affected signal you include with the unaffected one. For example, mixing a lot of reverb with the dry (unaffected) signal gives the impression of being farther away, so your instrument sounds like it’s farther back in the mix.
You have a ton of reverb choices in the computer-based recording world. Every recording program comes with at least one, but to be honest, most of them don’t sound very natural. This doesn’t mean they aren’t useful, but don’t expect them to sound the same as a good room or an external reverb unit. That said, some reverbs do sound pretty darn good to my ears. But don’t take my word for it — read the next two sections to bone up a bit on reverbs and then give the ones I recommend a shot.
Seeing reverb settings
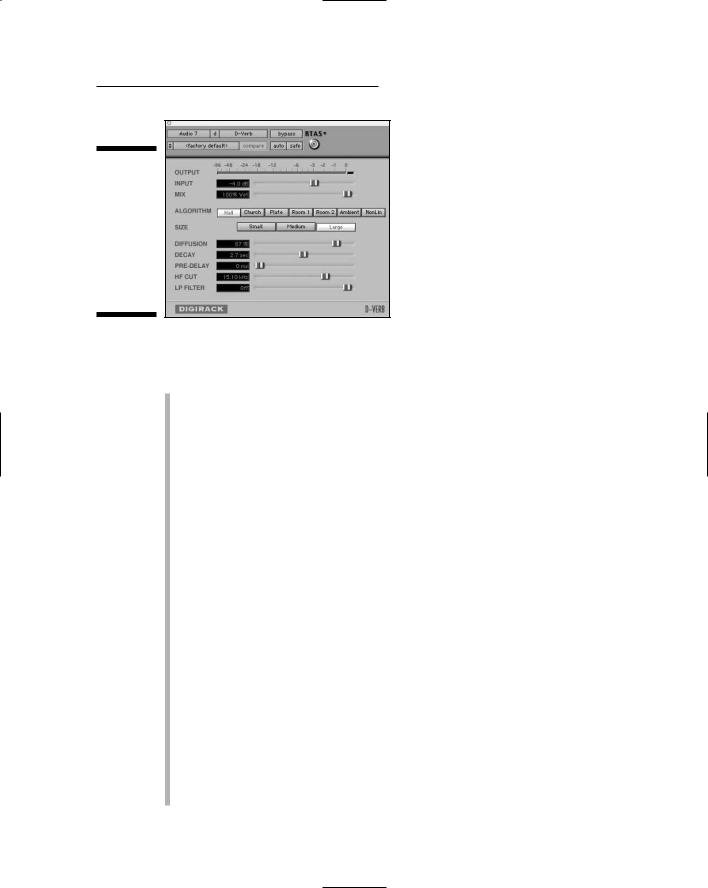
Every reverb plug-in offers different parameters that you can adjust. As much as I’d like to, I can’t possibly run down a comprehensive list of all the parameters you’ll encounter. Instead, I’ve chosen a basic, fairly full-function, popular reverb plug-in from Pro Tools. As you can see in Figure 17-5, a full-function plug-in gives you quite a bit of flexibility.
TEAM LinG - Live, Informative, Non-cost and Genuine !
Chapter 17: Using Effects Effectively 329
Figure 17-5:
Reverb can add ambience to your instrument, giving it a more realistic sound.
The following list explains how the parameters — most, but not all, visible in Figure 17-5 — affect the sound of the reverb:
Algorithm: This setting lets you choose the type of room that the reverb sounds like. You have the option of a hall, church, plate (a type of reverb that uses a metal plate to create its sound), two different rooms, ambient (natural room sound), and non-linear (less natural) sound. Each choice also sets the other parameters for the reverb, but you can adjust those as you like to give your reverb a distinct sound.
Size: This option refers to the room choices you have in the Algorithm setting. You have three setting to choose from: Small, Medium, and Large. Clicking one of these buttons adjusts the rest of parameters in the window, except for the Algorithm setting.
Diffusion: Diffusion affects the density of the reflections in the room you’ve chosen. A higher diffusion setting results in a thicker sound. Think of the diffusion parameter as a way to simulate how reflective the room is. More reflective rooms produce a much higher diffusion. To simulate a less reflective room, use lower diffusion settings.
Decay: The decay is the length of time that the reverb lasts. Larger or more reflective rooms produce a longer decay.
Predelay: A sound reaches your ears before the sound’s reverb does, and the predelay is the amount of time from the sound’s beginning and the start of the reverb, which is described in milliseconds (ms). Because reverb is made up of reflections of sound within a room, the sound takes time to bounce around the room and reach your ears. By then, you’ve already heard the sound because it came directly to you. Predelay helps to define the initial sound signal by separating it from the reverb. This parameter is essential in making your reverb sound natural.
A small room has a shorter predelay than a large room.
TEAM LinG - Live, Informative, Non-cost and Genuine !
330 Part V: Playing with Plug-Ins
HF Cut: This setting allows you to control the rate at which the high frequencies decay. Most of the time the high frequencies decay faster, so being able to control this effect can result in a more natural-sounding reverb.
Low Pass: This filter controls the level of the high frequencies within the reverb. Setting this frequency gives the impression of a darker (lowerfrequency setting) or brighter (higher-frequency setting) room.
Getting started using reverb
Reverb is like garlic: The more you use, the less you can taste it. Just as the new chef puts garlic in everything (and lots of it), many budding engineers make the same mistake with reverb. Go easy. Remember: Less is more.
Here are some other useful tips to keep in mind:
Mixes often sound better when you use reverb on only a few instruments instead of them all. For example, often just the snare drum of the drum set to have reverb on it. The rest of the drums and cymbals remain dry (unaffected).
Try using reverb to glue instruments together. Routing all your drum tracks to the same reverb, for instance, can make them sound like they were all recorded in the same room. When gluing instruments together, make sure that you adjust the Send level for each instrument so that the effect sounds natural. Also, use less reverb for all the instruments than you would for just one. This keeps the sound from becoming muddy from using too much reverb.
Think about how you want each instrument to sit in the mix when you choose reverb. Make sure the type and amount of reverb fit the song and the rest of the instruments.
Try putting the dry (unaffected) sound on one side of the stereo field and the reverb on the other. For example, if you have a rhythm guitar part that you set at 30 degrees off to the right of the stereo field, set the reverb 30 degrees off to the left. This can be a nice effect.
To keep the vocals up front in the mix, use a short reverb setting. A vocal plate is a great choice because the decay is fast. This adds a fair amount of the reverb to the vocal without making it sit way back in the mix.
Experiment with room types, sizes, and decay times. Sometimes a long decay on a small room reverb sounds better than a short decay on a large room or hall reverb.
TEAM LinG - Live, Informative, Non-cost and Genuine !
Chapter 17: Using Effects Effectively 331
Detailing Delay
Along with reverb, delay is a natural part of sound bouncing around a room. When you speak (or sing or play) into a room, you often hear not only reverb, but also a distinct echo caused by the return of the original sound bouncing off the walls of the room to your ears. This echo might be short or long depending on the size of the room. The original sound might bounce back to you as a single echo or as multiple, progressively quieter ones. These echoes are created by a delay effect.
Digging into delay settings
Several types of delay effects exist, including a slap-back echo, tape delay, and multiple delays, and each of them is designed to add dimension to your instrument. To create these various effects, you adjust several parameters. The delay plug-ins included with audio recording programs have a lot of similarities.
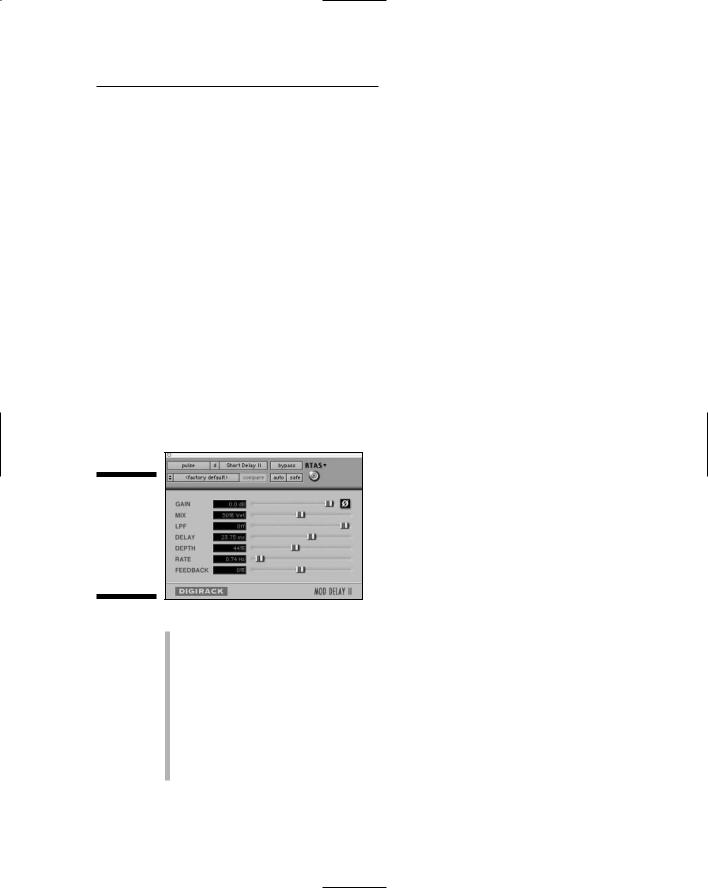
Figure 17-6 shows a delay plug-in that comes with Pro Tools so you can see how this type of plug-in works. This plug-in offers the following parameters:
Figure 17-6:
A Delay plug-in allows you to create various echoes.
Gain: This lets you set the signal level going into the delay.
Mix: This parameter controls the output level of the effect. The higher you set this parameter, the louder the delayed signal is relative to the original signal.
LPF: The low-pass filter (LPF) lets you filter out some of the high frequencies from the delay.
Delay: This parameter controls the amount of time between the initial signal and the repeated sound. The time is listed in milliseconds (ms) and can be as short as a few milliseconds or as long as several seconds.
TEAM LinG - Live, Informative, Non-cost and Genuine !