

PC Recording Studios for Dummies (Jeff Strong)
.pdf152 Part III: Choosing and Installing Recording Software
Figure 8-1:
Select
Windows
Classic
under
Themes.
5.Select the Desktop tab and then select None from the Background list box, as shown in Figure 8-2.
6.Click OK.
This procedure disables the active desktop in Windows, which might free up some valuable system resources depending on how your system was set up to begin with.
Figurer 8-2:
Under the Desktop tab, select None from the Background options.
TEAM LinG - Live, Informative, Non-cost and Genuine !
Chapter 8: Installing Your Software 153
Choosing Control Panel settings
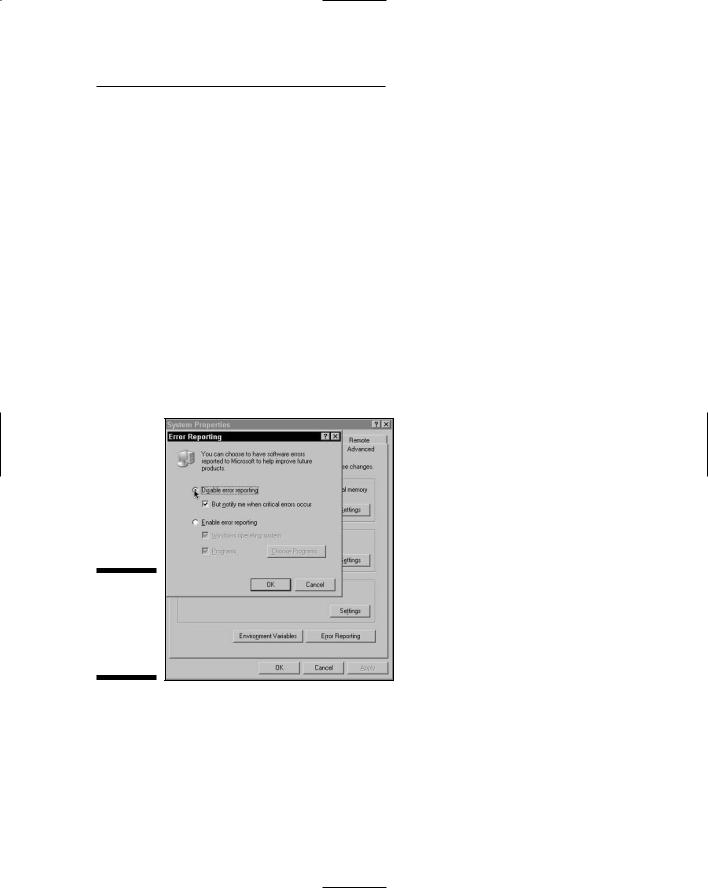
Windows XP is remarkably stable, but for those rare times when it (or a program running under Windows) crashes, it generates an error report and asks whether you want to send the report to Microsoft. This feature, called Error Reporting, takes system resources to run — and because you’d rather have those resources working hard to keep your recording software running smoothly, you need to disable Error Reporting. Here’s the drill:
1.Choose Start Settings Control Panel.
The contents of the Control Panel folder appear on-screen.
2.Double-click the System icon.
The System Properties dialog box appears.
3.Select the Advanced tab.
4.Click the Error Reporting button.
The Error Reporting dialog box appears, as shown in Figure 8-3.
Figure 8-3:
Select the
Disable
Error
Reporting
option.
5.Select the Disable Error Reporting radio button.
6.Click OK to close the Error Reporting dialog box.
7.Click OK in the System Properties dialog box to close it. Leave the Control Panels window open.
TEAM LinG - Live, Informative, Non-cost and Genuine !
154 Part III: Choosing and Installing Recording Software
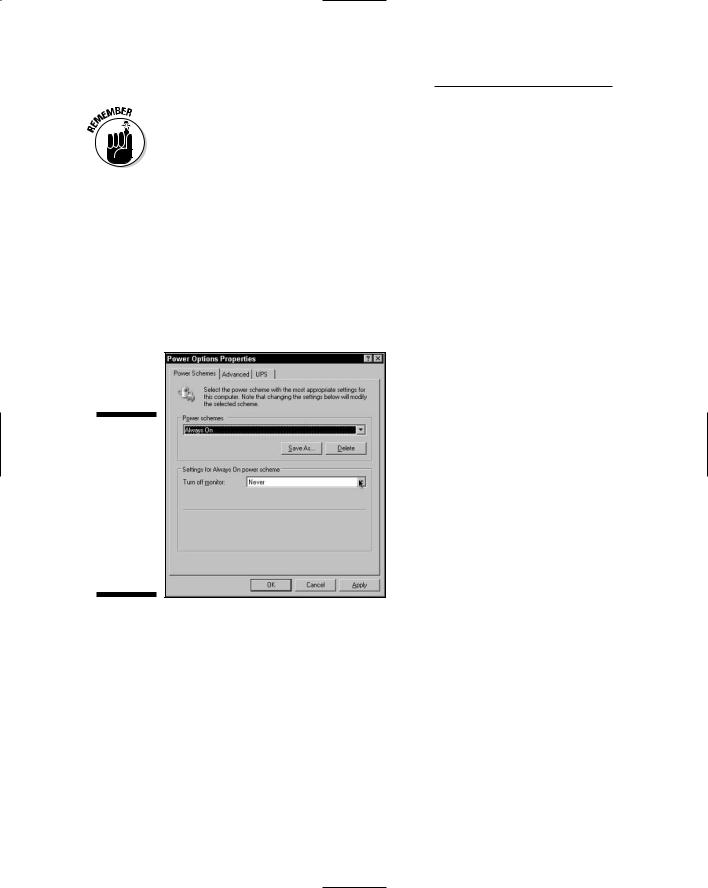
Standby power should be set to Always On for whatever audio recording system you use. This ensures that your computer doesn’t go to sleep while you’re recording. To do this, follow these steps:
1.Open the Control Panel if you closed it already. (Choose Start Settings Control Panel.)
2.Double-click the Power Options icon.
The Power Options Properties dialog box opens.
3.Select the Always On option from the Power Schemes drop-down list.
4.In the Settings for Always On Power Scheme section of the dialog box, select Never from the Turn Off Monitor drop-down list, as shown in Figure 8-4.
Figure 8-4:
Select the Always On and Never options to keep your
monitor from shutting down during a long song.
5.Click Apply to accept these settings.
6.Click OK to close the Power Options Properties dialog box.
7.Leave the Control Panel open. You have more settings to adjust.
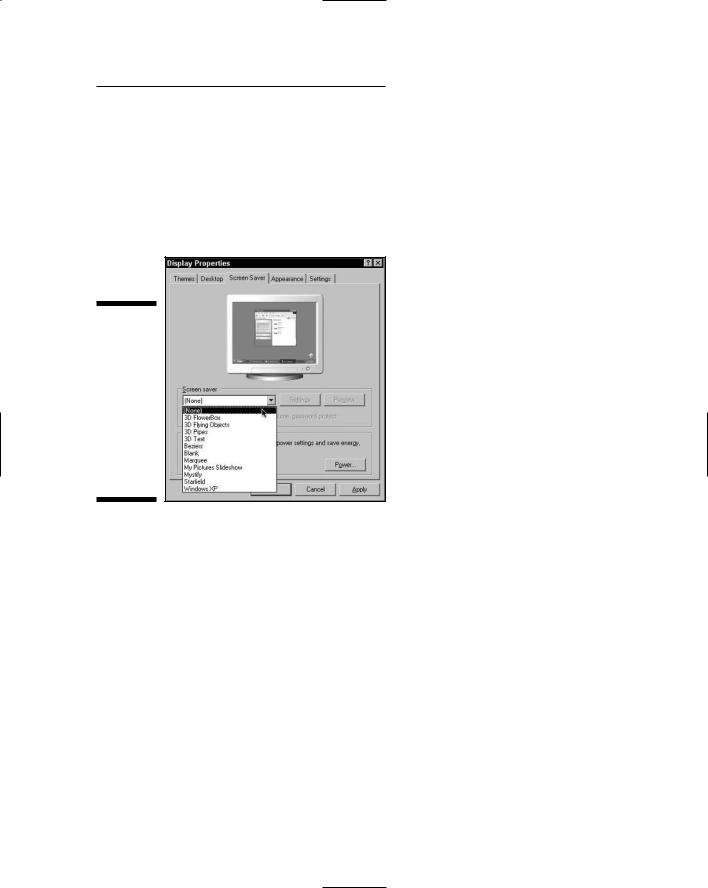
You also want to make sure that no screen saver appears on your screen as you record because if it does you won’t be able to see what’s happening
on-screen and the screen saver might crash your system to boot. The following steps show you how you can make sure that no screen saver makes an unplanned appearance:
TEAM LinG - Live, Informative, Non-cost and Genuine !
Chapter 8: Installing Your Software 155
1.Open the Control Panel if you closed it already. (Choose Start Settings Control Panel.)
2.Double click the Display icon.
The Display Properties dialog box makes an appearance.
3.Select the Screen Saver tab and then select None from the Screen Saver drop-down list, as shown in Figure 8-5.
Figure 8-5:
To keep a screen saver from disrupting your recording session, select None from the Screen Saver list.
4.Click the Apply button.
5.Click the Appearance tab and then click the Effects button in the lower-right corner of the tab.
The Effects dialog box opens, as shown in Figure 8-6.
6.Make sure that none of the seven options listed in the window are selected with a check mark. If any of them are selected, simply click those pesky check marks so they disappear.
7.Click OK to close the Effects dialog box.
8.Click OK to close the Display Properties dialog box.
9.Leave the Control Panel open; there’s still one more thing you have to do.
TEAM LinG - Live, Informative, Non-cost and Genuine !
156 Part III: Choosing and Installing Recording Software
Figure 8-6:
Turn off all display effects by making sure none of the check boxes in this dialog box are selected.
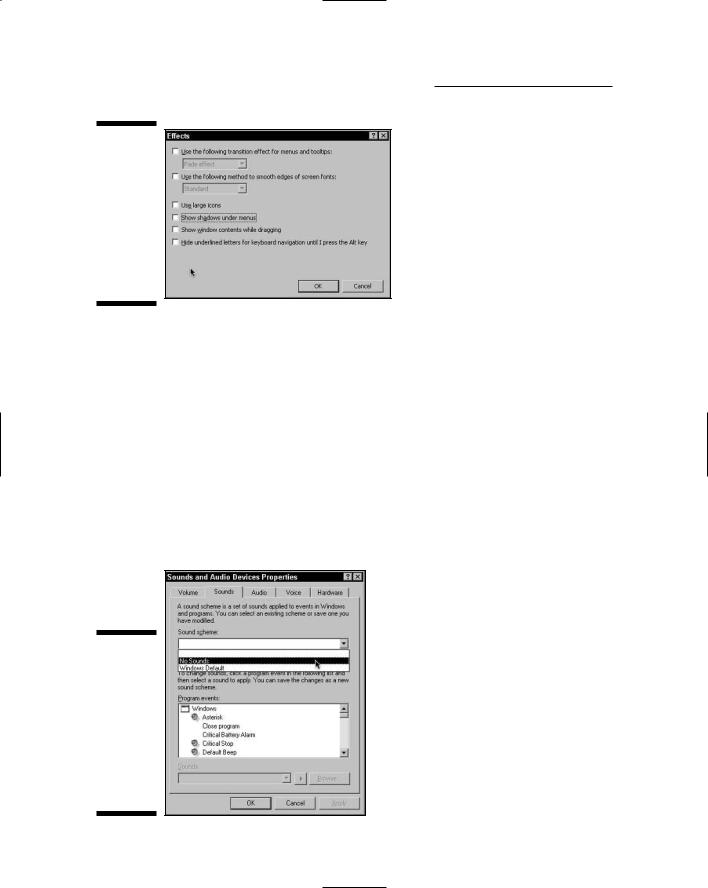
Your system sounds need to be disabled to prevent potential problems with audio programs — problems such as clicks, pops, or dropouts in your audio or having your system crash when you record or playback audio. To disable your system sounds, follow these steps:
1.Open the Control Panel if you closed it already. (Choose Start Settings Control Panel.)
2.Double-click the Sounds and Audio Devices icon in the Control Panel.
The Sounds and Audio Devices Properties dialog box opens.
3.Click the Sounds tab.
4.Select No Sounds from the Sound Scheme drop-down list, as shown in Figure 8-7.
Figure 8-7:
Selecting No Sounds from the Sound Scheme drop-down list silences those pesky internal sounds.
TEAM LinG - Live, Informative, Non-cost and Genuine !

Chapter 8: Installing Your Software 157
5.Click Apply to accept this change.
6.Click OK to close the Sounds and Audio Devices Properties dialog box.
7.Close the Control Panel by clicking the X at the upper-right corner of the window.
Congratulations! You’ve just configured your system settings.
Enabling DMA
All IDE hard drives on your system must have DMA (direct memory access) enabled before your recording program can effectively write and read data to and from your hard drives. This takes the central processing unit (CPU) out of the process and improves the transfer of data from your RAM to your hard drive. To enable DMA, do the following:
1.Right-click the My Computer icon on the Windows desktop.
2.From the contextual menu that appears, choose Properties to access the Properties dialog box, and then click the Hardware tab.
3.On the Hardware tab of the Properties dialog box, click the Device Manager button.
4.In the Device Manager dialog box, double click the IDE ATA/ATAPI Controllers branch of the navigation tree.
The navigation tree expands to show the controllers associated with your system.
5.From the listing, double click the Primary IDE Controller branch and select the Advanced Settings tab.
If it doesn’t already say DMA If Available under the Transfer Mode option, change it so that it does. If you have several disk drives on your system, you have to do the same for each drive.
6.Click OK and repeat the same steps for the Secondary IDE controller.
It’s in the Device Manager navigation tree, directly below the Primary controller.
Disabling AutoPlay
AutoPlay is a feature of Windows XP that automatically runs certain programs or plays music on a CD when you insert it into your computer’s CD drive. This is a handy feature in everyday life, but can cause problems with audio recording software because resources are used in your computer to run this feature, which can slow your system down. In addition, AutoPlay has been known to cause glitches in audio recording or playback on some systems. For the sake of your music, disable AutoPlay for all CD drives on your system. Here’s the drill:
TEAM LinG - Live, Informative, Non-cost and Genuine !

158 Part III: Choosing and Installing Recording Software
1.Double click the My Computer icon on the Windows desktop.
The My Computer window duly appears.
2.In the My Computer window, right-click the icon for your CD drive.
3.From the contextual menu that appears, select Properties to access the Properties dialog box and then select the AutoPlay tab.
4.On the AutoPlay tab, select Music Files from the Select Content Type drop-down list.
5.At the bottom of the Properties dialog box, select the Prompt Me Each Time to Choose an Action option.
6.Repeat Steps 4 and 5 with the Pictures, Video Files, Mixed Content, Music CD, and Blank CD options for the Select Content Type dropdown list.
7.Click OK.
8.Repeat Steps 2 through 7 for each CD or DVD drive on your computer.
Disabling virus protection
Virus protection is an important thing to have on any computer that connects to the Internet, but virus protection can also adversely affect audio recording performance. Ideally, your computer would be dedicated to recording, editing, and mixing your music. However, you will likely be using an allpurpose computer that you will use for many tasks, such as surfing the Web for business, pleasure, and/or helping with your children’s homework. In that case, be sure to turn off your virus protection whenever you’re running any audio recording program. Check with the documentation that came with your virus-protection software for the best way to do this. (And don’t forget to re-enable virus protection before you log on to the Internet again.)
I hate to repeat myself, but I will: If you’re really serious about having a bulletproof system, try to keep any extra software (such as games, finance, publishing, graphics, and so on) off your audio computer. At the very least, keep all other applications closed while you work on your music.
Connecting your hardware
When you have your system fine-tuned (which I cover in the previous section), you can connect your hardware. Shut down your computer and do what needs to be done to connect your audio interface. (Not sure what needs to be done? Each piece of hardware has its own installation procedure, as spelled out in it’s accompanying manual, but I do give you some general guidelines in Chapter 5.) When you have the hardware connected, turn on your computer.
TEAM LinG - Live, Informative, Non-cost and Genuine !

Chapter 8: Installing Your Software 159
Then, after the Windows desktop appears, turn on the power to your audio interface. (If you’re using a product that doesn’t have a power switch, you can obviously ignore this particular step.)
On Windows PCs, it’s important to wait to install any software until after you’ve attached your hardware, and, if needed, powered it on. The complete details for attaching hardware are located in Chapter 5.
Installing your software
After you complete the Windows system-setup adjustments that I list in earlier sections, you can install your audio program. You need to check the documentation that came with your software for the specific procedure, but most software installations work pretty much the same way. With that in mind, here’s a rundown on the steps involved when installing Pro Tools, one of the more popular audio programs out there. As you can see, it’s pretty simple. Just follow these steps:
1.Connect your interface to your computer.
As I explain in Chapters 5 and 7, Pro Tools runs only with Digidesign hardware, so your interface of choice had better be a Digidesign model. If you have a 002 or 002 Rack, this means connecting the FireWire cable, whereas the Mbox requires a USB connection, and the 001 requires plugging in the PCI card into an open PCI slot and making the connection between the PCI card and the break-out box — the rest of the 001 system.
2.Boot up your PC.
The Windows desktop appears.
3.If your Digidesign interface has a separate power switch, this is the time to turn on the interface.
If it doesn’t have a separate power switch, jump right to Step 4.
4.Insert the Pro Tools software CD in your computer’s CD drive.
5.Double-click the My Computer icon on the Windows desktop.
The My Computer window appears.
6.In the My Computer window, double-click the icon for your CD drive.
The contents of the CD are displayed in a new window.
7.Double click the Pro Tools LE Installer folder.
The contents of the Pro Tools LE Installer folder are displayed for all to see.
8.Double-click the Setup icon.
TEAM LinG - Live, Informative, Non-cost and Genuine !

160 Part III: Choosing and Installing Recording Software
9.After the Installer dialog box appears, click Next to continue.
10.Accept the default paths for installation — they’re fine, and it’s less hassle — and then click the Install button.
11.Wait for the installation to complete.
12.Restart your computer.
Installing Software on a Mac
Getting up and going on a Mac is easy. When you have a computer that has the right specs (I spell out specs in Chapter 3), it will take you less than 15 minutes to be ready to plug in your hardware (Chapter 5 covers this) and start recording (as Chapter 10 details). This section takes you through, step by step, the process of turning your Mac into a lean, mean, audio recording machine.
Recording, editing, and mixing audio on a computer takes a toll on your system’s resources. The best (and time-tested) way to ensure that you have as few problems as possible is to keep your computer lean by dedicating it to audio only. Use a different computer for all your other chores such as home finance, word processing, or games. If you have only one computer, I strongly suggest that you keep all other applications turned off while you record.
That said, I’m going to contradict myself and tell you that I’ve done a lot of testing by using audio programs on different Mac computers with OS X and my experience is that it’s a very robust operating system that seems to handle having more than just audio on the computer. In fact, I’ve successfully run an Internet browser while downloading music, a graphics program, a photo-editing program, a word processor, and an e-mail program while mixing 8 tracks of audio and didn’t have any problems. I don’t recommend that you have these other programs on while you work, but my experience is that OS X seems to be up to the task of at least having other programs on your system.
If you decide to use your everyday computer for recording audio, use a dedicated hard drive for the audio data and defragment it frequently. Also, don’t put any other data on this drive — ever. If your system gets sluggish and you start to experience audio clicks, pops, or dropouts, it’s time to defragment your drive.
Setting system settings
Before you install any audio recording software, check to make sure that you have the latest version of OS X. (Also check your software manufacturer’s Web site to make sure the latest version of OS X is supported.) Then follow these steps to prepare your system for the software installation:
TEAM LinG - Live, Informative, Non-cost and Genuine !
Chapter 8: Installing Your Software 161
1.Log on to your computer by using an administration account.
Your OS X documentation spells out this procedure for you.
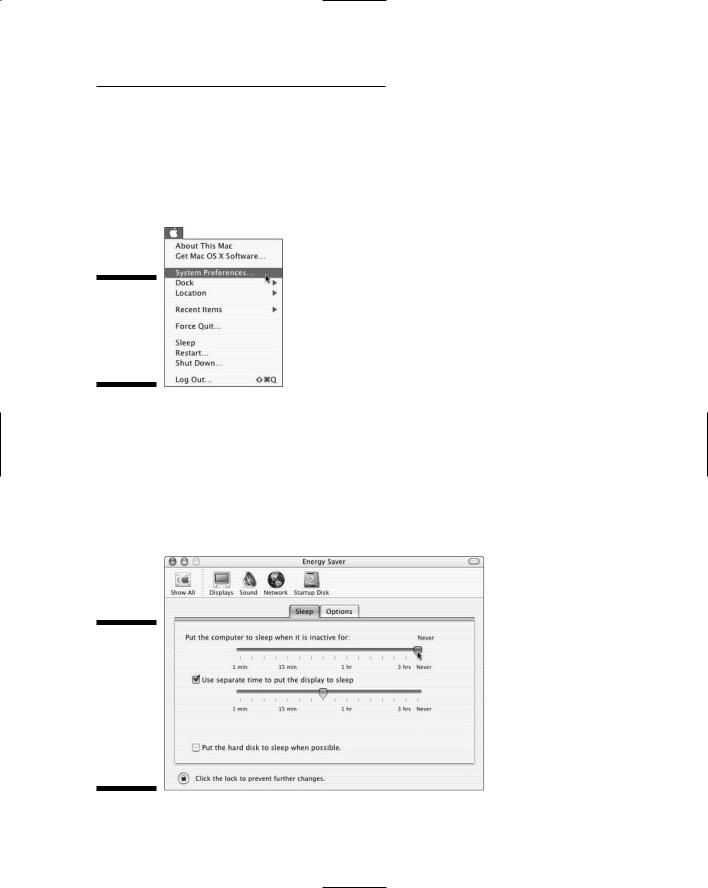
2.Choose Apple System Preferences, as shown in Figure 8-8.
The System Preferences dialog box appears.
Figure 8-8:
Systems preferences are located under the Apple menu.
3.Under the Hardware Options, click the Energy Saver icon.
A new dialog box opens.
4.Under the Sleep tab, slide the slider for Put the Computer To Sleep When It Is Inactive For option over to Never, as in Figure 8-9.
This keeps your computer from shutting down if you record a long song because you don’t touch any keys while recording.
Figure 8-9:
Turn off the sleep function for the computer in the Energy Saver dialog box.
TEAM LinG - Live, Informative, Non-cost and Genuine !