

PC Recording Studios for Dummies (Jeff Strong)
.pdf332 Part V: Playing with Plug-Ins
Depth: This parameter lets you add modulation to the delay so that you can create a chorus effect. (See the “Creating Chorus Effects” section, later in this chapter, for more on chorus and flange effects.) The higher the level on this setting, the greater the modulation.
Rate: This setting lets you adjust the amount of time that the modulation takes to go once through its cycle.
Feedback: The Feedback parameter controls how many times the echo repeats. A low setting makes the echo happen just once, and higher settings produce more echoes.
Some delay plug-ins also offer the ability to set the delay to the tempo of your song. The following list covers these settings:
Tempo Match: This option allows you to set the delay to beat in time with the music. The Tempo Match feature is referenced to the tempo map that you set for the song. You can set this parameter to any note division, from 16th notes to whole notes, if you want the delays to keep time with your song. (Quarterand eighth-note delays are the most commonly used note divisions.)
Set that tempo map before you start to record. If you didn’t bother to set a tempo map — metronome settings for each section of the song — this feature will be relatively useless to you because it won’t have a reference point from which to draw. (For tips on creating and using tempo maps, see Chapter 10.)
Meter: This lets you set the meter of the song and the subdivision of the measure, such as quarter note or eighth note, that you want the delay to follow. When you change this parameter, the Delay parameter moves, too.
Groove: Use this parameter to adjust the rate of the delay in relation to the tempo and subdivision you chose. By changing this setting, you alter the delay (by percentages) away from the strict tempo and subdivision settings. This can be useful if you’re adjusting the exact delay that you want. When you adjust this parameter, the Delay setting changes as well.
Getting started using delay
Many mix engineers and producers use delay frequently in contemporary music, and many times you don’t hear it unless you listen carefully. Other times it’s prominent in the mix (for example, the snare drum in some reggae music). Here are ways you can use delay in your music:
TEAM LinG - Live, Informative, Non-cost and Genuine !

Chapter 17: Using Effects Effectively 333
One of the most effective ways to use delay is as a slap-back echo on vocals. A slap-back echo consists of one to three echoes spaced very closely together, which fattens up the sound of the vocals. You generally want to set your time parameter between 90 and 120 milliseconds. Set the level so you barely hear the first echo when your vocal is in the mix and adjust it from there until you like the sound. In pop music, a slapback echo and a vocal plate reverb are commonly used on lead vocals. (It was really common in the 1950s, and shows up a lot — less subtly — in rockabilly.) A good place to start is a slap delay (Pro Tools) or a tape delay (Logic).
Use the Tempo Match feature to have your delay echo in time with the music. This can add some depth to the mix without creating a muddy or cluttered sound. Be careful — if you use this too much, it can make your music sound annoyingly repetitive.
Creating Chorus Effects
The chorus effect takes the original sound and creates a copy that is very slightly out of tune with the original and which varies over time. This variance is called modulation, and the result is an effect that can add interest and variety to an instrument. Many recordists use chorus quite extensively to add fullness to an instrument, particularly guitars and vocals. Some programs (Pro Tools, for example) don’t come with a chorus plug-in, but other programs (Logic) have several modulation effects to choose from.
If reverb is like garlic, chorus is cayenne pepper. You might get away with a little too much garlic in your food without too much trouble, but if you add too much cayenne, you run the risk of making your food inedible. Such is the case with the chorus effect. Used sparingly, it can add a lot to your music; overdone, it can wreak havoc on a good song. Keep the following tips in mind:
To fill out a vocal track, try setting the rate at 2 Hz, the depth with a value of about 20 to 30, and the delay at 10 to 20 ms. Keep the Feedback level low.
Use a chorus on backup vocals to make them much fuller and allow you to use fewer tracks.
Pan the chorus to one side of the mix and the dry (unaffected) signal to the other. This can be especially interesting on guitars and synthesizer patches.
TEAM LinG - Live, Informative, Non-cost and Genuine !

334 Part V: Playing with Plug-Ins
TEAM LinG - Live, Informative, Non-cost and Genuine !
Chapter 18
Digging into Dynamics Processors
In This Chapter
Understanding and using dynamics processors
Getting to know compressors and limiters
Introducing gates and expanders
Examining side-chain processing
Dynamics processors allow you to control the dynamic range of a signal. The dynamic range is the difference between the softest and loudest sig-
nals that a sound source produces. The dynamic range is listed in decibels (dB). The larger the dynamic range, the more variation exists between the softest and loudest notes.
The four types of dynamics processors are compressors, limiters, gates, and expanders. This chapter gives you the lowdown on the different types and how they can help you do several important adjustments to your music. You can add punch, smooth out an instrument’s sound, even out an erratic performance, eliminate noise from a track, and more.
Dynamics processors can be tricky to use. With just a minor change in settings, you can go from no noticeable change in the source sound to supreme ugliness in your track. The worst part is that you might not even notice it as you tweak the settings. The best way to ensure that you don’t mess up your mix with these processors is to make it a practice to switch the effect on and off as you work by using the Bypass button in the Plug-In window. This lets you check your effect settings against your original signal, reducing the possibility that you’ll use too much processing. Don’t be afraid to skip the processor and go with the original sound if you don’t get it to sound better.
Connecting Dynamics Processors
Dynamics processors are Insert effects. This means you insert them into a track so they become part of it, affecting the track’s entire signal. In most computer-based recording programs, applying a dynamics processor usually
TEAM LinG - Live, Informative, Non-cost and Genuine !
336 Part V: Playing with Plug-Ins
involves choosing the plug-in in the Insert section of your track’s Channel strip. Here’s how you do it in Pro Tools and Logic:
1.In Pro Tools, choose Display Mix Window Shows Inserts to make sure that the Inserts section is showing in the Mix window; In Logic, choose Windows Environment to show the Mixer window.
2.Click the top arrow on the left side of the Inserts section of the track’s channel strip (Pro Tools) or click and hold over the insert in the track’s channel strip (Logic).
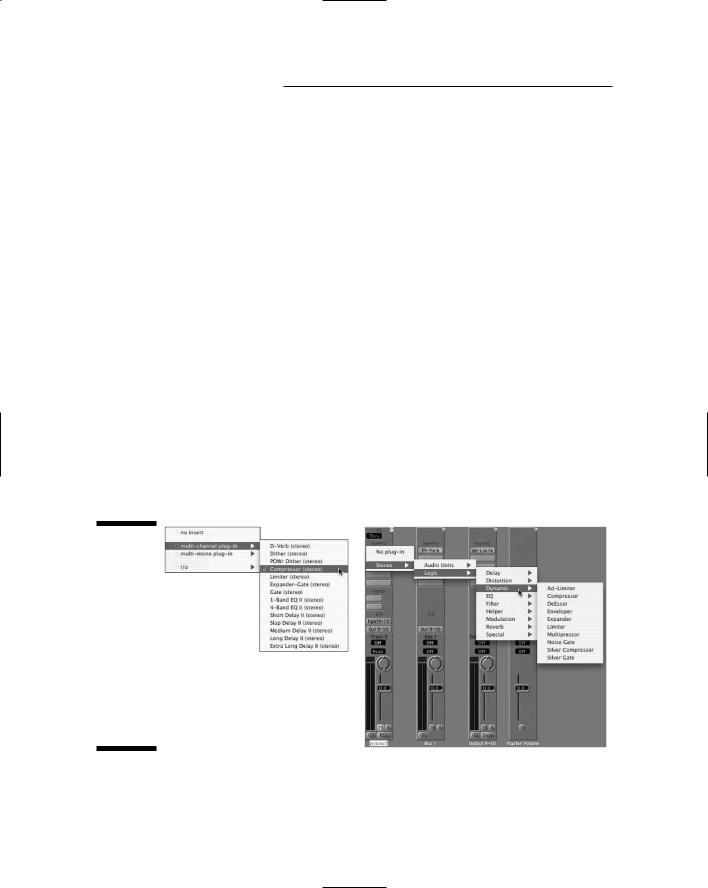
The Insert pop-up menu opens, as shown in Figure 18-1.
3.In Pro Tools, select the Multi-Channel Plug-In if your track is a stereo track; select the Multi-Mono Plug-In option if your track is a mono track. In Logic, choose Mono Logic Dynamic for a mono track or choose Stereo Logic Dynamic for a stereo track.
4.In Pro Tools, select the Compressor, Limiter, Expander-Gate, or Gate option. In Logic, choose one of several dynamic processors in the drop-down list.
The chosen plug-in window opens, and you’re now ready to create your settings. The rest of this chapter explains how and when to use the different processors. For example, you’d use a compressor to even out an erratic performance. (Later in this chapter, you can see the Compressor, Limiter, Expander-Gate, and Gate windows in Pro Tools in Figures 18-2, 18-3, 18-4, and 18-5, respectively.)
Figure 18-1:
Open the Insert popup menu and select the dynamics processor plug-in to insert into your track. Pro Tools (Left) and Logic (Right).
TEAM LinG - Live, Informative, Non-cost and Genuine !

Chapter 18: Digging into Dynamics Processors 337
Introducing Compressors
The compressor’s job is to compress (go figure) the dynamic range of the sound being affected. The compressor not only limits how loud a note can be but also reduces the difference between the loudest and softest note — which is pretty much what I mean when I say something compresses the dynamic range.
You use compressors for three main purposes (although other purposes certainly exist as well):
They keep transients — the initial attack of an instrument — from creating digital distortion during tracking. This is common with drums that have a very fast attack (initial signal), which can easily overload the recorder (or converters or preamps).
They even out any performance that shows signs of a high degree of unwanted dynamic variation. An example of unwanted dynamic variation is a singer who might have great energy but poor mic control — for example, jumping and dancing around in front of the mic. As a result of all that movement, some recorded passages are too loud, and others are too quiet. This type of compression is usually performed during the tracking (see Chapter 10) or mixing (see Chapter 14) stage.
They raise the overall apparent level of the music during mastering. For example, compressing your mixed song just a couple of decibels brings up the quieter parts of music and makes your entire song louder.
I cover Purpose 1 in Chapter 9, and you can find Purpose 3 in Chapter 14. So that leaves Purpose 2 to explore (with sample settings) later in this section.
Getting to know compressor parameters
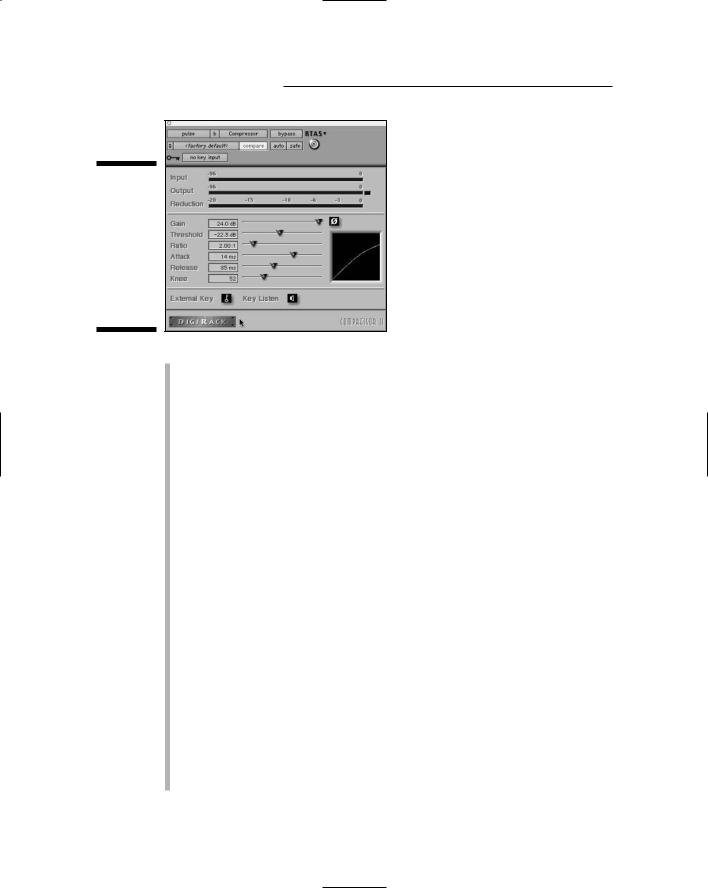
You can find hundreds of different compressor plug-ins for your computerbased system, and many of those plug-ins have unique controls. Because I can’t explain all of them in this section (it would take an entire book to do that), I highlight a very common compressor setup from a very common audio recording program: Pro Tools. You insert this plug-in into a track by following the procedures in the “Connecting Dynamics Processors” section at the beginning of this chapter. This plug-in contains the following parameters (listed top to bottom as they appear in Figure 18-2):
TEAM LinG - Live, Informative, Non-cost and Genuine !
338 Part V: Playing with Plug-Ins
Figure 18-2:
The Pro Tools compressor plug-in lets you adjust several parameters to even out your sound.
Gain: The Gain slider allows you to adjust the level (volume) of the signal going out of the compressor. This is listed in decibels (dB). Because adding compression generally reduces the overall level of the sound, you use this control to raise the level back up to where it was when it went in.
Threshold: The Threshold setting dictates the decibel level at which the compressor starts to act on the signal. This setting is often listed as decibel below peak (0dB). In other words, a setting of –6dB means that the compressor starts to act when the signal is 6dB below its calibrated 0dB mark. (In digital systems, 0dB is the highest level a signal can go before clipping.)
Ratio: The Ratio setting shows how much the compressor affects the signal. For instance, a ratio of 2:1 means that every decibel that your signal goes over the threshold setting the level of this signal is reduced by two decibels. So if a signal goes 1dB over the threshold setting, its output from the compressor will be only 0.5dB louder. With ratios above 10:1, your compressor starts to act like a limiter. (See the later section “Looking into Limiters.”)
Attack: The Attack slider controls how soon the compressor kicks in. The attack is defined in milliseconds (ms); the lower the number, the faster the attack.
Release: The Release slider controls how long the compressor continues affecting the signal after it drops back below the Threshold setting. Like the attack, the release is defined in milliseconds. The lower the number, the faster the release time.
Knee: The Knee slider controls how the compressor behaves as the input signal passes the threshold. The lower the Knee setting, the more gradually the compressor acts as the signal passes the threshold.
TEAM LinG - Live, Informative, Non-cost and Genuine !

Chapter 18: Digging into Dynamics Processors 339
Getting started using compression
Regardless of the type of compressor or audio recording program you use, I can tell you that this particular processor is one of the most useful — and one of the most abused — pieces of gear in the recording studio. The most
difficult part of using compression is that every instrument reacts differently to the same settings. In this section, I offer you some guidelines and ideas for using the compressor effectively.
The following steps show you one good way to get familiar with the compressor:
1.Start with a high Ratio setting (between 8:1 and 10:1) and move the Threshold slider all the way to the right.
2.While playing your track, slowly move the Threshold slider back to the left; watch the meters and listen carefully.
As you reduce the threshold, notice where the meters are when you start hearing a change in the sound of the track. Also notice what happens to the sound when you have the threshold really low and the meters are peaked. (The sound is very different from where you started.)
3.Slowly move the Threshold slider back to the right and notice how the sound changes back again.
After you get used to how the sound changes as you adjust the Threshold setting, try using different Attack and Release settings and do this procedure again. The more you experiment and critically listen to the changes made by the different compressor settings, the better you’ll understand how to get the sound that you want. The following guidelines can also help you achieve your desired sound:
Try to avoid using any compression on your 2-track mix while you mix your music. Compression is a job for the mastering phase of your project. If you compress your stereo tracks during mixdown, you limit what you can do to your music in the mastering stage. This is true even if you master it yourself and think you know what you want during mixdown.
If you hear noise when you use your compressor, you’ve set it too high.
What’s happening is you’re compressing the loud portions enough to make the level of the softest sections of the music (including any noise) much louder in comparison. To get rid of the noise, decrease the Ratio or the Threshold settings.
To increase the punch of a track, make sure that the Attack setting isn’t too quick. Otherwise, you lose the initial transient and the punch of a track.
TEAM LinG - Live, Informative, Non-cost and Genuine !
340 Part V: Playing with Plug-Ins
To smooth out a track, use a short Attack setting and a quick Release time. This evens out the difference in level between the initial transient and the body of the instrument. The result is a smoother sound.
Less is more when using compression. Resist the temptation to move those sliders too much to the right — it just squashes your music. On the other hand, if that’s an effect that you’re going for, don’t be afraid to experiment.
Looking into Limiters
The limiter works much like the compressor except that it limits the highest level of a sound source. Any signal above the threshold is chopped off rather than compressed. Limiters are great for raising the overall level of an instrument and keeping transients from eating up all the headroom (maximum level) of a track.
Understanding limiter settings
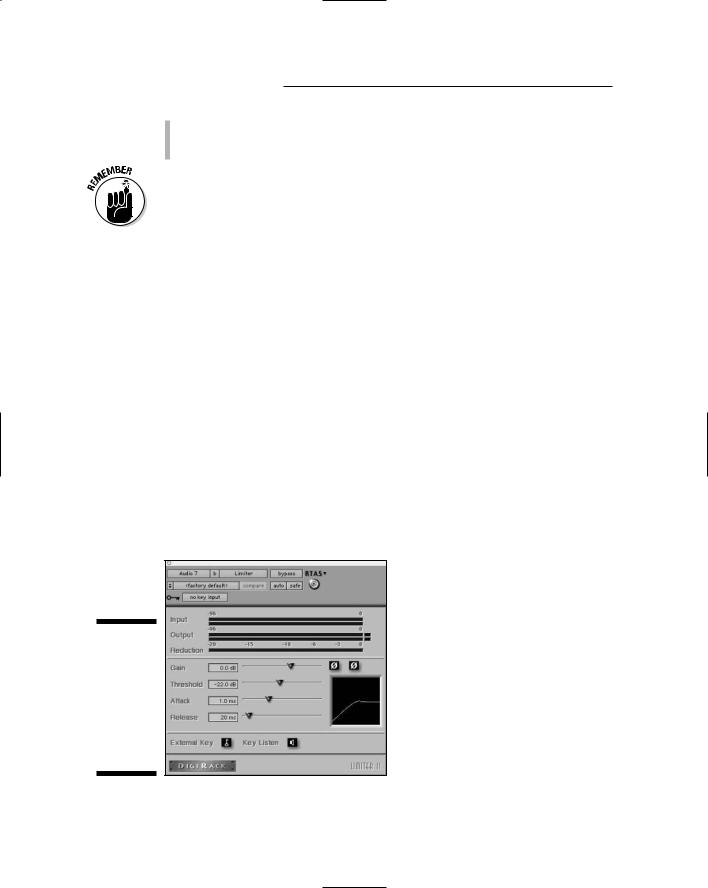
As is the case with compressor plug-ins, limiters come in many varieties. Still, many of them use a few common controls. In this section, I detail the limiter that comes standard with Pro Tools (shown in Figure 18-3). Again, you insert this plug-in into a track by following the procedures in the “Connecting Dynamics Processors” section at the beginning of this chapter. The limiter contains the following parameters:
Figure 18-3:
The limiter plug-in limits the maximum level of the signal passing through it.
TEAM LinG - Live, Informative, Non-cost and Genuine !

Chapter 18: Digging into Dynamics Processors 341
Gain: The Gain slider allows you to adjust the level (volume) of the signal going out of the limiter. The level is listed in decibels.
Threshold: The Threshold setting dictates the level at which the limiter starts to act on the signal. This is listed in decibels (dB). This setting is often listed as decibels below peak (0dB). So a setting of –5dB means that the limiter kicks in when the signal is 5dB below its calibrated 0dB mark. (In digital systems, 0dB is the highest level a signal can go before clipping.)
Attack: The Attack slider controls how soon the limiter kicks in. The attack is defined in milliseconds (ms); the lower the number, the faster the attack.
Release: The Release slider controls how long the limiter continues limiting the signal after it drops back below the Threshold setting. The release is defined in milliseconds. The lower the number, the faster the release time.
Setting limits with the limiter
The limiter is essentially a compressor on steroids, so many of the settings that you can use for a compressor work for limiters. The only difference is that you don’t have the Ratio and Knee settings. Keep in mind these two tips when using limiters on your tracks:
When using limiters to raise the volume of a track or mix, limit only 2 or 3dB at a time. This way, the limiter doesn’t alter the sound of your signal; it just reduces the highest peaks and raises the volume.
To add grunge to a track, lower the Threshold setting so that you limit the signal 6 to 12dB. Tweak the Attack and Release parameters to get the sound you’re after. This creates distortion that might work for a particular track such as the snare drum.
Introducing Gates
A gate is basically the opposite of the limiter: Rather than limiting how loud a note can get, the gate limits how soft a note can get. The gate filters out any sound below the threshold and allows any note above it to be passed through unaffected.
Gates are useful for filtering out any unwanted noise that might be present in the recording environment. A classic situation for using gates is when you
TEAM LinG - Live, Informative, Non-cost and Genuine !