

PC Recording Studios for Dummies (Jeff Strong)
.pdf162 Part III: Choosing and Installing Recording Software
5.Leave the Put the Hard Disk to Sleep When Possible option deselected.
This keeps your computer from going to sleep during long sessions.
6.Go back to the main Systems Preferences dialog box by pressing the Show All button in the upper-left corner of the dialog box.
7.Select Software Update from the System options at the bottom of the dialog box.
8.When the new Software Update dialog box opens, deselect the Automatically Check for Updates When You Have a Network Connection option, as shown in Figure 8-10.
This keeps your system from dedicating resources to look for and download software updates.
9.Close the dialog box by clicking the red button in the upper-left corner of the dialog box.
Figure 8-10:
Deselect the automatic software update option in the Software Update dialog box.
Installing your software
After you complete the system-setup requirements in the preceding section, you can install your audio program. You need to check the documentation that came with your software for the specific procedure, but most software installations work pretty much the same way. I highlight the Pro Tools software program as an example of a Windows-base software program earlier in this chapter, so for the sake of consistency I’m sticking with Pro Tools for the Mac section as well. Here’s a rundown:
TEAM LinG - Live, Informative, Non-cost and Genuine !

Chapter 8: Installing Your Software 163
1.Insert the Pro Tools software CD in your computer’s CD drive.
2.In the new window that appears, double-click the Install Pro Tools icon.
The OS X Administration window appears, asking you to enter your password.
3.Enter your OS X administration password and click OK.
The Pro Tools installer opens.
4.Select the Startup hard drive as the destination drive.
The installation path is set.
5.Click the Install button.
Pro Tools is installed on your computer. (This might take a few minutes, so sit back and contemplate the fun you’re going to have once it’s finished installing itself.)
6.Restart your computer.
Wait to open the program until after you attach your hardware. The complete details for attaching hardware are located in Chapter 5.
Configuring Your Hardware
If you think that after installing your software you can start documenting your musical genius right away, think again. Before you can do any recording,
you need to configure your hardware in your audio recording program. This involves several steps, including installing hardware drivers and choosing hardware settings, choosing I/O buffer settings, and selecting input and output routing. These steps are detailed in this section.
Setting up your interface
Hardware settings are the configurations that relate to your audio interface and include such things as the clock source, bit depth, sample rate, and digital input/output routing selections. The options that you have to choose from as well as the steps you perform to select these settings vary depending on the hardware you use. To give you an idea of this process, I detail the set up procedures for two interfaces — a Digidesign model and a MOTU model — in this section. And because I use a Mac for most of my recording, the steps
in this section use a Macintosh running OS X. The procedures for Windows XP are similar.
TEAM LinG - Live, Informative, Non-cost and Genuine !
164 Part III: Choosing and Installing Recording Software
Installing interface software
Every audio interface comes with software that allows you to run it with your audio application. Unless the maker of your audio recording software is the same as the manufacturer of your audio interface, you need to install this software separately from your audio recording software. To do this, follow the steps that I list in “Installing your software” section of the Mac OS X and Windows XP sections of this chapter — depending, of course, on which operating system you have installed on your computer.
After you have the interface software installed and have restarted your computer, you’re ready to perform the setup procedure.
Opening the Hardware Setup dialog box
Depending on your hardware/software choice, you need to open your audio recording application or your audio interface software program. For example, if you use Pro Tools software (which requires one of the Digidesign audio interfaces), follow this procedure to open the Hardware Setup dialog box:
1.Turn on your interface by depressing the power button located on the front panel.
2.Double-click the Pro Tools icon in the Applications folder of your computer — or wherever Pro Tools is installed on your system — to launch Pro Tools.
Pro Tools boots up without any open windows.
3.Choose Setups Hardware Setup from the menu at the top of your screen.
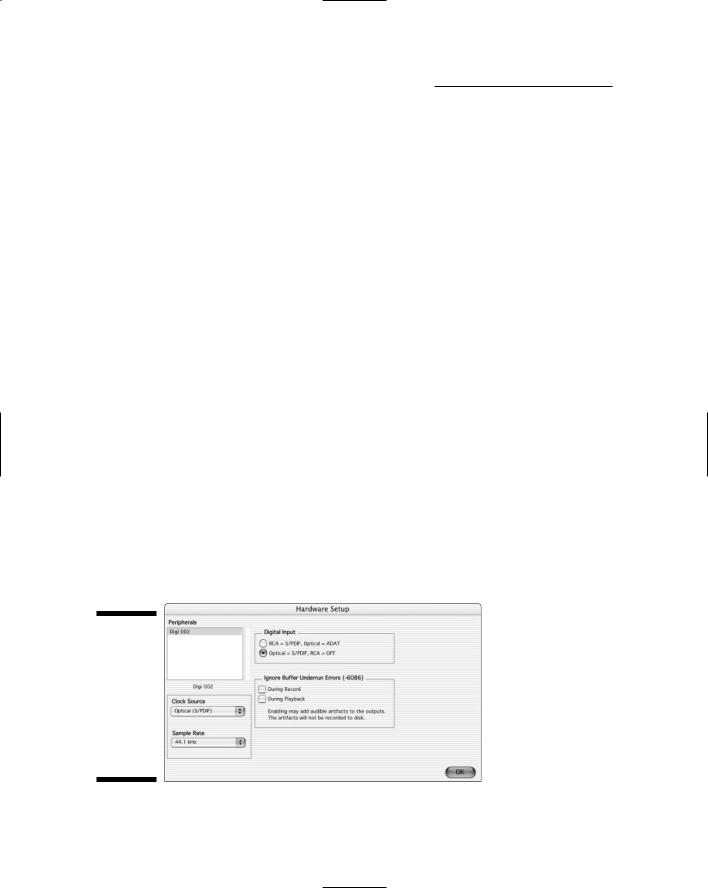
The Hardware Setup dialog box opens. (See Figure 8-11.) You’re now ready to adjust the settings.
Figure 8-11:
The Hardware Setup dialog box is where you configure your hardware device.
TEAM LinG - Live, Informative, Non-cost and Genuine !
Chapter 8: Installing Your Software 165
If you use an audio interface that isn’t joined at the hip with your audio program, you need to open the interface’s software to make the hardware setting adjustments, rather than adjusting your audio program. As an example, here’s how you adjust hardware settings when using a MOTU application:
1.Turn on your interface by flipping the switch on the front panel.
2.Double-click the MOTU icon in your application folder to open the software.
The setup dialog box for your particular device opens.
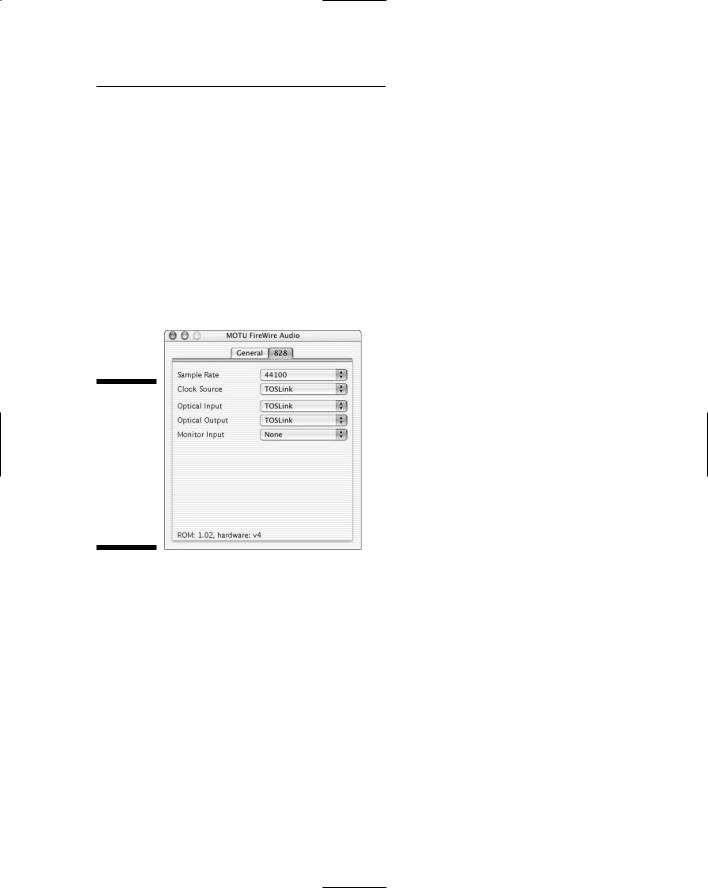
3.Click on the tab for the interface you have to access your setup options, as shown in Figure 8-12.
Figure 8-12:
Your audio interface hardware settings dialog box lets you choose the settings you want to use.
Making your selection
Getting to the Hardware Setup dialog box is only half the battle. You still have to actually change some of the settings. This section gives you some guidelines on what to do.
With the hardware setup dialog box open, you can see a bunch of settings you can tweak. Each device’s setup dialog box has different options. The most common settings include the specific hardware device, clock source, sample rate, and digital/optical inputs and outputs. Some devices, such as the MOTU interfaces (see Figure 8-12), give you monitoring options for some version of low-latency monitoring. (Latency refers to the delay caused by your audio being converted from analog to digital and back again so you can hear what you play, and low latency refers to a setting that reduces this
TEAM LinG - Live, Informative, Non-cost and Genuine !

166 Part III: Choosing and Installing Recording Software
latency by routing your signal to skip either part of the software or part of the hardware in your system. Chapter 10 has more on low-latency monitoring). Here’s a rundown of the most common (dare I say, important) selection areas:
Device: The device is the piece of hardware you have. If the manufacturer of your interface makes more than one device, you might have the option of choosing from their various models. As you can see in Figures 8-11 and 8-12, the dialog box lists the device (or devices) that you have connected to your system. If you have more than one device, you need to select the one whose settings you want to adjust. This is as easy as clicking the name of the device. For the Pro Tools example, you can find the device name in the Peripherals list box (refer to Figure 8-11); in the MOTU example, the device selection option is located as a tab at the top of the Hardware Setup dialog box. (Refer to Figure 8-12.)
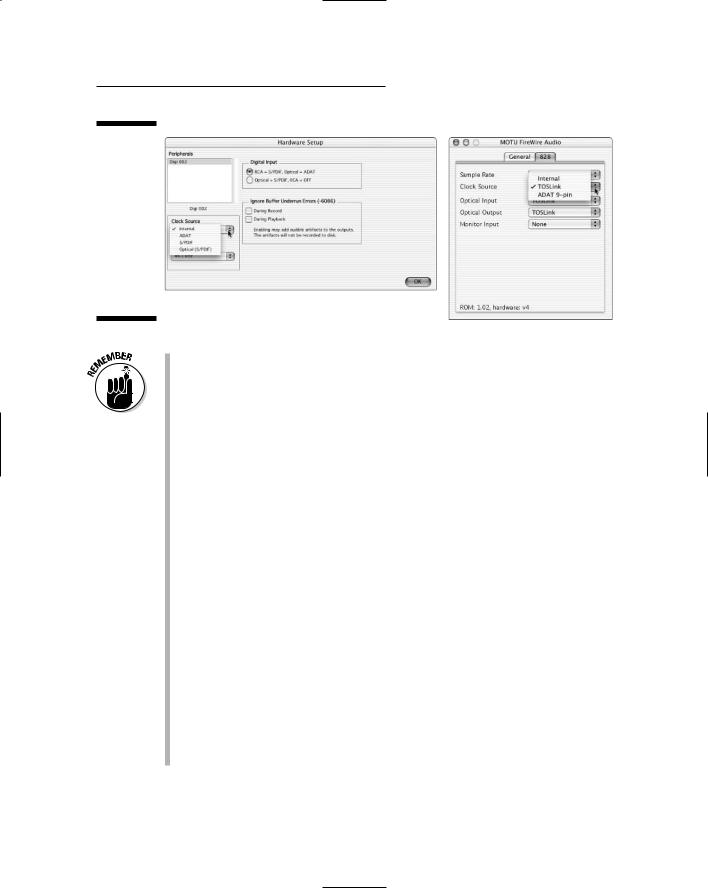
Clock Source: The clock source is the device that controls the digital clock (the exact time that each sample takes place). This drop-down list allows you to choose your source for the digital master clock, thus making sure that if you have more than one device (a separate A/D converter connected to your interface, for example), all devices are synchronized. If you use just your connected interface, simply choose Internal in this menu, but if you have other digital devices, such as a digital mixer or external converter, select your clock source based on the device that has the best clock. Your choices here depend on your interface and
how it defines the different possibilities. For example, the Digi 002 (see Figure 8-13, left) includes these options:
•Internal: Uses the digital clock inside the Digidesign interface.
•ADAT: Synchronizes from a signal sent into the ADAT input of your interface. ADAT stands for Alesis Digital Audio Tape. (For more on ADAT inputs, see Chapter 5.)
•S/PDIF: Synchronizes to a signal sent via the coaxial S/PDIF input. S/PDIF stands for Sony/Phillips Digital Interface Format. (For more on S/PDIF inputs, see Chapter 5.)
•Optical (S/PDIF): Synchronizes to a S/PDIF signal coming in the ADAT optical input. You can choose this last one only if you have the lower option selected in the Digital Input check box. (See the “Digital/Optical Input and Output” bullet.)
The MOTU 828 (Figure 8-13, right), on the other hand, contains these options:
•Internal: Uses the digital clock inside the MOTU interface
•ADAT 9-pin: Synchronizes from a signal sent into the 9-pin ADAT connector of your interface.
•Toslink: Synchronizes to a signal coming in the optical ADAT or S/PDIF input. (For more on Toslink connections, see Chapter 5.)
TEAM LinG - Live, Informative, Non-cost and Genuine !
Chapter 8: Installing Your Software 167
Figure 8-13:
You can choose from several clock sources for most interfaces (Digidesign
Digi 002, left and MOTU 828, right).
With some interfaces, such as the Digidesign units, you have to connect your desired device to your Digidesign hardware before opening the Hardware Setup dialog box if you want to use one of the digital connections as a clock source. If the device isn’t connected beforehand, it won’t show up in the dialog box.
If you have more than one digital device connected (such as a digital mixer connected to your Digidesign interface), do some experimenting by recording with different clock sources; compare the chosen sources to see which one gives you the best sound. (Digital clocks vary in quality.) Also, if you have more than three digital devices connected to your system, consider using a specialized master clock and distribute this clock source to all your devices. This will likely give you a better sound because it ensures that all your devices are following the same clock timing.
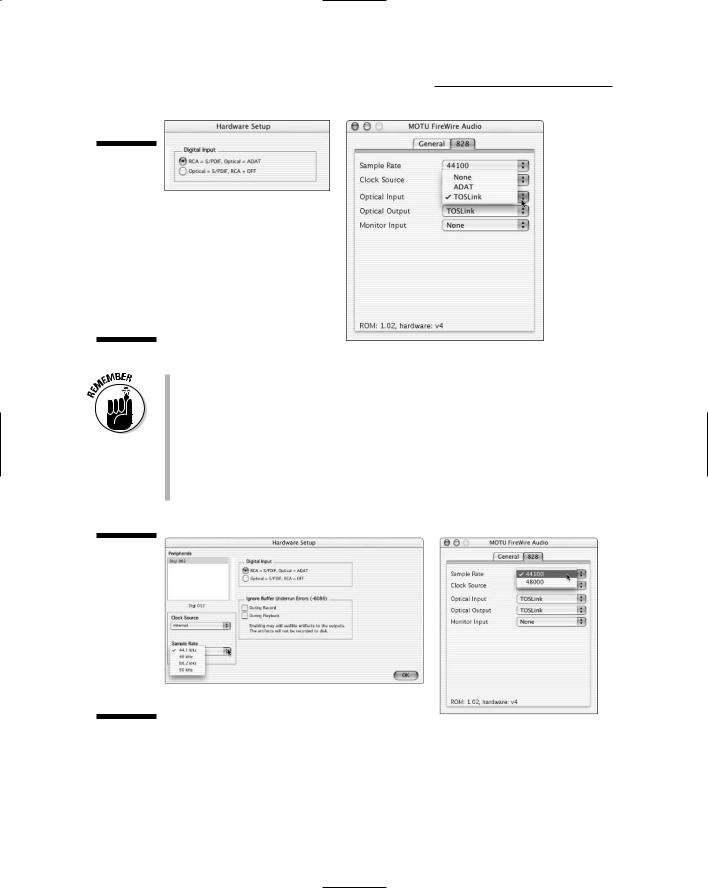
Digital/Optical Input and Output: The digital/optical input and output parameters let you choose how the digital/optical inputs on your interface function. Most devices that have an optical input and output let you select how they function. The optical jacks are able to handle either ADAT (eight channels of digital audio) or S/PDIF (two channels of digital audio) signals, but not both. Aside from being able to select between the two data types, some interfaces also allow you to select None for this parameter. Figure 8-14 shows you the options that the Digidesign and MOTU hardware setup dialog boxes have to offer.
Sample Rate: The Sample Rate drop-down list allows you to choose the sample rate — how many times every second digital data is collected — in which to work. Depending on your interface, you might be able to choose from 44.1 kHz, 48 kHz, 88.2 kHz, or 96 kHz. Figure 8-15 shows you your options in both the Digidesign and MOTU hardware setup dialog boxes.
TEAM LinG - Live, Informative, Non-cost and Genuine !
168 Part III: Choosing and Installing Recording Software
Figure 8-14:
You choose the way the digital/
optical input and output jack transfer information (Digidesign Digi 002, left and MOTU 828, right).
Figure 8-15:
You can select your interface’s sample rate from a drop-
down list (Digidesign Digi 002, left and MOTU 828, right).
For some devices, such as the Digidesign interface, the Sample Rate drop-down list is editable only when you don’t have a song file open. If you have a song file open, this drop-down list box shows the sample rate chosen when this song file was created but won’t allow you to make any changes. To choose a different sample rate for any future song files, close the song file you have open and then choose Setups Hardware Setup from the main menu, make your choice, and then click OK. Then open a new song file. This new song file is in the sample rate that you just chose.
After you make your selections, you can close the Hardware Setup dialog box. This can be accomplished by either clicking the OK button, as with the Digidesign device, or by clicking on the Close button at the top of the window (the red button on the left side for Mac OS X and the X button on the right side for Windows XP).
TEAM LinG - Live, Informative, Non-cost and Genuine !
Chapter 8: Installing Your Software 169
Configuring your audio application hardware settings
You need to adjust a few settings in your audio application to get your system up and running and to give you the best performance possible. For example, you need to assign drivers and adjust buffer settings. This section outlines these areas.
Setting up your hardware
If you use an interface and audio recording program from different manufacturers, you need to set up your interface within the recording program in addition to setting it up in its own software. Just to give one example, if you use Logic Pro, follow these steps:
1.Double-click the Logic Icon in your application folder (or wherever Logic is located in your computer) to launch the application.
Logic opens with a new song file. (Chapter 10 has more about opening a song file.)
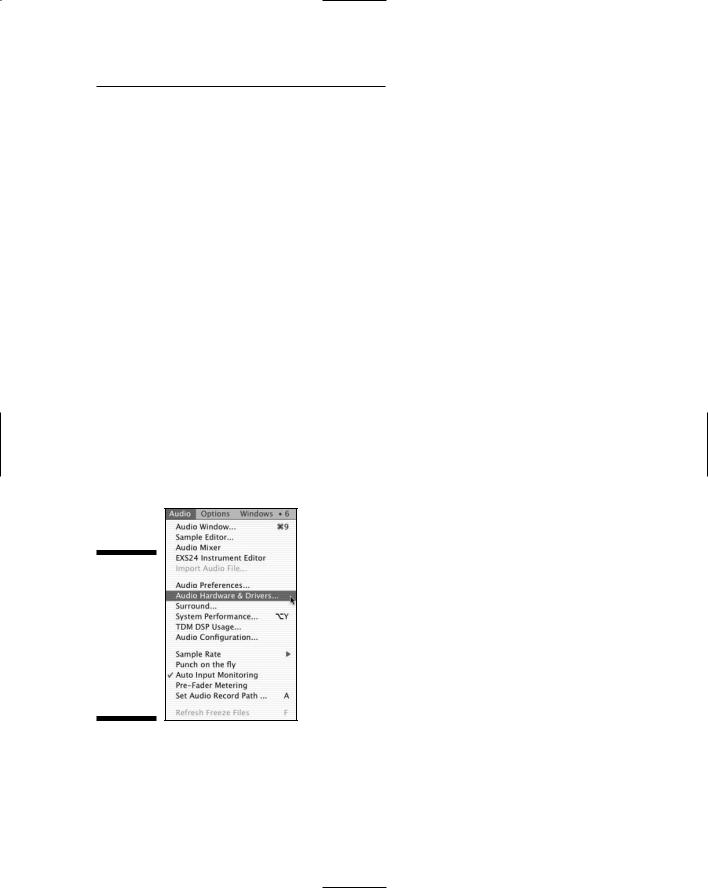
2.Choose Audio Audio Hardware & Drivers, as shown in Figure 8-16.
The Audio Hardware and Drivers panel of the Preferences dialog box opens.
Figure 8-16:
Open the hardware settings dialog box in your recording program to select your interface.
3.Select the check box for the type of driver that your interface uses.
The driver type expands to show the hardware options.
Note: The MOTU 828 and the Digidesign Digi 002, the two interfaces I’ve been using as examples in this chapter, both use Core Audio drivers in Mac OS X as well as in Windows XP.
TEAM LinG - Live, Informative, Non-cost and Genuine !
170 Part III: Choosing and Installing Recording Software
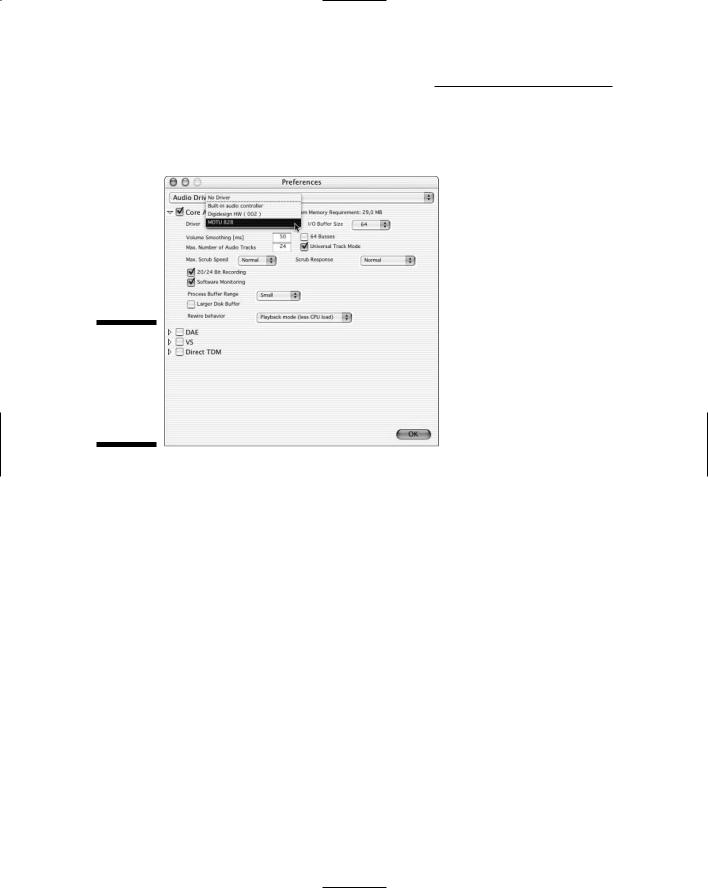
4.Select your audio interface from the Driver drop-down list, as shown in Figure 8-17.
Figure 8-17:
Select your audio interface from the Driver dropdown list.
5.Click OK to accept your selection and close the Audio Hardware and Drivers dialog box.
Adjusting buffer settings
Audio recording programs allow you to control to some degree the amount of stress you put your computer through. These settings are in the form of buffers, which store data and parcel it out as appropriate to help your system run most efficiently. Buffers come in several varieties, depending on the particular software you use, but I cover the most important ones in the following sections.
Inputs and outputs
In Logic, this particular buffer is called the I/O buffer; in Pro Tools, it’s referred to as the H/W buffer size. Regardless of what you call it, this setting lets you determine how many samples are placed in memory before being written to disk. The specifics of each recording program vary, but the bottom line here is that tweaking this setting determines how much latency (delay) you have from the audio coming in to your system and the audio going out again to your headphones or speakers.
This is an important setting because this latency can be noticeable when you record and can easily make it harder for you to get into a groove. (Chapter 10 has more on latency and recording.)
TEAM LinG - Live, Informative, Non-cost and Genuine !

Chapter 8: Installing Your Software 171
Every audio recording program offers you several settings to choose from. These can be as low as about 64 to as high as 1024 or more. (These numbers refer to the number of audio samples that are placed in the buffer at a time.) Here, lower numbers mean a lower degree of latency — with an accompanying greater strain on your processor — whereas higher numbers mean more latency.
To adjust the hardware buffer size, follow these steps:
In Pro Tools:
1.Choose Setups Playback Engine.
The Playback Engine dialog box opens.
2.Select the setting that you want from the H/W Buffer Size drop-down list.
3.Click OK to accept the setting and close the dialog box.
In Logic Pro:
1.Choose Audio Audio Hardware and Drivers.
The Audio Hardware and Drivers dialog box opens.
2.Select the setting that you want from the I/O Buffer drop-down list.
3.Click OK to accept the setting and close the window.
I suggest that you keep this setting as low as possible while recording (especially when you do overdubs). How low you can go depends on how many tracks you record at once — and whether you want to use plug-ins such as reverb while recording. Using lots of tracks and lots of plug-ins requires lots of memory, which might force you (rats!) to bump up the hardware-buffer size. Higher buffer sizes mean higher latencies, which can make overdubbing tracks more difficult, so I reserve high buffer sizes until after I’m done recording all my tracks.
When you’re ready to mix, go ahead and raise the buffer size — it doesn’t matter if there’s a delay within your system because you’re not trying to record a new track to it. This puts less stress on your system and allows you to have more plug-ins going at a time before you run into performance problems.
Playback or disk/process buffer
The playback or disk/processor buffer deals with the amount of memory the audio engine uses to manage the hard drive’s buffers. As with the hardware buffer, you want as low a setting as you can get without sacrificing system performance. If the setting is too high, you experience a delay between when you hit the Play command and when your program starts playing the recording.
TEAM LinG - Live, Informative, Non-cost and Genuine !