

PC Recording Studios for Dummies (Jeff Strong)
.pdf212 Part IV: Revving Up the Recording Process
4.In either the Edit or Mix window, use the Input drop-down list for your new track to select any one of your hardware inputs.
5.Using the Output drop-down list for your new track, set your output to the main stereo outputs of your session.
6.Display your inserts options by choosing Displays Mix Window Shows Inserts.
The Inserts section for each channel strip appears in the Mix window.
7.Choose Click Plug-in from the Inserts drop-down list for the track you just created.
The Click Plug-in dialog box opens. Here you can choose the volume for your accented and unaccented notes. Adjust them to taste, then close the window by clicking the Close button in the upper-left corner.
Wait, you’re not done yet. You still have to enable the click track. This part is easy and can be done a couple ways:
Choose MIDI Click.
Click the Click button in the MIDI section of the Transport window. When Click is engaged, this button is blue.
Okay, now you’re ready to hear the click track when you play your song.
Hitting the Record Button
At last, the moment you’ve been waiting for: recording your music. This is the easy part. Well, at least the computer end of it is easy — you still have to create the performance of your life (no pressure).
Recording your first take
With your track record enabled, you can get to the business at hand. (If your track is not enabled yet, simply click the Record Enable button for your track — see the “Preparing to Record” section earlier in this chapter for details.) Because this is your first take, you probably want to start recording from the very start of the song. You have several ways of doing this, depending on your recording program. In Logic Pro, click the Stop button in the Transport window. (If the song is playing, you need to double-click the Stop button.) In Pro Tools, click the Zero Return button in the Transport window.
TEAM LinG - Live, Informative, Non-cost and Genuine !

Chapter 10: Recording and Editing Audio 213
To start recording:
1a. In Logic Pro, click the Record button.
Your session kicks into gear.
or
1b. In Pro Tools, click the Record button, and then click the Play button.
Your recording session starts.
2.Click the Stop button to stop recording.
Your session stops.
How’d ya do? If you’re not sure, you can play your track back to hear your performance. The following section details how to do this. If you know you messed up and want to fix a part or two, check out the “Punching in and out” section later in this chapter. If your performance was perfect, well, then congratulations; now you can go to the “Doing overdubs” section later in this chapter to add some more tracks.
Listening to your take
To hear what you’ve recorded (called your take), all you have to do is disengage the Record Enable button in the track you just recorded and click the Play button. You can adjust the volume level of your playback with the fader for the track in your software.
Some programs — Pro Tools would be an example — allow you to hear your take while your track is still record-enabled. If you have Pro Tools and you’d like to monitor your tracks this way, you just need to make sure that you have the Auto Input monitoring option selected in the Operations menu at the top of your screen.
Punching in and out
Punching in and out is the process of re-recording a section of your track, thus replacing the original take with a new one. Punching in and out (often simply referred to as punching) is a mainstay of the multitrack recording process. In the bad old days of tape-based recording, punching in and out of a track to make corrections was a touchy process. Some tape decks could handle a tight punch (one where you have little room for error), but others
TEAM LinG - Live, Informative, Non-cost and Genuine !
214 Part IV: Revving Up the Recording Process
were, to put it nicely, not as well calibrated. (Okay, they were sloppy and frustrating to use.)
This isn’t the case with computer-based recording systems. In fact, the power of nearly all the audio recording programs available for punching makes it a joy to use. You also get lots of options when it comes to how you can punch. The following sections spell out the Big Three — Manual, Auto, and Loop.
Manual punching
Manual punching is where you play your song, manually press the Record button when you want to start the punch, and manually press the Stop button when you’re done. (I wondered why it was called manual.) This is the oldfashioned way of punching that only really works if you have lightning-fast hands for mashing buttons.
I honestly don’t know many home recordists who use this approach, for the simple reason that, when you’re both engineer and the artist (as most home recordists are), it’s darned difficult to do the punch and get ready to play without making a mistake.
Auto punching
Auto punching is the process of letting your computer do the punching in and out for you. This requires telling your recording program (Pro Tools or Logic Pro, for example) when to punch in and out.
Before you create your Start and End points for a punch, you need to decide where these points are going to be. To make this decision, you most likely need to play the track back to find the exact point where you want to punch — and then write down the coordinates, whether it be in bars and beats, minutes and seconds, or frames. If you’re not sure how to do this, the “Listening to your take” section earlier in this chapter gives you the details on this process.
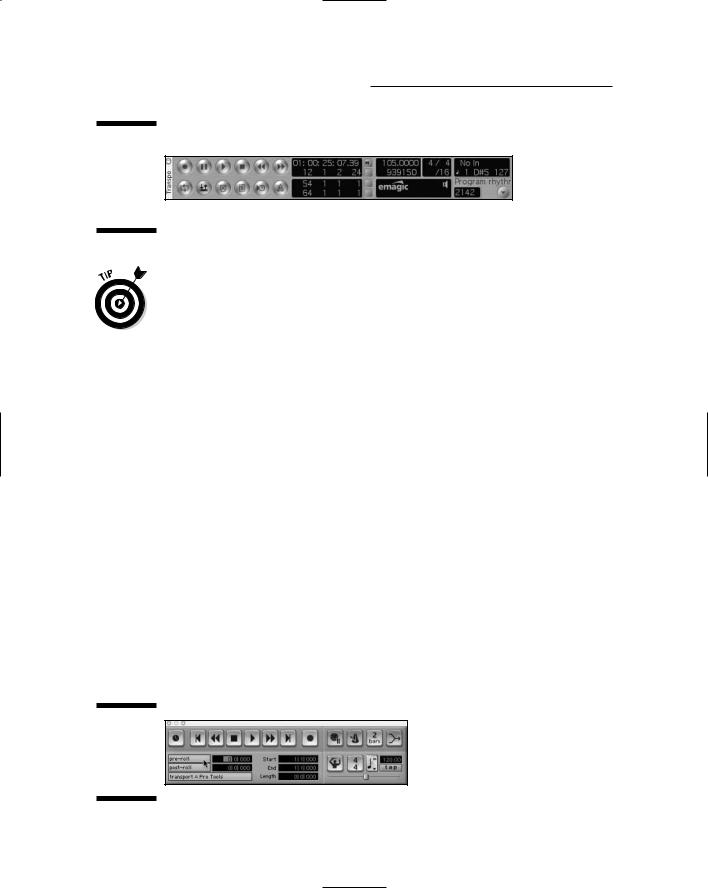
In Pro Tools, you can set up Auto punching one of several ways, but one of the easiest ways is to do it is by using the Transport window. Here’s how:
1.Select the Expanded view option of the Transport window by choosing Displays Transport Window Shows Expanded.
2.Click in the Start text box in the Basic Controls section of the Transport window and type in the beginning of the punch section you want.
The Start text box appears in the same format as the Main counter located at the top of the Edit window. In the case of Figure 10-14, it shows bars and beats. You might also have the options for minutes and seconds or for frames and subframes.
TEAM LinG - Live, Informative, Non-cost and Genuine !
Chapter 10: Recording and Editing Audio 215
3.Press Enter or Return.
4.Click in the End text box and type in the end of the range.
This text box, too, appears in the format selected for the main counter.
5.Press Enter or Return.
You’re now ready to perform a punch. Check out the “Performing the punch” section, later in this chapter, for steps on how to actually perform the punch.
Figure 10-14:
Type Start
and End points in the appropriate text boxes.
In Logic Pro, do the following to set up Auto punching:
1.Start by clicking and holding the arrow in the lower-left corner of the Transport window.
The Transport Views pop-up menu appears.
2.Select the Locator Display check box on the Transport Views pop-up menu.
The locator fields appear.
3.Click in the Start Point field in the Transport window and type in the Start point you want, as shown in Figure 10-15.
This text box is displayed in the same format as the main counter. In the case of Figure 10-15, the format is bars and beats.
4.Press Enter or Return.
5.Click in the End Point text box and type in your desired value.
This, too, is displayed in the format selected for the main counter.
6.Press Enter or Return.
7.Click the Autodrop button in the Transport window to engage the auto punch function. (In Figure 10-15, the button has the icon with two
arrows — one facing down and one facing up — positioned over a bar.)
TEAM LinG - Live, Informative, Non-cost and Genuine !
216 Part IV: Revving Up the Recording Process
Figure 10-15:
Type Start
and End points in the appropriate text boxes.
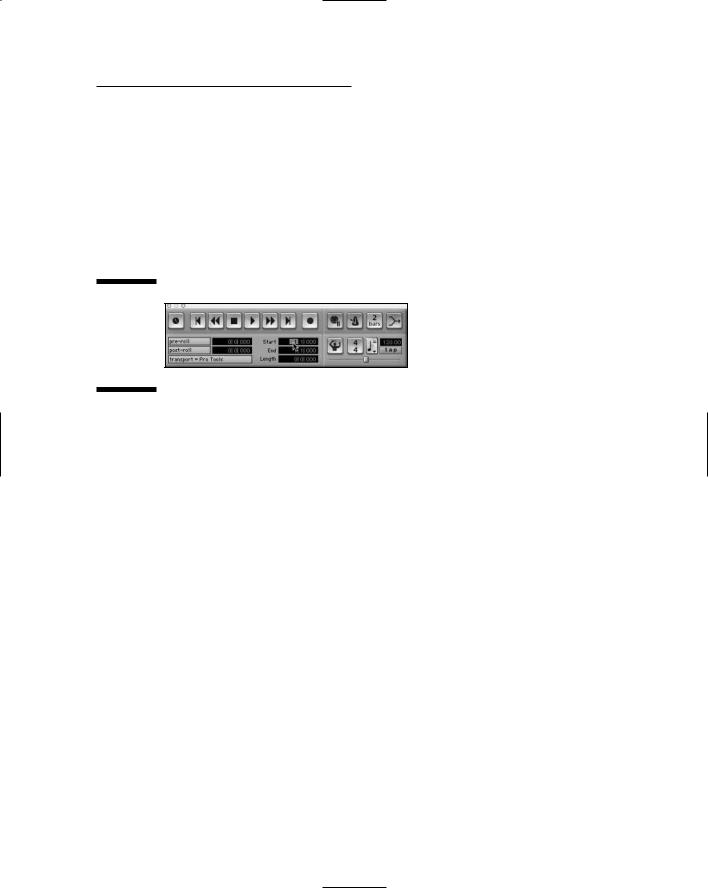
To make the punch itself a bit easier, I recommend that you set a pre-roll. A pre-roll is a designated number of bars before the punch actually happens that your song starts playing from. This allows you to get into the groove of the song before you actually have to record. To create a pre-roll in your song, follow these steps:
In Pro Tools:
1.Choose Displays Transport Window Shows Expanded View.
The Pre-Roll and Post-Roll text boxes appear beneath the basic transport controls.
2.Click in the Pre-Roll Counter text box in the Transport window and type in the length you want, as shown in Figure 10-16.
This text box is displayed in the same format as the main counter. In the case of Figure 10-16, the format is bars and beats.
3.Press Enter or Return.
4.Click in the Post-Roll Counter text box and type in your desired value.
This value, too, is displayed in the format selected for the main counter.
5.Press Enter or Return.
6.Click the Pre-Roll and/or Post-Roll button in the Transport window to enable them. (The buttons are to the left of the counter text boxes that you used in Steps 2 and 4.)
All enabled buttons are highlighted.
Figure 10-16:
Enter a value for the pre-roll and post-roll.
TEAM LinG - Live, Informative, Non-cost and Genuine !
Chapter 10: Recording and Editing Audio 217
Logic Pro doesn’t have preand post-roll text boxes. Instead, you can start playing your song anywhere before your punch-in point by simply clicking along the timeline (the location numbers at the top of the Arrange window). Instead of a post-roll, the song continues playing until you click the Stop button in the Transport window. (Note that recording itself stops at your designated End point.)
Performing the punch
Once you have set the Start and End points for your punch as well as your pre-roll and post-roll, you can record to that section using the standard editing features of your audio recording program. In Pro Tools, for example, you’d do the following:
1.Choose either Non-Destructive or Destructive Record mode.
Non-destructive record mode is the default mode and is active if you have a Record button without any icon in it. The Destructive Record mode is selected from the Operations menu (Choose Operations Destructive Record from the main menu). When you have this mode selected a small “D” is visible in the center of the Record button in the Transport window.
Only use the Destructive Record mode if you’re really sure you don’t want to keep the previous take in the selected section.
2.Click the Record Enable button for the track you want to record onto.
The button will shine red.
3.Click the Record button.
The Record light flashes red.
4.Click the Play button when you’re ready to record.
The session will start at the pre-roll time, the Record button will flash red, and you’ll hear the previously recorded track until the pre-roll is over. The monitoring will switch to the input source and the Record light stops flashing — but remains red.
When you hit the end of the recording range, the session either stops playing or — if you have the post-roll enabled — stops recording. At that point, the Record button starts flashing again — and the monitoring switches back to the recorded region until the end of the post-roll period. When the session reaches that point, it stops playing.
Loop punching
Loop punching is basically an Auto punch that repeats until you press the Stop button. This allows you to do multiple takes of a section until you get it
TEAM LinG - Live, Informative, Non-cost and Genuine !

218 Part IV: Revving Up the Recording Process
right. The process of setting up the Start and End points of the loop are the same as for Auto punching. The only difference here is you have to select the Loop Record mode before doing the punch. This is done by:
1.Record-enabling the track you want to punch in and out of.
The “Enabling recording” section earlier in this chapter lays out how to do that.
2.Engage the loop recording function (most audio recording programs have one).
In Pro Tools, choose Operations Loop Recording. In Logic Pro, click the Loop icon in the Transport window.
3.Set the Start and End points.
Check out the preceding section for specifics.
4.Click the Play button for your track.
This starts the session. After the track reaches the Start point, your song automatically starts recording until you reach the End point, where you are instantly brought back to the Start point (or the pre-roll — see the Tip icon in the “Auto punching” section for details) so you can go over the section again. This process keeps repeating until you get it right — or until you give up and settle for what you can get.
5.Click the Stop button in the Transport window to stop the loop recording process.
Depending on your choice of audio recording programs, these recorded loops show up in your session a number of ways. In Pro Tools, for example, each repetition through the loop shows up as a separate playlist in your track. In Logic Pro, the takes are each placed into a new track in your session.
Doing overdubs
Overdubbing is the process of recording additional tracks to the ones you’ve already put down. This process is at the core of what most home recordists — who act as engineer, producer, songwriter, guitar player, drummer, bassist, keyboardist, and so on — do day by day. Most people can play only one instrument at a time, so unless you’ve got a band at your beck and call you’re going to have to record each instrument in its own pass. Luckily, this process is simple: Follow the steps to record your first take for the new track, and then create a monitor mix that makes it easy (or at least easier) to play and record your other instruments correctly and with feeling. For details on creating a monitor mix, check out the “Monitoring your inputs” section earlier in this chapter.
TEAM LinG - Live, Informative, Non-cost and Genuine !

Chapter 10: Recording and Editing Audio 219
Editing Audio
Being able to make edits to a recorded performance has long been an important part of the multitrack recording process. Early tape-based recording systems required a deft hand and an acceptance of many limitations on what editing you could perform. The introduction of computer-based recording means that changing your recorded audio is now easy.
Some programs make editing audio easy — Pro Tools is an obvious example — whereas some programs require a little more finesse on the part of the user — Logic Pro, anyone? No matter which program you use, however, you’re going to discover quite a few options for manipulating your tracks in ways that were unheard of when using tape.
Regardless of the specifics involved in making edits, some commonalities exist when it comes to using a computer to edit audio. These are
Selecting audio to edit: Audio is represented visually in your recording program and can be selected for editing in a number of different ways. You can find a variety of different selection tools in most audio programs for making your selections.
Editing regions: Regions are sections of your recorded audio. Editing regions involves taking sections of an audio file and moving them around in your song. In most audio programs, editing regions doesn’t change the actual audio recorded in your computer — it simply changes the way your program plays it back within your song. Most programs allow you to save this region as its own unique audio file without altering the original file.
Editing audio data: Editing audio data means changing the audio data that you’ve recorded. This alters the original audio file.
The upcoming sections examine these commonalities in a bit more detail.
Selecting audio to edit
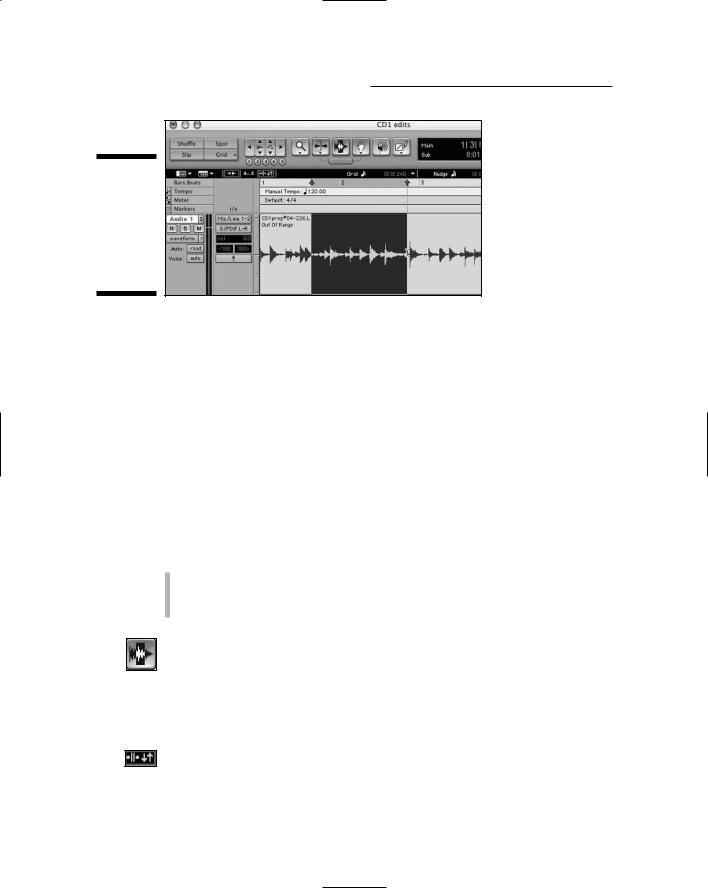
The first step in editing audio is selecting what you want to edit. Making a selection in an audio recording program is very similar to making a selection in any computer program: Click and drag your mouse over the section you want, and then release the mouse. (See Figure 10-17.)
TEAM LinG - Live, Informative, Non-cost and Genuine !
220 Part IV: Revving Up the Recording Process
Figure 10-17:
Selecting audio to edit is as simple as dragging over the section you want to edit.
This type of procedure is pretty handy and is just the thing for a lot of simple procedures, such as selecting a section of a vocal that has some silence before and after it. But if you want to make more precise selections, such as fixing a single drum hit or editing a bad guitar note, you’re going to need to fall back on more precise tools and features. Fortunately, most audio recording programs offer some very cool features and tools to help you select the exact audio you want to edit.
Because Pro Tools is the undisputed heavy-weight champion of editing audio, I list some ways that you can select material by using this program. If editing audio is important to you, make sure that whatever program you’re considering for your studio can perform these tasks at least as easily.
Selecting an entire track
In Pro Tools, you can select all the regions in a track one of two ways:
Triple-click one of the regions in the track.
Click in the track with the Selector tool and choose Edit Select All or press Ô+A on a Mac or Ctrl+A on a PC.
You call up the Selector tool by clicking the Selector button located at the top of the Edit window.
Selecting on the fly
You can make selections while your session is playing by using the arrow keys. Follow these steps:
1.Engage the Link Edit and Timeline Selection button or choose Operations Link Edit and Timeline Selection. Alternatively, you can engage the Edit and Timeline Link button in the upper-right of the Edit window.
The button becomes highlighted.
TEAM LinG - Live, Informative, Non-cost and Genuine !

Chapter 10: Recording and Editing Audio 221
2.Click the track somewhere before the place you want to start your selection.
This is where the session will start playing back. If you want to select a point near the beginning of the session, you can skip this step and just start playing from the beginning.
3.Either click Play in the Transport window or press the spacebar to start playing the session.
4.Press the down-arrow key when your playback reaches the point where you want the selection to begin.
5.Press the up-arrow key when your playback reaches the point where you want the selection to end.
6.Click the Stop button in the Transport window or press the spacebar to stop the session.
To scroll back to the selection Start point, press the left-arrow key; to scroll to the selection End point, press the right-arrow key.
Making a selection with the Tab to Transients function
Transients are the initial attack in an instrument. In Pro Tools, you can move from one transient in a region to another by engaging the Tab to Transients button and pressing the Tab key. This is one of the most useful functions in Pro Tools for editing, and it’s the main reason that I use this program for audio editing. Tabbing to transients lets you quickly find the exact beginning of a phrase to edit. To use this function to choose Start and End points for a selection, do the following:
1. Enable the Tab to Transients button.
The button here in the margin shows you what to look for.
2.Make sure that you have the Edit and Timeline Selection option enabled by selecting the Link Edit and Timeline Selection check box on the Operations main menu at the top of your screen or engaging the Edit and Timeline Link button.
3.Using the Selector tool, click in the audio track somewhere before the Start point of the area you want to select.
4.Press Tab repeatedly to move from transient to transient until you get to the Start point.
If you go too far, you can back up by pressing Ctrl (on a PC) or Option (on a Mac) when you press Tab.
5.Press Shift as you tab through the transients to the End point.
If you go too far, you can back up the End point by pressing Shift+Ctrl+Tab (on a PC) or Shift+Option+Tab (on a Mac).
TEAM LinG - Live, Informative, Non-cost and Genuine !