

In this example, if the Color drop-down list on the Font Tab of the Format Editor is set to Blue for the sales field, all values that are exactly 10% will appear in blue. The dialog box setting does not override the formula setting; it simply provides an attribute when the formula does not.
Several Hands-On topics are included showing how to format sections and objects conditionally. These topics both detail specific reporting needs and illustrate basic procedures.
HANDS-ON (Absolute Formatting)
How to add color, shading, and borders
Seagate Crystal Reports allows you to add color, borders, and shading to fields on your report in order to emphasize important data and create professional looking reports.
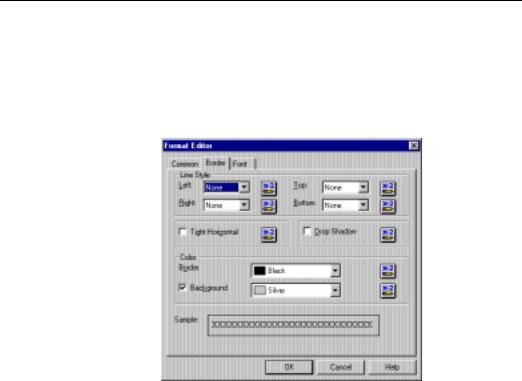
1Right-click the field you want to format and choose CHANGE BORDER from the shortcut menu.
The Format Editor appears with the Border Tab active.
2Select the border type (line style), color, placement, and background color you want and click OK when finished.
The program formats the selected field to your specifications.
Formatting |
215 |
How to add/edit lines and boxes
Adding lines
Editing lines
Adding boxes
Seagate Crystal Reports allows you to add lines and boxes to a report to emphasize important data and create professional-looking reports.
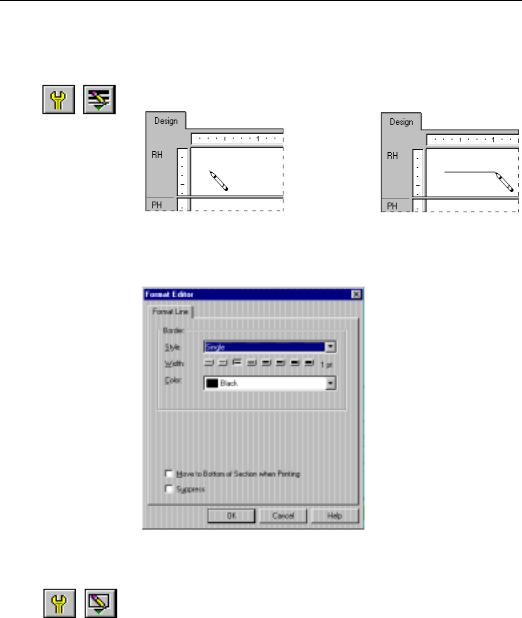
1Click the INSERT LINE button on the supplementary toolbar. A pencilshaped cursor appears.
2 Use the Pencil cursor to draw the line where desired.
1Right-click the line you want to format and choose FORMAT LINE from the shortcut menu. The Format Editor appears with the Format Line Tab active.
2 Make the desired changes and click OK when finished to return to your report.
The program formats the selected line to your specifications.
1Click the INSERT BOX button on the supplementary toolbar. A pencilshaped cursor appears.
216 |
Seagate Crystal Reports User’s Guide |
Editing boxes
2 Use the pencil cursor to draw the box where desired.
1Right-click the box you want to format and choose FORMAT BOX from the shortcut menu. The Format Editor appears with the Format Box Tab active.
2 Select the color, width, style, and/ or fill color you want and click OK when finished.
The program formats the selected box to your specifications.
How to change margins
1Choose the PAGE SETUP command from the File Menu. The Page Setup dialog box appears.
Formatting |
217 |
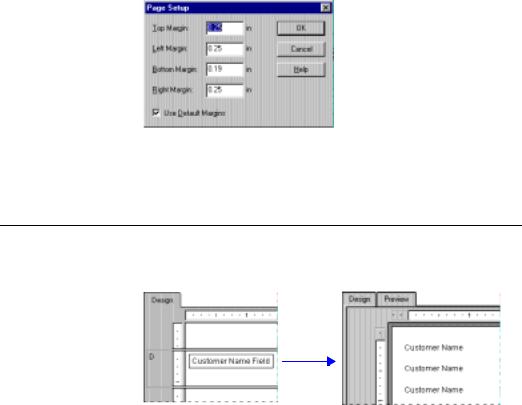
2 Change the default page margins to fit your needs and click OK when finished.
All margins are calculated from the paper edge. Thus, a left margin of.25 inches causes the printing to start exactly one quarter inch in from the edge of the paper.
How to add/delete white space between rows
Deleting white space by resizing
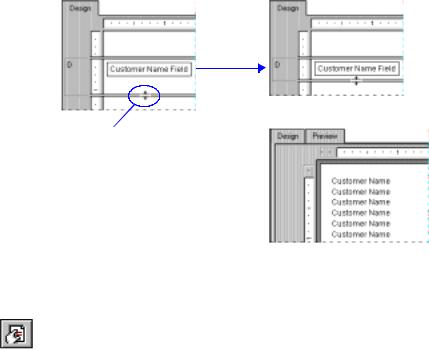
The height of a section in relation to the objects within it affects the amount of white space that appears between rows on the report.
The free form Design Tab allows you to add and delete white space in two ways:
1.by using the Resizing cursor to resize the area in the Design Tab, or
2.by changing the options in the Section Expert.
NOTE: You can also right-click the shaded area to the left of the section and choose FIT SECTION from the shortcut menu. The program automatically resizes the section so that the bottom boundary is even with the baseline of the bottom object in the section. See How to eliminate blank lines, Page 207.
To delete unnecessary white space within a section, simply move the mouse pointer over the lower section boundary line. The pointer will change to a Resizing cursor.
218 |
Seagate Crystal Reports User’s Guide |
Deleting white space using the Section Expert
Adding white space by resizing
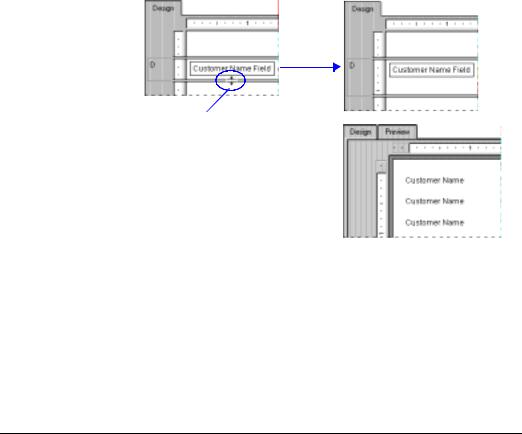
When the Resizing cursor appears drag the section boundary upward to remove extra white space.
Your report will print like this...
If an entire section is blank (for instance, if you are not putting anything into the Page Footer section of the report), you can eliminate the unnecessary white space by suppressing the section in the Section Expert.
1Click the SECTION EXPERT button on the standard toolbar. The Section Expert appears.
2Highlight the Page Footer section in the Sections list box.
3Toggle the Suppress (No Drill-Down) check box on.
4Click OK to return to the report.
The Page Footer section will no longer print.
To add extra white space between rows in the report, simply move the mouse pointer over the lower section boundary line. The pointer will change to a Resizing cursor.
Formatting |
219 |
When the Resizing cursor appears, drag the section boundary downward to add extra white space.
Your report will print like this...
NOTE: White space can also be added to a section by right-clicking the shaded area to the left of the section and choosing INSERT LINE from the shortcut menu. The program resizes the section automatically, adding the amount of space necessary to hold a line of typical database fields.
Related Topics
How to add, delete, and move guidelines, Page 72
How to add blank lines conditionally, Page 208
How to set page orientation and paper size
You can print your reports using either portrait or landscape orientation, and in a variety of paper sizes. You can specify these options using the PRINTER SETUP command on the File Menu.
1Choose the PRINTER SETUP command from the File Menu. The Print Setup dialog box appears.
220 |
Seagate Crystal Reports User’s Guide |