

●cross-tabs (see Cross-Tab Objects, Page 443),
●multi-section reports (see Multiple Section Reports, Page 195),
●and much, much more.
HANDS-ON (Report Creation and Design)
How to select data and begin creating a report
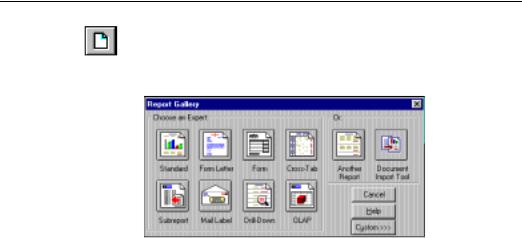
Experts help you create reports as quickly as possible. When you click the NEW REPORT button on the Standard toolbar, the Report Gallery appears. In the Report Gallery you will find a series of buttons representing the different types of Experts that are at your disposal.
Click the icon for the type of report you want to create and follow the steps outlined on the tabs in the Expert that appears.
●To build a new report based upon one that already exists, click the Another Report button. You can select a report file to serve as a template for the new report. The program makes a duplicate of the original report, which you can modify however you please. For more information, see ANOTHER REPORT, Page 94.
●To build a report based on an ASCII text report, click the Document Import Tool button. With this specialized reporting tool, you can easily convert a plain ASCII text report into a Seagate Crystal report. For more information, Document Import Tool, Page 433.
●To build a report from scratch, click the Custom button. Several Report Type and Data Type icons appear at the bottom of the Report Gallery. Click the report and data type appropriate to your needs.
The program opens a dialog box that allows you to select the data you need.
Introduction to Reporting |
101 |
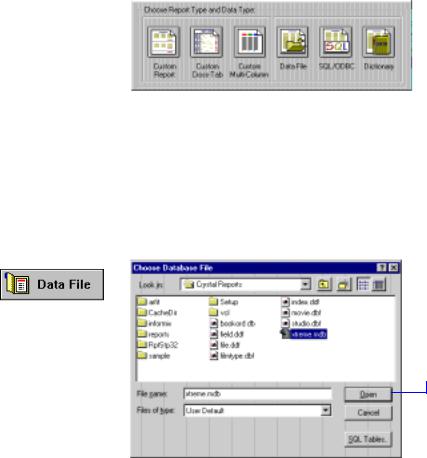
If you choose Data File as
your data source...
102
Since building reports from scratch is the easiest way to learn about all the powerful features of the program, this is the method discussed throughout the documentation.
NOTE: For the purposes of this tutorial, it is assumed that you are using the xtreme.mdb sample database provided with this version of Seagate Crystal Reports. If you are using another database, some of the dialog boxes shown here may differ from those that actually appear.
1 Use the File Name and Directories list boxes to select the desired file.
2 Click Open to add the file to your report.
Seagate Crystal Reports User’s Guide
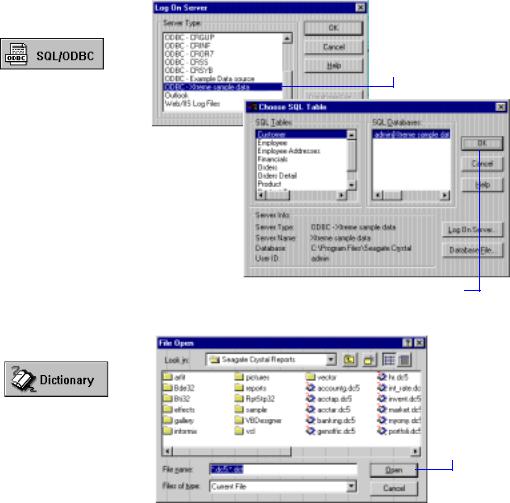
If you choose SQL/ODBC as
your data source...
1 Choose the Server Type from this list and click OK.
2 Use the SQL Tables and SQL Databases list boxes to select the desired table and databases.
If you choose Dictionary as your data source...
3 Click OK when you are finished.
1 Use the File Name and Directories list boxes to select the desired file.
2 Click Open to open the file and add it to your report.
Related Topics
Data Sources, Page 579
How to select a dictionary for a report, Page 504
Introduction to Reporting |
103 |

How to add and link multiple tables
After you have selected a database table to begin working on the report, you may need to select a second table and then link the tables so that the records in each table match up. For example, if you are using a Customers table and an Orders table for the report, you will need to link the tables so the records in the Orders table are matched up with the records of the customers who placed the orders.
1Choose the ADD DATABASE TO REPORT command from the Database Menu. The Choose Database File dialog box appears.
2Use the Directories, Drives, and File Name boxes to select the new database you want to use in the report.
3Click OK when finished. The Visual Linking Expert appears and displays the databases currently available for linking. Search for Visual Linking Expert in Seagate Crystal Reports online Help.
NOTE: If the Auto-Smart Linking option is toggled on in the Database Tab of the Options dialog box, you will not need to manually create links between the tables. See Linking tables, Page 513, and search for Options dialog box in Seagate Crystal Reports online Help.
NOTE: If the primary database is either Access or Btreive, all tables contained in those databases will appear in the Visual Linking Expert. You do not have to manually add each table to your report.
104 |
Seagate Crystal Reports User’s Guide |
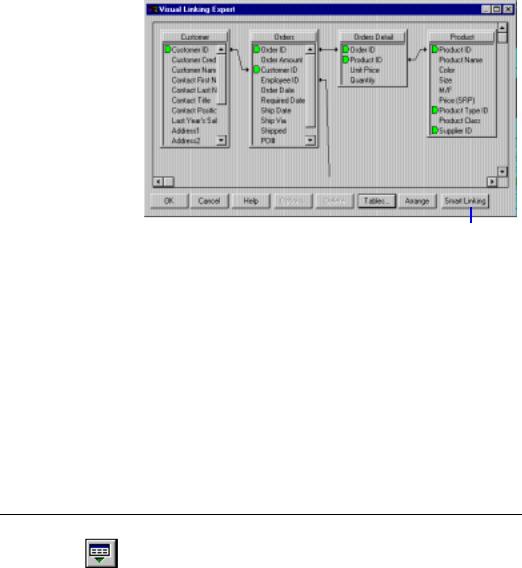
To create links manually, drag a field from one table to a field in another table. If successful, a link line is created. If unsuccessful, a message is issued.
|
|
|
|
|
Click OK when finished. |
To specify tables, |
|
Click Smart Linking to link |
|
|
||||
|
|
click this button. |
|
tables automatically. |
NOTE: When manually creating links, the field you are linking “to” must be an indexed field. For more information on indexed fields and tables, see Indexed tables, Page 511.
The Visual Linking Expert closes, and you are returned to your report. The linked databases are now available for use in your report. If you are not satisfied with the link, you can modify it using the Visual Linking Expert. Search for Visual Linking Topics Index in Seagate Crystal Reports online Help.
Related Topics
Working With Databases, Page 507
SQL join types (ODBC data sources), Page 527
How to insert database fields
1Click the INSERT FIELDS button on the Standard toolbar. The Insert Fields dialog box appears with the Database Field Tab active, listing all the fields in the chosen database(s). To speed the report building process, this dialog box remains on-screen until you click CLOSE. You can move this dialog box wherever you wish.
Introduction to Reporting |
105 |

2 Select the field you want to appear in the report.
3 Click Insert to place it in the report.
 4 Click Browse to review the values in the selected field.
How to insert special fields
Seagate Crystal Reports allows you to easily insert Page Number, Record Number, Group Number, Print Date, and Total Page Count fields, among others, into your report.
There are two ways to insert special fields:
1.click the INSERT FIELDS button on the Standard toolbar and click on the Others Tab, or
2.choose the SPECIAL FIELD command from the Insert Menu. The Insert Fields dialog box appears with the Others Tab active. Search for Special Field commands in Seagate Crystal Reports online Help.
106 |
Seagate Crystal Reports User’s Guide |
Each special field is inserted into the report as an object. An object frame appears. You can now place it on the report.
NOTE: To change the formatting of an inserted object, click the object to select it and click the OBJECT PROPERTIES button on the Supplementary toolbar. The Format Editor appears where you can make the desired changes. See Formatting, Page 209.
How to create an SQL expression field
An SQL Expression field is similar to a Formula field. An SQL Expression field uses the SQL syntax instead of the Crystal Reports Formula language used in a Formula field. SQL Expression fields can be used in much the same way as a Database field. It is possible to sort, group, and base record selection on them. SQL Expressions are always evaluated on the server.
When an SQL/ODBC data source is used to design a report, the program adds a sixth tab to the Insert Fields dialog box - the SQL Expressions Tab. This new tab allows SQL expressions to be entered in the Insert Fields dialog box and then inserted into a report quickly and efficiently.
1With the SQL Expressions Tab active, click New. The SQL Expression Name dialog box appears.
2Enter a name in the New Name text box, and then click OK. The SQL Expression Editor appears.
NOTE: The SQL Expression Editor functions in the same way as the Formula Editor. For a thorough discussion of these tools see How formulas are created: an introduction to the Formula Editor, Page 296.
Introduction to Reporting |
107 |
3Type the expression in the SQL Expression Editor.
4Click OK.
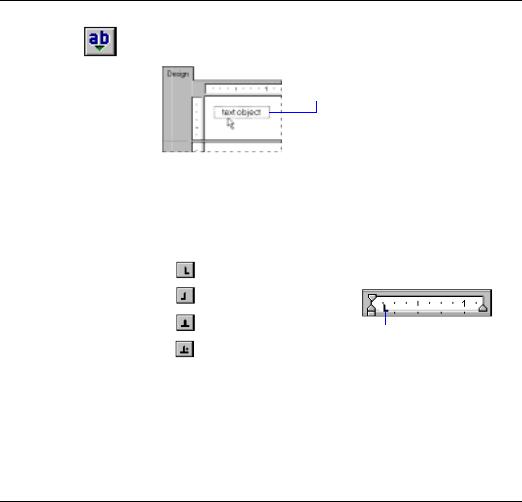
How to insert text objects
1Click the INSERT TEXT OBJECT button on the Standard toolbar. An empty object frame appears.
2 Position the text object where you want it to appear in the report.
●Click once on the border of the text object to select it for resizing and moving.
●Double-click inside the text object to select it for editing. The Design Tab ruler changes to a text object ruler sized to the length of the selected object. To the left, a tab indicator appears.
Left-aligned tab.
Right-aligned tab.
Center-aligned tab.
Decimal-aligned tab.
Drag to set the |
Drag to set the |
|||
left margin. |
right margin. |
|||
|
|
|
|
|
|
|
|
|
|
Once you have chosen the desired tab, click the position on the ruler where you want to insert it.
The ruler allows you to add indents and align text within the text object. By clicking the tab indicator, you can cycle through the four tab options available.
NOTE: When you first insert the text object into the report, the object is automatically selected for editing.
How to use a database field in a text object
The primary function of a text object is to hold text. However, text objects can hold database fields as well, making them ideal for creating custom form letters.
108 |
Seagate Crystal Reports User’s Guide |

1 Insert a text object in the report.
2 Type in the text and spaces you want to appear before the first database field (if any).
3Click the INSERT FIELDS button on the Standard toolbar. The Insert Fields dialog box appears with the Database Tab active.
4Highlight the database field to be inserted and drag it into the text object. As you move the Drag and Drop cursor over the text object, the program displays a movable insertion point. See Cursors, Page 54.
5 Drag the object to the insertion point where you want the database field to appear, and then Drop the field.
How to insert a picture
When designing reports, there will be times when you want to include a picture. For example, you may wish to put a company logo in the report header.
1Click the INSERT PICTURE button on the Supplementary toolbar. The Open dialog box appears.
2Select the desired picture file from the file list and click Open to return to the report. An object frame appears with the picture inside, ready to be positioned.
3 Position the picture object at the point where you want it to appear in the report and right-click once.
Introduction to Reporting |
109 |
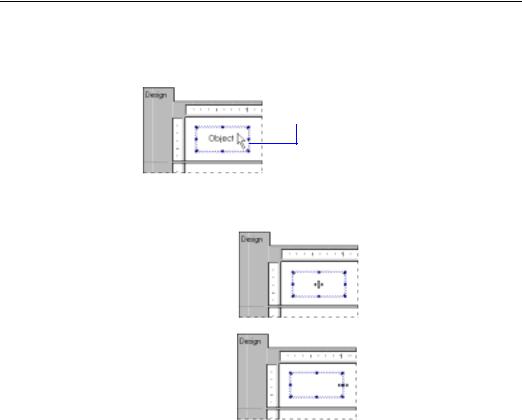
How to select, move, and resize objects
Selecting objects Select an object by clicking it once. An object must be selected in order to change the font, move the object, etc. When you select an object, sizing handles appear around it.
This frame indicates that the object is selected.
Moving and resizing objects
Once an object is selected, you can then tell the program what to do with it. For example, you can move or resize an object as follows:
To move an
object... Press and hold the left mouse button to activate the Move cursor and drag the object to the desired position.
To resize an
object... Drag the handles of the frame to change the size of the object.
Selecting multiple objects
Seagate Crystal Reports allows you to select multiple objects using the marquee selection technique.
110 |
Seagate Crystal Reports User’s Guide |

1 Position the mouse pointer above and to the left of the objects you want to select.
When the mouse button is released, the rectangle disappears and object frames appear around the selected objects.
2 Drag the selection rectangle to the bottom right of the objects, surrounding them completely.
2QFH WKH REMHFWV DUH VHOHFWHG \RX FDQ PRYH WKHP DV D JURXS
NOTE: Objects can be moved over (across) other objects without affecting the placement of the objects beneath.
Fields can also be moved between sections, with the following exceptions:
●grand totals can only be moved within the Report Footer section or to the Report Header section, and
●a subtotal or summary can be moved only within its originating section or to the header of its originating section.
Related Topics
Formatting concepts, Page 210
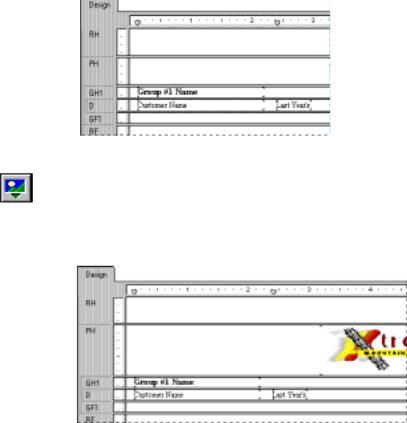
How to make an object underlay a following section(s)
In this example you will make the Xtreme logo (Xtreme.bmp) underlay multiple sections. This is a procedure similar to the procedure for inserting a company watermark to serve as a report background.
To make an object underlay a following section, first place the object in the section above the section you want it to underlay. Then toggle the Underlay Following Sections option on in the Section Expert for the section in which the object was placed.
Introduction to Reporting |
111 |
CREATING A SIMPLE REPORT
1To get started, create a report using the Customer table in xtreme.mdb (located in the \CRW16 directory (16-bit), or \Program Files\Seagate Software\Crystal Reports,(32-bit), or the directory in which the program resides).
2Place {customer.CUSTOMER NAME} and {customer.LAST YEAR’S SALES} side-by-side in the Details section of the report. To eliminate unnecessary objects in this example, delete the field titles that the program places in the Page Header section for each field.
3Break the data into regional groups. To do this, choose the GROUP command from the Insert Menu and select {customer.REGION} as the sort and group by field.
INSERTING A PICTURE
1Click the PICTURE button on the Supplementary toolbar.
2Choose the picture file Xtreme.bmp (located in the \CRW16 directory (16-bit), \Program Files\Seagate Software\Crystal Reports (32-bit), or the directory in which the program resides) and place it in the Page Header section, to the right of the report body.
112 |
Seagate Crystal Reports User’s Guide |
NOTE: In this example, the picture is placed to the right of the fields because it is not meant to underlay the text. When you are working with a watermark, a subdued picture designed to be nearly invisible, place it directly above the text.
3Click the PRINT PREVIEW button on the Standard toolbar. Note that the picture prints first (entirely in the PH section) and then the body of the report follows. Return to the Design Tab when finished previewing.
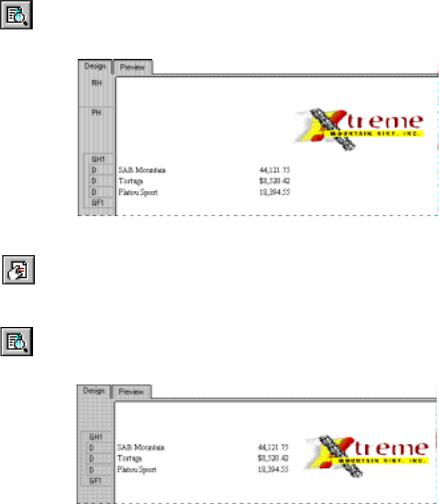
UNDERLAYING THE FOLLOWING SECTION(S)
1Click the SECTION EXPERT button on the Standard toolbar. The Section Expert appears.
2Select the Page Header section and toggle the Underlay Following Sections check box on. See Types of formatting properties, Page 211.
3Click OK and preview your work again. Note that now the picture prints in the Group Header and Details sections, next to (instead of above) the text in the body of the report.
NOTE: Placing the picture to the right of the body of the report, as you did here, is the same technique you would follow if you wanted a chart or an employee picture to print beside the details that pertain to the chart or to the employee.
Introduction to Reporting |
113 |

Pre-printed forms
4Return to the Design Tab and resize the object vertically so that it is two or three times bigger, and then preview the report again. The bitmap now underlays more sections.
The area the picture underlays is determined by:
●its size,
●the section in which it was placed originally, and
●its position in the section.
By modifying size and placement of an object, you can create many stunning visual effects using the underlay capabilities.
If you print on pre-printed forms, you may be able to:
●scan a form,
●place it in the report as a bitmap,
●use the underlay capability to line up the bitmap and report and move objects anywhere you want them, and
●eliminate the need to print the forms separately by printing your report and the form as a single unit.
How to hide parts of a report
Hiding sections
There are a number of properties you can set to prevent particular parts of a report from printing.
Seagate Crystal Reports has three properties you can set in the Section Expert to hide report sections.
114 |
Seagate Crystal Reports User’s Guide |

Hiding objects
1.Hide (Drill-down OK)
The Hide property hides a section whenever you run the report. For example, in a summary report, the Hide property can be used to display only the summaries, but not the details behind the summaries. When the Hide property is applied to a section, it becomes visible when the Drill-down cursor is used to drill-down on the section contents. This property is absolute; it can not be applied conditionally with a formula. For more information about drillingdown, read about the Drill-down cursor in Cursors, Page 54).
2.Suppress (No Drill-down)
The Suppress property also hides a section when you run the report. Unlike the Hide property, however, you can not apply the Suppress property and then drill-down to reveal the section contents. This property can be applied absolutely, or conditionally by using a formula. This can be useful for writing form letters. For example, in a form letter you might create two details sections - one to suppress when sales are over $X and one to suppress when sales are less than $X.
3.Suppress Blank Section
The Suppress Blank Section property hides a section whenever there is nothing in it. If something is placed within the section, then it remains visible.
Seagate Crystal Reports has three formatting options in the Format Editor for use in hiding individual objects.
1.Suppress If Duplicated (Common Tab)
The Suppress If Duplicated option prevents a field value from printing if it is identical to (a duplicate of) the value that comes immediately before it. The value does not print but the space in which it would have printed remains.
Duplicated values are suppressed and do not print.
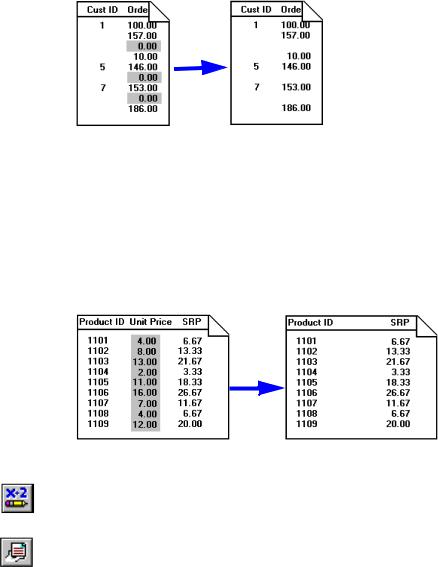
2.Suppress If Zero (Number Tab)
The Suppress If Zero option prevents a value from printing if it is a zero value. The value does not print but the space in which it would have printed remains. To remove the blank space, toggle the Suppress Blank Section option on in the Section Expert.
Introduction to Reporting |
115 |
NOTE: This will only work if there are no other objects in the section.
The zero values are suppressed and do not print.
NOTE: Use the Section Expert to eliminate blank lines in this situation, and toggle the Suppress Blank Section option off for the section that the field is in. This will eliminate the lines as long as there are no other objects in the section.
3.Suppress (Common Tab)
The Suppress option hides an object when you run the report. It is common, for example, to apply this property to formulas that are needed to do some report calculations but that you do not want to print when you run the report. When this property is toggled on, the selected object will not print.
The object is invisible and will not print.
NOTE: You can click the Conditional Formula button for any of these properties and create a formula that will make the setting conditional on some event. See Conditional formatting, Page 212.
To set these properties, highlight the object, click the OBJECT PROPERTIES button on the Supplementary toolbar and set the property in the Format Editor when it appears.
116 |
Seagate Crystal Reports User’s Guide |