


Sorting summarized group values
●count all the values or only those values that are distinct from one another,
●determine the maximum, minimum, or average value, and
●calculate up to two kinds of standard deviations and variances.
All these summaries are set up by clicking the INSERT SUMMARY button on the standard toolbar or by choosing the SUBTOTAL command from the Insert Menu. Search for Subtotal command and Summary functions in Seagate Crystal Reports online Help.
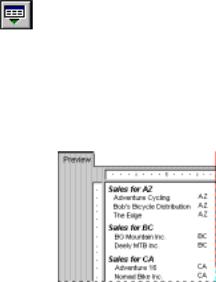
Summarized group values can be sorted in either ascending or descending order. For example, in an orders report, if you subtotal orders by state, you could have the group with the:
●lowest subtotal first, then the next lowest, and so forth (ascending), or
●highest subtotal first, then the next highest, and so forth (descending).
You can sort your report based on group values by using the TOPN/SORT GROUP EXPERT command on the Report Menu. For more information on TopN/BottomN sorting and grouping, see How to select the top or bottom N groups, Page 242.
NOTE: To sort groups that are not summarized, choose the CHANGE GROUP EXPERT command from the Report Menu.
HANDS-ON (Sorting, Grouping, and Totaling)
When you insert a database field into your report, the data within the fields appears in the order in which it was originally entered into the database.
252 |
Seagate Crystal Reports User’s Guide |

NOTE: This sample report has been designed to illustrate concepts only, and not the actual look of the finished report.
As you can see, pinpointing information in this kind of report would be difficult. It would be much easier to review or find information when you can see it sorted in a logical format. For instance, you may want to have a customer list sorted alphabetically by name or by country. That is known as a single field sort.
NOTE: To see an example of the above report, open the SGT01.RPT file in the \CRW16 directory (16-bit), or \Program Files\Seagate Software\Crystal Reports directory (32-bit).
How to do a single field sort
1To get started, create a report using the customer table in xtreme.mdb, and place the following fields from left to right in the Details section:
{customer.CUSTOMER NAME} {customer.REGION} {customer.POSTAL CODE} {customer.COUNTRY}
Sorting, Grouping, and Totaling |
253 |
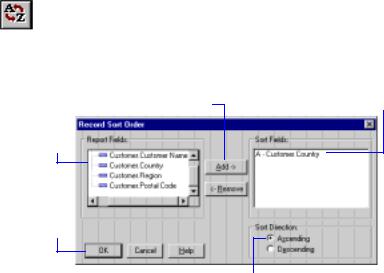
2Click the SORT ORDER button on the standard toolbar. The Record Sort Order dialog box appears.
NOTE: The following illustrates both a "before" and "after" state of the dialog box. Typically, any fields you move to the Sort Fields list box will no longer appear in the Report Fields list box.
4 Click Add...
3 Highlight the field to be sorted from this list.
6 Click OK when finished.
...the selected field is added to this list.
5 Specify the sort direction.
Records are sorted based on the values in the sort field.
For example, if you choose to sort the {customer.COUNTRY} field in ascending order, the report would appear as follows:
254 |
Seagate Crystal Reports User’s Guide |

The Regions within each Country remain unsorted.
Countries are now sorted in alphabetic order.
NOTE: This sample report has been designed to illustrate concepts only, and not the actual look of the finished report.
Notice that the records are displayed in alphabetic order by country: all of Canada, then Spain, then the United States. There is no further sorting of these records, however. If you want your customers sorted by Country and then, for example, by Region, then you need to do a multiple field sort.
NOTE: To see an example of the above report, open the SGT02.RPT file in the \CRW16 directory (16-bit), or \Program Files\Seagate Software\Crystal Reports directory (32-bit).
Related Topics
Introduction to Reporting, Page 85
How to do a multiple field sort, Page 256
How to sort records within groups, Page 260
Sorting, Grouping, and Totaling |
255 |
How to do a multiple field sort
Using the report you created in How to do a single field sort, Page 253, you can further organize your data by sorting on multiple fields.
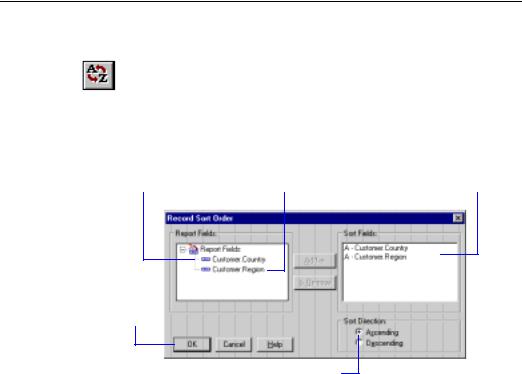
1Click the SORT ORDER button on the standard toolbar. The Record Sort Order dialog box appears.
NOTE: The following illustrates both a "before" and "after" state of the dialog box. Typically, any fields you move to the Sort Fields list box will no longer appear in the Report Fields list box.
2 Highlight the field you want the data sorted by first and click the Add button to add it to the Sort Fields list.
3 Highlight the field you want |
The selected fields are |
the data to be sorted by second |
displayed in the order by |
and add it to the Sort Fields list. |
which they are sorted. |
5 Click OK when finished.
4 As you add each field to the Sort Fields list, specify the sort direction.
Records are sorted by Country first and then by Region.
For example, if you choose to sort first by the {customer.COUNTRY} field and then by the {customer.REGION} field, both in ascending order, the report would appear as follows:
256 |
Seagate Crystal Reports User’s Guide |
Countries are sorted in alphabetic order.
The Regions within each Country are sorted in alphabetic order.
Postal Codes within each
Region are unsorted.
NOTE: This sample report has been designed to illustrate concepts only, and not the actual look of the finished report.
Notice that the data is organized alphabetically by Country, and where a country has customers in different regions, those regions are sorted in alphabetic order as well.
NOTE: To see an example of the above report, open the SGT03.RPT file in the \CRW16 directory (16-bit), or \Program Files\Seagate Software\Crystal Reports directory (32-bit).
Related Topics
Introduction to Reporting, Page 85
How to do a single field sort, Page 253
How to sort records within groups, Page 260
Sorting, Grouping, and Totaling |
257 |

How to group data
Sometimes sorting is not enough. You may want to break data into meaningful groups. Seagate Crystal Reports allows you to group data in one easy step.
NOTE: It is unnecessary to sort data before you group it. The program does the necessary sorting automatically, as part of the grouping procedure. To sort data, follow the sorting procedures outlined in How to do a single field sort, Page 253, and How to do a multiple field sort, Page 256.
1To get started, create a report using the sample data, xtreme.mdb, and place the following fields from left to right in the Details section:
{customer.CUSTOMER NAME} {customer.REGION} {customer.POSTAL CODE} {customer.COUNTRY}
You will use this same data for the topic How to sort records within groups, Page 260, as well.
2Click the INSERT GROUP button on the supplementary toolbar. The Insert Group dialog box appears.
258 |
Seagate Crystal Reports User’s Guide |
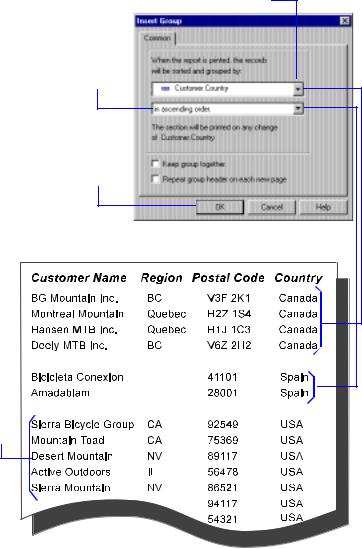
3 Select the field you want your data grouped by from this drop-down list.
4 Next, specify the sort direction.
5 Click OK when finished.
The Customers are grouped by Country.
The groups are also sorted in ascending(A-Z) order...
...but the records within each group are unsorted.
NOTE: This sample report has been designed to illustrate concepts only, and not the actual look of the finished report.
Sorting, Grouping, and Totaling |
259 |

Notice that the values are grouped by Country, and that the Country groups appear in ascending (A to Z) order. Notice too, however, that the records within each group remain unsorted. To remedy this, you need to sort the records within each group. See How to sort records within groups, Page 260.
NOTE: To see an example of the above report, open the SGT04.RPT file in the \CRW directory (16-bit), or \Program Files\Seagate Crystal Reports directory (32-bit).
Related Topics
Introduction to Reporting, Page 85
How to sort records within groups, Page 260
How to group based on the first letter of a company name, Page 274
How to group data in intervals, Page 277
How to create group headers, Page 285
How to sort records within groups
Once you have grouped your data, you can easily sort the records within the groups to further organize the information. For this tutorial, you must first group your data using the technique in How to group data, Page 258.
1Once the data is grouped, click the SORT ORDER button on the standard toolbar. The Record Sort Order dialog box appears.
NOTE: The following illustrates both a "before" and "after" state of the dialog box. Typically, any fields you move to the Sort Fields list box will no longer appear in the Report Fields list box.
260 |
Seagate Crystal Reports User’s Guide |

2 Highlight the field you want the |
NOTE: This field specifies the sort |
...the selected fields are |
|||||
records in the groups sorted by |
done automatically when you |
displayed in the order by |
|||||
and click the Add button... |
grouped the data. It can’t be moved. |
which they are to be sorted. |
|||||
|
|
|
|
|
|
|
|
|
|
|
|
|
|
|
|
|
|
|
|
|
|
|
|
4 Click OK when finished.
3 Specify the sort direction.
The customers within each country are sorted.


The data is grouped by Country.
NOTE: This sample report has been designed to illustrate concepts only, and not the actual look of the finished report.
Sorting, Grouping, and Totaling |
261 |

NOTE: To see an example of the previous report, open the SGT05.RPT file in the \CRW directory (16-bit), or \Program Files\Seagate Crystal Reports directory 32-bit).
Related Topics
Introduction to Reporting, Page 85
How to do a single field sort, Page 253
How to do a multiple field sort, Page 256
How to summarize grouped data
Often, you will want to summarize the data in each group and then print the summaries in your report. You can use summaries to:
●count the number of values in a group,
●calculate the sum, average, standard deviation, or variance of values in a group, or
●identify the minimum or maximum value in a group.
For more information on summarizing your data, search for Summary functions in Seagate Crystal Reports online Help.
For example, you may want to count the number of customers within each country. To do this, the data must be broken into country groups, and then the records in each group must be counted. Instead of grouping the data manually and then summarizing it, you can let the program group and summarize in a single step.
1To get started, create a report using the sample data, xtreme.mdb, and place the following fields from left to right in the Details section:
{customer.CUSTOMER NAME} {customer.REGION} {customer.POSTAL CODE} {customer.COUNTRY}
2Click the Customer Name field (the field you want to summarize) and click the SUMMARY button on the standard toolbar. The Insert Summary dialog box appears.
262 |
Seagate Crystal Reports User’s Guide |
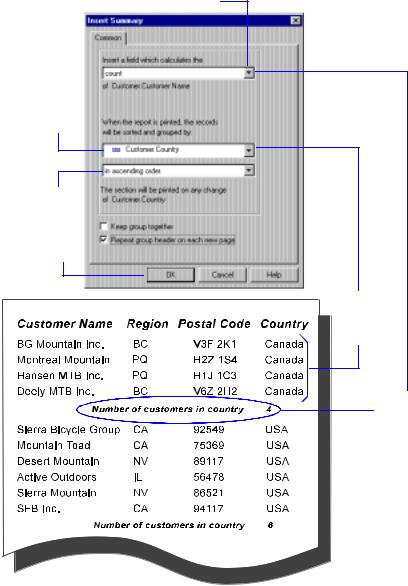
3 Select the desired summary operation from this drop-down list.
4 Highlight the field you want the data to be grouped by.
5 Specify the sort direction.
6 Click OK when finished.
The data is broken into Country groups.
This will count the records in each group.
NOTE: This sample report has been designed to illustrate concepts only, and not the actual look of the finished report.
Sorting, Grouping, and Totaling |
263 |

NOTE: To see an example of the previous report, open the SGT06.RPT file in the \CRW16 directory (16-bit), or \Program Files\Seagate Software\Crystal Reports directory (32-bit).
Related Topics
Introduction to Reporting, Page 85
How to subtotal grouped data, Page 264
How to create multiple levels of subtotals, Page 270
How to extend prices and then subtotal the extensions, Page 266
How to calculate a percentage of the grand total, Page 282
How to create group headers, Page 285
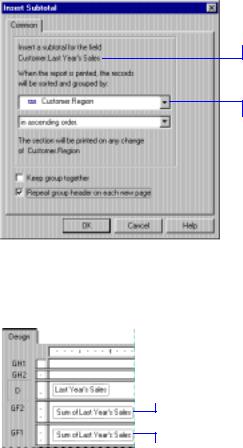
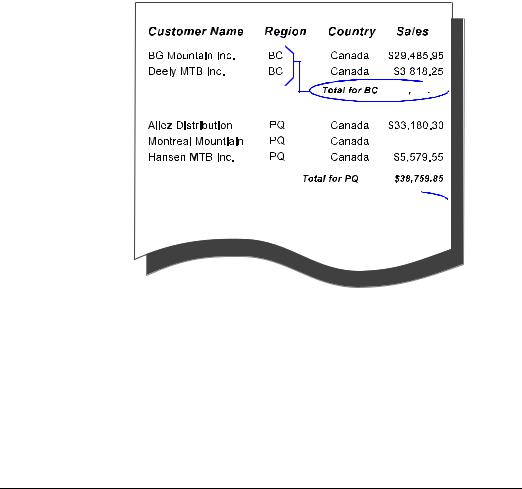
How to subtotal grouped data
A subtotal is a special kind of summary. It totals or sums numeric values in a group. Like any summary, the program groups and subtotals in a single step. For more information on summary functions, search for Summary functions in Seagate Crystal Reports online Help.
In this example you will group the data by Country and subtotal Last Year’s Sales by Country. To get started, create a report using the sample data, xtreme.mdb, and place the following fields from left to right in the Details section:
{customer.CUSTOMER NAME} {customer.REGION} {customer.POSTAL CODE} {customer.COUNTRY} {customer.LAST YEAR’S SALES}
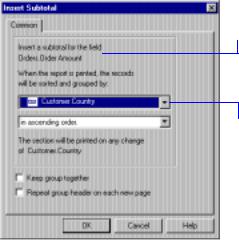
1Right-click the Last Year’s Sales field and choose INSERT SUBTOTAL from the shortcut menu. The Insert Subtotal dialog box appears with the chosen field listed at the top of the dialog box.
264 |
Seagate Crystal Reports User’s Guide |
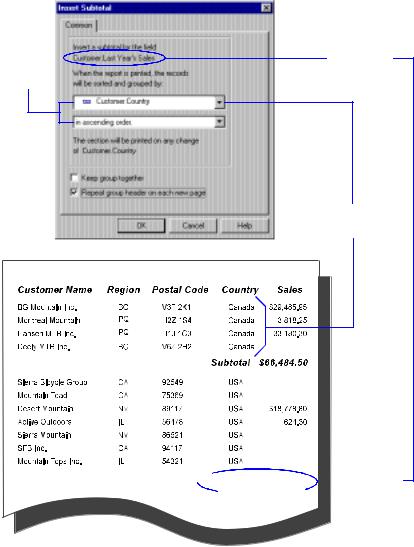
2 Choose the field you want the data grouped by, specify a sort direction, then click OK when finished.
The field you selected to be subtotaled.
Data is broken into Country groups.
The values in


 each group
  are now subtotaled.
NOTE: This sample report has been designed to illustrate concepts only, and not the actual look of the finished report.
NOTE: To see an example of the above report, open the SGT07.RPT file in the \CRW16 directory (16-bit), or \Program Files\Seagate Software\Crystal Reports directory 32-bit).
Sorting, Grouping, and Totaling |
265 |

Related Topics
How to summarize grouped data, Page 262
How to create multiple levels of subtotals, Page 270
How to extend prices and then subtotal the extensions, Page 266
How to calculate a percentage of the grand total, Page 282
How to create group headers, Page 285
How to sort based on summarized group values
1Click the TOP N button on the supplementary toolbar. The Top N Sort Group Expert appears with a tab for each of the groups in the report.
2Click the tab for the group you want to sort.
3Select the Sort All option from the drop-down list on the left.
4From the top-right drop-down list, select the summary you want to sort by (when you have more than one summary in the group section - for example, you might have both a sum and an average summary in a section).
5Click the option button to specify the sort direction.
6To select a second sort group, repeat Steps 2-5.
When you run the report, the program will sort your data based on the group order(s) specified.
How to extend prices and then subtotal the extensions
In an orders report or invoice, you may need to extend the prices for individual line items and then subtotal the extensions. You do this by using a simple formula to extend the prices, and then you subtotal the formula field.
1To get started, create a report using the Customer, Orders, and Orders Detail tables in xtreme.mdb, and place the following fields from left to right in the Details section:
{customer.CUSTOMER ID} {orders detail.PRODUCT ID} {orders detail.QUANTITY} {orders detail.UNIT PRICE}
266 |
Seagate Crystal Reports User’s Guide |
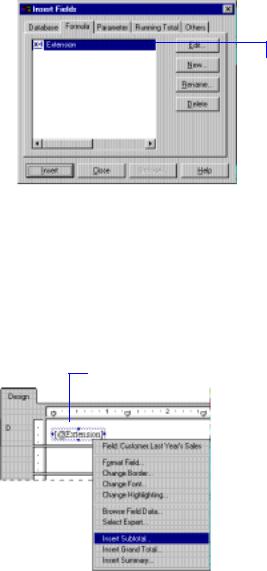
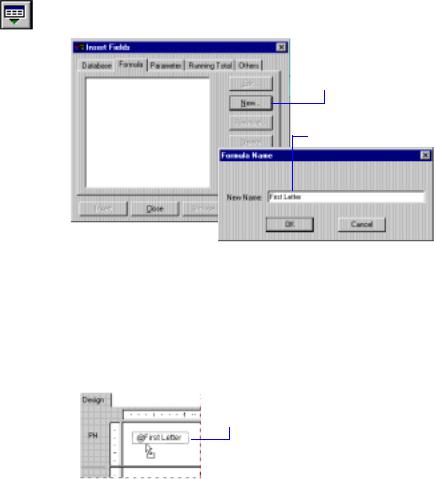
2To create the formula for extending the prices, click the Formula Tab in the Insert Fields dialog box to activate it.
3 Click New.
4 Type a name to identify the formula.
5Click OK. The Formula Editor appears. Enter the following formula into the Formula text box:
{orders detail.QUANTITY} * {orders detail.UNIT PRICE}
See Introduction to Formulas, Page 291, for more information on formulas.
6Click the SAVE AND CLOSE button when finished. The Formula Editor disappears and the program returns you to the Insert Fields dialog box with the name of your formula highlighted in the list box.
Sorting, Grouping, and Totaling |
267 |
The formula you just created.
 7 Click the Insert button to place the formula in the report.
8Place the formula field to the right of the Unit Price field in the Details section of the report.
9Click Close to close the Insert Fields dialog box.
Next you will subtotal the extensions.
NOTE: The menus have been shortened by removing some of the commands that are unrelated to the current discussion.
10 Right-click the formula field, and choose Insert Subtotal from the shortcut menu.
The Insert Subtotal dialog box appears, already set to subtotal @Extension (the extended price field). For more information on summary functions, search for Summary functions in Seagate Crystal Reports online Help.
268 |
Seagate Crystal Reports User’s Guide |

You are interested in weekly sales, so you want to create a subtotal whenever the values in the Order Date field change from one week to the next.
11Choose {orders.ORDER DATE} as the sort-and-group-by field, and choose for each week as the date change that is going to trigger the grouping.
NOTE: In order to do this, the Orders table must be linked to the Orders Detail table before you preview the report. Search for Visual Linking Topics Index in Seagate Crystal Reports online Help.
NOTE: The Section will be printed drop-down box will not be activated until you choose the Order Date field.
The dialog box should look like this:
The data will be
sorted by date...
...and grouped whenever the date changes from one week to the next.
When you click OK, the program inserts the subtotal in the report. Your final report should look similar to the following:
Sorting, Grouping, and Totaling |
269 |
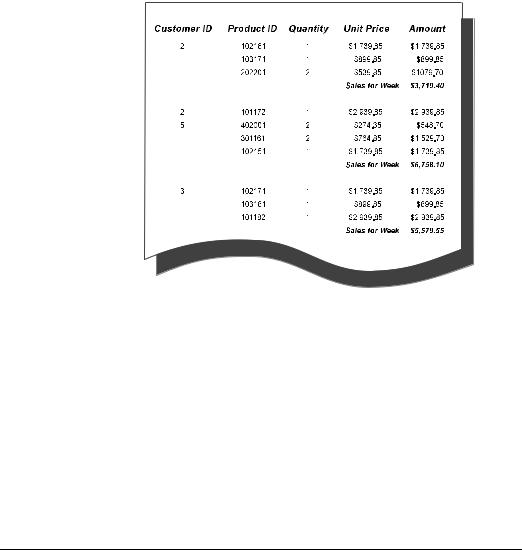
NOTE: This sample report has been designed to illustrate concepts only, and not the actual look of the finished report.
NOTE: To see an example of the above report, open the SGT08.RPT file in the \CRW16 directory (16-bit), or \Program Files\Seagate Software\Crystal Reports directory(32-bit).
Related Topics
How to summarize grouped data, Page 262
How to subtotal grouped data, Page 264
How to calculate a percentage of the grand total, Page 282
How to create group headers, Page 285
How to create multiple levels of subtotals
Sometimes one level of subtotals will not do. For example, you may not only want to see the sales for each region subtotaled, but also the sales for each sales representative or each postal code within each region. The program enables you to create these multiple subtotals with ease.
There are two keys to effective reporting using multiple subtotals:
270 |
Seagate Crystal Reports User’s Guide |

1.First, make sure the subtotals are entered in the correct order. The rule to follow is to go from general to specific. For example, to subtotal both by country and by region, enter the country subtotal first and then the region subtotal.
2.The other key is to make sure you label the subtotals for clarity. With multiple subtotals, it can be difficult to tell which is which unless they are labeled properly.
Here is how you subtotal Last Year’s Sales by Country and then by Region:
1To get started, create a report using the sample data, xtreme.mdb, and place the following fields from left to right in the Details section:
{customer.CUSTOMER NAME} {customer.REGION} {customer.COUNTRY} {customer.LAST YEAR'S SALES}
NOTE: The menus below have been shortened by removing some of the commands that are unrelated to the current discussion.
2 Right-click the database field, and....
...choose Insert Subtotal from the shortcut menu.
3When the Insert Subtotal dialog box appears, select Country as your sort-and-group-by field and click OK.
Sorting, Grouping, and Totaling |
271 |
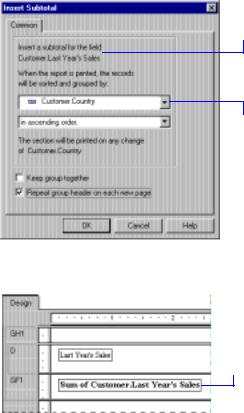
The field you are going to subtotal.
Every time the value in this field changes, a subtotal will be shown for each country.
The program creates a group section (GH1, GF1) and places the subtotal in the Group Footer.
The country subtotal.
4Now right-click the Last Year’s Sales field again and choose INSERT SUBTOTAL from the shortcut menu.
272 |
Seagate Crystal Reports User’s Guide |
You are subtotaling the same field.
A subtotal for each region will be shown.
5This time, select Region as your sort-and-group-by field and click OK. The program creates a second group section (GH2, GF2) and places this subtotal in the second Group Footer (GH2). See How to group data, Page 258.
The region subtotal.
The country subtotal.
Your report should look similar to the following:
Sorting, Grouping, and Totaling |
273 |
This report contains multiple levels of subtotals.
 Each
Each 


 region is subtotaled.
 So is each


 country.
NOTE: This sample report has been designed to illustrate concepts only, and not the actual look of the finished report.
NOTE: To see an example of the above report, open the SGT09.RPT file in the \CRW16 directory (16-bit), or \Program Files\Seagate Software\Crystal Reports directory (32-bit).
Related Topics
For more information on summarizing your data, search for Summary functions in Seagate Crystal Reports online Help.
How to group based on the first letter of a company name
You might want to break your data into groups based on the first letter of the company name. For example, in a customer list you might want all the “A” customers in a group, then all the “B” customers, and so forth. To do this requires the use of a formula.
Do not worry if you are unfamiliar with formulas. This text will show you what formula you need here and how to enter it.
You can learn more about creating and editing formulas in Introduction to
Formulas, Page 291.
274 |
Seagate Crystal Reports User’s Guide |
You are going to create a formula that will extract the first letter of each customer’s name. Then you will group the data using that formula field as the sort-and-group-by field. The program will sort the data based on the first letter of each customer name and start a new group whenever that letter changes.
1To get started, create a report using the sample data, xtreme.mdb, and place the following fields from left to right in the Details section:
{customer.CUSTOMER NAME} {customer.REGION} {customer.POSTAL CODE} {customer.COUNTRY}
2Click the INSERT FIELDS button on the standard toolbar. When the Insert Fields dialog box appears, click the Formula Tab to activate it.
3 Click the New button.
4 Type a name to identify the formula.
5When you click OK, the Formula Editor appears. Type the following formula into the Formula text box:
{customer.CUSTOMER NAME}[1]
6Click the SAVE AND CLOSE button. The Formula Editor disappears and you are returned to the Insert Fields dialog box. The name of the formula is now highlighted in the list box.
7Click the INSERT button to place the formula object in the report.
8 Place the formula object temporarily in the Page Header section of the report.
Sorting, Grouping, and Totaling |
275 |

You are going to move the formula object into a Group Header section, but the report does not have one yet. As soon as you group the data, you can move the formula object into the desired section.
9Click the Insert GROUP button on the supplementary toolbar. The Insert Group dialog box appears.
10 Select the formula field as the field you want your data grouped by.
 11 Click OK when finished.
You are returned to your report with the data grouped by the formula field as specified.
12Finally, move the formula field into the Group Header #1 (GH1) section where it will serve as a live group header, changing according to the value returned by the formula calculation. For more information on live headers, see Live headers, Page 286.
Your report should look similar to the following:
276 |
Seagate Crystal Reports User’s Guide |
The data is broken into
groups based on the first 


 letter of the Customer’s


Name.
The formula also provides a live header for every group.
NOTE: This sample report has been designed to illustrate concepts only, not the actual look of the finished report.
NOTE: To see an example of the above report, open the SGT10.RPT file in the \CRW16 directory (16-bit), or \Program Files\Seagate Software\Crystal Reports directory (32-bit).
Related Topics
Introduction to Formulas, Page 291
Introduction to Reporting, Page 85
How to group data, Page 258
How to group data in intervals, Page 277
How to create group headers, Page 285
How to group data in intervals
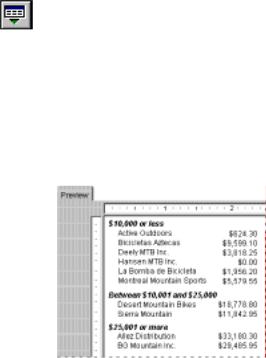
You may want to group your data into intervals. Age groups, time periods, and sales categories are some of the interval groupings that can be created using the process you will learn here. In this example, you will rank customers by the amount of business they did in the previous year.
Sorting, Grouping, and Totaling |
277 |
This example uses specified order grouping. This kind of grouping lets you specify the records that will be included in each group. You define the intervals you want and the program will do the rest.
1To get started, create a report using the sample data, xtreme.mdb, and place the following fields from left to right in the Details section:
{customer.CUSTOMER NAME} {customer.REGION} {customer.POSTAL CODE} {customer.COUNTRY} {customer.LAST YEAR’S SALES}
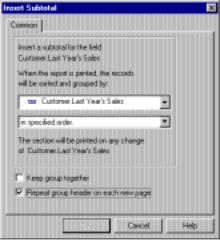
2Right-click the Last Year’s Sales field and choose INSERT SUBTOTAL from the shortcut menu. The Insert Subtotal dialog box appears. You want to set up intervals based on the previous year’s sales so select Last Year’s Sales as the sort-and-group-by field (the top drop-down list).
3Select in specified order from the second drop-down list. The Specified Order Tab appears in the dialog box.
278 |
Seagate Crystal Reports User’s Guide |

4 Click the NEW button. The Define Named Group dialog box appears.
5Type “Less than $10,000” in the Group Name edit box. This is the name that will appear as the Group Name field value for the group.
6Since the first group is to contain only those records that have a Last Year’s Sales figure of less than $10,000, set the three edit boxes so your condition reads:
is less than 10000
Sorting, Grouping, and Totaling |
279 |

 7 Click OK to return to the Specified Order Tab.
8Click NEW again, and the Define Named Group dialog box reappears. This time set up a second group that contains values between $10,000 and $25,000.
9Type “$10,000 to $25,000” in the Group Name edit box.
10Set the first two edit boxes so the condition reads: is between
The program creates a fourth edit box. There are now two edit boxes on the right, one above the other, with the word “and” separating them. Use the drop-down lists on these boxes to specify a range of values.
11To specify the range:
●type “10000” in the top edit box, and
●type “25000” in the bottom edit box.
You have now set up the group to contain all values between $10,000 and $25,000.
12Click OK to return to the Specified Order Tab.
13To set up the final group (all values over $25,000), click the NEW button again.
14When the Define Named Group dialog box appears, type “Over $25,000” in the Group Name edit box.
15Set the three edit boxes so the condition reads: is greater than 25000
16Click OK to return to the Specified Order Tab.
17Immediately to the right of the Specified Order Tab is the Others Tab.
280 |
Seagate Crystal Reports User’s Guide |
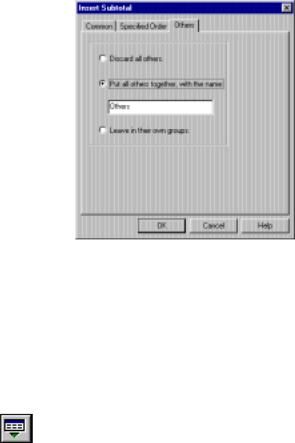
Use this tab to specify how you want to handle all values that do not fit into any of the groups. Since all of the values in the Last Year’s Sales field fall into one of the three groups, you will not have to worry about your settings here, so click OK. The program returns you to your report.
Only one other thing remains in setting up your interval report and that is to insert group headers in order to identify each of the groups. If you insert the Group Name field into the Group Header (GH) section of your report, then the program will use the name you assigned to each group to identify those groups in the report.
18Click the INSERT FIELDS button on the standard toolbar. The Insert Fields dialog box appears.
19Click the Others Tab. There should only be one group name in the list: Group #1 Name.
20Drag that name into the Group Header section.
Your report should look similar to this:
Sorting, Grouping, and Totaling |
281 |
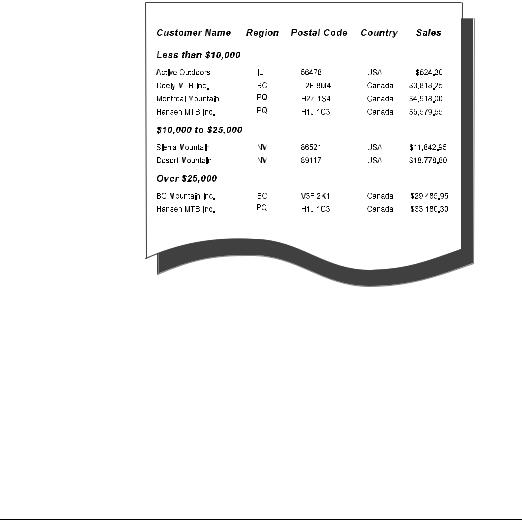
This report is grouped by interval in a specified order.
NOTE: This sample report has been designed to illustrate concepts only, and not the actual look of the finished report.
NOTE: To see an example of the above report, open the SGT11.RPT file in the \CRW16 directory (16-bit), or \Program Files\Seagate Software\Crystal Reports directory (32-bit).
Related Topics
Introduction to Reporting, Page 85
How to group based on the first letter of a company name, Page 274
How to create group headers, Page 285
How to calculate a percentage of the grand total
In some reports, you want to see what percentage of the grand total each group contributes. In this example, you will create a report that subtotals orders by country and then determines what percentage of total worldwide sales each country generated. The process is simple and straightforward. It uses built-in subtotaling techniques plus one simple formula.
282 |
Seagate Crystal Reports User’s Guide |
1To get started, create a report using the sample data, xtreme.mdb, and place the following fields from left to right in the Details section:
{customer.CUSTOMER NAME} {customer.REGION} {customer.COUNTRY} {orders.ORDER AMOUNT}
2Right-click the Order Amount field and choose INSERT SUBTOTAL from the shortcut menu.
3When the Insert Subtotal dialog box appears, specify Country as your sort-and-group-by field and click OK.
This calculates the sales for each country. It breaks the data into country groups and subtotals each group.
This field will be
subtotaled...
...whenever the value in this field changes.
4Right-click the Order Amount field again and choose INSERT GRAND TOTAL from the shortcut menu. When the Insert Grand Total dialog box appears, make sure that the function is set to sum and then click OK. Search for Summary functions in Seagate Crystal Reports online Help.
Sorting, Grouping, and Totaling |
283 |
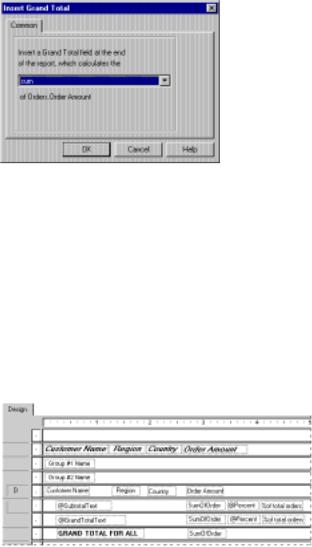
This calculates world- |
|
|
|
wide sales, the total of |
|
|
|
all sales in the report. |
The operation to |
||
|
|
||
|
|
be performed on |
|
|
|
the field. |
|
|
|
|
|
|
|
|
|
|
|
|
|
|
|
|
|
|
|
The field that is |
|
|
|
going to be totaled. |
|
Now you need to determine the percentage of worldwide sales generated by each country. To do this, you will create a simple formula.
5Open the Formula Editor and enter the following formula in the
Formula text box:
Sum ({orders.ORDER AMOUNT}, {customer.COUNTRY})/Sum ({orders.ORDER AMOUNT})*100
See Introduction to Formulas, Page 291.
6Place the formula in the Group Footer section of the report, just to the right of the Country subtotal.
After you add labels, headers, and formatting, and you run the report, the Design Tab should look similar to this:
Your report should look similar to the following:
284 |
Seagate Crystal Reports User’s Guide |

The program calculates the percentage of total sales contributed by each customer and each country.
Each customer is subtotaled.
Each country is subtotaled.
NOTE: This sample report has been designed to illustrate concepts only, and not the actual look of the finished report.
NOTE: To see an example of the above report, open the SGT12.RPT file in the \CRW16 directory (16-bit), or \Program Files\Seagate Software\Crystal Reports directory (32-bit).
Related Topics
Introduction to Formulas, Page 291
How to create group headers
Whenever you create a group, a subtotal, or a summary, the program creates both a Group Footer (GF) section (where it places any subtotal or summary value), and a Group Header (GH) section (where it automatically places the group name/header). Group Headers are useful, even necessary, if you want your report data to be clear and easily
Sorting, Grouping, and Totaling |
285 |

Standard headers
Live headers
understood. Though the program creates a group header automatically, you may find that you would like to change/modify the header to suit your needs. In this tutorial, you will learn how to create the five most common kinds of group headers:
●Standard headers, Page 286,
●Live headers, Page 286,
●Live headers for groups based on a formula, Page 288, and
●Headers for custom groups, Page 289.
A standard header is a block of text that is used to identify each group in a rather generic kind of way. “Customer,” “State,” and “Monthly Orders” are all examples of this kind of header.
While the header is somewhat descriptive (“Region Sales Figures” clearly means it is a regional group), you never know what region is in the group without first looking at the details in the group.
Nonetheless, this kind of header has its place and it is easy to create.
1To create a standard header, click the INSERT TEXT OBJECT button on the standard toolbar.
2When the object pointer appears, move the object frame into the Group Header section.
3When the Text Object is positioned, the program automatically selects the frame for editing. Enter the text you want to use for the header.
4Click outside the frame when finished to complete the process. Now when you run the report, the same header will appear at the beginning of each group. See How to insert text objects, Page 108.
A live header is a header that changes based on the content of the group. If the data is subtotaled by region, for example, a live header would typically identify the region detailed in each group. Thus, the Arizona group would have a header identifying the data as Arizona data, the
286 |
Seagate Crystal Reports User’s Guide |
California group would have a header identifying the data as California data, and so on.
NOTE: When creating a group, the program automatically inserts a group name field in the Group Header section unless you have toggled the option off using the OPTIONS command on the File Menu. The information that follows details how to manually insert such a section (if you do not have the program insert one automatically) and how to create different kinds of live headers for different needs.
GROUP NAME ONLY
The easiest live header to create is an identifying field value. To create this type of live header for region groups, for example, simply insert a Group Name field in the Group Header section. This prints Arizona (or AZ) at the beginning of the Arizona group, California (or CA) at the beginning of the California group, and so on.
1Click the INSERT FIELDS button on the standard toolbar. The Insert Fields dialog box appears.
2Click the Others Tab to activate it.
3Select the Group Name field that matches the group you are working with and drag it into the Group Header section for that group.
4Format the field as desired.
Now, when you run the report, the region identifier will appear as the group header for each region group.
GROUP NAME WITH TEXT
A more complex type of live header combines a field value and text. A typical group header of this kind for data broken down by region would be, “Sales for California” or “Customers in Postal Code 60606“. Creating these headers involves three steps:
1.Insert a text object in the Group Header section.
2.Type in the text you want to appear.
3.Enter the Group Name field in the text field where you want it to appear in the Group Header.
For example, if you want your header to read “Sales for” and then the name of the region in the current group (Sales for AZ, Sales for CA, and so forth), follow these steps:
1Click the INSERT TEXT OBJECT button on the standard toolbar.
2Place the object frame into the Group Header section for the group.
Sorting, Grouping, and Totaling |
287 |
Live headers for groups based on a formula
3When the TEXT OBJECT is positioned, the program automatically selects the frame for editing. Type in “Sales for” with a space after it.
4Click the INSERT FIELDS button on the standard toolbar. The Insert Field dialog box appears.
5Click the Others Tab to activate it.
6Select the Group Name Field that matches the group, and drag it into the text object, immediately after the text and the space you entered.
7Format the text object as you want it to appear.
Now, when you run the report, the program will create a live header (with text) for each of your groups.
When you create a group and use a formula field as a sort-and-group-by field, the program automatically creates a group name field based on the value returned by the formula.
For example, if you create this formula:
{customer.CUSTOMER NAME}[1]
and then group on the formula, the program will group your data based on the first letter in the Customer Name field.
To create a live group header for a group based on a formula, simply insert the group name field in the Group Header section.
When you run the report, the “A” group will have the letter “A” as a header, the “B” group will have the letter “B”, and so on. For more information, see How to group based on the first letter of a company name, Page 274.
288 |
Seagate Crystal Reports User’s Guide |
Headers for custom groups
To create a more descriptive header such as “Customers beginning with the letter B”, you simply follow these four steps:
1Insert a text object in the Group Header section.
2Type in this text:
Customers beginning with the letter
3Add a space.
4Insert the group name field into the text object and place it right after the space.
NOTE: If the program automatically inserted a group name field in the Group Header section, you will need to delete that field so you will not have duplicate headers.
The final type of header is a header for the types of custom groups created when things are grouped in a specific order. When using specified order grouping, both the name for each group and the records that belong in it are specified. As in the other grouping situations, the program creates a group name field for each group based on the group names specified.
Sorting, Grouping, and Totaling |
289 |
1Click the INSERT FIELDS button on the standard toolbar. The Insert Field dialog box appears.
2Click the Others Tab to activate it.
3Select the Group Name field for the custom group and drag it into the Group Header section for that group.
The program automatically applies each of the group names you assigned to the appropriate groups.
NOTE: Make certain that when you assign the names to the groups using the Define Named Group dialog box, the names you assign are the names you want to appear as group headers.
290 |
Seagate Crystal Reports User’s Guide |

13 |
Introduction to Formulas |
What you will find in this chapter...
What are formulas?, Page 292
How formulas are created: an introduction to the Formula Editor, Page 296
Other formula conventions, Page 304
Formula syntax, Page 306
How formulas are evaluated - order of precedence, Page 309
HANDS-ON (Formulas), Page 309
Introduction to Formulas |
291 |
What are formulas?
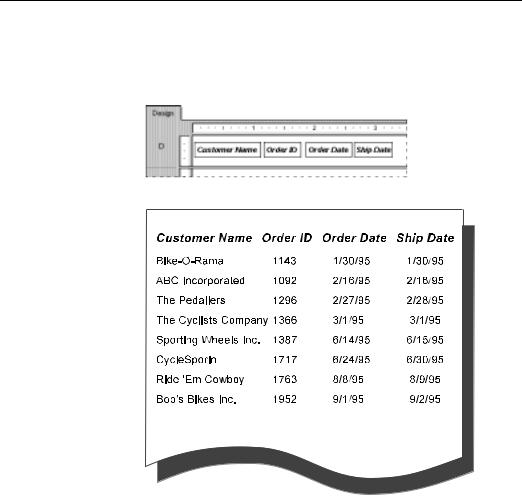
In many cases, the data needed for a report already exists in database table fields. To prepare an order list, for example, you simply need to place the appropriate fields on the report.
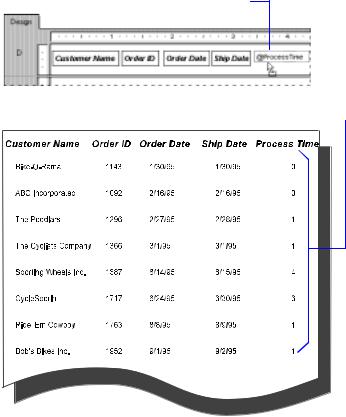
By placing these fields...
...you get this kind of report.
Sometimes, however, you need to put data on the report that does not exist in any of the data fields. In such cases, you need to create a formula. For example, to calculate the number of days it takes to process each order, you need a formula that determines the number of days between the order date and the ship date. Seagate Crystal Reports makes it easy for you to create such a formula.
292 |
Seagate Crystal Reports User’s Guide |

1Click the INSERT FIELDS button on the standard toolbar. The Insert Fields dialog box appears.
2 Click the Formula Tab to activate it.
3 Click New.
4 Type a name to identify the formula.
5When you click OK in the Formula Name dialog box, the Formula Editor appears. Use the Formula Editor to create, test, and modify the formula.
For more information on the Formula Editor, see How formulas are created: an introduction to the Formula Editor, Page 296.
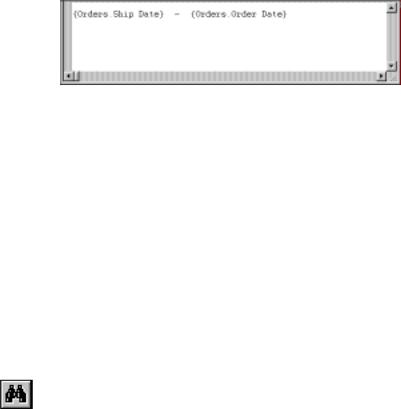
6To build the processing time formula, enter the Ship Date field, the Subtraction operator, and the Order Date field.
Introduction to Formulas |
293 |

7 Double-click the Orders.Ship Date field in the Report Fields list.
8 Double-click the subtraction operator in the Operators list.
9 Double-click the Orders.Order Date field from the Report Fields list.
The formula components are entered as you choose them.
NOTE: When you double-click an item in the Fields, Functions, or Operators tree, it is placed in the Formula text box complete with the brackets, punctuation, and other syntax items the Formula Editor needs to process them correctly (see Formula syntax, Page 306).
NOTE: The list of values in the Browse Field Data dialog box represents only a subset of the available records.
10When you are finished, click the CHECK button. The program checks the formula syntax.
11If the syntax is correct, click the SAVE AND CLOSE button. The Formula Editor closes and you are returned to the Insert Fields dialog box.
NOTE: If you use the SAVE AND CLOSE button, your personalized settings will be saved. The next time the Formula Editor is opened, it will appear with the settings you specified. However, if you use the SAVE button to save the formula, and later use the CANCEL button any resizing or customizing performed in the Formula Editor will be lost. The next time the Formula Editor is opened, it will appear with its default settings active.
NOTE: Other formulas can also be edited from within the Formula Editor. To do this, select the formula you want to edit from the drop-down list at the top of the Formula Editor.
294 |
Seagate Crystal Reports User’s Guide |
12 Click the Insert button to place the formula field object in the report.
13 When the object frame appears, place it where you want the formula to appear in the report.
You get this kind of report:
The formula subtracts the Order Date from the Ship Date and then prints the result here.
This is just one example of how formulas can be used to create powerful reports.
Some of the other typical uses for formulas are:
● creating calculated fields to add to your report
{orders detail.UNIT PRICE}*.85
«Calculates a price discounted 15%.»
● formatting text on a report
UpperCase ({customer.CUSTOMER NAME})
Introduction to Formulas |
295 |

«Changes all the values in the Customer Name field to uppercase. See How to format text with formulas, Page 318.»
● pulling out a portion, or portions, of a text string,
{customer.CUSTOMER NAME} [1]
«Extracts the first letter of the customer name. See How to group based on the first letter of a company name, Page 274, and search for
Subscript in Seagate Crystal Reports online Help.»
● pulling out a portion of a date
Month ({orders.ORDER DATE})
«Determines what month an order was placed.»
These examples just scratch the surface. If you have a need for specialized data manipulation, chances are you can do it with a formula.
Related Topics
Advanced Formulas, Page 315
How formulas are created: an introduction to the Formula Editor
Creating a formula in Seagate Crystal Reports is much like creating one in any spreadsheet application. You can use:
● fields:
({customer.CUSTOMER LAST NAME}, {customer.LAST YEAR'S SALES}, etc.),
● numbers:
(1, 2, 3.1416, etc.),
● text:
(“Quantity”, “ ”, “:”, ’your text’, etc.),
●operators:
(+, -, etc.),
●functions:
(TrimRight (x), Length (x), etc.),
●group field values:
(Average (fld, condFld), Sum (fld, condFld, “condition”), etc.), or
●other formulas:
(@GrossProfit, @QUOTA, etc.).
296 |
Seagate Crystal Reports User’s Guide |
Formula Editor
Toolbar
The Formula Editor is used to combine these components into working formulas. The Formula Editor allows you to type the components into the formula directly, or, in the case of fields, functions, operators, group field values, and other formulas, to select them from lists of those items that are available.
The Formula Editor requires you to enter the various components according to a specific set of rules called syntax, such rules as:
●text enclosed in quotation marks,
●arguments enclosed in parentheses (where applicable),
●referenced formulas identified with a leading @ sign,
●and so on.
The Formula Editor checks the syntax and helps you debug (fix) problems before you enter the formula into the report.
The Formula Editor combines elements to create a working formula. The three drop-down lists at the top of the Formula Editor contain the primary formula components.
The formula editor toolbar enables you to access many popular options with the click of a button or a selection from a drop-down list.
One drop-down list is available on the toolbar.
Introduction to Formulas |
297 |

Use this drop-down list to select a formula to create for the report you are currently working on.
The buttons on the Formula Editor toolbar perform the following functions:
Creates a new formula.
Saves the formula.
Saves the formula and closes the Formula Editor.
Tests the syntax of the formula for errors.
Undoes an action.
Repeats an action.
Views the data in that data field.
Finds/Replaces.
Bookmarks the current line of the selected formula or removes the bookmark from the current line.
Jumps to the next bookmark.
Jumps to the previous bookmark.
Clears all bookmarks.
Arranges directories alphabetically in the field, function, and operator trees.
298 |
Seagate Crystal Reports User’s Guide |
Formula Editor
Key Controls
Hides or views the Field Tree.
Hides or views the Function Tree.
Hides or views the Operator Tree.
NOTE: The Formula Editor has drag-and-drop capability.
NOTE: The Options dialog box (File menu) allows you to change the font size and the background/foreground color of text, comments, and keywords in the Formula Editor.
The Formula Editor accepts the following key controls:
Keyboard |
Action Preformed |
|
Combination |
||
|
||
|
|
|
|
|
|
Alt-T |
Shows toolbar (when it has been closed). |
|
Ctrl-A |
Selects all. |
|
|
|
|
Ctrl-C |
Copies. |
|
|
|
|
Ctrl-End |
Goes to the end of the last line of the formula. |
|
Ctrl-F |
Opens the Find dialog box (same as clicking the |
|
|
find button). |
|
Ctrl-F2 |
Sets bookmark. |
|
|
|
|
Ctrl-F3 |
Finds Next (based on the last search performed |
|
|
using the Find/Replace function). |
|
|
|
|
Ctrl-Home |
Goes to the beginning of file. |
|
Ctrl-Left |
Goes to the beginning of the left work (+Shift key |
|
Arrow |
will do the selection). |
|
Ctrl-M |
Sets focus to formula name combination box. |
|
|
|
|
Ctrl-N |
Creates a new formula. |
|
|
|
|
Ctrl-Right |
Changes focus to next control box (reverse order of |
|
Arrow |
Ctrl-Tab). |
|
|
|
|
Ctrl-S |
Saves and closes formula. |
|
Ctrl-Shift- |
Changes focus to next control box (reverse order of |
|
Tab |
Ctrl-Tab). |
|
Ctrl-Tab |
Changes focus to next control box. |
|
|
|
|
Ctrl-V |
Pastes. |
Introduction to Formulas |
299 |
Keyboard |
Action Preformed |
|
Combination |
||
|
||
|
|
|
|
|
|
Ctrl-X |
Cuts. |
|
Ctrl-Z |
Undoes an action. |
|
|
|
|
Ctrl-Shift-Z |
Redoes an action. |
|
End |
Goes to end of line. |
|
|
|
|
Enter |
Copies a selected object from a tree to the formula |
|
|
text box. |
|
F2 |
Goes to next bookmark. |
|
|
|
Bookmarks |
Bookmarks make it easy to navigate through long formulas, allowing you |
|
to write and edit complex formulas efficiently. For example, bookmarks |
|
can be used to mark: |
|
● frequently edited parts of a formula, so you can find them easily |
|
when you want to revise the formula; |
|
● major sections of a formula, so you can quickly navigate through |
|
long formulas; and |
|
● the beginning of each new if-then statement, so you can easily |
|
jump to the next if-then statement. |
|
As an example, consider a long formula that calculates a salesperson’s |
|
salary based on a minimum base pay value from a database, a variable |
|
related to length of service, a formula that calculates commission based on |
|
sales, and other considerations. Imagine that this formula is quite lengthy, |
|
contains multiple if-then statements, and includes frequent comments. |
|
Each time you edit this formula, you might have to spend time to |
|
reacquaint yourself with its structure. However, if you use bookmarks to |
|
mark key sections in your formula, you can quickly jump to the important |
|
parts. |
|
HOW TO USE BOOKMARKS IN A FORMULA |
|
You can place bookmarks on formulas that you create or edit in the |
|
Formula Editor and the Format Formula Editor. |
|
1 To place a bookmark, position the insertion point in the line of text |
|
which you want to mark with a bookmark. |
|
2 Click the TOGGLE BOOKMARK button on the Formula Editor toolbar. |
|
A blue dot appears in the gray column left of the text line, indicating |
|
that the line is now bookmarked. |
|
3 Repeat Steps 1 and 2 for each bookmark you want to place. |
300 |
Seagate Crystal Reports User’s Guide |
|
Once bookmarks are placed on a formula, you can quickly jump between |
|||||||||
|
bookmarks by using buttons on the Formula Editor toolbar. Click the |
|||||||||
|
Next Bookmark and Previous Bookmark buttons to jump to the next and |
|||||||||
|
previous bookmark, respectively. When you click these buttons, the |
|||||||||
|
insertion point moves to the beginning of the line marked by the next or |
|||||||||
|
previous bookmark. |
|||||||||
|
You can easily delete bookmarks that you don’t need. Simply position the |
|||||||||
|
insertion point in the line of text which is marked with a bookmark and |
|||||||||
|
click the Toggle Bookmark button. The blue dot disappears from the gray |
|||||||||
|
column left of the text line, indicating that the line is not bookmarked. To |
|||||||||
|
remove all bookmarks from your formula, click the Clear All Bookmarks |
|||||||||
|
button on the Formula Editor toolbar. |
|||||||||
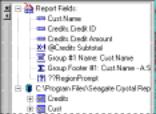
Fields tree |
The Fields tree contains all the fields you can use as formula arguments. |
|||||||||
|
|
|
|
|
|
|
|
|
|
|
|
|
|
|
|
|
|
|
|
|
|
|
|
|
|
|
Fields already used in the report. |
|||||
|
|
|
|
|
|
|
|
|||
|
|
|
|
|
|
|
|
Formulas used/defined in the report. |
||
|
|
|
|
|
|
|
||||
|
|
|
|
|
|
|
|
|
|
|
|
|
|
|
|
|
|
|
|
Parameter fields used/defined in the |
|
|
|
|
|
|
|
|
|
|
||
|
|
|
|
|
|
report. |
||||
|
|
|
|
|
|
|
|
|||
|
All active database fields. |
|||||||||
|
NOTE: The Fields tree is resizable. It is also dockable; you can right-click |
|||||||||
|
within the tree to toggle the dockable property on/off. You can also right- |
|||||||||
|
click and choose Hide from the shortcut menu to hide the tree box. |
|||||||||
|
HOW TO INSERT FIELDS INTO A FORMULA |
|||||||||
|
Fields can be inserted into a formula in two ways: |
|||||||||
|
1. by placing the I-beam cursor where you want the field to appear in |
|||||||||
|
|
the Formula text box of the Formula Editor, setting the insertion point |
||||||||
|
|
and then double-clicking the desired field in the Fields tree, or |
||||||||
|
2. by placing the I-beam cursor where you want the field to appear in |
|||||||||
|
|
the Formula text box and then typing it in manually. |
||||||||
|
NOTE: Be sure to review the correct syntax for using fields in your |
|||||||||
|
formulas. If you fail to include the file name, include the separating |
|||||||||
|
period, or surround the field in braces, the program will generate a |
|||||||||
|
Formula Compiler Error message detailing your error. See Formula syntax, |
|||||||||
|
Page 306, and search for Error Messages and Formula Compiler Warnings in |
|||||||||
|
Seagate Crystal Reports online Help. |
|||||||||
Introduction to Formulas |
301 |
Functions tree
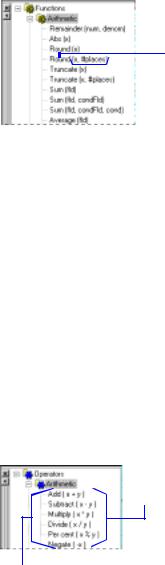
The Functions tree lists the dozens of functions that are included with Seagate Crystal Reports. These functions are prebuilt procedures that return values. They perform such calculations as average, sum, count, etc. All functions available are listed with their arguments and are arranged by their use.
Function name.
 Arguments you must supply.
NOTE: The Functions tree is resizable. It is also dockable; you can rightclick within the tree to toggle the dockable property on/off. You can also right-click and choose Hide from the shortcut menu to hide the tree box.
HOW TO INSERT FUNCTIONS INTO A FORMULA
Operators tree
Functions can be inserted into a formula in the same manner as fields:
●via the Functions tree, or
●by typing them in manually.
See HOW TO INSERT FIELDS INTO A FORMULA, Page 301.
NOTE: Be sure to review the correct syntax for using functions in your formula. If a function has required arguments, all arguments must be entered. If any required arguments are not entered, the program will generate a Formula Compiler Error message detailing the error. See
Formula syntax, Page 306, and search for Error Messages and Formula Compiler Warnings in Seagate Crystal Reports online Help.
The Operators tree lists the “action verbs” you can use in your formulas. Operators include such things as + (add), / (divide), -x (negate), etc. Search for Operators and Variables in Seagate Crystal Reports online Help.
Models showing how operators are used.
Operator names.
302 |
Seagate Crystal Reports User’s Guide |
NOTE: The Operators tree is resizable. It is also dockable; you can rightclick within the tree to toggle the dockable property on/off. You can also right-click and choose Hide from the shortcut menu to hide the tree box.
|
HOW TO INSERT OPERATORS INTO A FORMULA |
|
Operators can be inserted into formulas in the same manner as fields and |
|
functions: |
|
● via the Operators tree, or |
|
● by typing them in manually. |
|
See HOW TO INSERT FIELDS INTO A FORMULA, Page 301. |
Formula |
The Formula text box is where you actually enter the formula. |
text box |
|
You can:
●use the keyboard to enter the formula manually,
●choose the formula components from the Fields, Functions, and
Operators trees, or
●combine the two methods, choosing some of the components from the list boxes and entering other parts of the formula manually.
HOW TO INSERT TEXT AND NUMBERS INTO A FORMULA
Insert text and numbers into formulas by typing them directly into the Formula text box of the Formula Editor. You can also click the Browse Field Data button, highlight the value you want to insert from the list that appears, and select Paste to paste the value into your formula. See HOW TO INSERT FIELDS INTO A FORMULA, Page 301.
NOTE: Be sure to review the correct syntax for text and numbers in formulas. See Formula syntax, Page 306.
HOW TO SEARCH AND REPLACE IN THE FORMULA EDITOR
Click the FIND/REPLACE button to open a Find dialog box. From this dialog box, you can search and replace text within the Formula text box. Click the MARK ALL button to mark all occurrences of the search text. Click the REPLACE ALL button to replace all occurrences of the search text with the contents of the Replace with text box.
Introduction to Formulas |
303 |

You can also search (but not replace) within any of the Formula Editor trees (use the Search options to specify which tree boxes you are searching). The MARK ALL, REPLACE, and REPLACE ALL buttons become inactive when you specify a search within a tree box.
Other formula conventions
Other formulas
The following is a description of the remaining elements available for use in assembling a formula.
Just as you can insert fields into formulas, you can also insert other formulas within formulas. Seagate Crystal Reports performs the calculations in the inserted formula, and then uses the value returned by the referenced formula in the same way it uses any other value.
For example, the formula:
1*(2+4*6/3-7*12-8) +2*(2+4*6/3-7*12-8) +3*(2+4*6/ 3-7*12-8) +4*(2+4*6/3-7*12-8)= -820
includes the expression (2+4*6/3-7*12-8) repeated many times.
If you create a formula for the repeated expression (@F = (2+4*6/3-7*12- 8)) and then reference that formula instead of entering the expression itself, you will get the same result.
1*{@F}+2*{@F}+3*{@F}+4*{@F} = -820
Group field values
Every time the program sees the formula @F, it performs the @F calculation and returns the value -82, just as the expression underlying the formula (2+4*6/3-7*12-8) returns the value -82. See How formulas are evaluated - order of precedence, Page 309.
HOW TO INSERT FORMULAS INTO OTHER FORMULAS
Formulas can be inserted into other formulas in the same manner as you did other fields:
●via the Fields tree, or
●by typing them in manually.
See HOW TO INSERT FIELDS INTO A FORMULA, Page 301.
NOTE: Be sure to review the correct syntax for using formula fields in your formula. See Formula syntax, Page 306.
Group field values are values that summarize a group (a group subtotal, a group average, etc.). You can use them in formulas for a variety of
304 |
Seagate Crystal Reports User’s Guide |
purposes. For example, you could use group field values to find the percentage of the grand total contributed by each group. For instance, you may want to know what percentage of the $2,300,000 U.S. sales figure the Western Region generated.
HOW TO INSERT GROUP FIELD VALUES INTO FORMULAS
Group field values can be inserted into formulas in the same way you inserted other fields:
|
● via the Fields tree, or |
|
● by typing them in manually. |
|
NOTE: Due to the syntax complexity of some group fields, it is |
|
recommended that you enter group fields by selecting them from the |
|
Fields tree instead of manually typing them in. See Formula syntax, Page |
|
306. |
Formula |
Formula comments are notes included with a formula to explain its |
comments |
design and operation. |
|
Comments do not print and they do not affect the formula, but they |
|
appear in the Formula Editor. It is always a good idea to include |
|
comments with complex formulas for other users of your reports, |
|
especially those formulas that will be used again and again. |
|
HOW TO INSERT COMMENTS INTO FORMULAS |
|
Type your comments into the Formula text box in the Formula Editor. A |
|
comment must be preceded by two slashes (//). The comment can be |
|
above or below the formula, or it can even follow the formula on the same |
|
line. |
|
Any of the following three placements are acceptable: |
|
//This is an acceptable |
|
//position for a comment. |
|
//Note that when you force the line break, |
|
//you have to begin each new line |
|
//with double slashes. These comments |
|
//refer to the formula below. |
|
If {orders.ORDER AMOUNT} in (100.00 to 250.00) Then |
|
.10 * {orders.ORDER AMOUNT} |
|
Else |
|
0 |
|
//This is also an acceptable comment position |
|
//for detailing the formula above. |
Introduction to Formulas |
305 |

Formula comment considerations
Formula syntax
If {orders.ORDER AMOUNT} > 10.00 Then
“” //This position is also acceptable.
Else
“Flag”
The following are considerations when including comments with formulas:
●The proper syntax for a comment is two forward slashes (//) followed by the comment. When the program sees the two slashes, it realizes that the text that follows for the rest of the line is comment only and not to be evaluated as part of the formula itself.
●Seagate Crystal Reports treats everything that follows the slashes on the same line as a comment.
●If a comment is long and automatically wraps to the next line, no additional slashes are necessary; the program treats it as one continuous comment.
●If the Enter key is used to break the comment into two or more lines, each new line must begin with two slashes. If each new line does not begin with two slashes (//), the program treats each unslashed line as part of the formula itself and displays an error message when you check the formula syntax.
Seagate Crystal Reports requires the various components of a formula to be entered according to a specific set of rules called syntax. Learning and perfecting syntax, like the grammar of any language, takes practice.
Formula components must be written in a specific way and entered in specific order. The program uses syntax items (quotation marks, brackets, parentheses, etc.) to identify the various formula components, so it is very important that you stick to the rules in order for the program to recognize your formulas as well as have them work as you plan.
The various components of formulas, and their syntax, are listed below:
Text |
“Text” or ’Text’ |
When using text in formulas, it must be enclosed within single (’) or double (”) quotes. Whatever text is within those quotes will be printed. If your text includes an apostrophe, you must use double quotes.
306 |
Seagate Crystal Reports User’s Guide |
CORRECT
“Last Year’s Sales”
INCORRECT
’Last Year’s Sales”
Numbers 23134.7
When using numbers in formulas, they must be entered without any comma separators or currency symbols.
Fields |
{table.FIELD} |
When using fields in formulas, they must be enclosed within French braces { }. Enter the table name to identify which database table you are referring to, followed by a period and then enter the field name within that table.
EXAMPLE
{customer.REGION}
This identifies the Region field from the Customer table.
Operators 1+1
When using operators in formulas, you simply type in the operator where desired. You may place a space before and after the operator if you desire, but it is not required (i.e., 1 + 1).
Functions |
FunctionName(x) |
Brackets in formulas
When using functions in formulas, you simply type the function and supply the arguments (if any) as specified in the parentheses. For example, the Average (x) function requires a field or formula as its (x) argument.
EXAMPLE
Average({order.AMOUNT})
This formula will calculate the average of all values in the Amount field.
Seagate Crystal Reports uses three different types of brackets in formulas. Each one has a specific purpose and can be used only with certain formula elements.
●{ } are called French braces and are placed around database, formula, and parameter fields:
Introduction to Formulas |
307 |

{customer.REGION}, {@sum}, {?Region}
●[ ] are called Square brackets and are placed around the Subscript or Array Operator:
{customer.CUSTOMER NAME} [1]
●( ) are called Parentheses and are placed around the arguments of a function:
Round(x, # places), Abs(x)
NOTE: Parentheses can also be used to control the order in which the formula elements are evaluated. See How formulas are evaluated - order of precedence, Page 309.
HINT: Here is a useful way to remember when to use different types of brackets:
●French { } = Fields
●Square [ ] = Subscript (and Array)
●Parentheses ( ) = Parameters
Whether the formula is entered manually or by selecting formula components from the component list boxes, the correct syntax must be used in order for the formula to work.
When you double-click this Sum function, the program enters the function and required syntax items.
|
Commas between |
|
|
Parentheses |
|
|
Quotes for |
||||
|
arguments |
arguments |
|
||
Sums the values in the |
|
|
...from one week |
||
|
|
|
|||
...whenever the |
|
||||
Order Amount field... |
date changes... |
|
|
to the next. |
|
308 |
Seagate Crystal Reports User’s Guide |