


Underlaying |
By default, when an object is placed in a section: |
objects |
● the section expands to accommodate the object, if necessary, and |
|
● the object prints in the section where it is placed, whenever that |
|
section prints. |
|
However, when an object is placed in a section that has been set to |
|
underlay the following sections: |
|
● the object still prints when the section in which it is placed prints, |
|
but |
|
● it underlays the following section(s) as well. |
|
NOTE: Objects placed in a section can underlay all sections up to (but not |
|
including) its “sister” section. For example, the Page Header section can |
|
underlay all sections up to (but not including) the Page Footer section. |
|
This enables you to produce a number of interesting report effects. For |
|
example you can: |
|
● print an object so that it appears one time in the Details section |
|
beside a number of details (for example, a chart that compares |
|
sales figures by region alongside the details for the regions), |
|
● print a company watermark that is centered on the page, flowing |
|
through multiple sections, and |
|
● use a scanned bitmap of a form as a guide in setting up a report to |
|
print on preprinted forms. |
|
Using the Underlay facility, you can produce stunning visual effects. For |
|
more information, see How to make an object underlay a following section(s), |
|
Page 111. |
HANDS-ON (Report Design Environment)
How to move and resize toolbars
The 32-bit version of Seagate Crystal Reports includes several movable, resizeable toolbars.
You can move these toolbars into fixed positions or you can turn them into floating pallets if you wish. You move and resize these toolbars in the following ways:
70 |
Seagate Crystal Reports User’s Guide |

Moving |
To move the toolbars, click on the bar in a space where there is no button |
|
and drag the bar to a new position. |
|
|
Drag the bar to the desired position. |
Resizing |
To resize the toolbars, position the pointer over an edge or a corner of the |
|
|
bar. When the resizing pointer appears, drag it inward or outward to |
|
|
resize the bar. |
|
|
To go from |
Drag the |
|
this... |
cursor to |
|
|
create the |
|
|
desired size. |
|
The toolbar will be |
to this... |
resized as specified. |
|
|
You can toggle the toolbars on and off using the Toolbars dialog box. You can also open the Toolbars dialog box from the View Menu (TOOLBARS command).
Getting to Know Seagate Crystal Reports |
71 |
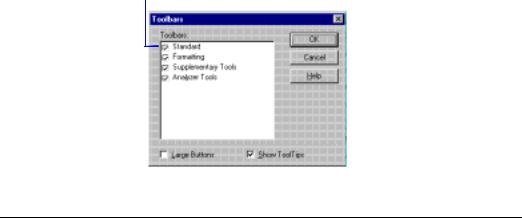
Toggle the check boxes on for the desired toolbars.
How to add, delete, and move guidelines
Seagate Crystal Reports provides guidelines to help you accurately place objects on your report. Guidelines are non-printing lines that you can place anywhere in the Design and Preview Tabs to aid in alignment. The visibility of the guidelines can be toggled on and off in two ways:
1.Using the two commands on the View Menu, GUIDELINES IN DESIGN and GUIDELINES IN PREVIEW. Search for Guidelines in Design command and Guidelines in Preview command in Seagate Crystal Reports online Help.
2.Using the two options, Show Guidelines in Design and Show Guidelines in Preview on the Layout Tab of the Options dialog box. Search for Options dialog box in Seagate Crystal Reports online Help.
Seagate Crystal Reports inserts guidelines automatically in some situations:
●Whenever a field or formula field is inserted in a report, the program automatically creates a guideline at the left edge of the field frame and snaps the field and field title to it.
●When a field is summarized, the program snaps the summary to the same guideline to assure proper alignment.
●When you right-click the shaded areas to the left of a section and choose ARRANGE LINES from the shortcut menu, the program automatically creates one or more horizontal guidelines in the section and snaps the fields to them.
72 |
Seagate Crystal Reports User’s Guide |
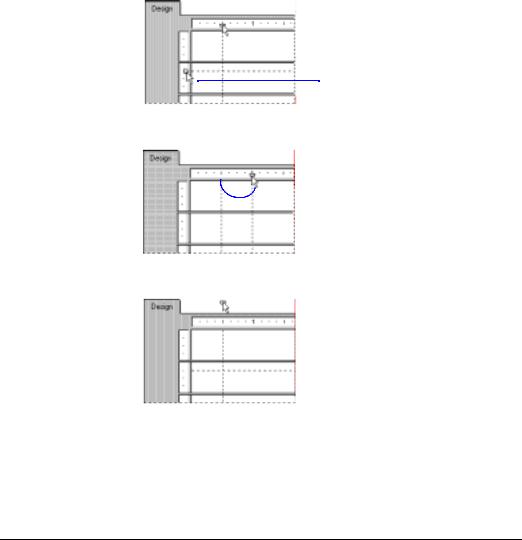
Adding |
There may be times when you want to insert guidelines manually. |
||
guidelines |
|
|
|
|
|
|
Click this ruler to activate |
|
|
|
a vertical guideline. |
|
|
||
|
|
|
|
|
|
|
Click this ruler to activate |
|
|
|
a horizontal guideline. |
Moving |
Each guideline is attached to an arrowhead on its originating ruler. |
||
guidelines |
|
|
|
|
|
Drag the guideline arrowhead |
|
|
|
to the desired position. |
|
|
|
|
|
Deleting |
Each guideline is attached to an arrowhead on its originating ruler. |
||
guidelines |
|
|
|
|
|
|
|
|
|
Drag the guideline arrowhead |
|
|
|
away from the ruler. |
|
NOTE: With the Snap to Grid option toggled on you will only be able to insert or move guidelines in grid increments. To get the full power of movement with guidelines, toggle the Snap to Grid option off using the Layout Tab in the Options dialog box. Search for Options dialog box in
Seagate Crystal Reports online Help.
How to move and position objects using guidelines
Positioning objects with guidelines
Guidelines have a snap property that automatically snaps objects to them. That is, objects will connect to the guidelines as positioning devices.
An object can snap to a horizontal guideline on its top, bottom, or horizontal midline (the invisible line that bisects the object horizontally).
Getting to Know Seagate Crystal Reports |
73 |

Snap to the top.
Snap to the midline.
Snap to the bottom.
An object can snap to a vertical guideline on its right or left side or on its vertical midline (the invisible line that bisects the object vertically).
Snap to |
Snap to |
the left. |
Snap to the midline. the right. |
When a guideline has its snap property toggled on and the guideline is moved, all objects snapped to the guideline are moved. The snap property can be toggled on/off from the Layout Tab of the Options dialog box, which can be opened from the File Menu (OPTIONS command).
Drag the guideline to the desired position.
The object moves with the guideline.
NOTE: When a guideline is moved, any object that is snapped to it is moved as well. But if you move an object that is snapped to a guideline, the program does not to move the guideline.
74 |
Seagate Crystal Reports User’s Guide |
Resizing objects using guidelines
Snapping objects with two guidelines
When one or more objects are snapped to guidelines on two sides (top and bottom, or right and left), the object(s) can be resized by dragging either or both of the guidelines. This can be especially helpful if you need to resize a number of objects similarly at the same time.
This is a two step process.
1First, you have to snap the object(s) to two guidelines.
2Then you have to drag a guideline to resize the object(s).
You may have two or more objects that you want to resize and they are either the same size (height or width) or different sizes. The process for resizing with two guidelines is the same for either case.
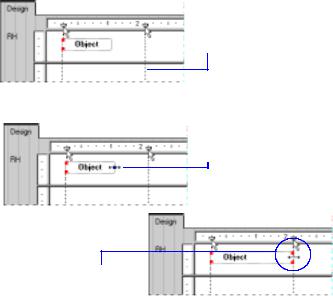
1Begin by creating a guideline and snapping one side of the object to that guideline.
2 Create a second guideline to the right of the object. It should not be touching the object.
3 Now click the object to activate the sizing handles.
4 Drag the resizing handle over to the second guideline.
The object snaps to the second guideline.
5Repeat Steps 2 through 4 for every additional object you want to snap to both guidelines.
6If the objects are not yet the desired size, drag one or both of the guidelines until the objects are the correct size.
Getting to Know Seagate Crystal Reports |
75 |

How to turn the grid on/off
The Design and Preview Tabs have an underlying grid structure that you can activate and resize in the Options dialog box.
1Choose the OPTIONS command from the File Menu. The Options dialog box appears with the Layout Tab active.
2 Set the Grid Size, Grid Options, and View Options in this dialog box.
NOTE: By default, all of the grid options are toggled off.
How to zoom the report in and out
You can easily zoom in on a report. You can choose any magnification from 25% to 400%. This feature is active in both the Design and Preview Tabs.
To zoom the report in or out, set the zoom level in the MAGNIFICATION
FACTOR edit box found on the Standard toolbar.
76 |
Seagate Crystal Reports User’s Guide |
Set the desired magnification factor and click OK when finished.
25%
50%
100%
It is helpful to view reports at low magnifications in order to get an overall picture of the layout of your report. Views at higher magnifications work well for attention to the details of the report.
How to undo/redo activities
Seagate Crystal Reports includes multiple levels of undo. With multiple levels of undo, you can undo several changes, a step at a time, until you have your report in the condition you want it.
The program also has a redo feature that reverses an undo. If you move an object, for example, and do not like its new position, you can click UNDO to move it back to its original position. If you then change your mind, you can click REDO to restore it to the place where you moved it.
●To undo an action, click the UNDO button on the Standard toolbar. The first time the button is clicked, it reverses the most recent change made to the report. Each additional time the button is clicked, it reverses the next most recent change.
●To redo a change after you have undone it, click the REDO button on the Standard toolbar.
Getting to Know Seagate Crystal Reports |
77 |

The program disables the UNDO button and the UNDO/REDO commands whenever there is nothing to undo/redo or when you have made a change that can not be reversed.
NOTE: If you undo an action (Action A) and then perform some new action, you will no longer be able to redo action A.
How to drill-down on summarized data
Drill-down cursor
You can drill-down on your data using the Drill-down cursor (to show the data behind individual groups). See Sorting, Grouping, and Totaling, Page 245.
Seagate Crystal Reports allows you to drill-down on group or summary information in the Preview Tab in both the Standard and the Group Tree view (See Standard view, Page 62 and Group Tree view, Page 63). When you position the cursor over any summary value that you can drill-down on, the program displays a Drill-down cursor.
If you then double-click, the program reveals the details behind that specific summary value. For example, if the Drill-down cursor becomes active over the city summary, you can double-click to see the details behind that summary. See Cursors, Page 54.
●If you have only a single summary, you can look at the summary or at the data from the individual records that are summarized.
●If you have multiple summaries, you can look at the summaries behind summaries (the city summaries that make up the region summaries, for example), or at the data from the individual records that are summarized.
How to disable field clipping
To disable field clipping:
1Select the field and click the OBJECT PROPERTIES button on the Supplementary toolbar. The Format Editor appears with the Number Tab active.
2Click the Number Tab.
3To allow overflow field representation, toggle the Allow Field Clipping check box on.
78 |
Seagate Crystal Reports User’s Guide |