

- •Welcome to Seagate Crystal Reports
- •HANDS-ON (Report Design Environment)
- •HANDS-ON (Sections and Areas)
- •HANDS-ON (Report Creation and Design)
- •HANDS-ON (Finishing Your Report)
- •HANDS-ON (Exporting a Report)
- •HANDS-ON (Compiled Reports)
- •HANDS-ON (Viewing reports with a web browser)
- •Introduction
- •HANDS-ON (Reporting on OLAP data)
- •HANDS-ON (Multiple Section Reports)
- •HANDS-ON (Absolute Formatting)
- •HANDS-ON (Conditional Formatting)
- •HANDS-ON (Record and Group Selection)
- •HANDS-ON (Sorting, Grouping, and Totaling)
- •HANDS-ON (Formulas)
- •HANDS-ON (Running Totals)
- •HANDS-ON (Parameter Field Objects)
- •HANDS-ON (Charting)
- •HANDS-ON (Mapping)
- •HANDS-ON (OLE Objects)
- •HANDS-ON (Subreports)
- •HANDS-ON (Document Import Tool)
- •HANDS-ON (Cross-Tab Objects)
- •HANDS-ON (Queries)
- •HANDS-ON (Dictionaries)
- •HANDS-ON (Working With Databases)
- •North/South American Head Office
- •USA and Latin America
- •Asia/Pacific Offices
- •Europe/Middle East/Africa Offices
- •France – Southern European Head Office
- •Middle East Regional Office (ME & Northern Africa)
- •Glossary

95 and Windows 98 know to register and convert PBRUSH.EXE OLE bitmaps as MSPAINT OLE bitmaps, the opposite is not true. You can open a Windows 3.1 OLE bitmap report in Windows 95 and Windows 98; however, you can not open a Windows 95 and Windows 98 OLE bitmap report in Windows 3.x. Thus, if you are going to be working back and forth between these two operating systems, it is best to create the reports in Windows 3.1 rather than in Windows 95 and Windows 98.
HANDS-ON (OLE Objects)
How OLE objects are represented in a report
An OLE object is displayed in a report in any of several different formats depending on how you choose to insert the object.
●If you have chosen to display the object as an icon, the icon will appear in the report. Using this capability with large bitmaps will speed up report processing. Users can choose to edit the bitmap later by double-clicking the icon.
●If the object was created from an existing file, the data from that file (or an icon) will be displayed in the report. This data can be edited by double-clicking the object or its icon.
●If you are creating a new object, the application for the object type that you chose will open, and you can begin designing the object. When you are finished, close or exit the application. The object (or its icon) will be displayed in the report.
Related Topics
Search for Insert Object dialog box in online Help.
How to use OLE - General Overview Tutorial
|
The easiest way to understand the OLE concepts is to create a sample |
|
report that uses static, embedded, and linked objects and compare their |
|
differences. |
Static OLE object |
1 To begin, create a report using the sample data, xtreme.mdb. Place |
|
any field in the Details section of the report. |
OLE |
409 |
Embedded OLE object
Linked bitmap image object
2Choose the PICTURE command from the Insert Menu and then choose Xtreme.bmp from the \CRW16 directory (16-bit), or \Program Files\Seagate Software\Crystal Reports directory (32-bit). When the object frame appears, place the picture on the far left side of the Report Header section.
3Right-click the picture. When the shortcut menu appears, notice that the picture is identified as an OLE object.
4When you double-click the object, nothing happens. A static OLE object can not be edited in place.
1Choose the OLE OBJECT command from the Insert Menu. The Insert Object dialog box appears.
2Click the Create From File option. The dialog box changes, allowing you to either type in an object name or browse.
3Click Browse and choose Xtreme.bmp from the \CRW16 directory (16-bit), or \Program Files\Seagate Software\Crystal Reports directory (32-bit).
4Click Insert to return to the Insert Object dialog box.
5Click OK to return to the report. An object frame appears.
6Place the object in the Report Header section, just to the right of the first picture.
7Right-click this picture and observe that it is also identified as an OLE Object on the shortcut menu. The second command from the bottom of the shortcut menu identifies it as a Bitmap Image Object. It is an embedded OLE object.
8Double-click the object. Note that you have remained in Seagate Crystal Reports but that all the menus and tools have changed to those found in Microsoft Paint. These tools can be used to edit the bitmap in place. Remember that even though you are working with the tools of the OLE server application, you are not working on the original object; you are working with a copy and nothing you do here will affect the original.
9Click the first object you placed - the static OLE object. Note that when you click the object, the tools and menus change back to those from Seagate Crystal Reports. This confirms that the static object can not be edited in place. It also demonstrates how to stop editing an embedded object; when your editing is finished, simply click outside the object to return to Seagate Crystal Reports.
1Choose the OLE OBJECT command from the Insert Menu. The Insert Object dialog box appears.
410 |
Seagate Crystal Reports User’s Guide |

Converting a static OLE object to a linked bitmap image object
Dragging and dropping OLE objects
2Click the Create From File option. The dialog box changes, allowing you to either type in an object name or browse.
3Click Browse and choose Xtreme.bmp from the \CRW16 directory (16-bit), or \Program Files\Seagate Software\Crystal Reports directory (32-bit).
4Click Insert to return to the Insert Object dialog box.
5This time, toggle the Link check box on.
6Click OK to return to the report. An object frame appears.
7Place this object just to the right of the embedded object.
8Right-click this object and observe that this object is identified as an OLE object. The second command from the bottom of the shortcut menu identifies this as a Linked Bitmap Image Object.
9Double-click the object. Microsoft Paint opens, displaying the original version of the object. Any changes you make to the original will be reflected in the object that appears in your report.
10Close Microsoft Paint and return to your report.
1Right-click the first object you placed -- the static OLE object.
2When the shortcut menu appears, choose CONVERT PICTURE OBJECT. The Convert dialog box appears.
3Select Paintbrush Picture from the Object Type list, and click OK. You have just converted a static OLE object to a modifiable OLE object.
4Right-click the object you have just converted. The second command from the bottom of the shortcut menu is now BITMAP IMAGE OBJECT, the same command that appeared for the first object you linked.
5Now double-click the object. Microsoft Paint opens, just as it did for the linked bitmap image object.
6Click the SAVE button on the standard toolbar and save the report as OLE.RPT.
One more procedure needs to be demonstrated: dragging an object from a server application and dropping it in Seagate Crystal Reports. For this tutorial, you will work with a spreadsheet object instead of a graphic object.
NOTE: This procedure assumes that you have Microsoft Excel on your computer or another spreadsheet program that is an OLE server application.
OLE |
411 |

1Open both Seagate Crystal Reports and Microsoft Excel and size the program windows so that they both are visible at the same time. You will need to be able to see both the object’s origin and its destination.
2In Seagate Crystal Reports, open OLE.RPT if it's not already open.
3Create a simple spreadsheet in Microsoft Excel by typing the numbers one through ten (1-10) in cells A1 through A10.
4Highlight cells A1 through A10.
5Move the cursor to the left edge of the highlighted cells until you get an arrow pointer.
6Press the mouse button and hold it down. This activates the cells to be moved. Since you're only going to copy the cells, press the Control key and hold it down too.
7Now drag the cells into the Details section of the report in Seagate Crystal Reports and, when you have the cells positioned, release the mouse button and Control key. That's all there is to it. You have just dragged an OLE object into your report.
8Save the file you created in Excel and close the application.
9Right-click the spreadsheet object in the report. When the shortcut menu appears, observe that it is identified as an OLE object and that the second command from the last identifies it as a Worksheet Object.
10Double-click the spreadsheet object. The menus and tools change to those from the OLE server application. You can now edit the object in place. The object is an embedded object. Any changes you make to the object will not affect the original.
11Click outside the object when you are finished. The menus and tools change back to those from Seagate Crystal Reports.
Now that you have a working understanding of OLE, you can use these capabilities within Seagate Crystal Reports to make your work more efficient.
How to insert a graphic/picture as an OLE object
You can add already existing graphics/pictures to your reports as OLE objects or you can create new graphics/pictures from scratch.
412 |
Seagate Crystal Reports User’s Guide |
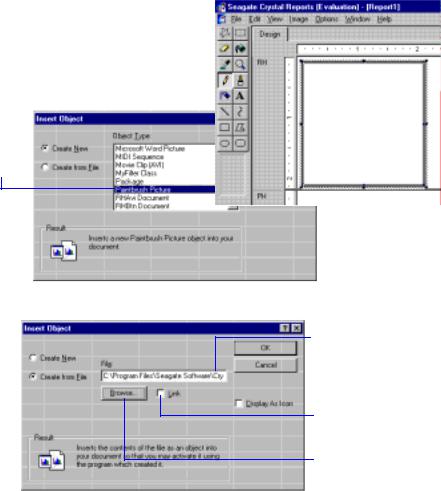
When you choose the
Create New option...
2 Select the Object Type you want to create.
1Choose the OLE OBJECT command from the Insert Menu. The Insert Object dialog box appears. You have two options when it comes to OLE objects. You can:
●insert an existing object, or
●create a new object in Seagate Crystal Reports, using in-place editing.
...The associated program takes control of Seagate Crystal Reports, allowing you to create the object in place.
3 When finished, click anywhere on the report to exit the graphic program.
A frame approximating the size of the object (or icon) appears.
4 Type in the full path of the object you want to insert.
5 Toggle this option on to have the object automatically updated.
 6 If you do not know the path, click the Browse button to locate the object.
OLE |
413 |
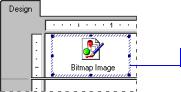
7 Position the OLE object (icon shown here) where you want it to appear in your report.
414 |
Seagate Crystal Reports User’s Guide |

20 Subreports
What you will find in this chapter...
What are subreports?, Page 416
Unlinked vs. linked subreports, Page 416
How subreport linking works, Page 417
Database links vs. subreports in one-to-many situations, Page 418
HANDS-ON (Subreports), Page 419
Subreports |
415 |

What are subreports?
A subreport is a report within a report. The process for creating a subreport is similar to the process of creating a regular report. A subreport can have most of the characteristics of a report, including its own record selection criteria. The only differences between a subreport and a primary report are that a subreport:
●is inserted as an object in a primary report; it can not stand on its own (although a subreport can be saved as a primary report),
●can be placed in any report section and the entire subreport will print in that section, and
●can not itself contain a subreport.
There are four instances in which a subreport would typically be used:
1.To combine unrelated reports into a single report. See How to combine unrelated reports by using subreports, Page 425.
2.To coordinate data that can not otherwise be linked. See How to use subreports with unlinkable data, Page 427.
3.To present different views of the same data within a single report. See How to show different views of the same data in one report, Page 431.
4.To perform one-to-many lookups from a field that is not indexed on the lookup field. See ONE-TO-MANY RELATIONSHIPS, Page 515.
Unlinked vs. linked subreports
Unlinked |
Unlinked subreports are freestanding; their data is not in any way |
|
coordinated with the data of the primary report. |
|
In unlinked subreports, there is no attempt to match up the records in one |
|
report with the records in the other. An unlinked subreport does not have |
|
to use the same data as the primary report; it can use the same data source |
|
or a different data source entirely. In addition, the subreport is not limited |
|
to reporting on a single table. An unlinked subreport can be based on a |
|
single table or on multiple tables. Regardless of the underlying data |
|
sources, the reports are treated as unrelated. |
Linked |
Linked subreports are just the opposite; their data is coordinated. The |
|
program matches up the records in the subreport with the records in the |
|
primary report. If you create a primary report with customer information |
|
and a subreport with order information and link them, the program |
416 |
Seagate Crystal Reports User’s Guide |
creates a subreport for each customer and includes in that subreport all the orders for that customer.
For more information on linking, search for Visual Linking Topics Index in
Seagate Crystal Reports online Help.
How subreport linking works
When you link a subreport to a primary report, the program creates the link by using a parameter field. See Parameter Fields, Page 351.
Note: When an existing report with saved data is added as a linked subreport, the data is refreshed from the database. Unlinked subreports can preserve the saved data.
When a subreport link field is selected, the program creates:
●a parameter field in the subreport which is then used to retrieve values passed to it by the primary report, and
●a record selection formula for the subreport using the parameter field.
¾the selection formula limits the subreport to those records in which the link field is equal to the parameter field value.
When the report is run, the program finds the first primary field record it needs and passes the value in the link field to the parameter field in the subreport. The program then creates the subreport with record selection based on the parameter field value. Here is an example:
●You create a report that shows customer data and a subreport that shows order data and then you link the two reports using the Customer ID field.
●When you run the report, the program finds the first customer record it needs and passes the Customer ID value from that record to the subreport parameter field.
●The program runs the Orders subreport. Since the subreport selection formula selects only those records in which the Customer ID value is equal to the parameter field value, and since that parameter field value is equal to the Customer ID in the first record in the primary report, the subreport contains only those records that have the same customer ID. Namely, those records that are orders for the first customer.
Subreports |
417 |
●When the subreport is finished, the program locates the second record it needs in the primary report, prints the customer data, and then passes this customer’s ID number to the parameter field.
●The program then runs a subreport including only those order records for the second customer.
●The process continues until the report is finished.
●All of this parameter field manipulation takes place behind the scenes. You simply pick the fields that will link the primary report with the subreport and the program does the rest. The values are passed without the parameter field prompting you for a value.
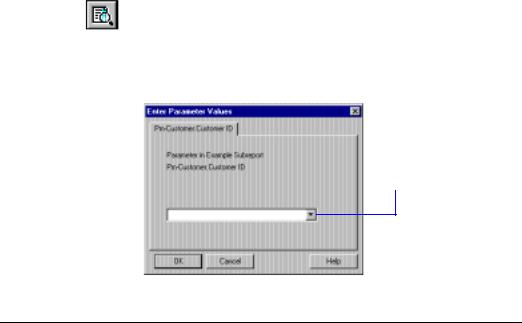
NOTE: If you have a linked subreport and you click the PRINT PREVIEW button on the standard toolbar (from the Subreport Design Tab), then the program runs the subreport on its own, without waiting to receive a parameter field value from the primary report and without evaluating the tab text formula. In this case, the program displays the Enter Parameter Values for Subreport dialog box and prompts you for a value.
The value entered here is the value the program uses to run the subreport.
Database links vs. subreports in one-to-many situations
When two tables in a report have a one-to-many relationship, the program retrieves the data in different ways depending on:
●the data source,
●the index situation,
●the record selection criteria, and
●whether you are creating a single report based on linked tables or a primary report that contains a subreport.
418 |
Seagate Crystal Reports User’s Guide |