

NOTE: You can also include third-party DLLs, if needed. These are files that are included with Seagate Crystal Reports but are not Seagate Crystal Reports components. Most commonly, these DLLs will be database drivers, supplied for accessing certain databases.
HANDS-ON (Exporting a Report)
How to export reports
Finished reports can be exported to a number of popular spreadsheet and word processor formats, as well as to HTML, ODBC, and common data interchange formats. This makes the distribution of information easier.
For example, you may want to use report data to project trends in a spreadsheet package, or you may want to enhance the presentation of data in a desktop publishing package.
NOTE: When you export a report to a file format other than Seagate Crystal Reports format (.RPT), you may lose some or all of the formatting that appears in your report. However, the program attempts to preserve as much formatting as the export format allows.
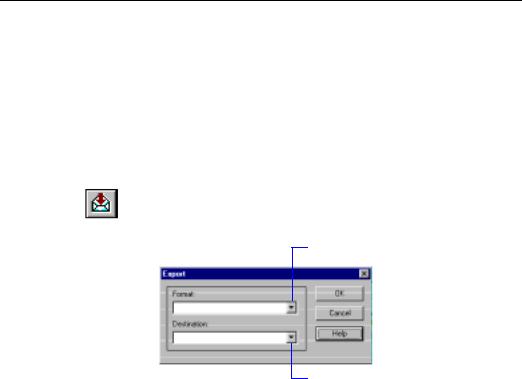
1With the report you want exported active, click the EXPORT button on the Standard toolbar. The Export dialog box appears.
2 Select the format to export the report in from this drop-down list.
3 Select a destination for your file from this drop-down list.
4 Click OK, and the export process begins.
When a report is exported to a disk file or to an application, a sequence of dialog boxes prompting you for formatting details appear, depending on the format you specified in the Export dialog box. After you supply these details and click OK, the Choose Export File dialog box appears. Use the controls in this dialog box to select a path and file name for the file to which the report is being exported.
Printing, Viewing, and Exporting |
133 |
Exporting
to an application
Exporting to
Lotus Notes
NOTE: Although the program assigns the native extension to all files you export in a specific word processor, database, or spreadsheet format, it automatically assigns the extension *.TXT for all files you export in one of the common data interchange formats. The program in which you want to use the data, however, may look for specific extensions other than *.TXT. Consult the manual for that program to determine the correct file extension, and change the extension accordingly in the File Name edit box.
5Click Save. The program exports the report to a disk file in the format specified.
If you export to an application, the program saves the report in a temp file and then opens the file in the appropriate application (unless you are exporting in HTML format, in which case you will need to specify a file path).
Keep in mind:
●When exporting in ODBC format, “Application” and “Disk file” are the same.
●You may not be able to export properly to an application if you are working with 16-bit Seagate Crystal Reports on an NT or Windows 95 and Windows 98 platform, with the application residing in a long path location (such as c:/Program Files/Office/ Excel.exe).
●The file name of the report and the file name of the temp file may not be the same.
1With the report you want exported active, click the EXPORT button on the Standard toolbar. The Export dialog box appears.
2Select the desired export file format from the Format drop-down list.
3Select Application (from the Destination drop-down list) as the export destination and click OK.
The program now saves the report and opens it in the appropriate application. For example, if the report was exported in a Word for Windows document format, the program opens the report in Microsoft Word.
NOTE: If you export in the Excel 5.0 Extended format, the Format Options dialog box will appear, allowing you to specify the column and row formatting for the report.
Lotus Notes is a powerful groupware application that promotes communication and information sharing between different departments in an organization.
134 |
Seagate Crystal Reports User’s Guide |

Exporting to an Exchange Folder
NOTE: You must have version 3.0 or later of the Lotus Notes Windows client. Seagate Crystal Reports will not export to a Lotus Notes OS/2 client.
1With the report you want exported active, click the EXPORT button on the Standard toolbar. The Export dialog box appears.
2Select an export file format, select Lotus Notes Database as the export destination, and click OK. The Select Database dialog box appears.
3In the Select Database dialog box, highlight the Lotus Notes server from the Servers list box, and select the database to which the report will be exported.
4Verify that the file name in the File name text box is correct, and click OK. The Comments dialog box appears.
5Type in any comments that are to appear when another user selects your report from the Lotus Notes Desktop.
6Click OK, and the export process begins.
The next time a user with access to the Lotus Notes database that you selected logs on to Lotus Notes, your report will be listed in the Lotus Notes Desktop. The user can double-click the report file name to display the comments you wrote, and can double-click the report icon that appears in order to view the report.
Seagate Crystal Reports lets you export a report file to an Exchange folder. You select the folder, and the report is stored there in the format that you specify. An Exchange folder can contain standard notes (mail), files, and instances of Exchange forms. For more information, search for Exchange Data Access in Seagate Crystal Reports online Help.
1With the report you want exported active, click the EXPORT button on the standard toolbar. The Export dialog box appears.
2Select the desired export file format from the Format drop-down list.
3Select Exchange Folder as the export destination, from the Destination drop-down list and click OK. The Choose Profile dialog box appears.
4Select the desired profile from the Profile Name drop-down list. If the profile is not listed, click the New button to create it.
5Click OK when finished.
6When the Select a Folder dialog box appears, highlight the folder in your profile in which you want the report to appear, and click OK.
The report is exported to the Exchange folder you selected. The exported report can be accessed through the Microsoft Exchange client.
Printing, Viewing, and Exporting |
135 |

Exporting to HTML
Exporting to an ODBC data source
Providing support for the Internet and corporate intranets becomes more important with every passing day. Seagate Crystal Reports recognizes this importance and provides World Wide Web support. Although incorporated as an export format, HTML represents a whole new export destination for reports as well.
By exporting reports in HTML format, Seagate Crystal Reports provides you with a new option for rapid, convenient distribution of important company data. Once exported, your reports become accessible with many of the most popular web browsers, including Netscape and Microsoft Internet Explorer.
1With the report you want exported active, click the EXPORT button on the Standard toolbar. The Export dialog box appears.
2From the Format drop-down list, select one of the HTML formats listed.
●If Netscape is your browser, select HTML 3.2 (Standard) format.
●If using Microsoft Internet Explorer as your browser, select HTML 3.0 (Draft Standard) format.
●The third HTML option, HTML 3.2 (Extended), is a new form of HTML
3Select a destination from the Destination drop-down list. The rest of this section assumes you select Disk file to store the HTML document in a directory on a web server.
4Click OK. The Export To Directory dialog box appears. When exported to HTML format, a report may create more than one HTML file. For this reason, the program asks you for the name of a directory for an export destination, and uses default names for the HTML files. The initial HTML page will be saved as DEFAULT.HTM. This is the file you open if you want to view your report through your web browser.
5Select an existing directory, or create a new directory for your report.
6Click OK. The program exports the report to HTML format.
Seagate Crystal Reports allows you to export reports to any ODBC data source. If you have an ODBC data source set up for a database or data format, you can export your report to that data format through ODBC.
For instance, you may have an ODBC data source set up through ODBC Administrator that you normally use to access database tables designed in Microsoft SQL Server. Using the Export dialog box, however, you can select your SQL Server data source and export your report as a new SQL Server database table.
136 |
Seagate Crystal Reports User’s Guide |
NOTE: You must have an ODBC data source set up through ODBC Administrator in order for the program to export to a particular ODBC database format. See How to set up an ODBC data source, Page 556.
Exporting to an ODBC data source lets you:
●change data from a centralized database format into a format compatible with a local DBMS application,
●change data from a local database format into a format compatible with a centralized database,
●create a new database table that can be used as a separate data set in future reporting,
●create a mini data-warehouse, and
●manipulate database data by filtering records, adding formulas, and removing fields to create a new database table that provides the data you need most for your work.
1With the report you want exported active, click the EXPORT button on the Standard toolbar. The Export dialog box appears.
2From the Format drop-down box, select the ODBC data source for the format in which you want to export your report. For example, ODBC - CRSS allows you to export your report to a Microsoft SQL Server database.
3Destination is ignored when you are exporting a report to an ODBC data source. You do not need to make any changes to the Destination drop-down box. Simply click OK in the Export dialog box.
4If your ODBC data source specifies a particular database, the report will be exported to that database. Otherwise, the Select Database dialog box appears. Select the database to which this report will be added as a new table, and then click OK.
5If the ODBC data source you selected requires a Logon ID and password, the Login or SQL Server Login dialog box appears. Enter your ID and Password, and then click OK. The Enter ODBC Table Name dialog box appears.
6Enter the name you want to give to the new table in the database, and then click OK. The program exports the report as a new table in the database you specified.
NOTE: If your report contains a binary field, you will be unable to export it to an ODBC data source successfully.
Search for Export format and destination files in Runtime File Requirements online Help (RUNTIME.HLP).
Printing, Viewing, and Exporting |
137 |