

302 HOW: The Joy of JavaScript: The Ever-Popular Image Rollover
They make a handy informational and branding tool, and they work in older browsers (like Netscape 4) that don’t support the <TITLE> attribute.
THE EVER-POPULAR IMAGE ROLLOVER
Problem: The site is pretty but feels lifeless. Visitors are encouraged to admire but not to click and explore. The site needs a shot of GUI-like, visual interactivity.
Solution: The JavaScript image rollover (see Figures 11.2 and 11.3).
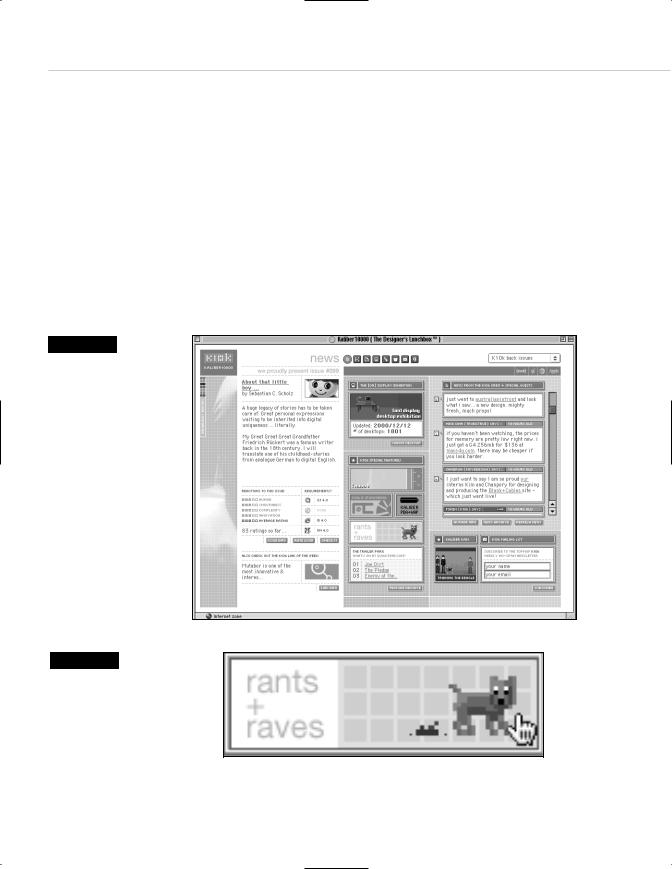
Figure 11.2
Kaliber 10000, “The Designer’s Lunchbox,” is a jewel of graphic and navigational design with numerous JavaScript tricks up its virtual sleeve. Note the “K10k back issues” pull-down menu at the upper right, the code for which is described later in this chapter. One of K10k’s simpler (but very effective) techniques is using the ever-popular image rollover to replace static icons with animated ones. For instance…
Figure 11.3
…dragging your mouse cursor over the Rants and Raves button replaces the static dog with a GIF animation of a pooping dog. Hey, we said they were brilliant web designers; we didn’t say they were mature (www.k10k.net).

Taking Your Talent to the Web |
303 |
Let’s assume that after reading Chapter 9, “Visual Tools,” you opened Photoshop and ImageReady, designed a web page comp, sliced it, and used ImageReady to generate the JavaScript rollover. Now take those same sliced images, open your HTML text editor of choice (Allaire Homesite, Barebones BBEdit, or Optima-Systems PageSpinner), and, using the techniques you learned in the books or online tutorials mentioned earlier in this chapter, write yourself an image rollover by hand.
You can do it! It’s okay to prop the books open in front of you or to refer back to Thau’s web pages. You’ll create links much like the text links we showed in the previous example. You’ll also hand-code a preload, usually in the <HEAD> of your document. A preload ensures that swapped images will be downloaded to the user’s cache before the page displays. In that way, those preloaded images are ready to leap into action the moment the user drags her mouse over them.
Why are rollover effects so popular? We think it is because users are accustomed to operating systems whose GUIs respond to their actions. Rollovers emulate this behavior, and they indicate that an image is more than an image—it is a dynamic trigger to an action the user can perform. Users dig that stuff.
A Rollover Script from Project Cool
On the assumption that you haven’t bought those other books yet, haven’t read any of the online tutorials, and still feel uncomfortable with JavaScript, we’ll go ahead and show you another simple way to create JavaScript image rollovers.
The following was adapted from a basic script at Project Cool. And that’s okay. Project Cool wrote their script back in the late 1990s so web designers would use it and learn from it. The future of Project Cool is doubtful because the site’s creators left in late 1999, but this script and others like it were still available online as of this writing (www.projectcool.com).
<script type=”text/javascript”> <!-- Adapted from Projectcool.com if (document.images){

304 HOW: The Joy of JavaScript: The Ever-Popular Image Rollover
mainover = new Image; mainout = new Image; mainover.src = “/images/menubar_over_1.gif”; mainout.src = “/images/menubar_out_1.gif”; storiesover = new Image; storiesout = new Image; storiesover.src = “/images/menubar_over_2.gif”; storiesout.src = “/images/menubar_out_2.gif”;
}
functiover swapem(iname, gname) { if(document.images){
iname.src = gname.src;
}
}
//--> </script>
This script goes inside the <head></head> of an HTML document. It might look complex if you’re unfamiliar with JavaScript, but it is really elegantly simple.
The script begins by announcing the fact that it is a script and that its type is text/javascript. Older browsers expected to see a <LANGUAGE> attribute with the name and, optionally, a version of the scripting language being used (“Javascript1.2,” for instance), but this attribute has been deprecated in favor of a more generic <MIME> type descriptor. Don’t worry if you don’t understand what we just said; simply relax and type:
<script type=”text/javascript”>
Similarly, the end of the script is announced by a </script> tag. As with HTML and CSS, <comment> tags tell search engine spiders (and non- JavaScript-capable browsers) to ignore everything written between <!-- and -->. You want search engines to help web users find your content, not your JavaScript.
Next, the Project Cool script sets a condition for running. Early versions of JavaScript did not support image rollovers. The script wants to make sure it is working with a browser that understands rollovers, so it tests the browser’s receptivity to the images array object of the document model:
if (document.images)

Taking Your Talent to the Web |
305 |
The script could have accomplished the same thing by detecting for browsers and platforms (a technique known as browser sniffing). For instance, it could have checked for the presence of Netscape 2 and Internet Explorer 3, two browsers that did not support the images array of the document model (and hence would not be able to process this script). But the code to check for these browsers is somewhat long compared to a simple line such as
if (document.images)
Besides, some versions of IE3 did understand image rollovers. Rather than get tangled in browser versions, it is easier, more elegant, and more reliable to test for an understanding of the document images object. If the browser does not understand (document.images), the script will be skipped. If the required conditions are met, the script runs.
The script next declares two image conditions (Over or Out) and preloads the required images (mb3_on-01-01.gif, mb3_off-01-01.gif, mb3_on-02- 01.gif, and mb3_off-02-01.gif):
if (document.images){
mainover = new Image; mainout = new Image; mainover.src = “/images/menubar_over_1.gif”; mainout.src = “/images/menubar_out_1.gif”; storiesover = new Image; storiesout = new Image; storiesover.src = “/images/menubar_over_2.gif”; storiesout.src = “/images/menubar_out_2.gif”;
Over corresponds to the onMouseOver state, and off corresponds to the default and onMouseOut state. The two images correspond to two named JavaScript objects (main and stories).
Finally, the script declares a swapem function, which works by swapping one image state for another:
function swapem(iname, gname) { if(document.images){
iname.src = gname.src;

306 HOW: The Joy of JavaScript: The Ever-Popular Image Rollover
As we said, all of this takes place in the <HEAD> of the HTML document, though it could just as easily live in an external JavaScript document. Like an external style sheet as described in Chapter 10, “Style Sheets for Designers” external JavaScript documents can live anywhere on the web server and are referenced via links in the <HEAD> of each HTML page:
<script language=”JavaScript” type=”text/javascript” src=”/daily.js”></script>
For more on external JavaScripts, see “Going Global with JavaScript,” later in this chapter.
All that remains is to call up these functions in the <BODY> of the HTML document itself.
And here is code that does just that:
<a href =”/main.html” onMouseOver=”swapem(main, mainover); return true;”onMouseOut=”swapem(main, mainout);return true;”><img name=”main”src”/images/menubar_out_1.gif “ width=”200” height=”25” border=”0” alt=”Visit themain page.” title=”Visit the main page.”></a>
This code should look somewhat familiar to you because it is fairly similar to the dreaded text rollover.
Once again, here is a standard HTML link followed by two event handlers: one for onMouseOver, the other for onMouseOut. But now, instead of invoking a status bar message, our MouseOver and MouseOut states call upon the swapem function declared earlier in the document. The onMouseOver event handler declares two variables for the swapem function: a named object (in this case, main) and an appropriate image state (mainover)—over, because this is the “MouseOver” state for the image object. The onMouseOut event handler also declares two variables for the swapem function: a named object (main) and an appropriate image state (mainout)—out, because this is the “MouseOut” state for the image object. Semicolons follow the naming of the variables and the required return true declaration.
The image <IMG> tag that follows gives the source image a name (main), allowing the swapem function to recognize the image as the object that is supposed to be swapped. The remaining <SRC>, <WIDTH>, <HEIGHT>, and <BORDER> attributes should be familiar to you from the HTML chapter. The <ALT> and <TITLE> attributes are included so that the menu item will