


Chapter 4
Instant Gratification
Let’s write a simple application to verify we’ve got Rails snugly installed on our machines. Along the way, we’ll get a peek at the way Rails applications work.
4.1Creating a New Application
When you install the Rails framework, you also get a new command-line tool, rails, which is used to construct each new Rails application that you write.
Why do we need a tool to do this—why can’t we just hack away in our favorite editor, creating the source for our application from scratch? Well, we could just hack. After all, a Rails application is just Ruby source code. But Rails also does a lot of magic behind the curtain to get our applications to work with a minimum of explicit configuration. To get this magic to work, Rails needs to find all the various components of your application. As we’ll see later (in Section 14.2, Directory Structure, on page 228), this means that we need to create a specific directory structure, slotting the code we write into the appropriate places. The rails command simply creates this directory structure for us and populates it with some standard Rails code.
To create your first Rails application, pop open a shell window, and navigate to a place in your filesystem where you’ll want to create your application’s directory structure. In our example, we’ll be creating our projects in a directory called work. In that directory, use the rails command to create an application called demo. Be slightly careful here—if you have an existing directory called demo, you will be asked whether you want to overwrite any existing files.
dave> cd work work> rails demo create
create app/controllers create app/helpers create app/models
: : :
CREATING A NEW APPLICATION |
44 |
create log/development.log create log/test.log
work>
The command has created a directory named demo. Pop down into that directory, and list its contents (using ls on a Unix box or dir under Windows). You should see a bunch of files and subdirectories.
work> cd demo |
|
|
|
|
demo> ls -p |
|
|
|
|
README |
components/ |
doc/ |
public/ |
tmp/ |
Rakefile |
config/ |
lib/ |
script/ |
vendor/ |
app/ |
db/ |
log/ |
test/ |
|
All these directories (and the files they contain) can be intimidating to start with, but we can ignore most of them when we start. In this chapter, we’ll use only two of them directly: the app directory, where we’ll write our application, and the script directory, which contains some useful utility scripts.
Let’s start in the script subdirectory. One of the scripts it contains is called server. This script starts a stand-alone web server that can run our newly created Rails application under WEBrick.1 So, without further ado, let’s start our demo application.
demo> ruby script/server
=> Booting WEBrick...
=> Rails application started on http://0.0.0.0:3000
=> Ctrl-C to shutdown server; call with --help for options [2006-01-08 21:44:10] INFO WEBrick 1.3.1
[2006-01-08 21:44:10] INFO ruby 1.8.2 (2004-12-30) [powerpc-darwin8.2.0] [2006-01-08 21:44:11] INFO WEBrick::HTTPServer#start: pid=10138 port=3000
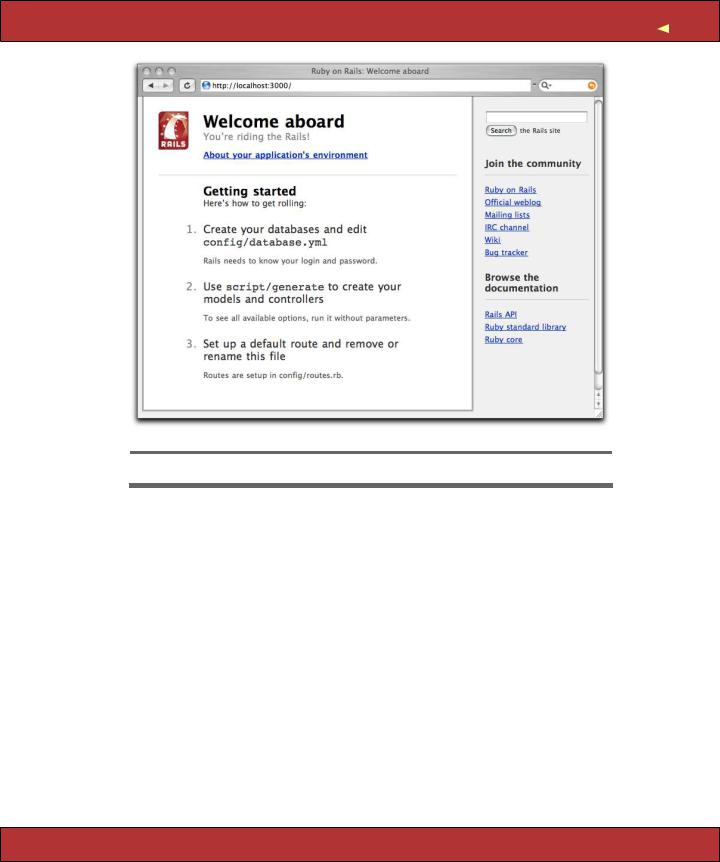
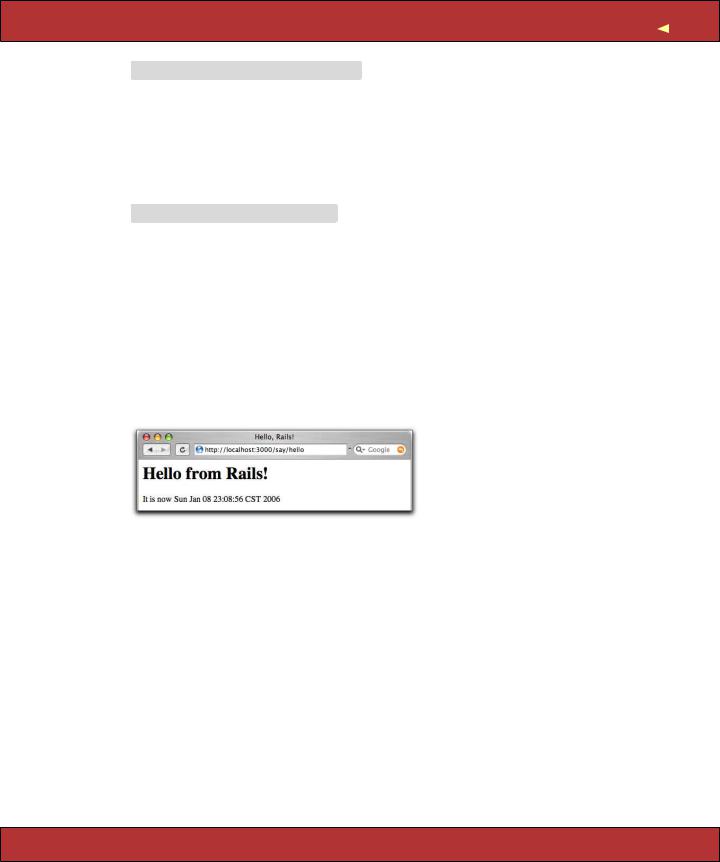
As the last line of the start-up tracing indicates, we just started a web server on port 3000.2 We can access the application by pointing a browser at the URL http://localhost:3000. The result is shown in Figure 4.1 (although the version numbers you see will be different).
If you look at the window where you started WEBrick, you’ll see tracing showing you accessing the application. We’re going to leave WEBrick running in this console window. Later on, as we write application code and run it via our browser, we’ll be able to use this console window to trace the incoming requests. When the time comes to shut down your application, you can press
1. WEBrick is a pure-Ruby web server that is distributed with Ruby 1.8.1 and later. Because it is guaranteed to be available, Rails uses it as its development web server. However, if web servers called Mongrel or Lighttpd are installed on your system (and Rails can find one of them), the script/server command will use one of them in preference to WEBrick. You can force Rails to use WEBrick by providing an option to the command.
demo>ruby script/server webrick
2. The 0.0.0.0 part of the address means that WEBrick will accept connections on all interfaces. On Dave’s OS X system, that means both local interfaces (127.0.0.1 and ::1) and his LAN connection.
Report erratum
HELLO, RAILS! 45
Figure 4.1: Newly Created Rails Application
control-C in this window to stop WEBrick. (Don’t do that yet—we’ll be using this particular application in a minute.)
At this point, we have a new application running, but it has none of our code in it. Let’s rectify this situation.
4.2Hello, Rails!
I can’t help it—I just have to write a Hello, World! program to try a new system. The equivalent in Rails would be an application that sends our cheery greeting to a browser.
As we saw in Chapter 2, The Architecture of Rails Applications, on page 22, Rails is a Model-View-Controller framework. Rails accepts incoming requests from a browser, decodes the request to find a controller, and calls an action method in that controller. The controller then invokes a particular view to display the results to the user. The good news is that Rails takes care of most of the internal plumbing that links all these actions. To write our simple Hello,
Report erratum
HELLO, RAILS! 46
World! application, we need code for a controller and a view. We don’t need code for a model, because we’re not dealing with any data. Let’s start with the controller.
In the same way that we used the rails command to create a new Rails application, we can also use a generator script to create a new controller for our project. This command is called generate, and it lives in the script subdirectory of the demo project we created. So, to create a controller called Say, we make sure we’re in the demo directory and run the script, passing in the name of the controller we want to create.3
demo> ruby script/generate controller Say
exists |
app/controllers/ |
exists |
app/helpers/ |
create |
app/views/say |
exists |
test/functional/ |
create |
app/controllers/say_controller.rb |
create test/functional/say_controller_test.rb create app/helpers/say_helper.rb
The script logs the files and directories it examines, noting when it adds new Ruby scripts or directories to your application. For now, we’re interested in one of these scripts and (in a minute) the new directory.
The source file we’ll be looking at is the controller. You’ll find it in the file
app/controllers/say_controller.rb. Let’s have a look at it. defining classes
֒→ page 634
Download work/demo1/app/controllers/say_controller.rb
class SayController < ApplicationController end
Pretty minimal, eh? SayController is an empty class that inherits from ApplicationController, so it automatically gets all the default controller behavior. Let’s spice it up. We need to add some code to have our controller handle the incoming request. What does this code have to do? For now, it’ll do nothing—we simply need an empty action method. So the next question is, what should this method be called? And to answer this question, we need to look at the way Rails handles requests.
Rails and Request URLs
Like any other web application, a Rails application appears to its users to be associated with a URL. When you point your browser at that URL, you are talking to the application code, which generates a response to you.
3. The concept of the “name of the controller” is actually more complex than you might think, and we’ll explain it in detail in Section 14.4, Naming Conventions, on page 240. For now, let’s just assume the controller is called Say.
Report erratum

HELLO, RAILS! 47
http://pragprog.com/say/hello
1. First part of URL addresses the application
2.then the controller (say)
3.and the action (hello)
Figure 4.2: URLs Are Mapped to Controllers and Actions
However, the real situation is somewhat more complicated than that. Let’s imagine that your application is available at the URL http://pragprog.com/. The web server that is hosting your application is fairly smart about paths. It knows that incoming requests to this URL must be talking to the application. Anything past this in the incoming URL will not change that—the same application will still be invoked. Any additional path information is passed to the application, which can use it for its own internal purposes.
Rails uses the path to determine the name of the controller to use and the name of the action to invoke on that controller.4 This is illustrated in Figure 4.2. The first part of the path is the name of the controller, and the second part is the name of the action. This is shown in Figure 4.3, on the following page.
Our First Action
Let’s add an action called hello to our say controller. From the discussion in the previous section, we know that adding a hello action means creating a method called hello in the class SayController. But what should it do? For now, it doesn’t have to do anything. Remember that a controller’s job is to set up things so that the view knows what to display. In our first application, there’s nothing to set up, so an empty action will work fine. Use your favorite editor to change the file say_controller.rb in the app/controllers directory, adding the hello method as shown.
Download work/demo1/app/controllers/say_controller.rb
class SayController < ApplicationController def hello
end end
4. Rails is fairly flexible when it comes to parsing incoming URLs. In this chapter, we describe the default mechanism. We’ll show how to override this in Section 20.2, Routing Requests, on page 393.
methods
֒→ page 632
Report erratum
HELLO, RAILS! 48
class UserController
|
|
def hello |
|
|
|
|||||
|
|
class SayController |
|
|||||||
|
|
|
# |
|
code for o action |
|
||||
|
|
|
|
|
||||||
|
|
end |
|
def hello |
|
|
||||
|
|
|
class ProductController |
|
||||||
end |
|
|
|
# |
code for hello action |
|
||||
|
|
end |
def hello |
|
||||||
|
|
|
|
|
|
class LoginController |
|
|||
|
|
end |
|
|
# code for hello action |
|
||||
|
|
|
|
def login |
|
|||||
|
|
|
|
|
|
|
end |
# code . . . |
|
|
|
|
|
|
|
|
|
|
|
|
|
|
|
|
|
|
end end |
|
||||
|
|
|
|
|
|
|
|
end |
|
|
http://pragprog.com/say/hello
Create an instance of SayController
and invoke the action method hello
class SayController def hello
# code for hello action end
end
Figure 4.3: Rails Routes to Controllers and Actions
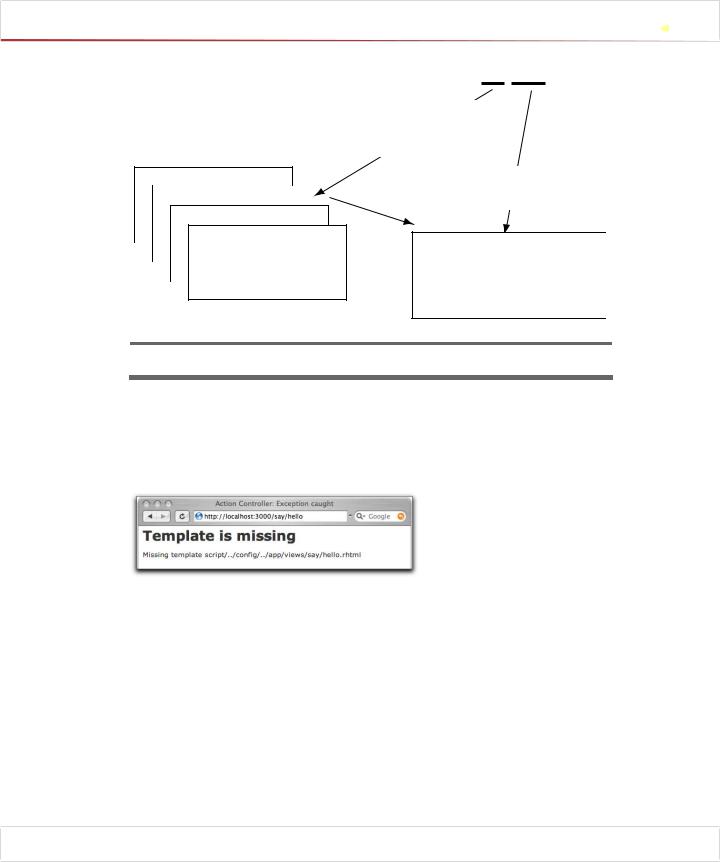
Now let’s try calling it. Navigate to the URL http://localhost:3000/say/hello in a browser window. (Note that in the development environment we don’t have any application string at the front of the path—we route directly to the controller.) You’ll see something that looks like the following.
It might be annoying, but the error is perfectly reasonable (apart from the weird path). We created the controller class and the action method, but we haven’t told Rails what to display. And that’s where the views come in. Remember when we ran the script to create the new controller? The command added three files and a new directory to our application. That directory contains the template files for the controller’s views. In our case, we created a controller named say, so the views will be in the directory app/views/say.
To complete our Hello, World! application, let’s create a template. By default, Rails looks for templates in a file with the same name as the action it’s handling. In our case, that means we need to create a file called hello.rhtml in the directory app/views/say. (Why .rhtml? We’ll explain in a minute.) For now, let’s just put some basic HTML in there.
Report erratum

HELLO, RAILS! 49
class SayController < ApplicationController
demo/ |
def hello |
||||||||||||
|
|
app/ |
end |
||||||||||
|
|
end |
|||||||||||
|
|
||||||||||||
|
|
|
|
|
|
controllers/ |
|||||||
|
|
|
|
|
|
|
|
||||||
|
|
|
|
|
|
|
|
||||||
|
|
|
|
|
|
|
|
say_controller.rb |
|
|
|||
|
|
|
|
|
|
|
|
|
|
||||
|
|
|
|
|
|
|
|
|
<html> |
||||
|
|
|
|
|
|
|
|
|
|
|
|
|
|
|
|
|
|
|
|
models/ |
|
<head> |
|||||
|
|
|
|
|
|
||||||||
|
|
|
|
|
|
|
|
|
|
|
|
|
<title>Hello, Rails!</title> |
|
|
|
|
|
|
views/ |
|
</head> |
|||||
|
|
|
|
|
|
|
|
|
say/ |
|
<body> |
||
|
|
|
|
|
|
|
|
|
|||||
|
|
|
|
|
|
|
|
|
|
<h1>Hello from Rails!</h1> |
|||
|
|
|
|
|
|
|
|
|
|
|
hello.rhtml |
|
|
|
|
|
|
|
|
|
|
|
|
|
|||
|
|
|
|
|
|
|
|
|
|
|
|
</body> |
|
|
|
|
|
|
|
|
|
|
|
|
|
||
|
|
|
|
|
|
|
|
|
|
|
|
|
|
|
|
|
|
|
|
|
|
|
|
|
|
|
</html> |
|
|
|
|
|
|
|
|
|
|
|
|
|
|
Figure 4.4: Standard Locations for Controllers and Views
Download work/demo1/app/views/say/hello.rhtml
<html>
<head>
<title>Hello, Rails!</title> </head>
<body>
<h1>Hello from Rails!</h1> </body>
</html>
Save the file hello.rhtml, and refresh your browser window. You should see it display our friendly greeting. Notice that we didn’t have to restart the application to see the update. During development, Rails automatically integrates changes into the running application as you save files.
So far, we’ve added code to two files in our Rails application tree. We added an action to the controller, and we created a template to display a page in the browser. These files live in standard locations in the Rails hierarchy: controllers go into app/controllers, and views go into subdirectories of app/views. This is shown in Figure 4.4.
Report erratum

HELLO, RAILS! 50
Making It Dynamic
So far, our Rails application is pretty boring—it just displays a static page. To make it more dynamic, let’s have it show the current time each time it displays the page.
To do this, we need to make a change to the template file in the view—it now needs to include the time as a string. That raises two questions. First, how do we add dynamic content to a template? Second, where do we get the time from?
Dynamic Content
There are two ways of creating dynamic templates in Rails.5 One uses a technology called Builder, which we discuss in Section 22.1, Builder Templates, on page 467. The second way, which we’ll use here, is to embed Ruby code in the template itself. That’s why we named our template file hello.rhtml: the .rhtml suffix tells Rails to expand the content in the file using a system called ERb (for Embedded Ruby).
ERb is a filter that takes a .rhtml file and outputs a transformed version. The output file is often HTML in Rails, but it can be anything. Normal content is passed through without being changed. However, content between <%= and %> is interpreted as Ruby code and executed. The result of that execution is converted into a string, and that value is substituted into the file in place of the <%=...%> sequence. For example, change hello.rhtml to contain the following.
Download erb/ex1.rhtml
<ul>
<li>Addition: <%= 1+2 %> </li> <li>Concatenation: <%= "cow" + "boy" %> </li>
<li>Time in one hour: <%= 1.hour.from_now %> </li> </ul>
When you refresh your browser, the template will generate the following HTML.
<ul>
<li>Addition: 3 </li> <li>Concatenation: cowboy </li>
<li>Time in one hour: Tue May 16 08:55:14 CDT 2006 </li> </ul>
In the browser window, you’ll see something like the following.
•Addition: 3
•Concatenation: cowboy
•Time in one hour: Sun May 07 16:06:43 CDT 2006
5.Actually, there are three ways, but the third, rjs, is useful only for adding AJAX magic to already-displayed pages. We discuss rjs on page 558.
1.hour.from_now
֒→ page 252
Report erratum
HELLO, RAILS! 51
In addition, stuff in .rhtml files between <% and %> (without an equals sign) is interpreted as Ruby code that is executed with no substitution back into the output. Interestingly, this kind of processing can be intermixed with non-Ruby code. For example, we could make a festive version of hello.rhtml.
<% 3.times do %> Ho!<br />
<% end %>
Merry Christmas!
This will generate the following HTML.
Ho!<br />
Ho!<br />
Ho!<br />
Merry Christmas!
Note how the text in the file within the Ruby loop is sent to the output stream once for each iteration of the loop.
But there’s something strange going on here, too. Where did all the blank lines come from? They came from the input file. If you think about it, the original file contains an end-of-line character (or characters) immediately after the %> of both the first and third lines of the file. So, the <% 3.times do %> is stripped out of the file, but the newline remains. Each time around the loop, this newline is added to the output file, along with the full text of the Ho! line. This accounts for the blank line before each Ho! line in the output. Similarly, the newline after <% end %> accounts for the blank line between the %last Ho! and the
Merry Christmas! line.
Normally, this doesn’t matter, because HTML doesn’t much care about whitespace. However, if you’re using this templating mechanism to create e-mails, or HTML within <pre> blocks, you’ll want to remove these blank lines. Do this by changing the end of the ERb sequence from %> to -%>. That minus sign tells Rails to remove any newline that follows from the output. If we add a minus on the 3.times line
<% 3.times do -%> Ho!<br />
<% end %>
Merry Christmas!
we get the following.
Ho!<br />
Ho!<br />
Ho!<br />
Merry Christmas!
3.times
֒→ page 640
Report erratum
HELLO, RAILS! 52
Making Development Easier
You might have noticed something about the development we’ve been doing so far. As we’ve been adding code to our application, we haven’t had to restart the running application. It has been happily chugging away in the background. And yet each change we make is available whenever we access the application through a browser. What gives?
It turns out that the WEBrick-based Rails dispatcher is pretty clever. In development mode (as opposed to testing or production), it automatically reloads application source files when a new request comes along. That way, when we edit our application, the dispatcher makes sure it’s running the most recent changes. This is great for development.
However, this flexibility comes at a cost—it causes a short pause after you enter a URL before the application responds. That’s caused by the dispatcher reloading stuff. For development it’s a price worth paying, but in production it would be unacceptable. Because of this, this feature is disabled for production deployment (see Chapter 27, Deployment and Production, on page 613).
Adding a minus on the line containing end
<% 3.times do -%> Ho!<br />
<% end -%> Merry Christmas!
gets rid of the blank line before Merry Christmas.
Ho!<br />
Ho!<br />
Ho!<br />
Merry Christmas!
In general, suppressing these newlines is a matter of taste, not necessity. However, you will see Rails code out in the wild that uses the minus sign this way, so it’s best to know what it does.
In the following example, the loop sets a variable that is interpolated into the text each time the loop executes.
Download erb/ex3.rhtml
<% 3.downto(1) do |count| -%> <%= count %>...<br />
<% end -%> Lift off!
That will send the following to the browser.
Report erratum
HELLO, RAILS! 53
3...<br />
2...<br />
1...<br /> Lift off!
There’s one last ERb feature. Quite often the values that you ask it to substitute using <%=...%> contain less-than and ampersand characters that are significant to HTML. To prevent these from messing up your page (and, as we’ll see in Chapter 26, Securing Your Rails Application, on page 599, to avoid potential security problems), you’ll want to escape these characters. Rails has a helper method, h, that does this. Most of the time, you’re going to want to use it when substituting values into HTML pages.
Download erb/ex4.rhtml
Email: <%= h("Ann & Bill <frazers@isp.email>" ) %>
In this example, the h method prevents the special characters in the e-mail address from garbling the browser display—they’ll be escaped as HTML entities. The browser sees Email: Ann & Bill <frazers@isp.email>, and the special characters are displayed appropriately.
Adding the Time
Our original problem was to display the time to users of our application. We now know how to make our application display dynamic data. The second issue we have to address is working out where to get the time from.
One approach is to embed a call to Ruby’s Time.now method in our hello.rhtml template.
<html>
<head>
<title>Hello, Rails!</title> </head>
<body>
<h1>Hello from Rails!</h1> <p>
It is now <%= Time.now %>
</p>
</body>
</html>
This works. Each time we access this page, the user will see the current time substituted into the body of the response. And for our trivial application, that might be good enough. In general, though, we probably want to do something slightly different. We’ll move the determination of the time to be displayed into the controller and leave the view the simple job of displaying it. We’ll change our action method in the controller to set the time value into an instance variable called @time.
instance variable
֒→ page 635
Report erratum
HELLO, RAILS! 54
Download work/demo2/app/controllers/say_controller.rb
class SayController < ApplicationController def hello
@time = Time.now end
end
In the .rhtml template we’ll use this instance variable to substitute the time into the output.
Download work/demo2/app/views/say/hello.rhtml
<html>
<head>
<title>Hello, Rails!</title> </head>
<body>
<h1>Hello from Rails!</h1> <p>
It is now <%= @time %>
</p>
</body>
</html>
When we refresh our browser window, we see the time displayed using Ruby’s standard format:
Notice that if you hit Refresh in your browser, the time updates each time the page is displayed. Looks as if we’re really generating dynamic content.
Why did we go to the extra trouble of setting the time to be displayed in the controller and then using it in the view? Good question. In this application, you could just embed the call to Time.now in the template, but by putting it in the controller instead, you buy yourself some benefits. For example, we may want to extend our application in the future to support users in many countries. In that case we’d want to localize the display of the time, choosing both the format appropriate to the user’s locale and a time appropriate to their time zone. That would be a fair amount of application-level code, and it would probably not be appropriate to embed it at the view level. By setting the time to display in the controller, we make our application more flexible—we can change the display format and time zone in the controller without having to update any view that uses that time object. The time is data, and it should
Report erratum

HELLO, RAILS! 55
Joe Asks. . .
How Does the View Get the Time?
In the description of views and controllers, we showed the controller setting the time to be displayed into an instance variable. The .rhtml file used that instance variable to substitute in the current time. But the instance data of the controller object is private to that object. How does ERb get hold of this private data to use in the template?
The answer is both simple and subtle. Rails does some Ruby magic so that the instance variables of the controller object are injected into the template object. As a consequence, the view template can access any instance variables set in the controller as if they were its own.
Some folks press the point: “just how do these variables get set?” These folks clearly don’t believe in magic. Avoid spending Christmas with them.
be supplied to the view by the controller. We’ll see a lot more of this when we introduce models into the equation.
The Story So Far
Let’s briefly review how our current application works.
1.The user navigates to our application. In our case, we do that using a local URL such as http://localhost:3000/say/hello.
2.Rails analyzes the URL. The say part is taken to be the name of a controller, so Rails creates a new instance of the Ruby class SayController
(which it finds in app/controllers/say_controller.rb).
3.The next part of the URL path, hello, identifies an action. Rails invokes a method of that name in the controller. This action method creates a new Time object holding the current time and tucks it away in the @time instance variable.
4.Rails looks for a template to display the result. It searches the directory app/views for a subdirectory with the same name as the controller (say) and in that subdirectory for a file named after the action (hello.rhtml).
5.Rails processes this template through ERb, executing any embedded Ruby and substituting in values set up by the controller.
6.The result is returned to the browser, and Rails finishes processing this request.
Report erratum