

Chapter 3
Installing Rails
Normally these kinds of books build up slowly, starting with the easy stuff and building slowly to the advanced material. The idea is to lull folks into thinking it’s easy while they’re browsing in the bookstores, and then hit them with the enormity of their purchase only after they’ve taken the book home.
We’re not that kind of book. Because Rails is just so easy, it turns out that this is probably the hardest chapter in the book. Yup—it’s the “how to get a Rails environment running on your computer” chapter.
Don’t let that put you off; it really isn’t that hard. It’s just that you’re installing a professional-quality web tier on your box, and a number of components are involved. And, because operating systems differ in the way they support components such as web servers, you’ll find that this chapter will have different sections for Windows, Mac, and Unix users. (Don’t worry, though. Once we’re past this chapter, all the operating system dependencies will be behind us.)
Mike Clark and Dave Thomas run a series of Rails Studios,1 where people who’ve never used Rails or Ruby learn to write applications. The recommendations in this chapter are based on our experiences getting these folks up and running as quickly and painlessly as possible.
Also, you’ll notice that this section defers to online resources. That’s because the world is changing rapidly, and any low-level instructions printed in a book are likely to become outdated.
3.1Your Shopping List
To get Rails running on your system, you’ll need the following.
•A Ruby interpreter. Rails is written in Ruby, and you’ll be writing your applications in Ruby too. The Rails team now recommends Ruby version
1. http://pragmaticstudio.com

INSTALLING ON WINDOWS  32
32
1.8.4. (The latest version of Ruby as of October 2006 is 1.8.5. This runs Rails just fine, but you may encounter some issues using the breakpointer.)
•Ruby on Rails. This book was written using Rails version 1.2.
•Some libraries.
•A database. We’re using MySQL 5.0.22 in this book.
For a development machine, that’s about all we’ll need (apart from an editor, and we’ll talk about editors separately). However, if you’re going to deploy your application, you’ll also need to install a production web server (as a minimum) along with some support code to let Rails run efficiently. We have a whole chapter devoted to this, starting on page 613, so we won’t talk about it more here.
So, how do you get all this installed? It depends on your operating system....
3.2Installing on Windows
If you’re using Windows for development, you’re in luck, because Curt Hibbs has put together a bundle of everything you’ll need to get started with Rails. InstantRails is a single download that contains Ruby, Rails, MySQL (version 4 at the time of writing), and all the gubbins needed to make them work together. It even contains an Apache web server and the support code that lets you deploy high-performance web applications.
1.Create a folder to contain the InstantRails installation. The path to the folder cannot contain any spaces (so C:\Program Files would be a poor choice).
2.Visit the InstantRails web site2 and follow the link to download the latest
.zip file. (It’s about 50MB, so make a pot of tea before starting if you’re on a slow connection.) Put it into the directory you created in step 1.
3.You’ll need to unzip the archive if your system doesn’t do it automatically.
4.Navigate to the InstantRails directory, and start InstantRails up by doubleclicking the InstantRails icon (it’s the big red I).
•If you see a pop-up asking whether it’s OK to regenerate configuration files, say OK .
•If you see a security alert saying that Apache has been blocked by the firewall, well.... We’re not going to tell you whether to block it or unblock it. For the purposes of this book, we aren’t going to be using Apache, so it doesn’t matter. The safest course of action is to
2. http://instantrails.rubyforge.org/wiki/wiki.pl
Report erratum
INSTALLING ON WINDOWS  33
33
Figure 3.1: Instant Rails—Start a Console
say Keep Blocking . If you know what you’re doing and you aren’t running IIS on your machine, you can unblock the port and use Apache later.
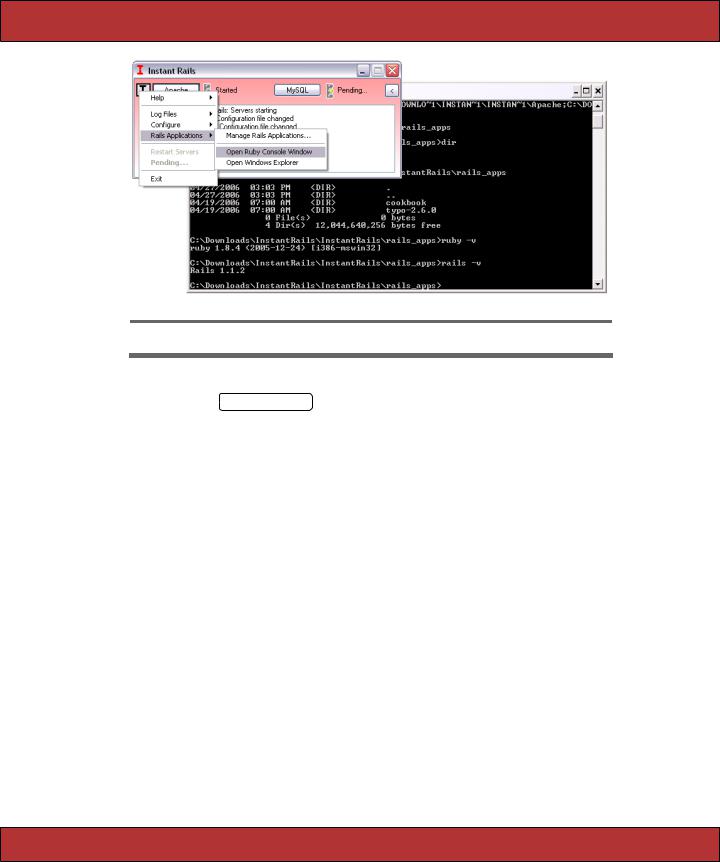
You should see a small InstantRails window appear. You can use this to monitor and control Rails applications. However, we’ll be digging a little deeper than this, so we’ll be using a console window. To start this, click the I button in the top-left corner of the InstantRails window (the button has a black I with a red dot in the lower right). From the menu, select
Rails Applications..., followed by Open Ruby Console Window. You should see a command window pop up, and you’ll be sitting in the rails_apps directory, as shown in Figure 3.1. You can verify your versions of Ruby and Rails by typing the commands ruby -v and rails -v, respectively.
At this point, you’re up and running. But, before you skip to the start of the next chapter you should know two important facts.
First, and most important, whenever you want to enter commands in a console window, you must use a console started from the InstantRails menu. Follow the same procedure we used previously (clicking the I, and so on). If you bring up a regular Windows command prompt, stuff just won’t work. (Why? Because InstantRails is self-contained—it doesn’t install itself into your global Windows environment. That means all the programs you need are not by default in the Windows path. You can, with a little fiddling, add them and then use the regular command window, but the InstantRails way seems just as easy.)
Report erratum

INSTALLING ON MAC OS X |
34 |
Second, at any time you can upgrade your version of Rails to the very latest by bringing up an InstantRails console and typing
C:\rails_apps> gem update rails --include-dependencies
OK. You Windows users are done: you can skip forward to Section 3.5, Development Environments, on page 36. See you there.
3.3Installing on Mac OS X
As of OS X 10.4.6, Mac users have a decent Ruby installation included as standard.3 You can install Rails on top of this by installing RubyGems and then installing Rails and a database.
Interestingly, though, many Mac users choose a different path. Rather than build on the built-in Ruby, either they use a prepackaged solution, such as Ryan Raaum’s Locomotive, or they use a package management system such as MacPorts.
Although using a bundled solution such as Locomotive might seem like a nobrainer, it comes with a downside: it doesn’t include the MySQL database. Instead, it comes with a database called SQLite. Now, SQLite is a perfectly good database for small applications, and this might suit you fine. However, the examples in this book use MySQL, and most Rails sites deploy using MySQL or Postgres. Also, Locomotive runs its applications under a web server called Mongrel. This is fine, but the samples in this book assume you’re using something called WEBrick. Both work fine, but you’ll need to adjust the instructions to fit Mongrel’s way of working. So, we recommend that you have a look at the “install-it-yourself” instructions that follow. If these seem too scary, feel free to install Locomotive (the details are on the next page).
Roll-Your-Own Mac Installation
Ready to roll your sleeves up and do some real installing? You came to the right place. In fact, just in case the instructions that follow seem too easy, we’ll make it even harder by forcing you to make a decision up front.
What we’ll be doing in this section is installing all the software needed by Ruby and Rails onto your system. And there are as many ways of doing that as there are developers on the Mac.4 Because the installation has a number of steps and because these steps to some extent depend of the version of OS X you’re running, we’re going to delegate the description of the installation to some write-ups on the Web. Here comes the decision: we’ve found two really good (and well-tested) descriptions of how to install Rails on your Mac.
3.And OS X 10.5 will include Rails itself.
4.More, probably, because I for one rarely install software the same way twice.
Report erratum