

ITERATION A2: ADD A MISSING COLUMN |
79 |


 David Says. . .
Won’t We End Up Replacing All the Scaffolds?
Most of the time, yes. Scaffolding is not intended to be the shake ’n’ bake of application development. It’s there as support while you build the application. As you’re designing how the list of products should work, you rely on the scaffold-generated create, update, and delete actions. Then you replace the generated creation functionality while relying on the remaining actions. And so on and so forth.
Sometimes scaffolding will be enough, though. If you’re merely interested in getting a quick interface to a model online as part of a back-end interface, you may not care that the looks are bare. But this is the exception. Don’t expect scaffolding to replace the need for you as a programmer just yet (or ever).
You don’t always use scaffolds when creating a Rails application—in fact, as you get more experienced, you’ll probably find yourself using them less and less. The scaffold can be used as the starting point of an application—it isn’t a finished application in its own right. Think of construction sites: the scaffolding helps the workers erect the final building. It’s normally taken down before the occupants move in.
Let’s make use of the transient nature of scaffolds as we move on to the next iteration in our project.
6.2Iteration A2: Add a Missing Column
So, we show our scaffold-based code to our customer, explaining that it’s still pretty rough-and-ready. She’s delighted to see something working so quickly. Once she plays with it for a while, she notices that something was missed—our products have no prices.
This means we’ll need to add a column to the database table. Some developers (and DBAs) would add the column by firing up a utility program and issuing the equivalent of the command
alter table products add column price decimal(8,2);
But we know all about migrations. Using a migration to add the new column will give us a version-controlled history of the schema and a simple way to re-create it.
Report erratum
ITERATION A2: ADD A MISSING COLUMN |
80 |
We’ll start by creating the migration. Previously we used a migration generated automatically when we created the product model. This time, we have to create one explicitly. We’ll give it a descriptive name—this will help us remember what each migration does when we come back to our application a year from now. Our convention is to use the verb create when a migration creates tables and add when it adds columns to an existing table.
depot> ruby script/generate migration add_price exists db/migrate
create db/migrate/002_add_price.rb
Notice how the generated file has a sequence prefix of 002. Rails uses this sequence number to keep track of what migrations have been and have not been added to the schema (and also to tell it the order in which migrations should be applied).
Open the migration source file, and edit the up method, inserting the code to add the price column to the products table, as shown in the code that follows. The down method uses remove_column to drop the column.
Download depot_a/db/migrate/002_add_price.rb
class AddPrice < ActiveRecord::Migration def self.up
add_column :products, :price, :decimal, :precision => 8, :scale => 2, :default => 0 end
def self.down
remove_column :products, :price end
end
The :precision argument tells the database to store eight significant digits for the price column, and the :scale option says that two of these digits will fall after the decimal point. We can store prices from -999,999.99 to +999,999.99.
This code also shows another nice feature of migrations—we can access features of the underlying database to perform tasks such as setting the default values for columns. Don’t worry too much about the syntax used here: we’ll talk about it in depth later.
Now we can run the migrations again.
depot> rake db:migrate
(in /Users/dave/Work/depot)
== AddPrice: migrating =========================================
-- add_column(:products, :price, :decimal, {:precision=>8, :scale=>2, :default=>0}) -> 0.0258s
== AddPrice: migrated (0.0264s) ================================
Rails knows that the database is currently at version 001, so applies only our newly created 002 migration.
Report erratum
ITERATION A3: VALIDATE! |
81 |
Prices, Dollars, and Cents
When we defined our schema, we decided to store the product price in a decimal column, rather than a float. There was a reason for this. Floating-point numbers are subject to round-off errors: put enough products into your cart, and you might see a total price of 234.99 rather than 235.00. Decimal numbers are stored both in the database and in Ruby as scaled integers, and hence they have exact representations.
Here’s the cool part. Go to your browser, which is already talking to our application. Hit Refresh, and you should now see the price column included in the product listing.
Remember we said that the product model went to the products table to find out what attributes it should have. Well, in development mode, Rails reloads the model files each time a browser sends in a request, so the model will always reflect the current database schema. At the same time, the scaffold declaration in the controller will be executed for each request (because the controller is also reloaded), so it can use this model information to update the screens it displays.
There’s no real magic here at the technical level. However, this capability has a big impact on the development process. How often have you implemented exactly what a client asked for, only to be told “Oh, that’s not what I meant” when you finally showed them the working application? Most people find it far easier to understand ideas when they can play with them. The speed with which you can turn words into a working application with Rails means that you’re never far from being able to let the client play with their application. These short feedback cycles mean that both you and the client get to understand the real application sooner, and you waste far less time in rework.
6.3Iteration A3: Validate!
While playing with the results of iteration 2, our client noticed something. If she entered an invalid price or forgot to set up a product description, the application happily accepted the form and added a line to the database. Although a missing description is embarrassing, a price of $0.00 actually costs her money, so she asked that we add validation to the application. No product should be allowed in the database if it has an empty title or description field, an invalid URL for the image, or an invalid price.
So, where do we put the validation?
Report erratum

ITERATION A3: VALIDATE! |
82 |
The model layer is the gatekeeper between the world of code and the database. Nothing to do with our application comes out of the database or gets stored into the database that doesn’t first go through the model. This makes it an ideal place to put all validation; it doesn’t matter whether the data comes from a form or from some programmatic manipulation in our application. If the model checks it before writing to the database, then the database will be protected from bad data.
Let’s look at the source code of the model class (in app/models/product.rb).
class Product < ActiveRecord::Base end
Not much to it, is there? All of the heavy lifting (database mapping, creating, updating, searching, and so on) is done in the parent class (ActiveRecord::Base, a part of Rails). Because of the joys of inheritance, our Product class gets all of that functionality automatically.
Adding our validation should be fairly clean. Let’s start by validating that the text fields all contain something before a row is written to the database. We do this by adding some code to the existing model.
class Product < ActiveRecord::Base
validates_presence_of :title, :description, :image_url end
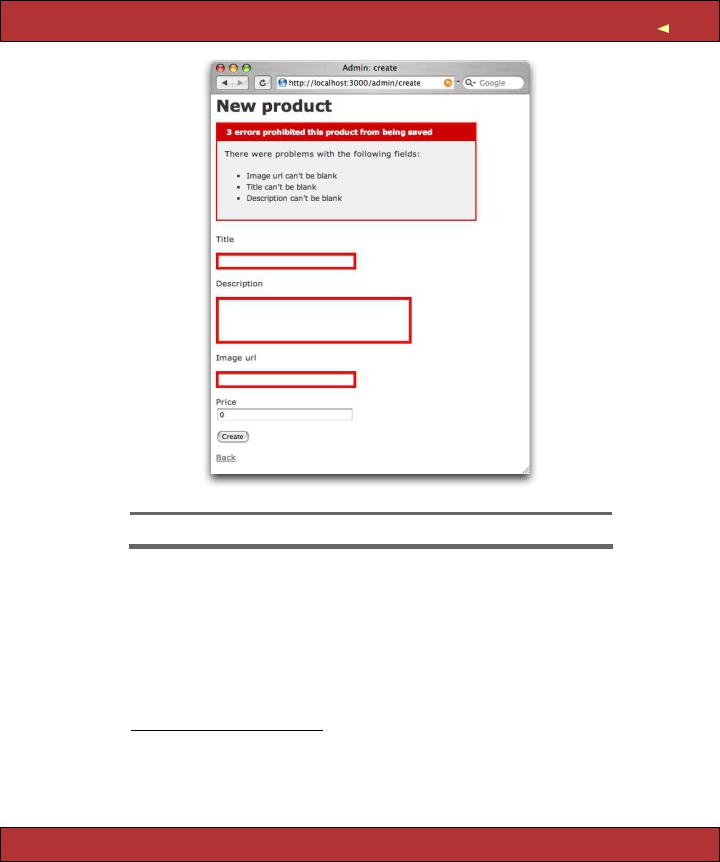
The validates_presence_of method is a standard Rails validator. It checks that a given field, or set of fields, is present and its contents are not empty. Figure 6.2, on the next page shows what happens if we try to submit a new product with none of the fields filled in. It’s pretty impressive: the fields with errors are highlighted, and the errors are summarized in a nice list at the top of the form. Not bad for one line of code. You might also have noticed that after editing and saving the product.rb file you didn’t have to restart the application to test your changes—the same reloading that caused Rails to notice the earlier change to our schema also means it will always use the latest version of our code, too.
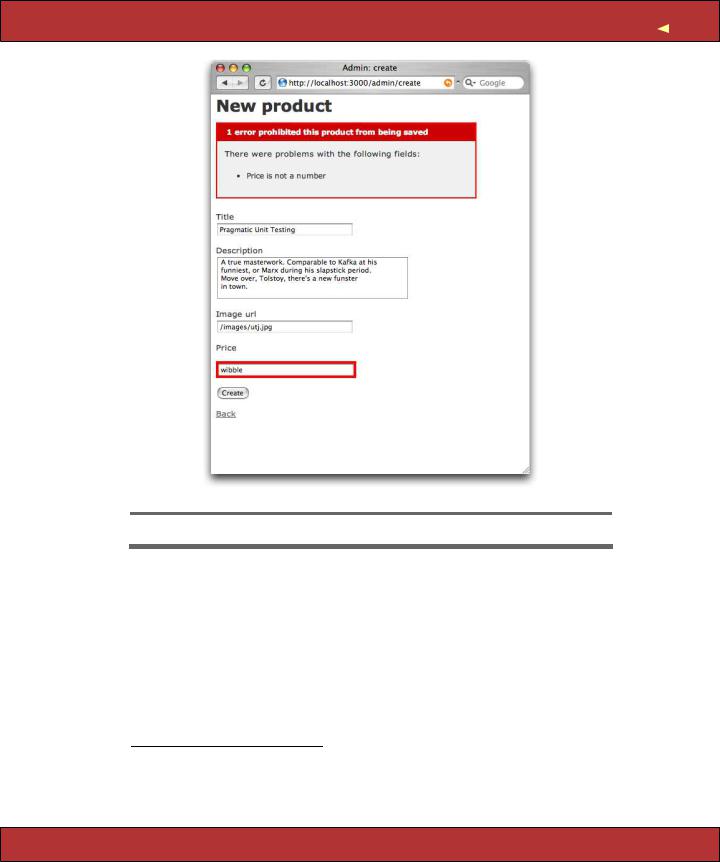
Now we’d like to validate that the price is a valid, positive number. We’ll attack this problem in two stages. First, we’ll use the delightfully named validates_numericality_of method to verify that the price is a valid number.
validates_numericality_of :price
Now, if we add a product with an invalid price, the appropriate message will appear, as shown in Figure 6.3, on page 84.
Next, we need to check that the price is greater than zero. We do that by writing a method named validate in our Product model class. Rails automatically calls this method before saving away instances of our product, so we can use it to
Report erratum
ITERATION A3: VALIDATE! |
83 |
Figure 6.2: Validating That Fields Are Present
check the validity of fields. We make it a protected method, because it shouldn’t be called from outside the context of the model.7
protected def validate
errors.add(:price, "should be at least 0.01") if price.nil? || price < 0.01 end
If the price is less than one cent, the validate method uses errors.add(...) to record the error. Doing this stops Rails writing the row to the database. It also
7. MySQL gives Rails enough metadata to know that price contains a number, so Rails stores it internally as a BigDecimal. With other databases, the value might come back as a string, so you’d need to convert it using BigDecimal(price) (or perhaps Float(price) if you like to live dangerously) before using it in a comparison.
protected
֒→ page 636
Report erratum
ITERATION A3: VALIDATE! |
84 |
Figure 6.3: The Price Fails Validation
gives our forms a nice message to display to the user.8 The first parameter to errors.add is the name of the field, and the second is the text of the message.
Note that before we compare the price to 0.01, we first check to see whether it’s nil. This is important: if the user leaves the price field blank, no price will be passed from the browser to our application, and the price variable won’t be set. If we tried to compare this nil value with a number, we’d get an error.
Two more items to validate. First, we want to make sure that each product has a unique title. One more line in the Product model will do this. The uniqueness
8. Why test against one cent, rather than zero? Well, it’s possible to enter a number such as 0.001 into this field. Because the database stores just two digits after the decimal point, this would end up being zero in the database, even though it would pass the validation if we compared against zero. Checking the number is at least one cent ensures only correct values end up being stored.
Report erratum