

- •Contents
- •Preface to the Second Edition
- •Introduction
- •Rails Is Agile
- •Finding Your Way Around
- •Acknowledgments
- •Getting Started
- •The Architecture of Rails Applications
- •Models, Views, and Controllers
- •Active Record: Rails Model Support
- •Action Pack: The View and Controller
- •Installing Rails
- •Your Shopping List
- •Installing on Windows
- •Installing on Mac OS X
- •Installing on Linux
- •Development Environments
- •Rails and Databases
- •Rails and ISPs
- •Creating a New Application
- •Hello, Rails!
- •Linking Pages Together
- •What We Just Did
- •Building an Application
- •The Depot Application
- •Incremental Development
- •What Depot Does
- •Task A: Product Maintenance
- •Iteration A1: Get Something Running
- •Iteration A2: Add a Missing Column
- •Iteration A3: Validate!
- •Iteration A4: Prettier Listings
- •Task B: Catalog Display
- •Iteration B1: Create the Catalog Listing
- •Iteration B4: Linking to the Cart
- •Task C: Cart Creation
- •Sessions
- •Iteration C1: Creating a Cart
- •Iteration C2: A Smarter Cart
- •Iteration C3: Handling Errors
- •Iteration C4: Finishing the Cart
- •Task D: Add a Dash of AJAX
- •Iteration D1: Moving the Cart
- •Iteration D3: Highlighting Changes
- •Iteration D4: Hide an Empty Cart
- •Iteration D5: Degrading If Javascript Is Disabled
- •What We Just Did
- •Task E: Check Out!
- •Iteration E1: Capturing an Order
- •Task F: Administration
- •Iteration F1: Adding Users
- •Iteration F2: Logging In
- •Iteration F3: Limiting Access
- •Iteration F4: A Sidebar, More Administration
- •Task G: One Last Wafer-Thin Change
- •Generating the XML Feed
- •Finishing Up
- •Task T: Testing
- •Tests Baked Right In
- •Unit Testing of Models
- •Functional Testing of Controllers
- •Integration Testing of Applications
- •Performance Testing
- •Using Mock Objects
- •The Rails Framework
- •Rails in Depth
- •Directory Structure
- •Naming Conventions
- •Logging in Rails
- •Debugging Hints
- •Active Support
- •Generally Available Extensions
- •Enumerations and Arrays
- •String Extensions
- •Extensions to Numbers
- •Time and Date Extensions
- •An Extension to Ruby Symbols
- •with_options
- •Unicode Support
- •Migrations
- •Creating and Running Migrations
- •Anatomy of a Migration
- •Managing Tables
- •Data Migrations
- •Advanced Migrations
- •When Migrations Go Bad
- •Schema Manipulation Outside Migrations
- •Managing Migrations
- •Tables and Classes
- •Columns and Attributes
- •Primary Keys and IDs
- •Connecting to the Database
- •Aggregation and Structured Data
- •Miscellany
- •Creating Foreign Keys
- •Specifying Relationships in Models
- •belongs_to and has_xxx Declarations
- •Joining to Multiple Tables
- •Acts As
- •When Things Get Saved
- •Preloading Child Rows
- •Counters
- •Validation
- •Callbacks
- •Advanced Attributes
- •Transactions
- •Action Controller: Routing and URLs
- •The Basics
- •Routing Requests
- •Action Controller and Rails
- •Action Methods
- •Cookies and Sessions
- •Caching, Part One
- •The Problem with GET Requests
- •Action View
- •Templates
- •Using Helpers
- •How Forms Work
- •Forms That Wrap Model Objects
- •Custom Form Builders
- •Working with Nonmodel Fields
- •Uploading Files to Rails Applications
- •Layouts and Components
- •Caching, Part Two
- •Adding New Templating Systems
- •Prototype
- •Script.aculo.us
- •RJS Templates
- •Conclusion
- •Action Mailer
- •Web Services on Rails
- •Dispatching Modes
- •Using Alternate Dispatching
- •Method Invocation Interception
- •Testing Web Services
- •Protocol Clients
- •Secure and Deploy Your Application
- •Securing Your Rails Application
- •SQL Injection
- •Creating Records Directly from Form Parameters
- •Avoid Session Fixation Attacks
- •File Uploads
- •Use SSL to Transmit Sensitive Information
- •Knowing That It Works
- •Deployment and Production
- •Starting Early
- •How a Production Server Works
- •Repeatable Deployments with Capistrano
- •Setting Up a Deployment Environment
- •Checking Up on a Deployed Application
- •Production Application Chores
- •Moving On to Launch and Beyond
- •Appendices
- •Introduction to Ruby
- •Classes
- •Source Code
- •Resources
- •Index
- •Symbols

HOW FORMS WORK  480
480
implicitly for every action in our controller using the paginate declaration at the class level. Or, we could go to the other extreme, manually creating Paginator objects and populating the current page array ourselves. These different uses are all covered in the API documentation.
Pagination is not a complete solution for breaking up the display of large sets of data. Although it is often useful, as you become more experienced with Rails you may well find yourself abandoning built-in pagination support and rolling your own. There are rumors that pagination might be split off into a plugin for Rails 2.0.
22.4How Forms Work
Rails features a fully integrated web stack. This is most apparent in the way that the model, controller, and view components interoperate to support creating and editing information in database tables.
Figure 22.1, on the next page, shows how the various attributes in the model pass through the controller to the view, on to the HTML page, and back again into the model. The model object has attributes such as name, country, and password. The template uses helper methods (which we’ll discuss shortly) to construct an HTML form to let the user edit the data in the model. Note how the form fields are named. The country attribute, for example, is mapped to an HTML input field with the name user[country].
When the user submits the form, the raw POST data is sent back to our application. Rails extracts the fields from the form and constructs the params hash. Simple values (such as the id field, extracted by routing from the form action) are stored as scalars in the hash. But, if a parameter name has brackets in it, Rails assumes that it is part of more structured data and constructs a hash to hold the values. Inside this hash, the string inside the brackets is used as the key. This process can repeat if a parameter name has multiple sets of brackets in it.
Form parameters |
params |
|
|
|
|
id=123 |
{ :id => "123" } |
|
user[name]=Dave |
{ :user => { :name => "Dave" }} |
|
user[address][city]=Wien |
{ :user => { :address => { :city => "Wien" }}} |
|
|
|
In the final part of the integrated whole, model objects can accept new attribute values from hashes, which allows us to say
user.update_attributes(params[:user])
Rails integration goes deeper than this. Looking at the .rhtml file in Figure 22.1, you can see that the template uses a set of helper methods to create the form’s HTML, methods such as form_for and text_field.
Report erratum
HOW FORMS WORK  481
481
!myapp_controller.rb def edit
@user = User.find(params[:id]) end
!The application receives a request to edit a user. It reads the data into a new User model object.
"The edit.rhtml template is called. It uses the information in the user object to generate...
#the HTML is sent to the browser. When the response is received...
$the parameters are extracted into a nested hash.
%The save action uses the parameters to find the user record and update it.
%def save
user = User.find(params[:id])
if user.update_attributes(params[:user])
...
end end
" edit.rhtml
<% form_for :user,
:url => { :action => 'save', :id => @user } do |f| %>
<%= f.text_field |
'name' %></p> |
<%= f.text_field |
'country' %></p> |
<%= f.password_field 'password' %></p>
. . .
<% end %>
# <form action="/myapp/save/1234"> <input name="user[name]" ... > <input name="user[country]" ... > <input name="user[password]" ... >
. . .
</form>
$ @params = { :id => 1234, :user => {
:name => " ... ", :country => " ... ", :password => " ... " }
}
Figure 22.1: Models, Controllers, and Views Work Together
Report erratum

FORMS THAT WRAP MODEL OBJECTS  482
482
In fact, Rails’ form support has something of a split personality. When you’re writing forms that map to database resources, you’ll likely use the form_for style of form. When you’re writing forms that don’t map easily to database tables, you’ll probably use the lower-level form_tag style. (In fact, this naming is consistent across most of the Rails form helper methods: a name ending _tag is generally lower level than the corresponding name without _tag).
Let’s start by looking at the high-level, resource-centric form_for type of form.
22.5Forms That Wrap Model Objects
A form that wraps a single Active Record module should be created using the form_for helper. (Note that form_for goes inside a <%...%> construct, not <%=...%>.)
<% form_for :user do |form| %>
. . .
<% end %>
The first parameter does double duty: it tells Rails the name of the object being manipulated (:user in this case) and also the name of the instance variable that holds a reference to that object (@user). Thus, in a controller action that rendered the template containing this form, you might write
def new
@user = User.new end
The action that receives the form data back would use the name to select that data from the request parameters.
def create
@user = User.new(params[:user])
...
end
If for some reason the variable containing the model object is not named after the model’s class, you can give the variable as an optional second argument to form_for.
<% form_for :user, @account_holder do |form| %>
. . .
<% end %>
People first using form_for are often tripped up by the fact that it should not be used in an ERb substitution block: you should write
<% form_for :user, @account_holder do |form| %>
and not the variant with the equals sign shown next.
<%= form_for :user, @account_holder do |form| %><!-- DON'T DO THIS -->
Report erratum

FORMS THAT WRAP MODEL OBJECTS  483
483
form_for takes a hash of options. The two most commonly used options are :url and :html. The :url option takes the same fields that you can use in the url_for and link_to methods. It specifies the URL to be invoked when the form is submitted.
<% form_for :user, :url => { :action => :create } %>
. . .
It also works with named routes (and this should probably be the way you use it as Rails moves in a RESTful direction).7
If you don’t specify a :url option, form_for posts the form data back to the originating action.
<% form_for :user, :url => users_url %>
. . .
The :html option lets you add HTML attributes to the generated form tag.
<% form_for :product,
:url => { :action => :create, :id => @product }, :html => { :class => "my_form" } do |form| %>
As a special case, if the :html hash contains :multipart => true, the form will return multipart form data, allowing it to be used for file uploads (see Section 22.8,
Uploading Files to Rails Applications, on page 501).
You can use the :method parameter in the :html options to simulate using something other than POST to send the form data.
<% form_for :product,
:url => { :action => :create, :id => @product },
:html => { :class => "my_form", :method => :put } do |form| %>
Field Helpers and form_for
form_for takes a block (the code between it and the <% end %>). It passes this block a form builder object. Inside the block you can use all the normal mixture of HTML and ERb available anywhere in a template. But, you can also use the form builder object to add form elements. As an example, here’s a simple form that captures new product information.
Download e1/views/app/views/form_for/new.rhtml
<% form_for :product, :url => { :action => :create } do |form| %>
<p>Title: |
<%= form.text_field |
:title, |
:size => 30 %></p> |
|
<p>Description: |
<%= form.text_area :description, :rows => 3 %></p> |
|||
<p>Image URL: |
<%= |
form.text_field |
:image_url %></p> |
|
<p>Price: |
<%= |
form.text_field |
:price, |
:size => 10 %></p> |
<%= form.select |
:title, %w{ one two |
three } %> |
||
<p><%= submit_tag %></p> <% end %>
7. As this book is being finalized, a plugin called Simply Helpful is being worked on. This plugin makes it even easier to integrate models, REST, and form_for. The plugin might end up in core Rails.
Report erratum

FORMS THAT WRAP MODEL OBJECTS  484
484
The significant thing here is the use of form builder helpers to construct the HTML <input> tags on the form. When we create a template containing something like
<% form_for :product, :url => { :action => :create } do |form| %>
<p> |
|
Title: |
<%= form.text_field :title, :size => 30 %> |
</p> |
|
Rails will generate HTML like
<form action="/form_for/create" method="post" >
<p>
Title: <input id="product_title" name="product[title]" size="30" type="text" />
</p>
Notice how Rails has automatically named the input field after both the name of the model object (product) and the name of the field (title).
Rails provides helper support for text fields (regular, hidden, password, and text areas), radio buttons, and checkboxes. (It also supports <input> tags with type="file", but we’ll discuss these in Section 22.8, Uploading Files to Rails Applications, on page 501.)
All form builder helper methods take at least one parameter: the name of the attribute in the model to be queried when setting the field value. When we say
<% form_for :product, :url => { :action => :create } do |form| %>
<p> |
|
Title: |
<%= form.text_field :title, :size => 30 %> |
</p> |
|
Rails will populate the <input> tag with the value from @product.title.
The name parameter may be a string or a symbol; idiomatic Rails uses symbols.
All helpers also take an options hash, typically used to set the class of the HTML tag. This is normally the optional second parameter; for radio buttons, it’s the third. However, keep reading before you go off designing a complicated scheme for using classes and CSS to flag invalid fields. As we’ll see later, Rails makes that easy.
Text Fields
form.text_field(:attribute, options) form.hidden_field(:attribute, options) form.password_field(:attribute, options)
Construct an <input> tag of type text, hidden, or password, respectively. The default contents will be taken from @variable.attribute. Common options include
:size => "nn" and :maxlength => "nn".
Report erratum

FORMS THAT WRAP MODEL OBJECTS  485
485
Text Areas
form.text_area(:attribute, options)
Construct a two-dimensional text area (using the HTML <textarea> tag). Common options include :cols => "nn" and :rows => "nn".
Radio Buttons
form.radio_button(:attribute, tag_value, options)
Create a radio button. Normally there will be multiple radio buttons for a given attribute, each with a different tag value. The one whose tag value matches the current value of the attribute will be selected when the buttons are displayed. If the user selects a different radio button, the value of its tag will be stored in the field.
Checkboxes
form.check_box(:attribute, options, on_value, off_value)
Create a checkbox tied to the given attribute. It will be checked if the attribute value is true or if the attribute value when converted to an integer is nonzero.
The value subsequently returned to the application is set by the third and fourth parameters. The default values set the attribute to "1" if the checkbox is checked; "0" otherwise.
Selection Lists
Selection lists are those drop-down list boxes with the built-in artificial intelligence that guarantees the choice you want can be reached only by scrolling past everyone else’s choice.
Selection lists contain a set of choices. Each choice has a display string and an optional value attribute. The display string is what the user sees, and the value attribute is what is sent back to the application if that choice is selected. For regular selection lists, one choice may be marked as being selected; its display string will be the default shown to the user. For multiselect lists, more than one choice may be selected, in which case all of their values will be sent to the application.
A basic selection list is created using the select helper method.
form.select(:attribute, choices, options, html_options)
The choices parameter populates the selection list. The parameter can be any enumerable object (so arrays, hashes, and the results of database queries are all acceptable).
The simplest form of choices is an array of strings. Each string becomes a choice in the drop-down list, and if one of them matches the current value of
Report erratum

FORMS THAT WRAP MODEL OBJECTS  486
486
@variable.attribute, it will be selected. (These examples assume that @user.name is set to Dave.)
Download e1/views/app/views/test/select.rhtml
<% form_for :user do |form| %>
<%= form.select(:name, %w{ Andy Bert Chas Dave Eric Fred }) %> <% end %>
This generates the following HTML.
<select id="user_name" name="user[name]">
<option value="Andy">Andy</option> <option value="Bert">Bert</option> <option value="Chas">Chas</option>
<option value="Dave" selected="selected">Dave</option> <option value="Eric">Eric</option>
<option value="Fred">Fred</option> </select>
If the elements in the choices argument each respond to first and last (which will be the case if each element is itself an array), the selection will use the first value as the display text and the last value as the internal key.
Download e1/views/app/views/test/select.rhtml
<%= form.select(:id, [ ['Andy', 1], ['Bert', 2], ['Chas', 3], ['Dave', 4], ['Eric', 5], ['Fred', 6]])
%>
The list displayed by this example will be identical to that of the first, but the values it communicates back to the application will be 1, or 2, or 3, or ..., rather than Andy, Bert, or Chas. The HTML generated is
<select id="user_id" name="user[id]">
<option value="1">Andy</option> <option value="2">Bert</option> <option value="3">Chas</option>
<option value="4" selected="selected" >Dave</option> <option value="5">Eric</option>
<option value="6">Fred</option> </select>
Finally, if you pass a hash as the choices parameter, the keys will be used as the display text and the values as the internal keys. Because it’s a hash, you can’t control the order of the entries in the generated list.
Applications commonly need to construct selection boxes based on information stored in a database table. One way of doing this is by having the model’s find method populate the choices parameter. Although we show the find call
Report erratum

FORMS THAT WRAP MODEL OBJECTS  487
487
Figure 22.2: Select List with Grouped Options
adjacent to the select in this code fragment, in reality the find would probably be either in the controller or in a helper module.
Download e1/views/app/views/test/select.rhtml
<%=
@users = User.find(:all, :order => "name").map {|u| [u.name, u.id] } form.select(:name, @users)
%>
Note how we take the result set and convert it into an array of arrays, where each subarray contains the name and the id.
A higher-level way of achieving the same effect is to use collection_select. This takes a collection, where each member has attributes that return the display string and key for the options. In this example, the collection is a list of user model objects, and we build our select list using those models’ id and name attributes.
Download e1/views/app/views/test/select.rhtml
<%=
@users = User.find(:all, :order => "name") form.collection_select(:name, @users, :id, :name) %>
Grouped Selection Lists
Groups are a rarely used but powerful feature of selection lists. You can use them to give headings to entries in the list. Figure 22.2 shows a selection list with three groups.
The full selection list is represented as an array of groups. Each group is an object that has a name and a collection of suboptions. In the following example, we’ll set up a list containing shipping options, grouped by speed of delivery. We’ll create a nondatabase model called Shipping that encapsulates
Report erratum

FORMS THAT WRAP MODEL OBJECTS  488
488
the shipping options. In it we’ll define a structure to hold each shipping option and a class that defines a group of options. We’ll initialize this statically (in a real application you’d probably drag the data in from a table).
Download e1/views/app/models/shipping.rb
class Shipping
ShippingOption = Struct.new(:id, :name)
class ShippingType
attr_reader :type_name, :options def initialize(name)
@type_name = name @options = []
end
def <<(option) @options << option
end
end |
|
|
|
ground |
= |
ShippingType.new("SLOW" ) |
|
ground |
<< |
ShippingOption.new(100, |
"Ground Parcel") |
ground |
<< |
ShippingOption.new(101, |
"Media Mail") |
regular |
= |
ShippingType.new("MEDIUM" ) |
|
regular |
<< |
ShippingOption.new(200, |
"Airmail") |
regular |
<< |
ShippingOption.new(201, |
"Certified Mail") |
priority |
= |
ShippingType.new("FAST" ) |
|
priority << |
ShippingOption.new(300, |
"Priority") |
|
priority << |
ShippingOption.new(301, |
"Express") |
|
OPTIONS = [ |
ground, regular, priority ] |
||
end
In the view we’ll create the selection control to display the list. There isn’t a high-level wrapper that both creates the <select> tag and populates a grouped set of options, and there isn’t a form builder helper, so we have to use the (amazingly named) option_groups_from_collection_for_select method. This takes the collection of groups, the names of the accessors to use to find the groups and items, and the current value from the model. We put this inside a <select> tag that’s named for the model and attribute.
Download e1/views/app/views/test/select.rhtml
<label for="order_shipping_option">Shipping: </label>
<select name="order[shipping_option]" id="order_shipping_option" > <%=
option_groups_from_collection_for_select(Shipping::OPTIONS,
:options, :type_name, # <- groups :id,:name, # <- items @order.shipping_option)
%>
</select>
Report erratum
FORMS THAT WRAP MODEL OBJECTS  489
489
Finally, some high-level helpers make it easy to create selection lists for countries and time zones. See the Rails API documentation for details.
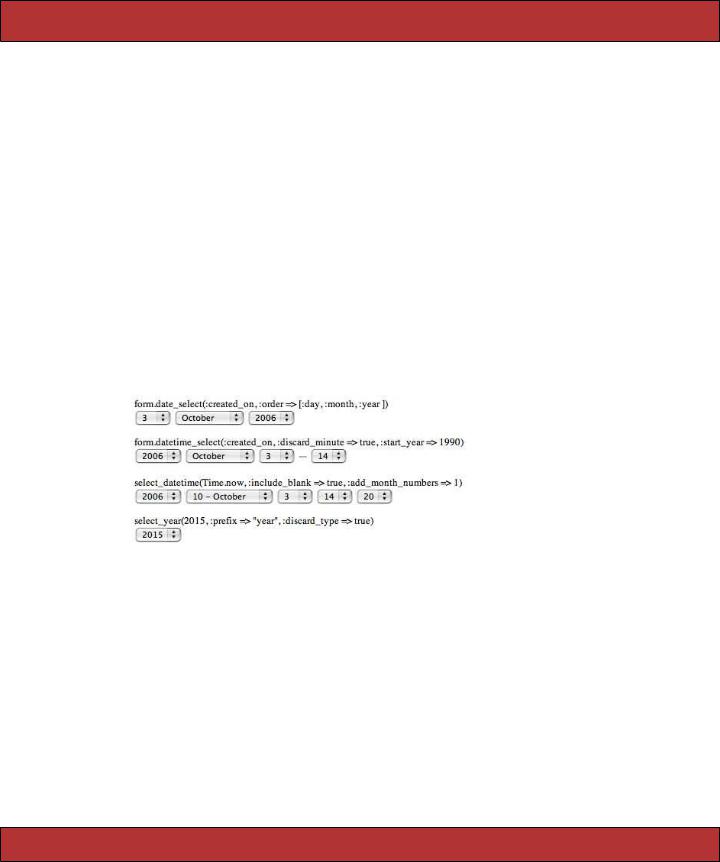
Date and Time Fields
form.date_select(:attribute, options) form.datetime_select(:attribute, options)
select_date(date = Date.today, options) select_day(date, options) select_month(date, options) select_year(date, options)
select_datetime(date = Time.now, options) select_hour(time, options) select_minute(time, options) select_second(time, options) select_time(time, options)
There are two sets of date selection widgets. The first set, date_select and datetime_select, work with date and datetime attributes of Active Record models. The second set, the select_xxx variants, also works well without Active Record support. The image below shows some of these methods in action.
The select_xxx widgets are by default given the names date[xxx], so in the controller you could access the minutes selection as params[:date][:minute]. You can change the prefix from date using the :prefix option, and you can disable adding the field type in square brackets using the :discard_type option. The :include_blank option adds an empty option to the list.
The select_minute method supports the :minute_step => nn option. Setting it to 15, for example, would list just the options 0, 15, 30, and 45.
The select_month method normally lists month names. To show month numbers as well, set the option :add_month_numbers => true. To display only the numbers, set :use_month_numbers => true.
The select_year method by default lists from five years before to five years after the current year. This can be changed using the :start_year => yyyy and
:end_year => yyyy options.
Report erratum

FORMS THAT WRAP MODEL OBJECTS  490
490
date_select and datetime_select create widgets to allow the user to set a date (or datetime) in Active Record models using selection lists. The date stored in @variable.attribute is used as the default value. The display includes separate selection lists for the year, month, day (and hour, minute, second). Select lists for particular fields can be removed from the display by setting the options :discard_month => 1, :discard_day => 1, and so on. Only one discard option is required—all lower-level units are automatically removed. The order of field display for date_select can be set using the :order => [ symbols,... ] option, where the symbols are :year, :month, and :day. In addition, all the options from the select_xxx widgets are supported.
Field Helpers without Using form_for
So far we’ve seen the input field helpers used in the context of a form_for block: each is called on the instance of a form builder object passed to the block. However, each has an alternate form that can be called without a form builder. This form of the helpers takes the name of the model object as a mandatory first parameter. So, for example, if an action set up a user object like this
def edit
@user = User.find(params[:id]) end
you could use form_for like this.
<% form_for :user do |form| %>
Name: <%= form.text_field :name %>
...
The version using the alternate helper syntax would be
<% form_for :user do |form| %>
Name: <%= text_field :user, :name %>
...
These style of helpers are going out of fashion for general forms. However, you may still need them when you construct forms that map to multiple Active Record objects.
Multiple Models in a Form
So far, we’ve used form_for to create forms for a single model. How can it be used to capture information for two or more models on a single web form?
One problem is that form_for does two things. First, it creates a context (the Ruby block) in which the form builder helpers can associate HTML tags with model attributes. Second, it creates the necessary <form> tag and associated attributes. This latter behavior means we can’t use form_for to manage two model objects, because that would mean there were two independent forms on the browser page.
Report erratum
FORMS THAT WRAP MODEL OBJECTS  491
491
Enter the fields_for helper. This creates the context to use form builder helpers, associating them with some model object, but it does not create a separate form context. Using this, we can embed fields for one object within the form for another.
For example, a product might have ancillary information associated with it, information that we wouldn’t typically use when displaying the catalog. Rather than clutter the products table, we’ll keep it in an ancilliary details table.
Download e1/views/db/migrate/004_create_details.rb
class |
CreateDetails < ActiveRecord::Migration |
|
def |
self.up |
|
create_table :details do |t| |
||
|
t.column :product_id, |
:integer |
|
t.column :sku, |
:string |
|
t.column :manufacturer, |
:string |
end |
|
|
end |
|
|
def self.down drop_table :details
end end
The model is equally trivial.
Download e1/views/app/models/detail.rb
class Detail < ActiveRecord::Base belongs_to :product validates_presence_of :sku
end
The view uses form_for to capture the fields for the product model and uses a fields_for call within that form to capture the details model data.
Download e1/views/app/views/products/new.rhtml
<% form_for :product, :url => { :action => :create } do |form| %> <%= error_messages_for :product %>
Title: |
<%= |
form.text_field :title %><br/> |
|
Description: |
<%= |
form.text_area |
:description, :rows => 3 %><br/> |
Image url: |
<%=form.text_field |
:image_url %><br/> |
|
<fieldset> <legend>Details...</legend>
<%= error_messages_for :details %>
<% fields_for :details do |detail| %>
SKU: <%= detail.text_field :sku %><br/> Manufacturer: <%= detail.text_field :manufacturer %>
<% end %>
</fieldset>
<%= submit_tag %> <% end %>
Report erratum

FORMS THAT WRAP MODEL OBJECTS  492
492
We can look at the generated HTML to see this in action.
<form action="/products/create" method="post" > Title:
<input id="product_title" name="product[title]" size="30" type="text" /><br/> Description:
<textarea cols="40" id="product_description" name="product[description]" rows="3"></textarea><br/>
Image url:
<input id="product_image_url" name="product[image_url]" size="30" type="text" /><br/>
<fieldset> <legend>Details...</legend>
SKU:
<input id="details_sku" name="details[sku]" size="30" type="text" /><br/>
Manufacturer:
<input id="details_manufacturer" name="details[manufacturer]"
size="30" type="text" />
</fieldset>
<input name="commit" type="submit" value="Save changes" />
</form>
Note how the fields for the details model are named appropriately, ensuring their data will be returned in the correct subhash of params.
The new action, called to render this form initially, simply creates two new model objects.
Download e1/views/app/controllers/products_controller.rb
def new
@product = Product.new @details = Detail.new
end
The create action is responsible for receiving the form data and saving the models back into the database. It is considerably more complex than a single model save. This is because it has to take into account two factors.
•If either model contains invalid data, neither model should be saved.
•If both models contain validation errors, we want to display the messages from both—that is, we don’t want to stop checking for errors if we find problems in one model.
Our solution uses transactions and an exception handler.
Download e1/views/app/controllers/products_controller.rb
def create
@product = Product.new(params[:product])
Report erratum

FORMS THAT WRAP MODEL OBJECTS  493
493
@details = Detail.new(params[:details])
Product.transaction do @details.product = @product @product.save! @details.save!
redirect_to :action => :show, :id => @product end
rescue ActiveRecord::RecordInvalid => e
@details.valid? # force checking of errors even if products failed render :action => :new
end
Error Handling and Model Objects
The various helper widgets we’ve seen so far in this chapter know about Active Record models. They can extract the data they need from the attributes of model objects, and they name their parameters in such a way that models can extract them from request parameters.
The helper objects interact with models in another important way; they are aware of the errors structure held within each model and will use it to flag attributes that have failed validation.
When constructing the HTML for each field in a model, the helper methods invoke that model’s errors.on(field) method. If any errors are returned, the generated HTML will be wrapped in <div> tags with class="fieldWithErrors". If you apply the appropriate stylesheet to your pages (we say how on page 477), you can highlight any field in error. For example, the following CSS snippet, taken from the stylesheet used by the scaffolding autogenerated code, puts a red border around fields that fail validation.
.fieldWithErrors { padding: 2px; background-color: red; display: table;
}
As well as highlighting fields in error, you’ll probably also want to display the text of error messages. Action View has two helper methods for this. error_message_on returns the error text associated with a particular field.
<%= error_message_on(:product, :title) %>
The scaffold-generated code uses a different pattern; it highlights the fields in error and displays a single box at the top of the form showing all errors in the form. It does this using error_messages_for, which takes the model object as a parameter.
<%= error_messages_for(:product) %>
Report erratum