

ITERATION D3: HIGHLIGHTING CHANGES  131
131
•If you’re using Internet Explorer, it might be running in what Microsoft call quirks mode, which is backward compatible with old IE releases but is also broken. IE switches into standards mode, which works better with the AJAX stuff, if the appropriate DOCTYPE header is seen in the downloaded page. Our layouts use
<!DOCTYPE html PUBLIC "-//W3C//DTD XHTML 1.0 Transitional//EN" "http://www.w3.org/TR/xhtml1/DTD/xhtml1-transitional.dtd" >
The Customer Is Never Satisfied
We’re feeling pretty pleased with ourselves. We changed a handful of lines of code, and our boring old Web 1.0 application now sports Web 2.0 AJAX speed stripes. We breathlessly call the client over. Without saying anything, we proudly press Add to Cart and look at her, eager for the praise we know will come. Instead, she looks surprised. “You called me over to show me a bug?” she asks. “You click that button, and nothing happens.”
We patiently explain that, in fact, quite a lot happened. Just look at the cart in the sidebar. See? When we add something, the quantity changes from 4 to 5.
“Oh,” she says, “I didn’t notice that.” And, if she didn’t notice the page update, it’s likely our customers won’t either. Time for some user-interface hacking.
9.3Iteration D3: Highlighting Changes
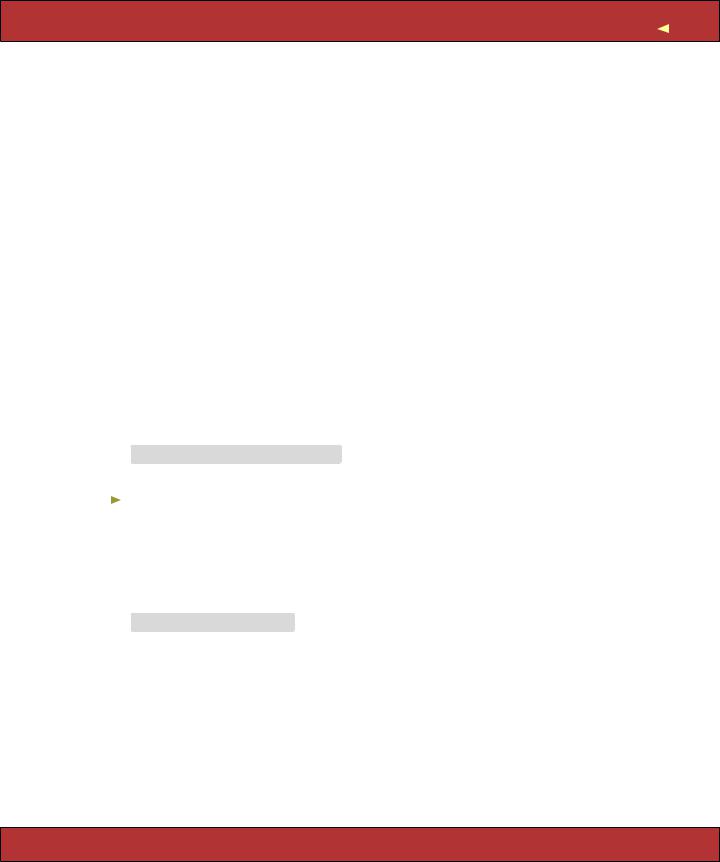
We said earlier that the javascript_include_tag helper downloads a number of JavaScript libraries to the browser. One of those libraries, effects.js, lets you decorate your web pages with a number of visually interesting effects.3 One of these effects is the (now) infamous Yellow Fade Technique. This highlights an element in a browser: by default it flashes the background yellow and then gradually fades it back to white. Figure 9.2, on the following page, shows the Yellow Fade Technique being applied to our cart: the image at the back shows the original cart. The user clicks the Add to Cart button, and the count updates to 2 as the line flares brighter. It then fades back to the background color over a short period of time.
Let’s add this kind of highlight to our cart. Whenever an item in the cart is updated (either when it is added or when we change the quantity), let’s flash its background. That will make it clearer to our users that something has changed, even though the whole page hasn’t been refreshed.
The first problem we have is identifying the most recently updated item in the cart. Right now, each item is simply a <tr> element. We need to find a way to flag the most recently changed one. The work starts in the Cart model. Let’s
3. effects.js is part of the Script.aculo.us library. Have a look at the visual effects page at http://wiki.script.aculo.us/scriptaculous/show/VisualEffects to see the cool things you can do with it.
Report erratum

ITERATION D3: HIGHLIGHTING CHANGES  132
132
Figure 9.2: Our Cart with the Yellow Fade Technique
have the add_product method return the CartItem object that was either added to the cart or had its quantity updated.
Download depot_m/app/models/cart.rb
def add_product(product)
current_item = @items.find {|item| item.product == product} if current_item
current_item.increment_quantity else
current_item = CartItem.new(product) @items << current_item
end current_item
end
Over in store_controller.rb, we’ll take that information and pass it down to the template by assigning it to an instance variable.
Download depot_m/app/controllers/store_controller.rb
def add_to_cart begin
product = Product.find(params[:id]) rescue ActiveRecord::RecordNotFound
logger.error("Attempt to access invalid product #{params[:id]}") redirect_to_index("Invalid product")
else
@cart = find_cart
@current_item = @cart.add_product(product) end
end
Report erratum
ITERATION D4: HIDE AN EMPTY CAR T  133
133
In the _cart_item.rhtml partial, we then check to see whether the item we’re rendering is the one that just changed. If so, we tag it with an id of current_item.
Download depot_m/app/views/store/_cart_item.rhtml
<% if cart_item == @current_item %>
<tr id="current_item"> <% else %>
<tr>
<% end %>
<td><%= cart_item.quantity %>×</td> <td><%= h(cart_item.title) %></td>
<td class="item-price" ><%= number_to_currency(cart_item.price) %></td> </tr>
As a result of these three minor changes, the <tr> element of the most recently changed item in the cart will be tagged with id="current_item". Now we just need to tell the JavaScript to invoke the highlight effect on that item. We do this in the existing add_to_cart.rjs template, adding a call to the visual_effect method.
Download depot_m/app/views/store/add_to_cart.rjs
page.replace_html("cart" , :partial => "cart", :object => @cart)
page[:current_item].visual_effect :highlight,
:startcolor => "#88ff88", :endcolor => "#114411"
See how we identified the browser element that we wanted to apply the effect to by passing :current_item to the page? We then asked for the highlight visual effect and overrode the default yellow/white transition with colors that work better with our design. Click to add an item to the cart, and you’ll see the changed item in the cart glow a light green before fading back to merge with the background.
9.4Iteration D4: Hide an Empty Cart
One last request from the customer: right now, even carts with nothing in them are still displayed in the sidebar. Can we arrange for the cart to appear only when it has some content? But of course!
In fact, we have a number of options. The simplest is probably to include the HTML for the cart only if the cart has something in it. We can do this totally within the _cart partial.
<% unless cart.items.empty? %>
<div class="cart-title">Your Cart</div> <table>
<%= render(:partial => "cart_item", :collection => cart.items) %>
<tr class="total-line" >
Report erratum
ITERATION D4: HIDE AN EMPTY CAR T |
134 |
<td colspan="2">Total</td>
<td class="total-cell"><%= number_to_currency(cart.total_price) %></td> </tr>
</table>
<%= button_to "Empty cart", :action => :empty_cart %> <% end %>
Although this works, the user interface is somewhat brutal: the whole sidebar redraws on the transition between a cart that’s empty and a cart with something in it. So let’s not use this code. Instead, let’s smooth it out a little.
The Script.aculo.us effects library contains a number of nice transitions that make elements appear. Let’s use blind_down, which will smoothly reveal the cart, sliding the rest of the sidebar down to make room.
Not surprisingly, we’ll use our existing .rjs template to call the effect. Because the add_to_cart template is invoked only when we add something to the cart, then we know that we have to reveal the cart in the sidebar whenever there is exactly one item in the cart (because that means that previously the cart was empty and hence hidden). And, because the cart should be visible before we start the highlight effect, we’ll add the code to reveal the cart before the code that triggers the highlight.
The template now looks like this.
Download depot_n/app/views/store/add_to_cart.rjs
page.replace_html("cart" , :partial => "cart", :object => @cart)
page[:cart].visual_effect :blind_down if @cart.total_items == 1
page[:current_item].visual_effect :highlight,
:startcolor => "#88ff88", :endcolor => "#114411"
This won’t yet work, because we don’t have a total_items method in our cart model.
Download depot_n/app/models/cart.rb
def total_items
@items.sum { |item| item.quantity } end
We have to arrange to hide the cart when it’s empty. There are two basic ways of doing this. One, illustrated by the code at the start of this section, is not to generate any HTML at all. Unfortunately, if we do that, then when we add something to the cart and suddenly create the cart HTML, we see a flicker in the browser as the cart is first displayed and then hidden and slowly revealed by the blind_down effect.
Report erratum

ITERATION D4: HIDE AN EMPTY CAR T  135
135
A better way to handle the problem is to create the cart HTML but set the CSS style to display: none if the cart is empty. To do that, we need to change the store.rhtml layout in app/views/layouts. Our first attempt is something like this.
<div id="cart"
<% if @cart.items.empty? %> style="display: none"
<% end %>
>
<%= render(:partial => "cart", :object => @cart) %> </div>
This code adds the CSS style= attribute to the <div> tag, but only if the cart is empty. It works fine, but it’s really, really ugly. That dangling > character looks misplaced (even though it isn’t), and the way logic is interjected into the middle of a tag is the kind of thing that gives templating languages a bad name. Let’s not let that kind of ugliness litter our code. Instead, let’s create an abstraction that hides it—we’ll write a helper method.
Helper Methods
Whenever we want to abstract some processing out of a view (any kind of view), we want to write a helper method.
If you look in the app directory, you’ll find four subdirectories.
depot> ls -p app
controllers/ |
helpers/ |
models/ |
views/ |
Not surprisingly, our helper methods go in the helpers directory. If you look in there, you’ll find it already contains some files.
depot> ls -p app/helpers
admin_helper.rb |
application_helper.rb |
store_helper.rb |
The Rails generators automatically created a helper file for each of our controllers (admin and store). The Rails command itself (the one that created the application initially) created the file application_helper.rb. The methods we define in a controller-specific helper are available to views referenced by that controller. Methods in the overall application_helper file are available in all the application’s views. This gives us a choice for our new helper. Right now, we need it just in the store view, so let’s start by putting it there.
Let’s have a look at the file store_helper.rb in the helpers directory.
module StoreHelper end
Let’s write a helper method called hidden_div_if. It takes a condition and an optional set of attributes. It creates a <div> tag and adds the display: none style if the condition is true. We’d use it in the store layout like this.
Report erratum
ITERATION D4: HIDE AN EMPTY CAR T  136
136
Download depot_n/app/views/layouts/store.rhtml
<%= hidden_div_if(@cart.items.empty?, :id => "cart") %> <%= render(:partial => "cart", :object => @cart) %>
</div>
We’ll write our helper so that it is local to the store controller by adding it to store_helper.rb in the app/helpers directory.
Download depot_n/app/helpers/store_helper.rb
module StoreHelper
def hidden_div_if(condition, attributes = {}) if condition
attributes["style" ] = "display: none" end
attrs = tag_options(attributes.stringify_keys)
"<div #{attrs}>" end
end
Note that we cheated slightly here. We copied code from the Rails standard helper called content_tag; that’s how we knew to call tag_options the way we did.4
And, finally, we need to remove the flash message that we used to display when the user empties a cart. It really isn’t needed any more, because the cart clearly disappears from the sidebar when the catalog index page is redrawn. But there’s another reason to remove it, too. Now that we’re using AJAX to add products to the cart, the main page doesn’t get redrawn between requests as people shop. That means we’ll continue to display the flash message saying the cart is empty even as we display a cart in the sidebar.
Download depot_n/app/controllers/store_controller.rb
def empty_cart session[:cart] = nil redirect_to_index
end
Although this might seem like a lot of steps, it really isn’t. All we did to make the cart hide and reveal itself was to make the CSS display style conditional on the number of items in the cart and to use the .rjs template to invoke the blind_down effect when the cart went from being empty to having one item.
Everyone is excited to see our fancy new interface. In fact, because our computer is on the office network, our colleagues point their browsers at our test application and try it for themselves. Lots of low whistles follow as folks marvel at the way the cart appears and then updates. Everyone loves it. Everyone,
4. And how did we find the source code of the content_tag method? We brought up the Rails API documentation in a browser and clicked the View Source link.
Report erratum