


ITERATION F2: LOGGING IN  163
163
the values in your row will be different, because the salt value is effectively random.)
mysql> |
select * from users; |
|
|
|
+---- |
+------ |
+-------------------------------- |
+----------------- |
+ |
| id | |
name | hashed_password |
| salt |
| |
|
+---- |
+------ |
+-------------------------------- |
+----------------- |
+ |
| |
1 | |
dave | 2890ed2e4facd4... |
56e54606751ff | 32920.319242... |
| |
+---- |
+------ |
+-------------------------------- |
+----------------- |
+ |
11.2Iteration F2: Logging In
What does it mean to add login support for administrators of our store?
•We need to provide a form that allows them to enter their user name and password.
•Once they are logged in, we need to record that fact somehow for the rest of their session (or until they log out).
•We need to restrict access to the administrative parts of the application, allowing only people who are logged in to administer the store.
We’ll need a login action in the login controller, and it will need to record something in session to say that an administrator is logged in. Let’s have it store the id of their User object using the key :user_id. The login code looks like this.
Download depot_p/app/controllers/login_controller.rb
def login session[:user_id] = nil if request.post?
user = User.authenticate(params[:name], params[:password]) if user
session[:user_id] = user.id redirect_to(:action => "index")
else
flash[:notice] = "Invalid user/password combination" end
end end
This uses the same trick that we used with the add_user method, handling both the initial request and the response in the same method. But it also does something new: it uses a form that isn’t directly associated with a model object. To see how that works, let’s look at the template for the login action.
Download depot_p/app/views/login/login.rhtml
<div class="depot-form">
<fieldset>
<legend>Please Log In</legend>
Report erratum
ITERATION F2: LOGGING IN  164
164
<% form_tag do %>
<p>
<label for="name">Name:</label>
<%= text_field_tag :name, params[:name] %>
</p>
<p>
<label for="password" >Password:</label>
<%= password_field_tag :password, params[:password] %>
</p>
<p>
<%= submit_tag "Login" %>
</p>
<% end %>
</fieldset>
</div>
This form is different from ones we’ve seen earlier. Rather than using form_for, it uses form_tag, which simply builds a regular HTML <form>. Inside that form, it uses text_field_tag and password_field_tag, two helpers that create HTML <input> tags. Each helper takes two parameters. The first is the name to give to the field, and the second is the value with which to populate the field. This style of form allows us to associate values in the params structure directly with form fields—no model object is required. In our case, we chose to use the params object directly in the form. An alternative would be to have the controller set instance variables.
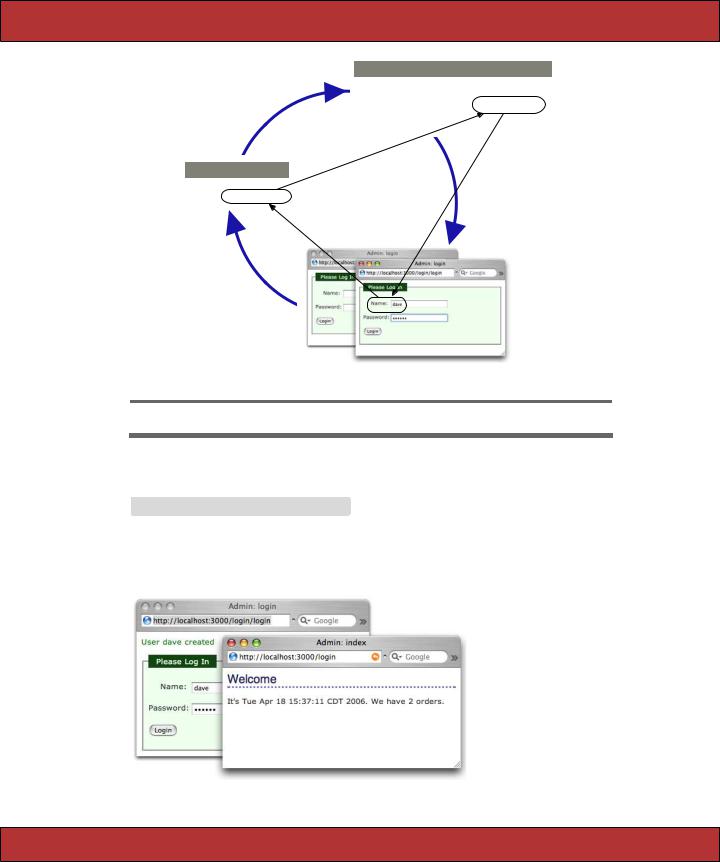
The flow for this style of form is illustrated in Figure 11.1, on the following page. Note how the value of the form field is communicated between the controller and the view using the params hash: the view gets the value to display in the field from params[:name], and when the user submits the form, the new field value is made available to the controller the same way.
If the user successfully logs in, we store the id of the user record in the session data. We’ll use the presence of that value in the session as a flag to indicate that an admin user is logged in.
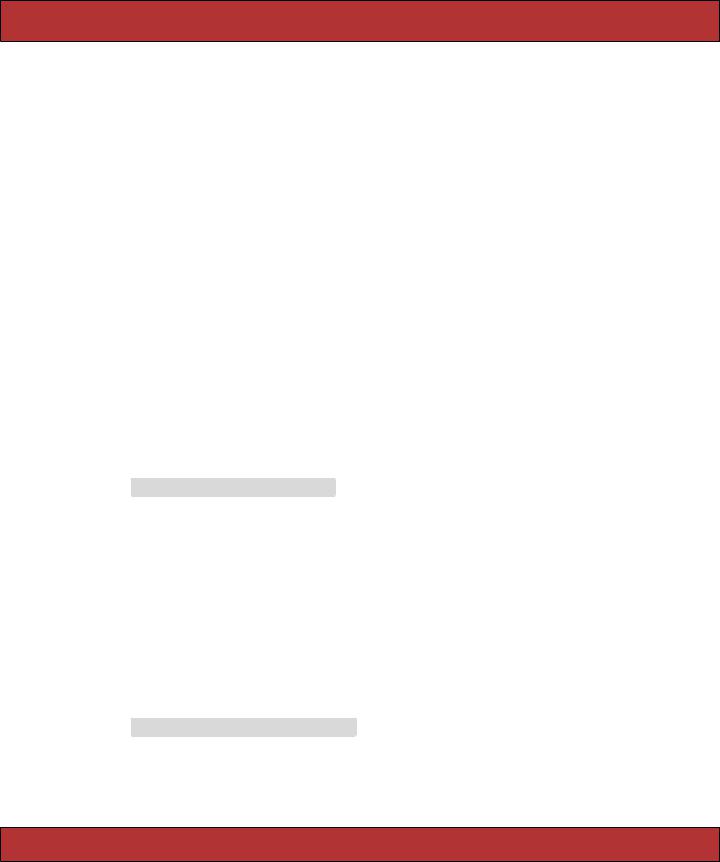
Finally, it’s about time to add the index page, the first screen that administrators see when they log in. Let’s make it useful—we’ll have it display the total number of orders in our store. Create the template in the file index.rhtml in the directory app/views/login. (This template uses the pluralize helper, which in this case generates the string order or orders depending on the cardinality of its first parameter.)
Download depot_p/app/views/login/index.rhtml
<h1>Welcome</h1>
It's <%= Time.now %>.
We have <%= pluralize(@total_orders, "order") %>.
Report erratum
ITERATION F2: LOGGING IN  165
165
Template
<% form_tag do %> Name:
<%= text_field_tag :name, params[:name] %>
. . .
<% end %>
Controller
def login
name = params[:name]
. . . end
Figure 11.1: Parameters Flow between Controllers, Templates, and Browsers
The index action sets up the count.
Download depot_p/app/controllers/login_controller.rb
def index
@total_orders = Order.count end
Now we can experience the joy of logging in as an administrator.
Report erratum
ITERATION F3: LIMITING ACCESS  166
166
We show our customer where we are, but she points out that we still haven’t controlled access to the administrative pages (which was, after all, the point of this exercise).
11.3Iteration F3: Limiting Access
We want to prevent people without an administrative login from accessing our site’s admin pages. It turns out that it’s easy to implement using the Rails filter facility.
Rails filters allow you to intercept calls to action methods, adding your own processing before they are invoked, after they return, or both. In our case, we’ll use a before filter to intercept all calls to the actions in our admin controller. The interceptor can check session[:user_id]. If set and if it corresponds to a user in the database, the application knows an administrator is logged in, and the call can proceed. If it’s not set, the interceptor can issue a redirect, in this case to our login page.
Where should we put this method? It could sit directly in the admin controller, but, for reasons that will become apparent shortly, let’s put it instead in the ApplicationController, the parent class of all our controllers. This is in the file application.rb in the directory app/controllers. Note too that we need to restrict access to this method, because the methods in application.rb appear as instance methods in all our controllers. Any public methods here are exposed to end users as actions.
Download depot_q/app/controllers/application.rb
class ApplicationController < ActionController::Base
private
def authorize
unless User.find_by_id(session[:user_id]) flash[:notice] = "Please log in"
redirect_to(:controller => "login", :action => "login") end
end
end
This authorization method can be invoked before any actions in the administration controller by adding just one line.
Download depot_q/app/controllers/admin_controller.rb
class AdminController < ApplicationController
before_filter :authorize
# ....
Report erratum

ITERATION F3: LIMITING ACCESS  167
167
A Friendlier Login System
As the code stands now, if an administrator tries to access a restricted page before they are logged in, they are taken to the login page. When they then log in, the standard status page is displayed—their original request is forgotten. If you want, you can change the application to forward them to their originally requested page once they log in.
First, in the authorize method, remember the incoming request’s URI in the session if you need to log the user in.
def authorize
unless User.find_by_id(session[:user_id]) session[:original_uri] = request.request_uri flash[:notice] = "Please log in" redirect_to(:controller => "login", :action => "login")
end end
Once we log someone in, we can then check to see whether there’s a URI stored in the session and redirect to it if so. We also need to clear down that stored URI once used.
def login session[:user_id] = nil if request.post?
user = User.authenticate(params[:name], params[:password]) if user
session[:user_id] = user.id uri = session[:original_uri] session[:original_uri] = nil
redirect_to(uri || { :action => "index" }) else
flash[:notice] = "Invalid user/password combination" end
end end
We need to make a similar change to the login controller. Here, though, we want to allow the login action to be invoked even if the user is not logged in, so we exempt it from the check.
Download depot_q/app/controllers/login_controller.rb
class LoginController < ApplicationController
before_filter :authorize, :except => :login
# . .
If you’re following along, delete your session information (because in it we’re already logged in).
Report erratum