

- •Contents
- •Preface to the Second Edition
- •Introduction
- •Rails Is Agile
- •Finding Your Way Around
- •Acknowledgments
- •Getting Started
- •The Architecture of Rails Applications
- •Models, Views, and Controllers
- •Active Record: Rails Model Support
- •Action Pack: The View and Controller
- •Installing Rails
- •Your Shopping List
- •Installing on Windows
- •Installing on Mac OS X
- •Installing on Linux
- •Development Environments
- •Rails and Databases
- •Rails and ISPs
- •Creating a New Application
- •Hello, Rails!
- •Linking Pages Together
- •What We Just Did
- •Building an Application
- •The Depot Application
- •Incremental Development
- •What Depot Does
- •Task A: Product Maintenance
- •Iteration A1: Get Something Running
- •Iteration A2: Add a Missing Column
- •Iteration A3: Validate!
- •Iteration A4: Prettier Listings
- •Task B: Catalog Display
- •Iteration B1: Create the Catalog Listing
- •Iteration B4: Linking to the Cart
- •Task C: Cart Creation
- •Sessions
- •Iteration C1: Creating a Cart
- •Iteration C2: A Smarter Cart
- •Iteration C3: Handling Errors
- •Iteration C4: Finishing the Cart
- •Task D: Add a Dash of AJAX
- •Iteration D1: Moving the Cart
- •Iteration D3: Highlighting Changes
- •Iteration D4: Hide an Empty Cart
- •Iteration D5: Degrading If Javascript Is Disabled
- •What We Just Did
- •Task E: Check Out!
- •Iteration E1: Capturing an Order
- •Task F: Administration
- •Iteration F1: Adding Users
- •Iteration F2: Logging In
- •Iteration F3: Limiting Access
- •Iteration F4: A Sidebar, More Administration
- •Task G: One Last Wafer-Thin Change
- •Generating the XML Feed
- •Finishing Up
- •Task T: Testing
- •Tests Baked Right In
- •Unit Testing of Models
- •Functional Testing of Controllers
- •Integration Testing of Applications
- •Performance Testing
- •Using Mock Objects
- •The Rails Framework
- •Rails in Depth
- •Directory Structure
- •Naming Conventions
- •Logging in Rails
- •Debugging Hints
- •Active Support
- •Generally Available Extensions
- •Enumerations and Arrays
- •String Extensions
- •Extensions to Numbers
- •Time and Date Extensions
- •An Extension to Ruby Symbols
- •with_options
- •Unicode Support
- •Migrations
- •Creating and Running Migrations
- •Anatomy of a Migration
- •Managing Tables
- •Data Migrations
- •Advanced Migrations
- •When Migrations Go Bad
- •Schema Manipulation Outside Migrations
- •Managing Migrations
- •Tables and Classes
- •Columns and Attributes
- •Primary Keys and IDs
- •Connecting to the Database
- •Aggregation and Structured Data
- •Miscellany
- •Creating Foreign Keys
- •Specifying Relationships in Models
- •belongs_to and has_xxx Declarations
- •Joining to Multiple Tables
- •Acts As
- •When Things Get Saved
- •Preloading Child Rows
- •Counters
- •Validation
- •Callbacks
- •Advanced Attributes
- •Transactions
- •Action Controller: Routing and URLs
- •The Basics
- •Routing Requests
- •Action Controller and Rails
- •Action Methods
- •Cookies and Sessions
- •Caching, Part One
- •The Problem with GET Requests
- •Action View
- •Templates
- •Using Helpers
- •How Forms Work
- •Forms That Wrap Model Objects
- •Custom Form Builders
- •Working with Nonmodel Fields
- •Uploading Files to Rails Applications
- •Layouts and Components
- •Caching, Part Two
- •Adding New Templating Systems
- •Prototype
- •Script.aculo.us
- •RJS Templates
- •Conclusion
- •Action Mailer
- •Web Services on Rails
- •Dispatching Modes
- •Using Alternate Dispatching
- •Method Invocation Interception
- •Testing Web Services
- •Protocol Clients
- •Secure and Deploy Your Application
- •Securing Your Rails Application
- •SQL Injection
- •Creating Records Directly from Form Parameters
- •Avoid Session Fixation Attacks
- •File Uploads
- •Use SSL to Transmit Sensitive Information
- •Knowing That It Works
- •Deployment and Production
- •Starting Early
- •How a Production Server Works
- •Repeatable Deployments with Capistrano
- •Setting Up a Deployment Environment
- •Checking Up on a Deployed Application
- •Production Application Chores
- •Moving On to Launch and Beyond
- •Appendices
- •Introduction to Ruby
- •Classes
- •Source Code
- •Resources
- •Index
- •Symbols
WORKING WITH NONMODEL FIELDS  498
498
Forms Containing Collections
If you need to edit multiple objects from the same model on one form, add open and closed brackets to the name of the instance variable you pass to the form helpers. This tells Rails to include the object’s id as part of the field name. For example, the following template lets a user alter one or more image URLs associated with a list of products.
Download e1/views/app/views/array/edit.rhtml
<% form_tag do %>
<% for @product in @products %>
<%= text_field("product[]" , 'image_url') %><br /> <% end %>
<%= submit_tag %> <% end %>
When the form is submitted to the controller, params[:product] will be a hash of hashes, where each key is the id of a model object and the corresponding value are the values from the form for that object. In the controller, this could be used to update all product rows with something like
Download e1/views/app/controllers/array_controller.rb
Product.update(params[:product].keys, params[:product].values)
your user interactions. They will also help when you need to follow accessibility guidelines for your applications. I recommend using form builders for all your Rails forms.
22.7Working with Nonmodel Fields
So far we’ve focused on the integration between models, controllers, and views in Rails. But Rails also provides support for creating fields that have no corresponding model. These helper methods, documented in FormTagHelper, all take a simple field name, rather than a model object and attribute. The contents of the field will be stored under that name in the params hash when the form is submitted to the controller. These nonmodel helper methods all have names ending in _tag.
We need to create a form in which to use these field helpers. So far we’ve been using form_for to do this, but this assumes we’re building a form around a model object, and this isn’t necessarily the case when using the low-level helpers.
We could just hard-code a <form> tag into our HTML, but Rails has a better way: create a form using the form_tag helper. Like form_for, a form_tag should
Report erratum
WORKING WITH NONMODEL FIELDS  499
499
appear within <%...%> sequences and should take a block containing the form contents.8
<% form_tag :action => 'save', :id => @product do %> Quantity: <%= text_field_tag :quantity, '0' %>
<% end %>
The first parameter to form_tag is a hash identifying the action to be invoked when the form is submitted. This hash takes the same options as url_for (see page 404). An optional second parameter is another hash, letting you set attributes on the HTML form tag itself. (Note that the parameter list to a Ruby method must be in parentheses if it contains two literal hashes.)
<% form_tag({ :action => :save }, { :class => "compact" }) do ...%>
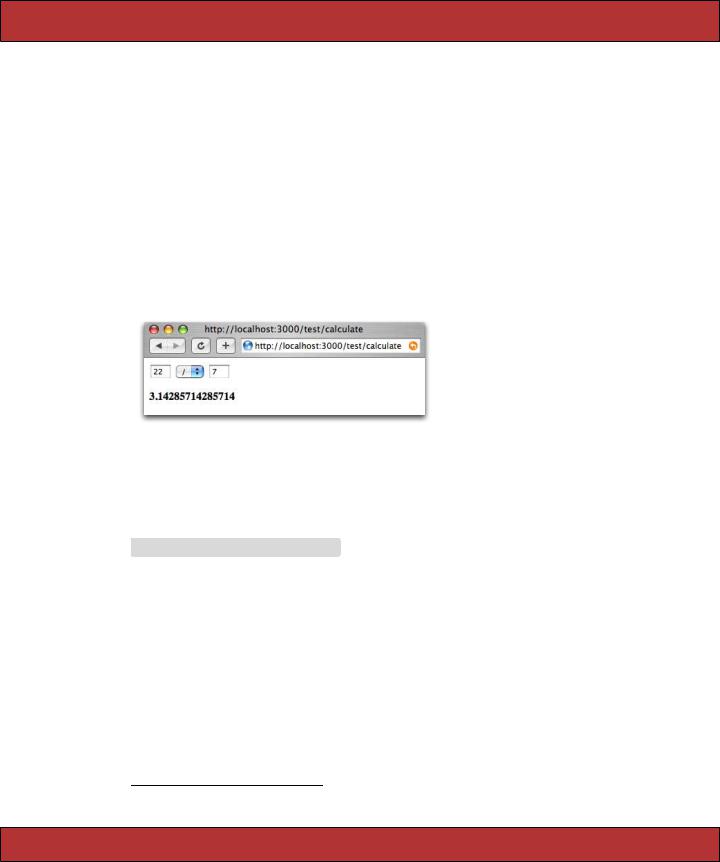
We can illustrate nonmodel forms with a simple calculator. It prompts us for two numbers, lets us select an operator, and displays the result.
The file calculate.rhtml in app/views/test uses text_field_tag to display the two number fields and select_tag to display the list of operators. Note how we had to initialize a default value for all three fields using the values currently in the params hash. We also need to display a list of any errors found while processing the form data in the controller and show the result of the calculation.
Download e1/views/app/views/test/calculate.rhtml
<% unless @errors.blank? %>
<ul>
<% for error in @errors %>
<li><p><%= h(error) %></p></li>
<% end %>
</ul>
<% end %>
<% form_tag(:action => :calculate) do %>
<%= text_field_tag(:arg1, @params[:arg1], :size => 3) %> <%= select_tag(:operator,
options_for_select(%w{ + - * / }, @params[:operator])) %>
<%= text_field_tag(:arg2, @params[:arg2], :size => 3) %> <% end %>
<strong><%= @result %></strong>
8. This is a change in Rails 1.2.
Report erratum

WORKING WITH NONMODEL FIELDS  500
500
Without error checking, the controller code would be trivial.
def calculate
if request.post?
@result = Float(params[:arg1]).send(params[:op], params[:arg2]) end
end
However, running a web page without error checking is a luxury we can’t afford, so we’ll have to go with the longer version.
Download e1/views/app/controllers/test_controller.rb
def calculate
if request.post? @errors = []
arg1 = convert_float(:arg1) arg2 = convert_float(:arg2)
op = convert_operator(:operator)
if @errors.empty? begin
@result = op.call(arg1, arg2) rescue Exception => err
@result = err.message end
end end
end
private
def convert_float(name) if params[name].blank?
@errors << "#{name} missing" else
begin
Float(params[name]) rescue Exception => err
@errors << "#{name}: #{err.message}" nil
end end
end
def convert_operator(name) case params[name]
when "+" then proc {|a,b| a+b} when "-" then proc {|a,b| a-b} when "*" then proc {|a,b| a*b} when "/" then proc {|a,b| a/b} else
@errors << "Missing or invalid operator" nil
end end
Report erratum
UPLOADING FILES TO RAILS APPLICATIONS  501
501
It’s interesting to note that most of this code would evaporate if we were using Rails model objects, where much of this housekeeping is built in.
Old-Style form_tag
Prior to Rails 1.2, form_tag did not take a block. Instead, it generated the <form> element as a string. You call it using something like
<%= form_tag :action => :save %>
... form contents ...
<%= end_form_tag %>
You can still use form_tag this way in Rails 1.2, but this use is disapproved of unless you have a compelling need to avoid the block form. (And it’s hard to come up with a real-world need that can’t be handled by the block form— perhaps a template when the form starts in one file and ends in another?)
To drive home the fact that this use of form_tag is frowned upon, Rails has deprecated the end_form_tag helper: you’ll now have to resort to
<%= form_tag :action => :save %>
... form contents ...
</form>
The ugliness of this is supposed to make you stop and think....
22.8Uploading Files to Rails Applications
Your application may allow users to upload files. For example, a bug-reporting system might let users attach log files and code samples to a problem ticket, or a blogging application could let its users upload a small image to appear next to their articles.
In HTTP, files are uploaded as a multipart/form-data POST message. As the name suggests, this type of message is generated by a form. Within that form, you’ll use one or more <input> tags with type="file". When rendered by a browser, this tag allows the user to select a file by name. When the form is subsequently submitted, the file or files will be sent back along with the rest of the form data.
To illustrate the file upload process, we’ll show some code that allows a user to upload an image and display that image alongside a comment. To do this, we first need a pictures table to store the data.
Download e1/views/db/migrate/003_create_pictures.rb
class CreatePictures < ActiveRecord::Migration def self.up
create_table :pictures do |t|
t.column |
:comment, |
:string |
t.column |
:name, |
:string |
Report erratum

UPLOADING FILES TO RAILS APPLICATIONS  502
502
t.column :content_type, :string
#If using MySQL, blobs default to 64k, so we have to give
#an explicit size to extend them
t.column :data, |
:binary, :limit => 1.megabyte |
end |
|
end |
|
def self.down drop_table :pictures
end end
We’ll create a somewhat artificial upload controller just to demonstrate the process. The get action is pretty conventional; it simply creates a new picture object and renders a form.
Download e1/views/app/controllers/upload_controller.rb
class UploadController < ApplicationController def get
@picture = Picture.new end
# . . .
end
The get template contains the form that uploads the picture (along with a comment). Note how we override the encoding type to allow data to be sent back with the response.
Download e1/views/app/views/upload/get.rhtml
<%= error_messages_for("picture") %>
<% form_for(:picture,
:url => {:action => 'save'},
:html => { :multipart => true }) do |form| %>
Comment: |
<%= |
form.text_field("comment") %><br/> |
Upload your picture: <%= |
form.file_field("uploaded_picture") %><br/> |
|
<%= submit_tag("Upload file") %> <% end %>
The form has one other subtlety. The picture is uploaded into an attribute called uploaded_picture. However, the database table doesn’t contain a column of that name. That means that there must be some magic happening in the model.
Download e1/views/app/models/picture.rb
class Picture < ActiveRecord::Base
validates_format_of :content_type, :with => /^image/,
:message => "-- you can only upload pictures"
Report erratum

UPLOADING FILES TO RAILS APPLICATIONS  503
503
def uploaded_picture=(picture_field)
self.name |
= base_part_of(picture_field.original_filename) |
self.content_type = picture_field.content_type.chomp |
|
self.data |
= picture_field.read |
end
def base_part_of(file_name) File.basename(file_name).gsub(/[^\w._-]/, '')
end end
We define an accessor called uploaded_picture= to receive the file uploaded by the form. The object returned by the form is an interesting hybrid. It is filelike, so we can read its contents with the read method; that’s how we get the image data into the data column. It also has the attributes content_type and original_filename, which let us get at the uploaded file’s metadata. All this picking apart is performed by our accessor method: a single object is stored as separate attributes in the database.
Note that we also add a simple validation to check that the content type is of the form image/xxx. We don’t want someone uploading JavaScript.
The save action in the controller is totally conventional.
Download e1/views/app/controllers/upload_controller.rb
def save
@picture = Picture.new(params[:picture]) if @picture.save
redirect_to(:action => 'show', :id => @picture.id) else
render(:action => :get) end
end
So, now that we have an image in the database, how do we display it? One way is to give it its own URL and simply link to that URL from an image tag. For example, we could use a URL such as upload/picture/123 to return the image for picture 123. This would use send_data to return the image to the browser. Note how we set the content type and filename—this lets browsers interpret the data and supplies a default name should the user choose to save the image.
Download e1/views/app/controllers/upload_controller.rb
def picture
@picture = Picture.find(params[:id]) send_data(@picture.data,
:filename => @picture.name, :type => @picture.content_type, :disposition => "inline")
end
Report erratum

UPLOADING FILES TO RAILS APPLICATIONS  504
504
Figure 22.3: Uploading a File
Finally, we can implement the show action, which displays the comment and the image. The action simply loads up the picture model object.
Download e1/views/app/controllers/upload_controller.rb
def show
@picture = Picture.find(params[:id]) end
In the template, the image tag links back to the action that returns the picture content. Figure 22.3 shows the get and show actions in all their glory.
Download e1/views/app/views/upload/show.rhtml
<h3><%= @picture.comment %></h3>
<img src="<%= url_for(:action => 'picture', :id => @picture.id) %>"/>
You can optimize the performance of this technique by caching the picture action. (We discuss caching starting on page 455.)
If you’d like an easier way of dealing with uploading and storing images, have a look at Rick Olson’s Acts as Attachment plugin.9 Create a database table that includes a given set of columns (documented on Rick’s site) and the plugin will automatically manage storing both the uploaded data and the upload’s metadata. Unlike our previous approach, it handles storing the uploads in both your filesystem or a database table.
And, if you’re uploading large files, you might want to show your users the status of the upload as it progresses. Have a look at the upload_progress plugin, which adds a new form_with_upload_progress helper to Rails.
9. http://technoweenie.stikipad.com/plugins/show/Acts+as+Attachment
Report erratum