


In this chapter, we’ll see
•adding virtual attributes to models
•using more validations
•coding forms without underlying models
•implementing one-action form handling
•adding authentication to a session
•using script/console
•using database transactions
•writing an Active Record hook
Chapter 11
Task F: Administration
We have a happy customer—in a very short time we’ve jointly put together a basic shopping cart that she can start showing to her users. There’s just one more change that she’d like to see. Right now, anyone can access the administrative functions. She’d like us to add a basic user administration system that would force you to log in to get into the administration parts of the site.
We’re happy to do that, because it gives us a chance to look at virtual attributes and filters, and it lets us tidy up the application somewhat.
Chatting with our customer, it seems as if we don’t need a particularly sophisticated security system for our application. We just need to recognize a number of people based on user names and passwords. Once recognized, these folks can use all of the administration functions.
11.1Iteration F1: Adding Users
Let’s start by creating a model and database table to hold the user names and hashed passwords for our administrators. Rather than store passwords in plain text, we’ll feed them through an SHA1 digest, resulting in a 160-bit hash. We check a user’s password by digesting the value they give us and comparing that hashed value with the one in the database. This system is made even more secure by salting the password, which varies the seed used when creating the hash by combining the password with a pseudorandom string.1
depot> ruby script/generate model user
Let’s create the migration and apply it to the database. Our user table has columns for a name, the hashed password, and the salt value.
1. For other recipes on how to do this, see the Authentication and Role-Based Authentication sections in Chad Fowler’s Rails Recipes [Fow06].

ITERATION F1: ADDING USERS  156
156
Download depot_p/db/migrate/007_create_users.rb
class |
CreateUsers |
< ActiveRecord::Migration |
|
def |
self.up |
|
|
create_table |
:users do |t| |
|
|
|
t.column :name, |
:string |
|
|
t.column :hashed_password, :string |
||
|
t.column :salt, |
:string |
|
end |
|
|
|
end |
|
|
|
def self.down drop_table :users
end end
Run the migration as usual.
depot> rake db:migrate
Now we have to flesh out the user model. This turns out to be fairly complex because it has to work with the plain-text version of the password from the application’s perspective but maintain a salt value and a hashed password in the database. Let’s look at the model in sections. First, here’s the validation.
Download depot_p/app/models/user.rb
class User < ActiveRecord::Base
validates_presence_of :name validates_uniqueness_of :name
attr_accessor :password_confirmation validates_confirmation_of :password
def validate
errors.add_to_base("Missing password") if hashed_password.blank? end
end
That’s a fair amount of validation for such a simple model. We check that the name is present and unique (that is, no two users can have the same name in the database). Then there’s the mysterious validates_confirmation_of declaration.
You know those forms that prompt you to enter a password and then make you reenter it in a separate field so they can validate that you typed what you thought you typed? Well, Rails can automatically validate that the two passwords match. We’ll see how that works in a minute. For now, we just have to know that we need two password fields, one for the actual password and the other for its confirmation.
Finally, we have a validation hook that checks that the password has been set. But we don’t check the password attribute itself. Why? Because it doesn’t
Report erratum

ITERATION F1: ADDING USERS  157
157
really exist—at least not in the database. Instead, we check for the presence of its proxy, the hashed password. But to understand that, we have to look at how we handle password storage.
First let’s see how to create a hashed password. The trick is to create a unique salt value, combine it with the plain-text password into a single string, and then run an SHA1 digest on the result, returning a 40-character string of hex digits. We’ll write this as a private class method. (We’ll also need to remember to require the digest/sha1 library in our file. See the listing starting on page 159 to see where it goes.)
Download depot_p/app/models/user.rb
private
def self.encrypted_password(password, salt)
string_to_hash = password + "wibble" + salt # 'wibble' makes it harder to guess Digest::SHA1.hexdigest(string_to_hash)
end
We’ll create a salt string by concatenating a random number and the object id of the user object. It doesn’t much matter what the salt is as long as it’s unpredictable (using the time as a salt, for example, has lower entropy than a random string). We store this new salt into the model object’s salt attribute. Again, this is a private method, so place it after the private keyword in the source.
Download depot_p/app/models/user.rb
def create_new_salt
self.salt = self.object_id.to_s + rand.to_s end
There’s a subtlety in this code we haven’t seen before. Note that we wrote self.salt =.... This forces the assignment to use the salt= accessor method—we’re saying “call the method salt in the current object.” Without the self., Ruby would have thought we were assigning to a local variable, and our code would have no effect.
Now we need to write some code so that whenever a new plain-text password is stored into a user object we automatically create a hashed version (which will get stored in the database). We’ll do that by making the plain-text password a virtual attribute of the model—it looks like an attribute to our application, but it isn’t persisted into the database.
If it wasn’t for the need to create the hashed version, we could do this simply using Ruby’s attr_accessor declaration.
attr_accessor :password
Report erratum
ITERATION F1: ADDING USERS  158
158
Behind the scenes, attr_accessor generates two accessor methods: a reader called password and a writer called password=. The fact that the writer method name ends in an equals sign means that it can be assigned to. So, rather than using standard accessors, we’ll simply implement our own and have the writer also create a new salt and set the hashed password.
Download depot_p/app/models/user.rb
def password @password
end
def password=(pwd) @password = pwd create_new_salt
self.hashed_password = User.encrypted_password(self.password, self.salt) end
And one last change. Let’s write a method that returns a user object if the caller supplies the correct name and password. Because the incoming password is in plain text, we have to read the user record using the name as a key then use the salt value in that record to construct the hashed password again. We then return the user object if the hashed password matches. We can use this method to authenticate a user.
Download depot_p/app/models/user.rb
def self.authenticate(name, password) user = self.find_by_name(name)
if user
expected_password = encrypted_password(password, user.salt) if user.hashed_password != expected_password
user = nil end
end user
end
This code uses a clever little Active Record trick. You see that the first line of the method calls find_by_name. But we don’t define a method with that name. However, Active Record notices the call to an undefined method and spots that it starts with the string find_by and ends with the name of a column. It then dynamically constructs a finder method for us, adding it to our class. We talk more about these dynamic finders starting on page 308.
The user model contains a fair amount of code, but it shows how models can carry a fair amount of business logic. Let’s review the entire model before moving on to the controller.
Report erratum

ITERATION F1: ADDING USERS  159
159
Download depot_p/app/models/user.rb
require 'digest/sha1'
class User < ActiveRecord::Base
validates_presence_of :name validates_uniqueness_of :name
attr_accessor :password_confirmation validates_confirmation_of :password
def validate
errors.add_to_base("Missing password") if hashed_password.blank? end
def self.authenticate(name, password) user = self.find_by_name(name)
if user
expected_password = encrypted_password(password, user.salt) if user.hashed_password != expected_password
user = nil end
end user
end
# 'password' is a virtual attribute def password
@password end
def password=(pwd) @password = pwd create_new_salt
self.hashed_password = User.encrypted_password(self.password, self.salt) end
private
def self.encrypted_password(password, salt)
string_to_hash = password + "wibble" + salt # 'wibble' makes it harder to guess Digest::SHA1.hexdigest(string_to_hash)
end
def create_new_salt
self.salt = self.object_id.to_s + rand.to_s end
end
Report erratum

ITERATION F1: ADDING USERS  160
160
Administering Our Users
Now we have the model and table set up, we need some way to administer these users. In fact, it’s likely that we’ll be adding a number of functions related to users: login, list, delete, add, and so on. Let’s keep the code tidy by putting these actions into their own controller.
At this point, we could invoke the same Rails scaffolding generator that we used when we worked on product maintenance, but this time let’s do it by hand. That way, we’ll get to try out some new techniques. We’ll start by generating our controller (Login) along with a method for each of the actions we want. (I split this command onto two lines to make it fit. Don’t type the \ if you’re typing along at home.)
depot> ruby script/generate controller Login add_user login logout \ index delete_user list_users
exists |
app/controllers/ |
exists |
app/helpers/ |
create |
app/views/login |
exists |
test/functional/ |
create |
app/controllers/login_controller.rb |
create test/functional/login_controller_test.rb
create |
app/helpers/login_helper.rb |
create |
app/views/login/add_user.rhtml |
create |
app/views/login/login.rhtml |
create |
app/views/login/logout.rhtml |
create |
app/views/login/index.rhtml |
create |
app/views/login/delete_user.rhtml |
create |
app/views/login/list_users.rhtml |
We know how to create new rows in a database table; we create an action, put a form into a view, and have the action invoke the form. The form then calls back to some kind of save action, which invokes the model to save data away. But to make this chapter just a tad more interesting, let’s create users using a slightly different style in the controller.
In the automatically generated scaffold code that we used to maintain the products table, the edit action set up a form to edit product data. When the user completed the form, it was routed back to a separate save action in the controller. Two separate methods cooperated to get the job done. We used the same technique when capturing the customer’s order.
In contrast, our user creation code will use just one action, add_user. Inside this method we’ll detect whether we’re being called to display the initial (empty) form or whether we’re being called to save away the data in a completed form. We’ll do this by looking at the HTTP method of the incoming request. If it comes from an <a href="..."> link, we’ll see it as a GET request. If instead it contains form data (which it will when the user hits the submit button), we’ll see a POST. (For this reason, this style is sometimes called postback handling.)
Report erratum
ITERATION F1: ADDING USERS  161
161
Inside a Rails controller, the request information is available in the attribute request. We can check the request type using methods such as get? and post?. Here’s the code for the add_user action in the file login_controller.rb. (Note that we added the admin layout to this new controller—let’s make the screen layouts consistent across all administration functions.)
Download depot_p/app/controllers/login_controller.rb
Line 1 class LoginController < ApplicationController
-layout "admin"
-def add_user
-@user = User.new(params[:user]) 5 if request.post? and @user.save
-flash.now[:notice] = "User #{@user.name} created"
-@user = User.new
-end
-end
10
-# . . .
First we create a new User object. If form data is present in the parameter array, it will be used to initialize the object. If no data is present, an empty user object will be created instead.
If the incoming request is a GET, we’ve finished with the action. It falls through to the end and renders the template (which we haven’t written yet) associated with add_user.
If the request is a POST, we’re looking at something the user submitted, so we try to save the data. If successful, we create a new user object and redisplay the form (displaying a nice message in the flash). This lets the admin continue entering more users. If the save failed, we also fall off the bottom of the action. This time, we have both the (bad) data in the @user object and the reason for the validation failures in the object’s errors structure. This means the user will be given the opportunity to correct the error.
There’s an interesting twist to the handling of the flash in this code. We want to use the normal flash mechanism to display the “user added” message. However, we also don’t want the flash message to survive beyond the current request. To deal with this, we use a variant, flash.now, which puts a message in the flash only for the duration of the current request.
To get this action to do anything useful, we’ll need to create a view for it. This is the template add_user.rhtml in app/views/login. Note that the form_for method needs no parameters, because it defaults to submitting the form back to the action and controller that rendered the template. The view listing is on the next page.
Report erratum
ITERATION F1: ADDING USERS  162
162
Download depot_p/app/views/login/add_user.rhtml
<div class="depot-form">
<%= error_messages_for 'user' %>
<fieldset>
<legend>Enter User Details</legend>
<% form_for :user do |form| %>
<p>
<label for="user_name">Name:</label>
<%= form.text_field :name, :size => 40 %>
</p>
<p>
<label for="user_password">Password:</label>
<%= form.password_field :password, :size => 40 %>
</p>
<p>
<label for="user_password_confirmation" >Confirm:</label>
<%= form.password_field :password_confirmation, :size => 40 %>
</p>
<%= submit_tag "Add User", :class => "submit" %>
<% end %>
</fieldset>
</div>
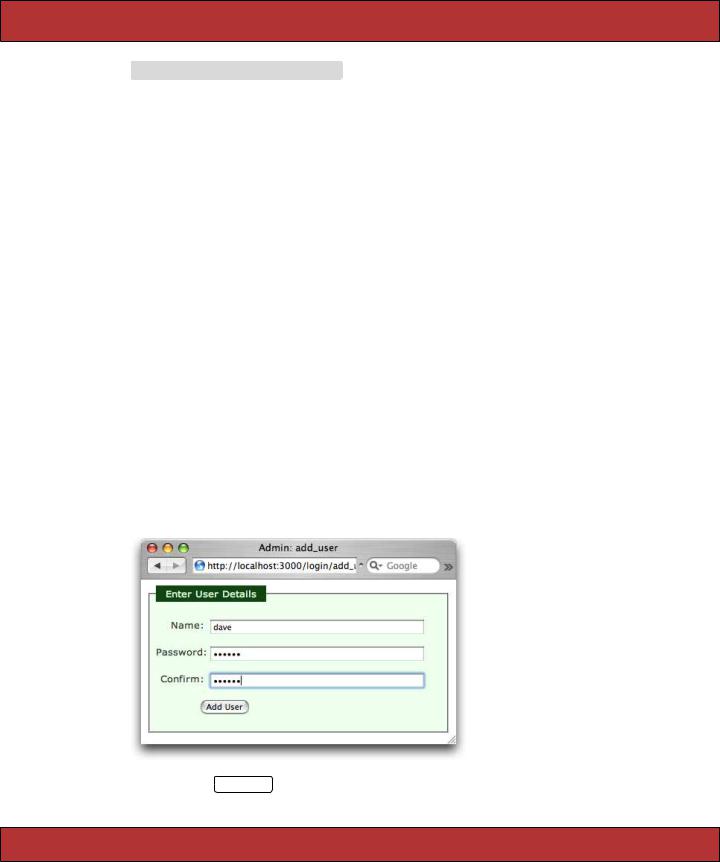
That’s it: we can now add users to our database. Let’s try it. Navigate to http://localhost:3000/login/add_user, and you should see this stunning example of page design.
After clicking Add User , the page is redisplayed with a cheery flash notice. If we look in our database, you’ll see that we’ve stored the user details. (Of course,
Report erratum