

Beginning SharePoint With Excel - From Novice To Professional (2006)
.pdf66 CHAPTER 4 ■ CREATING SHAREPOINT VIEWS
whether the user is logged into Microsoft Windows Messenger and is available for online chats. If you don’t use Messenger, clear this checkbox.
Regardless of which list you choose, select the column you want to use to populate the drop-down list from the In this column menu.
Yes/No (Check Box)
The Yes/No checkbox displays as a single checkbox. If the checkbox is selected, the value is Yes. If it’s unselected, the value is No.
Use this column type only if you want a default value of Yes or No for the column. If users do nothing, the default value is recorded in the list. For example, let’s say new employees are automatically enrolled in the company’s health care plan unless they opt out. You could set the default value to Yes to indicate that their enrollment is documented, and then clear the checkbox if an employee opts out.
However, if the column documents whether an employee has passed the company’s drug test, you probably wouldn’t want to set a default value. In this case, use the Choice column type, and then set Yes and No as the choices, with no default value for the column. If the column is blank, you know the information hasn’t yet been recorded, and you won’t erroneously assume the employee passed or didn’t pass just because no one changed the default.
Hyperlink or Picture
With this column type, you can insert a hyperlink or an actual image into the list. The hyperlink can be to any web page, and users can test the link to make sure it works.
Users follow the same process regardless of whether you choose the Hyperlink or Picture option in the “Format URL as” drop-down list. The difference is whether the actual picture or just a link to the picture appears in the list.
If you plan to use this column type to display photos, create a SharePoint picture library first and upload the pictures you want to use into it. With the Picture option selected, the photos are displayed in the list beside the other text fields. For this reason, you probably want to use thumbnails rather than full-size photos. Use a photo editing tool, such as Microsoft Digital Image 2006 or Adobe Photoshop, to save a thumbnail of the photo to the SharePoint picture library.
When users input a new record, they enter a hyperlink to the photo in the picture library, or a hyperlink to the web page into the “Type the Web address” text box, as you can see in Figure 4-4. Encourage them always to test the link by clicking Click here to test. The image or web page should open successfully.

CHAPTER 4 ■ CREATING SHAREPOINT VIEWS |
67 |
■Tip The easiest way for you to insert a hyperlink into a form is to open a second browser window, navigate to the page to which you want to link, and then copy and paste the link into the hyperlink text box on the New Item and Edit forms.
Figure 4-4. Use the Hyperlink or Picture column type to insert a link to a photo, which is displayed directly in the list or shown as a hyperlink, which users can then click to view the photo or web page.
Calculated (Calculation Based on Other Columns)
A calculated field is a computation based on other fields in the row. For example, in Figure 4-5, you can see the formula for Total Miles by adding Flight Miles to Bonus Miles.
Figure 4-5. Use the Calculated column type to enter a calculation based on other fields in
the row.

68 CHAPTER 4 ■ CREATING SHAREPOINT VIEWS
To enter a simple calculation, follow these steps:
1.Double-click the first column you want to include in the calculation.
2.Enter the operator (+, –, *, or /).
3.Double-click the second column you want to include.
4.Repeat steps 2 and 3 until you complete the formula.
5.Choose the data type you’d like to use for the result: Single line of text, Number (1, 1.0, 100), Currency ($, ¥, £), Date and Time, or Yes/No.
6.Select the number of decimal places you want to display.
7.Select the Show as percentage checkbox if you want the percent added to the result.
■Note You don’t need to start the formula with an equal sign (=); SharePoint adds that automatically.
Although formulas aren’t as easy to work with in SharePoint as they are in Excel, they’re quite powerful. Many of the functions available in Excel are also available in SharePoint. Refer to Chapter 5 for a more detailed explanation of using calculations in SharePoint.
Changing the Order in Which Fields Appear
You can determine the order in which fields appear on the New Item and Edit forms. This can make for easier and more logical data entry, and allows you to group related items together regardless of the order in which you created the columns.
To change the order of fields, follow these steps:
1.Open the list and then click Modify Settings and Columns in the Actions list.
2.Click Change the order of fields at the bottom of the Columns section of the Customize page.
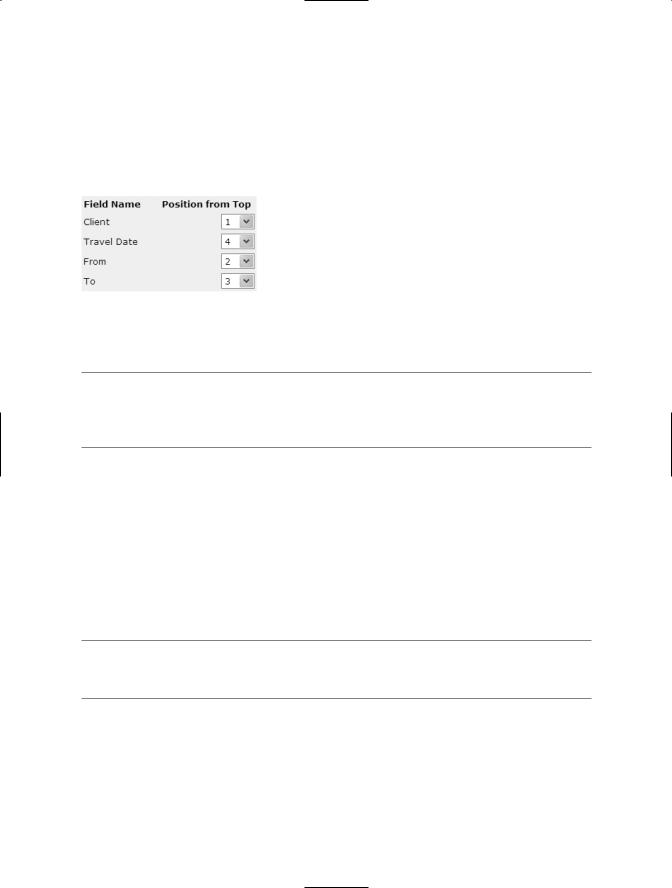
3.Click the Position from Top down arrow on the field you want to move, and then select the new position from the drop-down list.
4.Repeat step 3 until you have all the fields in the order you want them.
CHAPTER 4 ■ CREATING SHAREPOINT VIEWS |
69 |
In Figure 4-6, Travel Date was changed from position 2 to position 4. This change is reflected in the Columns list on the Customize page, and on the New Item or Edit form for this list. If you’re making a lot of changes, you might find it easier to rearrange a few fields, click OK to review the changes in the Columns list, and then repeat steps 2–4 for the next group of fields.
Figure 4-6. Use the Position from Top column to rearrange the positon of columns in the New Item or Edit form for a list.
■Note Changing the order of fields doesn’t impact the order in which columns appear in the Standard or Datasheet view of the list. To modify the list order, see “Creating a New View” and “Modifying an Existing View” later in this chapter.
Modifying a Column
After a list is in production, it can become apparent that users are confused by column names, are skipping important fields, and are entering data incorrectly in others. We know this probably isn’t your users, but just in case you want to give advice to another list manager, you should know that you can change a column’s name, its description, its required setting, and in some cases, even the column type. You can also delete columns that you no longer need.
■Tip If you’d like to change the name of the list, open the list, click Modify Settings and Columns in the Actions list, and then click Change General Settings in the General Settings section of the Customize page.
Changing a Column Name and Other Details
To modify a column’s name, description, and other properties, click the column in the Columns list on the Customize page of the list (open the list and then click Modify Settings and Columns in the Actions list).
Enter changes for the column on the Change Column page that opens.

70 CHAPTER 4 ■ CREATING SHAREPOINT VIEWS
Modifying the Column Type
When you modify a column, you can choose to change the type of the column. However, the choice of available column types is determined by the original type. For example, for Single line of text, Multiple lines of text, Choice, Number, Currency, and Date and Time you can only change to one of these other types. You can no longer choose Lookup, Yes/No, Hyperlink or Picture, or Calculated. To use these column types, you have to create a new column. Table 4-1 summarizes the available choices based on the original column type.
Table 4-1. Available Choices for Modification Based on Original Column Type
|
|
|
|
|
|
Date/ |
Yes/ |
Original |
Single |
Multiple |
Choice |
Number |
Currency |
Time |
Lookup No Hyperlink Calculated |
Single |
|
|
|
|
|
|
|
Multiple |
|
|
|
|
|
|
|
Choice |
|
|
|
|
|
|
|
Number |
|
|
|
|
|
|
|
Currency |
|
|
|
|
|
|
|
Date/Time |
|
|
|
|
|
|
|
Lookup |
|
|
|
|
|
|
|
Yes/No |
|
|
|
|
|
|
|
Hyperlink |
|
|
|
|
|
|
|
Calculated |
|
|
|
|
|
|
|
|
|
|
|
|
|
|
|
Deleting Columns from a List
To delete a column that you’ve created, simply click the Delete button at the bottom of the Change Column form. However, be aware that when you delete a column, you’ll lose all the data stored in the column.
If SharePoint created a column when you created the list, you might not be able to delete the column (the Delete button will be missing). For example, you cannot delete the Last Name column from a contacts list (unless you didn’t use the SharePoint Contacts list, but used the Custom List template to create the list in the first place). You can still choose whether to display the column in a list, but it always appears on the New Item and Edit forms. If this presents a problem for users, set the default value to “DO NOT USE” or something similar.
You can create a new view of the list to control whether a column appears in a list view, what position it appears in, how it’s sorted, whether it’s filtered or grouped, and a number of other options. In the next section, we’ll walk through all the options for creating a new view that displays just the data you want to see, in the way that’s most useful to you and your users.
CHAPTER 4 ■ CREATING SHAREPOINT VIEWS |
71 |
Creating a New View
A view is a collection of settings that includes columns displayed, column order, sort order, grouping, filters, totals, item limits, and style. Views can be saved as personal views that only you can see, or public views that are available to all users of the list.
All views, regardless of their individual settings, are based on three view types. These determine the overall structure of the view. Standard and Datasheet views, described in Chapter 2, are interchangeable, whereas Calendar views cannot be changed to another type of view.
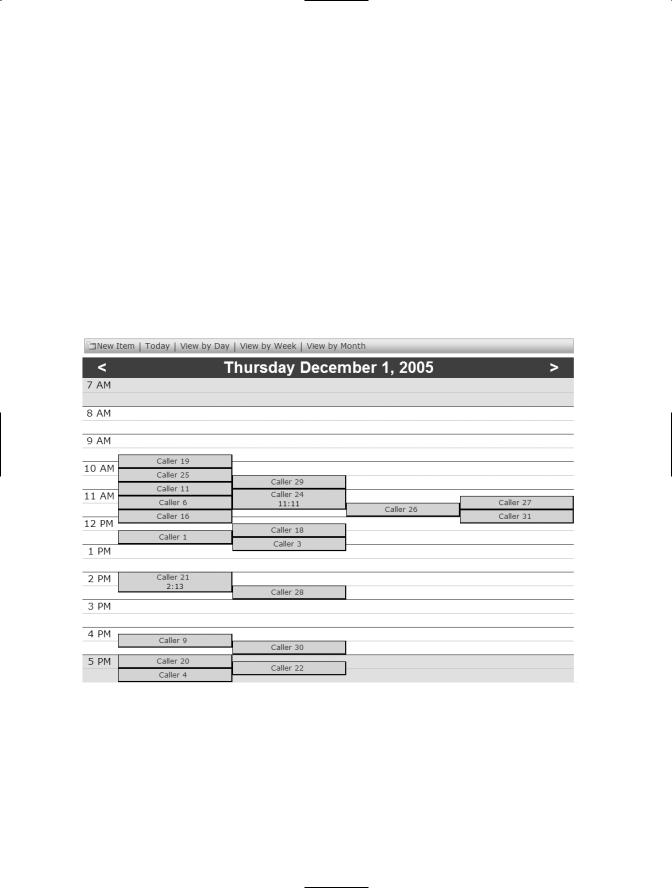
If you have date-specific data, a Calendar view lets you see that data displayed on
a daily, weekly, or monthly calendar. Let’s say you’re tracking call data to monitor lulls in activity patterns. By creating a Calendar view of the list, such as the one shown in Figure 4-7, you can quickly identify patterns of high and low activity levels.
Figure 4-7. Call data displayed in a Calendar view helps to identify activity patterns.

72 CHAPTER 4 ■ CREATING SHAREPOINT VIEWS
Customizing the View
After you’ve decided what kind of view you want to create, you’re ready to customize the view. First, we’ll give you an overview of the process for creating a view, and then delve deeper into each of the settings. To create a view, follow these steps:
1.Open the list and click Modify Settings and Columns on the Actions list.
2.Click Create a new view in the Views section of the Customize page.
3.On the Create View page, select the type of view you want to create: Standard View, Datasheet View, or Calendar View. For this example, we’ll create a Standard view.
4.Enter the name of the view in the View Name text box. This is what users will see in the list of views, so make it descriptive enough to know what the view shows. “Flights Grouped by Origination” or “December Calls by Call Date” are examples of effective view names.
5.If you want this to be the default view for the list, click the Make this the default view checkbox.
6.Select an Audience. Personal views are intended for just your use, and can be created by anyone with Contributor rights or higher; Public views are for everyone who has access to the list, and must be created by a user with Web Designer or higher rights to the list.
■Caution Personal views aren’t secure. If another user knows the URL of one of your personal views, they can use, modify, or even delete the view.
7.Select the columns you want to display and the order in which you want to display them.
8.Select an ascending or descending sort order. You can sort two levels deep.
9.Add any filters to limit the data return to specific criteria.
10.To group the data, identify a column on which to group and, if desired, to subgroup the data.
11.Add totals, including counts, to any columns.
12.Select a style for the list.

CHAPTER 4 ■ CREATING SHAREPOINT VIEWS |
73 |
13.Determine the number of records, or item limit, you want to display on a single page.
14.Click OK to save the view, and then click Go back to [List name] at the top of the Customize page to return to the list.
If you didn’t make the new view the default view, you need to select it from the Select a View list to apply the view.
Now that you know the overall steps to creating a view, the following sections will tell you more about each of the settings on the Create View page.
Displaying and Positioning Columns
When you select columns to display in the view, you might notice columns that weren’t part of the list you created. Every list SharePoint creates has the following six additional system fields that cannot be modified:
•ID: A unique identifier autonumber field
•Attachments: A field that indicates if an item has an attachment
•Created: The date and time an item was created
•Created By: The user who created the item
•Modified: The date and time an item was last modified
•Modified By: The user who last modified the item
If you’d like to display these system fields, select the corresponding checkbox in the Display column.
■Tip Even though the attachment field is available for all lists, only lists based on certain templates— Announcements, Contacts, Events, Issues, and Tasks—give you the ability to add attachments to list items by default (click the Attach File button on the New Item toolbar). If you’d like to attach files to list items in custom lists you create, open the General Settings for the list, click Change General Settings, and verify that Enabled is selected under “Attachments to this list are” in the Attachments section.
74 CHAPTER 4 ■ CREATING SHAREPOINT VIEWS
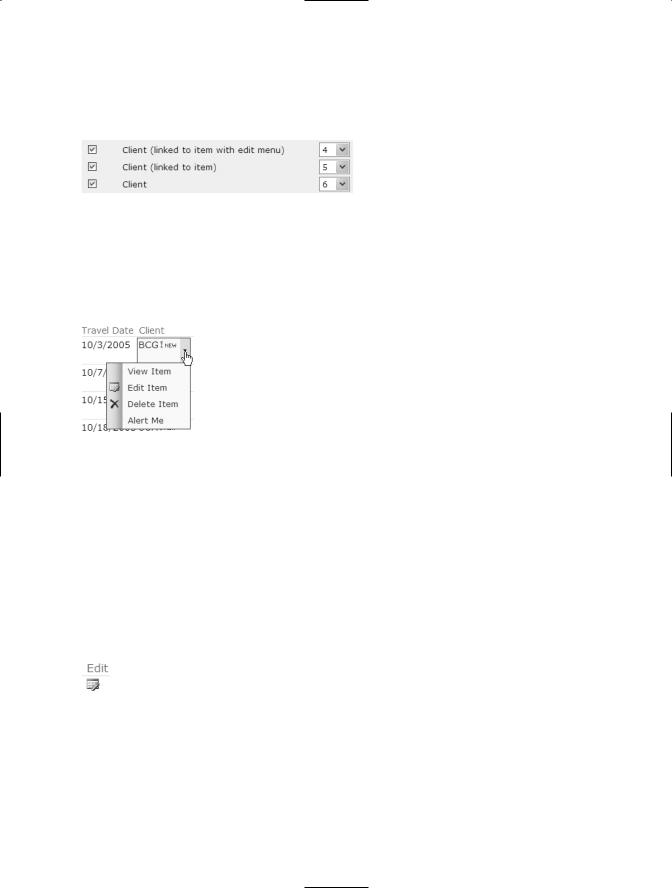
You might also notice that one field in the list, such as the Client field shown here, is listed three different ways:
The first option in this example—Client (linked to item with edit menu)—puts a hyperlink on the item so users can click to go to the detailed item. It also adds a drop-down edit menu with options to View Item, Edit Item, Delete Item, and Alert Me.
The second option—Client (linked to item)—puts the hyperlink on the item but doesn’t include an edit menu. Use this option if the list is read-only but you want users to be able to see the item detail.
The third option—Client—has no link and no edit menu. Use this option if you want users to see only the columns and records displayed in the view, without the option to see the full item detail.
You also have the option of displaying a column called Edit. This column, shown here, displays an Edit icon that users can click to open the item.
After you decide which fields you want to display, select the order in which you’d like them displayed.
CHAPTER 4 ■ CREATING SHAREPOINT VIEWS |
75 |
Sorting Data
Select the sort order by first choosing a column to sort, and then by selecting a direction: ascending or descending. You can sort up to two levels deep; for example, by last name and then by first name. However, you cannot sort three or more levels deep, so you cannot sort by organization, then by last name, then by first name. If you need more than two levels, use Group By.
Filtering Data
Filters are one of the most powerful tools in creating custom views. Rather than wading through hundreds of records, you can narrow a list down pretty quickly to just the few records that meet the criteria you set. By saving a filter as part of a view, users can quickly switch from all records to an identified subset of the records faster than they can say “wow.”
To create a filter, follow these steps:
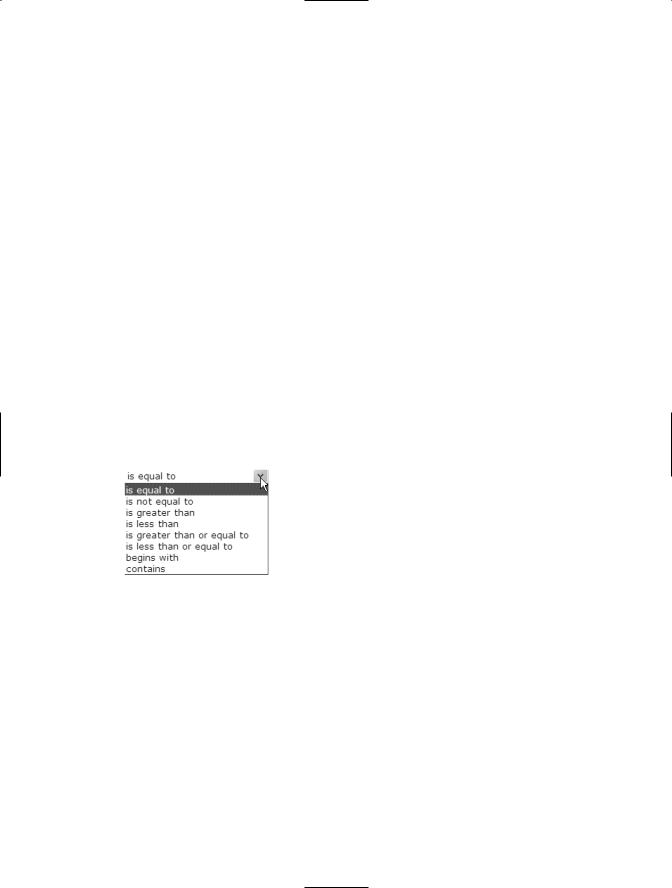
1.Select the column you want to filter on in the “Show the items when column” drop-down list. (SharePoint automatically switches the radio button from Show all items in this view to Show items only when the following is true).
2.Select the qualifier from the list of choices shown here:
3.Enter the value you’re comparing to in the Value text box.
4.To enter additional filter criteria, select And or Or, and then repeat steps 1–3.
For example, if you’d like to display flights that occurred between November 1 and November 30, 2005, enter the filter as shown in Figure 4-8.