

Beginning SharePoint With Excel - From Novice To Professional (2006)
.pdf106 C H A P T E R 6 ■ P U B L I S H I N G E X C E L W E B PA G E S F O R S H A R E P O I N T
The Title will appear in the browser title bar when the page is displayed. Click the Change Title button to open the Set Page Title dialog box and enter a title for the page.
■Tip If you intend to display this web page within another page (for example, the home page on your SharePoint site), don’t include a title. You can title the web part that displays the page, saving precious real estate on your page. For more information on displaying web pages within other pages, see the section “Displaying HTML Pages in SharePoint” later in this chapter.
Click Save to create the web page and close the dialog box. You’ll be prompted if your workbook contains features that aren’t supported in HTML. Discarded features include lists, views, scenarios, and shared workbook features, such as tracking. The message box in Figure 6-3 indicates that the workbook includes lists that won’t be saved. The data in the lists will be published, but the web page won’t include the Excel list functionality, such as sorting and the New Record row. Click Yes to continue and create the web page.
Figure 6-3. The HTML page won’t support Excel’s list features.
You can open the web page in either Excel or Internet Explorer (IE). To open the page, open the HTML file. The file opens as a regular workbook in Excel. The web page is shown in the IE browser in Figure 6-4. The page is formatted much like the workbook, including sheet tabs. You can edit this page using FrontPage, or any other application that can edit HTML.

C H A P T E R 6 ■ P U B L I S H I N G E X C E L W E B PA G E S F O R S H A R E P O I N T |
107 |
Figure 6-4. The Excel workbook saved as an HTML web page
If your workbook contains only one worksheet with data, Excel creates a single HTML file. If the Excel workbook has more than one worksheet with data, Excel creates a number of files. There’s an HTML file with the file name you specified. Other files are stored in a folder with the same name as the HTML file, with _files appended:
•The filelist.xml file, which references all the files in this folder and the main HTML file
•One HTML document for each worksheet
•A cascading stylesheet specifying how the workbook should be displayed in a browser
•The tabstrip file containing the sheet tabs
There will be additional files if your workbook contains other objects, such as charts or PivotTable reports.
Displaying the Web Page in SharePoint
When you’re ready to post the page on your SharePoint site, don’t use SharePoint’s Upload Files utility. You must move both the HTML page and the folder; SharePoint’s upload feature doesn’t upload folders, only files. To easily move the HTML file and folder contents to SharePoint, select and copy the file and the corresponding folder. Open the document library where you want to save the files, and click the Explorer View link on the left side of the page to switch to Explorer View. Paste the file and folder.
108 C H A P T E R 6 ■ P U B L I S H I N G E X C E L W E B PA G E S F O R S H A R E P O I N T
To provide access to the web page, create a link to the HTML file. You can add links to a Links list, or place links anywhere on a SharePoint web part page using the Content Editor Web Part.
Saving a Selection As a Web Page
You have more options, including automatic republishing and interactivity, when you save a selection as a web page. To save a selection, open the workbook and then select the content you wish to save as a web page. Valid selections include the following:
•A worksheet (select any single cell on the sheet)
•A range
•A chart
•A PivotTable report (select the entire pivot table)
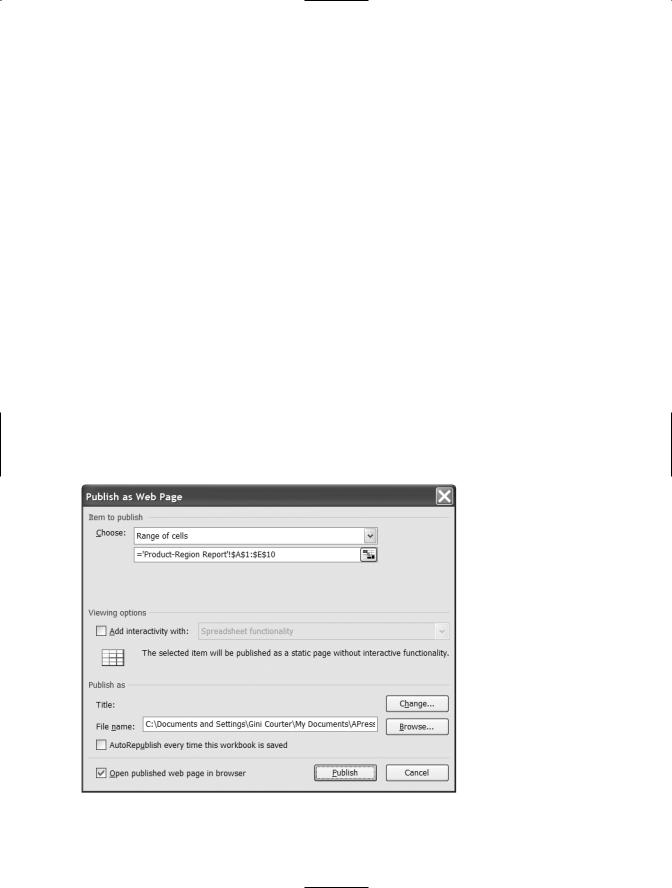
Select the cells, PivotTable report, or chart that you want to save as a web page, then choose File Save as Web Page. In the Save options, choose Selection instead of Entire Workbook. Edit the file name if you wish. Click the Publish button to open the Publish as Web Page dialog box, shown in Figure 6-5.
Figure 6-5. Use the Publish as Web Page dialog box settings to set options, including automatic republishing.

C H A P T E R 6 ■ P U B L I S H I N G E X C E L W E B PA G E S F O R S H A R E P O I N T |
109 |
Republishing Web Pages Automatically
In the “Publish as” section of the Publish as Web Page dialog box, you have another chance to designate a page title. Here’s an important option: select the AutoRepublish every time this workbook is saved checkbox to take the hassle out of republishing. Excel will automatically republish the worksheet every time any user saves changes, provided he or she has permission to write to the SharePoint folder or network folder where you publish the web page. If you’re going to republish automatically, you need to save the web page in its final destination: a folder on your SharePoint site (see the sidebar “Adding SharePoint Sites to My Places”). Click Browse to choose a file location. (See the section “Automatically Republishing Web Pages” later in this chapter for more information on republishing.)
Click the View in Web Browser button before you click Publish to view your page in IE immediately. When you’re ready to publish, click the Publish button to create the web page.
ADDING SHAREPOINT SITES TO MY PLACES
While you’re working intensely on a SharePoint site, you can save time by adding frequently used web folders to the My Places bar in Excel. Follow these steps to add shortcuts to Excel’s common dialog boxes:
1.In IE, copy the URL for your SharePoint folder.
2.In Excel (or any other Office application), open the Open or Save As dialog box.
3.Paste the URL in the Filename text box and press Enter.
4.Choose Tools from the dialog box toolbar, and then choose Add to My Places to add the folder to the My Places bar.
5.Close the Open or Save As dialog box.
Creating Interactive Web Pages
Excel includes three Office Web Components, and each supports specific kinds of interactivity. They’re called Office Web Components (OWCs) instead of Excel Web Components because they can be used in web pages created with other Office applications, but the functionality is all Excel.
110C H A P T E R 6 ■ P U B L I S H I N G E X C E L W E B PA G E S F O R S H A R E P O I N T
•The Spreadsheet component inserts a spreadsheet where users can add formulas, sort and filter data, and format the worksheet. Use the Spreadsheet component to present unsummarized data.
•The Chart component is linked to data in the Spreadsheet component, so that the chart can display changes when the data in the spreadsheet changes.
•The PivotTable component lets users analyze database information using most of the sorting, filtering, grouping, and subtotaling features of PivotTable reports.
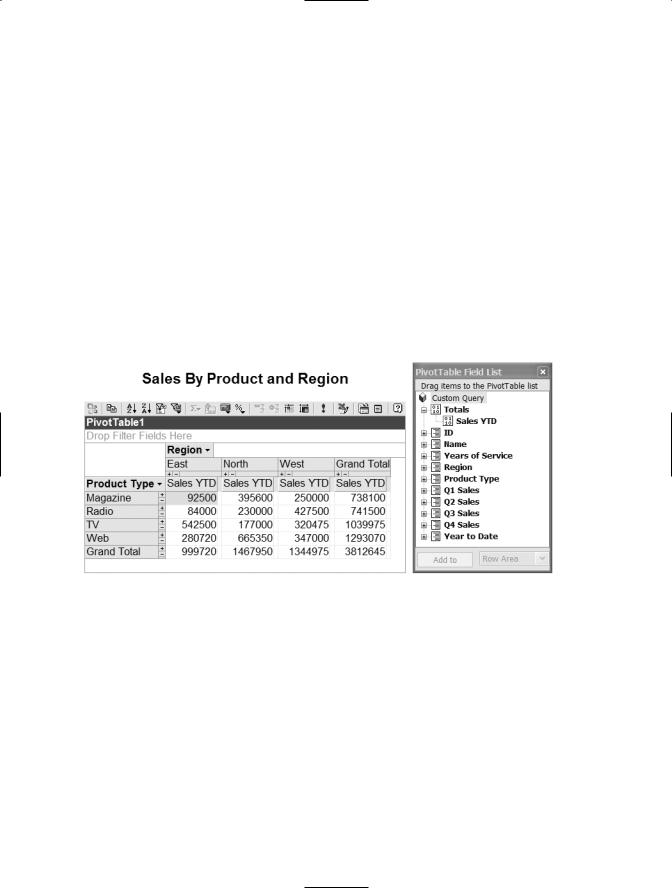
There’s a fourth component that works in the background: the Data Source component, the data retriever for the PivotTable and Chart components. Figure 6-6 shows an interactive web page using the PivotTable component. The toolbar at the top of the pivot table allows the user to sort, filter, show or hide the field list, and export the table to Excel for offline use.
Figure 6-6. Add interactivity to give your users the ability to analyze data.
C H A P T E R 6 ■ P U B L I S H I N G E X C E L W E B PA G E S F O R S H A R E P O I N T |
111 |
UNDERSTANDING OFFICE WEB COMPONENTS
The Office Web Components (OWCs) are a set of ActiveX components. With the components, you don’t need to learn Java to create the slick interactive interface your users are asking for. The OWCs are supported by Excel and Access 2000, 2002, and 2003; they rely on Internet Explorer, starting with version 5.01 with SP2 or higher.
The OWCs are only interactive if the user’s browser supports ActiveX components. If users have an older browser, they’ll still see the spreadsheet, chart, or pivot table, but they won’t be able to manipulate it in their browser. The OWCs have two other requirements: your users must have a Microsoft Office license to use the components, and the OWCs must be installed on your SharePoint server. (To download the components, go to http://www.microsoft.com/downloads and search for owc11.exe.) The Office licensing and browser requirements make the OWCs a better choice for an intranet, where they were intended to be used, rather than the Internet.
By default, IE blocks unsigned ActiveX components. When you or your users open a web page that includes ActiveX components, you’ll need to click the Information Bar that appears at the top of your browser window and choose Allow Blocked Content. Depending on your settings, you might also have to okay one or two message boxes as part of this process. Don’t let this IE behavior dissuade you from using the OWCs (or encourage you to dumb down your browser security settings). The active content won’t be blocked when you view the web pages as part of a SharePoint site. SharePoint is wall-to-wall trusted ActiveX web parts.
To create an interactive page, follow these steps:
1.Open the workbook that contains the sheet.
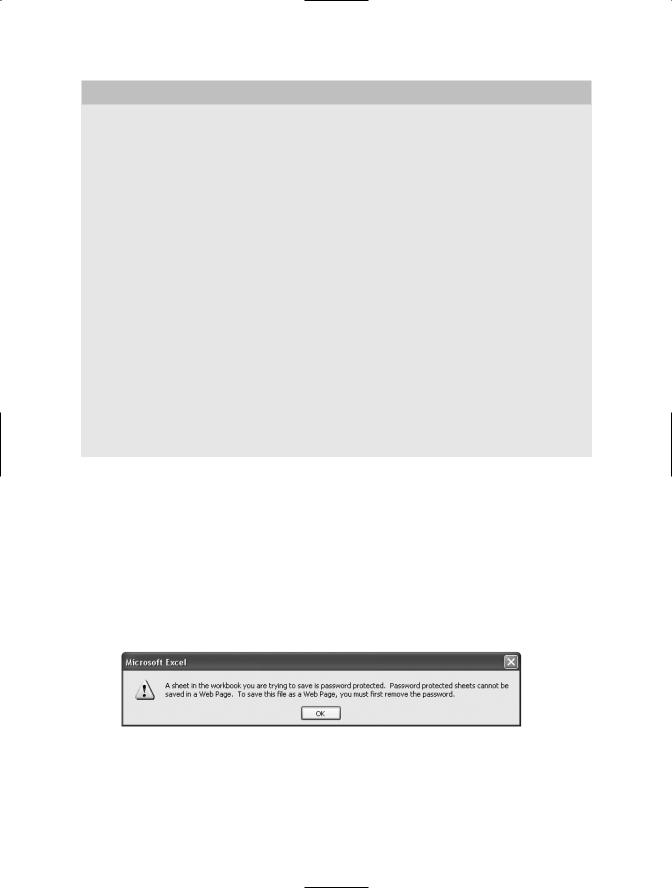
2.Remember to remove protection from protected workbooks, sheets, or ranges in the workbook, even if the protection doesn’t apply to the sheet or selection you wish to publish. If Excel trips over password protection in your workbook, you’ll see this message box, and will need to remove protection and begin the Save process again.
112C H A P T E R 6 ■ P U B L I S H I N G E X C E L W E B PA G E S F O R S H A R E P O I N T
3.Select the sheet, range, pivot table, or chart that you want to publish.
4.Choose File Save as Web Page to open the Save As dialog box.
5.Enable the Add Interactivity checkbox, then click the Publish button to open the Publish as Web Page dialog box, shown previously in Figure 6-5.
6.Choose the component you wish to use from the drop-down list by selecting the kind of functionality you want users to have: spreadsheet, chart, or pivot table. If you select an Excel data range, you can choose either the Spreadsheet or PivotTable component.
Excel creates the PivotTable. Excel isn’t as facile with charts; the Chart component is only available if you selected a chart object before opening the Save As dialog box.
Publishing and Using the Spreadsheet Component
The Spreadsheet component includes about as much spreadsheet functionality as you can pack into a browser window. With the static page, users had only one report available in the browser. With the interactive page, they have a report tool with sorting, filtering, and formatting capabilities. Changes users make are retained during the browser session so they can switch from the browser to other applications while they work with the spreadsheet.
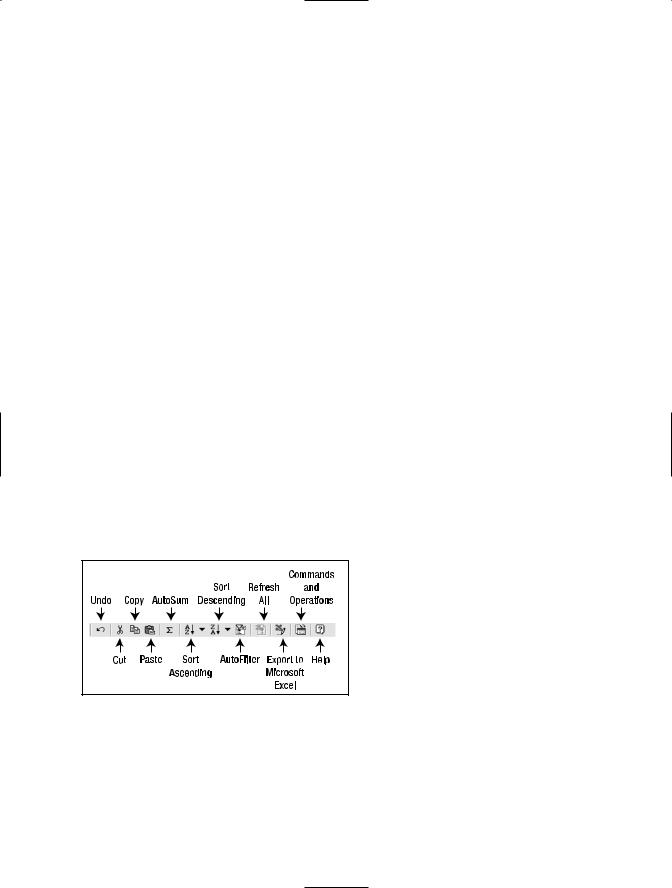
Excel users will immediately know how to use most of the buttons on the Spreadsheet component toolbar, shown in Figure 6-7, although the folks in our office were disappointed that the AutoSum button doesn’t have a drop-down list!
Figure 6-7. The Spreadsheet component toolbar provides spreadsheet functionality in a browser window.
C H A P T E R 6 ■ P U B L I S H I N G E X C E L W E B PA G E S F O R S H A R E P O I N T |
113 |
Two buttons aren’t standard in Excel: the Export To Excel button and the Commands and Options button. The Export To Excel button, familiar to SharePoint users, creates the Excel worksheet in a user-specified folder so users can manipulate a copy of the data as much as they wish without changing the original data in the web page.
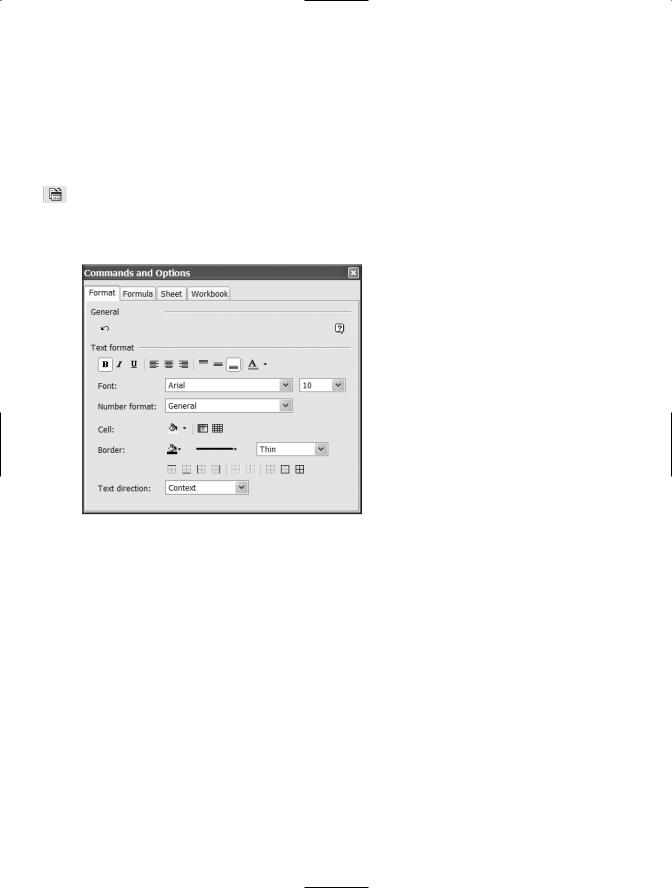
The Commands and Options button opens the Commands and Options dialog box, which includes additional user tools (see Figure 6-8). Make sure your users know about this dialog box, because it’s filled with power: the power to change the format of a worksheet, work with formulas in the worksheet, find worksheet data, and change worksheet and workbook options.
Figure 6-8. You use the Commands and Options dialog box to format and modify the data displayed in the Spreadsheet component.
The Spreadsheet component doesn’t support all the features and functionality of Excel. Table 6-1 describes worksheet properties and features that the component doesn’t support.

114 C H A P T E R 6 ■ P U B L I S H I N G E X C E L W E B PA G E S F O R S H A R E P O I N T
Table 6-1. Features and Formatting Not Supported by the Spreadsheet Component
Feature |
Description |
Comments |
Discarded. |
Conditional formatting |
Not supported. Cells display as formatted when the page |
|
is published. |
Graphics |
Not displayed. |
Group and outline symbols |
Not supported. |
Indented text |
Not supported. Displays without indents. |
Links to other worksheets, |
Discarded. Cells display with values when the page is |
workbooks, and web queries |
published. |
Outlined ranges |
Collapsed rows are hidden. |
Precedent and dependent arrows |
Discarded. |
Print settings, including rows to |
Discarded. |
repeat, columns to repeat, |
|
and print area |
|
Rotated text |
Not supported. Text is reset to horizontal. |
Shared workbook information |
Discarded. |
Validation rules and error alerts |
Discarded. |
|
|
Because data values persist during a browser session, another good use of the Spreadsheet component is to create a small application that collects values from a user and performs a few calculations.
Publishing and Using the Chart Component
The Chart component displays both the chart and the underlying data, as shown in Figure 6-9. Users modify the data to change the chart, just as they would in Excel.

C H A P T E R 6 ■ P U B L I S H I N G E X C E L W E B PA G E S F O R S H A R E P O I N T |
115 |
|
|
|
|
Figure 6-9. The Chart component reflects changes in the underlying data.
To publish a chart with interactivity, select the chart area before choosing File Save as Web Page. Don’t spend a lot of time formatting your chart before publishing it. The Chart component supports most chart features, but doesn’t support drawing objects (such as callouts and other annotations) and the placement of chart elements. For example, if you’ve neatly positioned the title and data labels and resized the plot area, you’ve wasted your time. They’ll all snap back to their default positions in the Chart component. Table 6-2 describes the chart features that the Chart component doesn’t support.