

Beginning SharePoint With Excel - From Novice To Professional (2006)
.pdf196 C H A P T E R 1 0 ■ B U I L D I N G E X C E L S P R E A D S H E E T W E B PA RT S
can’t edit them—a key difference between the Office Spreadsheet web part and a custom web part that you create from Excel. The user can select any cell, and use the toolbar commands to copy any cell or export the worksheet to Excel. The exported spreadsheet includes all the same formatting and protection as the web part.
Figure 10-1. A custom web part created in Excel
Custom web parts support more Excel features than the Office Spreadsheet web part. You have access to all the formulas that Excel supports—even the financial, statistical, and engineering analysis functions, such as GROWTH, TREND, and NETWORKDAYS, from the Analysis Toolpak. You can use built-in programs such as Goal Seek and other add-ins such as Solver to create your custom web parts. (For more information on installing Solver and the Analysis Toolpak, see Excel Help.)
■Note There are both client and server requirements for web parts created with the Spreadsheet Web Part Add-in. Client computers must have the Microsoft Office 2003 Spreadsheet Web Component (owc11.exe) installed. The component is installed by default as part of a Microsoft Office 2003 installation. The Microsoft Office Components for SharePoint Products and Technologies (stspkpl.exe), which include the Office Spreadsheet Web Part must be installed on the server before you can import custom web parts created using the add-in.
Installing the Spreadsheet Web Part Add-In
The Spreadsheet Web Part Add-in is available at no cost from Microsoft. The URL is bulky:
http://www.microsoft.com/downloads/details.aspx?familyid=dc3d8474-d960-4d14-a9df-
9024e39f5463&displaylang=en.
C H A P T E R 1 0 ■ B U I L D I N G E X C E L S P R E A D S H E E T W E B PA RT S |
197 |
You can type the link in your browser, but it’s easier to simply Google sharepoint spreadsheet add-in for excel. (Include SharePoint in the search string—there are a lot of spreadsheet add-ins.) The first item in the search results—Download Details: Windows SharePoint Services Add-in: Spreadsheet—is the link to the download page. Click the link. Follow these steps to install the add-in:
1.On the download page, click the Download button.
2.When the File Download - Security Warning dialog box appears, choose Run to start the install.
3.Review the Spreadsheet Web Part Add-in license agreement and click Yes.
4.In the next dialog box, click Browse to choose a location for the add-in. There are two good choices. The default add-ins folder is C:\Documents and
Settings\your user name\Application Data\Microsoft\AddIns. The add-ins folder for Office 2003, C:\Program Files\Microsoft Office\OFFICE11\ADDINS, is accessible to all users. Choose one of these locations (or another location if you prefer). Click OK to save the add-in in the folder.
After the add-in is saved, a message box tells you how to install the add-in in Excel:
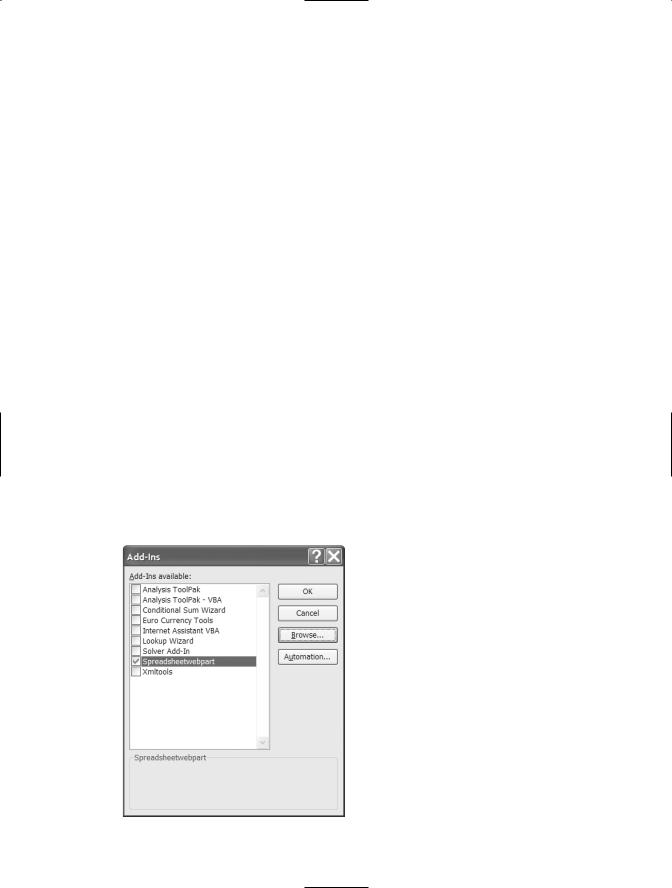
1.In Excel, choose Tools Add-Ins to open the Add-ins dialog box, shown in Figure 10-2.
2.Click the Browse button and locate the SpreadsheetWebpart.xla file. Select the file and click OK to install the add-in.
Figure 10-2. Install and enable or disable add-ins for Excel.

198 C H A P T E R 1 0 ■ B U I L D I N G E X C E L S P R E A D S H E E T W E B PA RT S
When the add-in is installed, a new command, Create WebPart, appears on the Excel main menu to the right of the Help menu.
■Note Add-ins are loaded every time Excel is launched. If you have add-ins that you use infrequently, open the Add-ins dialog box and turn off their checkboxes so they won’t be loaded with Excel. This saves memory and shortens the time it takes Excel to launch. To enable an add-in, open the Add-ins dialog box, turn on its checkbox, then close and reopen Excel.
Custom Web Parts
A Spreadsheet Web Part needs five files to run: one preinstalled on the server, one preinstalled on the client, and three that you’ll create using the add-in for installation on the server:
•Spreadsheet Web Part Assembly
•XML Spreadsheet
•Solution Specification
•Web Part Definition
•Spreadsheet Component
The Spreadsheet Web Part Assembly is installed on the Windows SharePoint Services site as part of the Office 2003 Web Parts and Components. One Spreadsheet Web Part Assembly can support all the Spreadsheet Web Parts on a site.
The XML Spreadsheet file defines the XML mapping, formatting, validation, and formulas used in your web part. You’ll create this file using the Spreadsheet Web Part Add-in.
The Solution Specification file is an XML file that integrates the other components in the web part. You’ll create this using the Spreadsheet Web Part Add-in. You can download a separate editor from Microsoft to modify this file.
The Web Part Definition file is an XML file that defines the default property settings for the web part, such as the title and description. It also specifies the location of the Solution Specification file. This file is used when you add a Spreadsheet web part to a web part page or web part catalog. You’ll create the Web Part Definition file using the Spreadsheet Web Part Add-in.
The Spreadsheet Component is installed on your users’ machines as part of the Office 2003 installation. Users without Office 2003 installed can download and install the Office Web Components (OWCs) separately. However, the OWCs rely on Office 2003 for some features, so users without Office 2003 will have a lesser user experience.
C H A P T E R 1 0 ■ B U I L D I N G E X C E L S P R E A D S H E E T W E B PA RT S |
199 |
Creating a Simple Custom Web Part
There are three steps to building a custom web part using the Spreadsheet Web Part Add-in:
1.Set up the Excel workbook, which will be used as the XML Spreadsheet file.
2.Use the Spreadsheet Web Part Add-in to specify web part settings.
3.Create the web part.
Setting Up the Excel Workbook
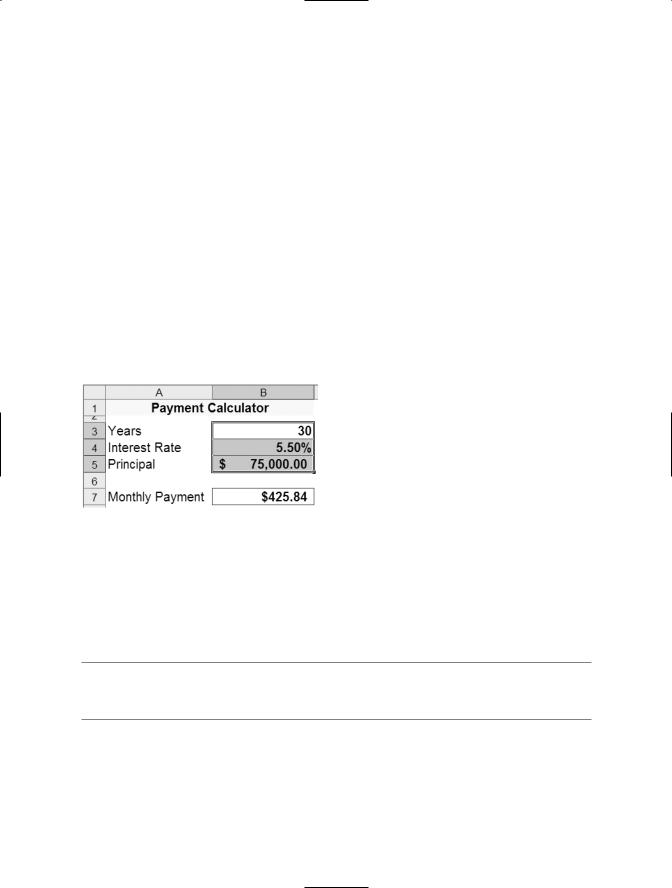
The custom web part can include XML maps, formatting, formulas, and data from an external source. The simple spreadsheet shown in Figure 10-3, which includes formatting and formulas, was used to create the web part shown in Figure 10-1.
Figure 10-3. The worksheet used to create the custom web part
The worksheet looks amazingly like the web part. Here are the steps to create a worksheet that you’ll use to create a simple custom web part:
1. Enter labels and formulas.
■Tip If you want to create the spreadsheet shown in Figure 10-3, there’s only one formula, in cell B7:
=PMT(B4/12,B3*12,-B5)
2.Apply formatting.
3.Select and unlock any cells where the user will enter data. Choose Format Cells on the menu, or right-click and choose Format Cells from the context menu to open the Format Cells dialog box. On the Protection tab, turn off the Locked checkbox, then click OK.
200 C H A P T E R 1 0 ■ B U I L D I N G E X C E L S P R E A D S H E E T W E B PA RT S
In your custom web part, users will only be able to modify cells that you just unlocked.
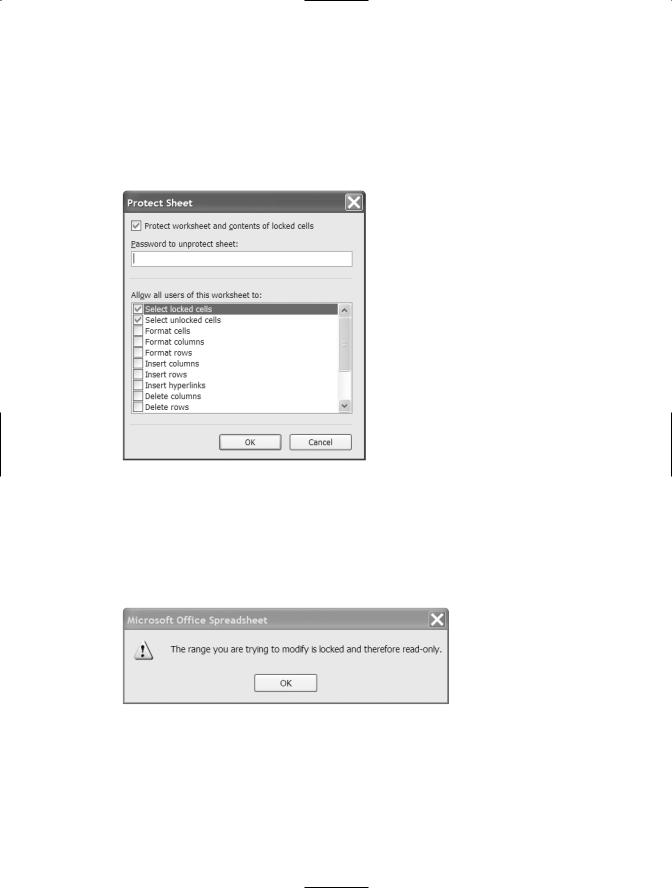
4.Choose Tools Protection Protect Sheet to open the Protect Sheet dialog box, shown in Figure 10-4.
Figure 10-4. Protect the worksheet before creating the web part to protect formulas and labels.
You don’t need to provide a password. Unlike Excel, SharePoint doesn’t offer the user an opportunity to enter a password and unprotect the spreadsheet. It just says “No”:
5.Click OK to protect the worksheet.
6.Save the workbook. Give it a short descriptive name.
Now you’re ready to use the Spreadsheet Add-in to create your custom web part.
C H A P T E R 1 0 ■ B U I L D I N G E X C E L S P R E A D S H E E T W E B PA RT S |
201 |
Using the Spreadsheet Add-In
Select the worksheet that you want to use to create the web part and click the Create WebPart command on the menu bar to open the Spreadsheet Add-in for Microsoft Excel. The add-in is a four-tab dialog box, much like a wizard.
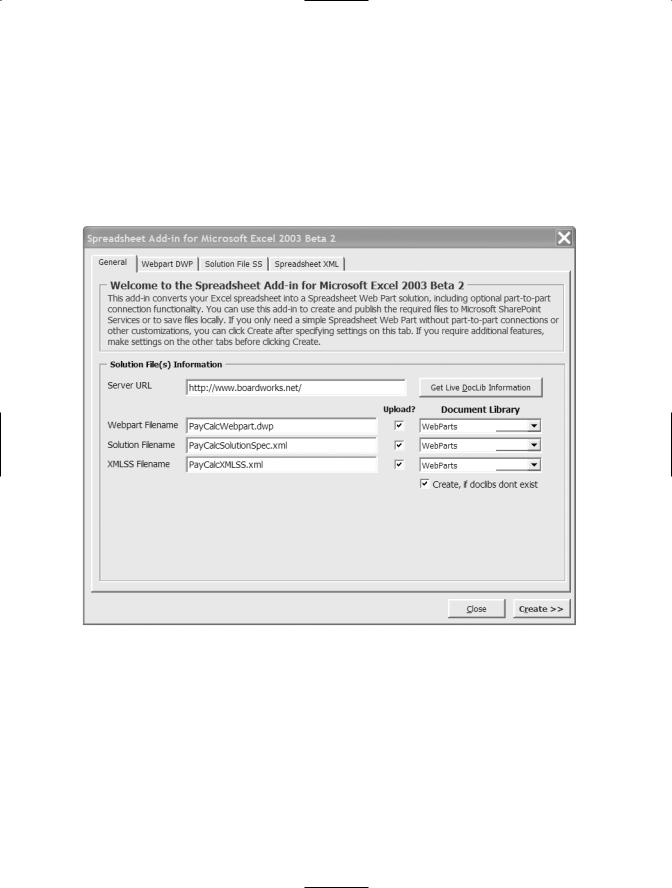
On the General tab, shown in Figure 10-5, you’ll identify your SharePoint site, name the web part files, and choose a document library in which to store the web part files.
Figure 10-5. You enter most of the information required for a simple web part on the General tab of the Spreadsheet Add-in.

202 C H A P T E R 1 0 ■ B U I L D I N G E X C E L S P R E A D S H E E T W E B PA RT S
Follow these steps to complete the information on the General tab:
1.Enter the URL for your Windows SharePoint Services site in the Server URL text box. If your site is a subsite, use the URL for the subsite.
2.In the Webpart Filename, Solution Filename, and XMLSS Filename text boxes, the suggested file name is the name of the workbook (including the extension),
a hyphen, then a description and file extension for the file. Replace the file name and extension with a name that describes the web part. For example, the Webpart Filename for our web part is PayCalcWebPart.dwp.
These three files will be saved in a document library on your SharePoint site. You don’t want users to delete or modify the files, so you shouldn’t store them in the Shared Documents library. We recommend creating a document library named webparts that isn’t listed on the Quick Launch bar. You can create the library in SharePoint, or have the Spreadsheet Add-in create the library for you. The Solution Specification file must be stored on the web site where you want to place the custom web part, and the WebPart Description must be stored on the same site as the Solution Specification file. You might as well store them all together in the same document library. Then, follow these steps:
1.If the library you want to store the web part files in already exists, click the Get Live DocLib Information button to populate the three Document Library drop-down lists with the names of the document libraries on the site you specified earlier. Choose the library in each of the drop-down lists. (Don’t choose Web Part Gallery— it seems like a good idea, but it won’t work.) Clear the Create, if doclibs dont exist checkbox.
Or, do the following:
1.If you need to create a new document library, type the name in each of the three Document Library drop-down lists. Leave the Create, if doclibs dont exist checkbox turned on.
2.On the Webpart DWP tab, enter a brief name and description for your web part (see Figure 10-6). (If you don’t do this, the web part will have the same name as your workbook.)

C H A P T E R 1 0 ■ B U I L D I N G E X C E L S P R E A D S H E E T W E B PA RT S |
203 |
Figure 10-6. Enter a name and description for your web part.
Don’t click Create yet. Continue to the next section to learn how to protect your web part.
Protecting Your Web Part
The default web part settings allow the user to save changes (within the web part, not within the data source), connect to a data source, edit queries, and engage in other random acts of mischief. You can lock down the web part to keep your users from modifying your web part. When you set LockedDown to True, the web part you create will have the following modifications:
•The Connect to Data toolstrip (the menu above the toolbar) command will be hidden
•The Save toolstrip command will be hidden
•The Edit Query and Delete Query commands on the context menu will be disabled
204 C H A P T E R 1 0 ■ B U I L D I N G E X C E L S P R E A D S H E E T W E B PA RT S
To lock down the web part, follow these steps:
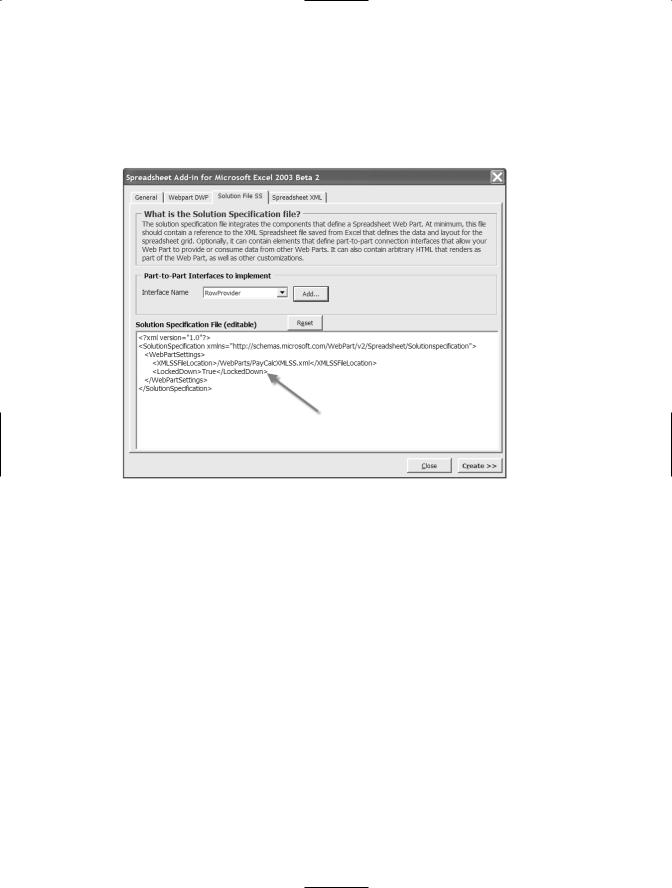
1. Choose the Solution File SS tab, shown in Figure 10-7.
Figure 10-7. The Solution File SS tab of the Spreadsheet Add-in
2.Add the following line after the <XMLSSFileLocation> specification between the WebPartSettings start and end tags in the Solution Specification pane, as shown in Figure 10-7:
<LockedDown>True</LockedDown>
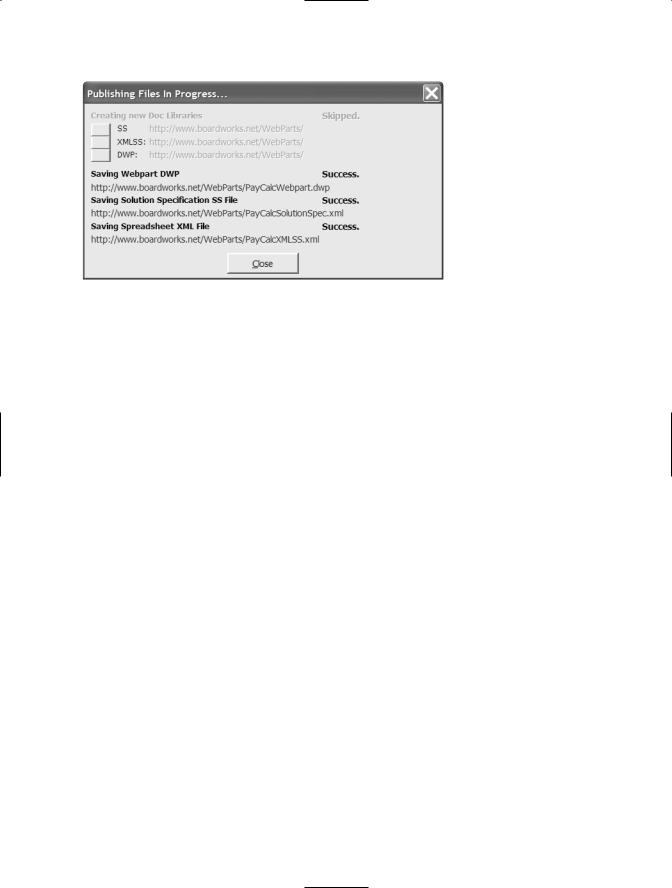
3.You’re now ready to create your web part. Click the Create button.
The Publishing Files In Progress dialog box opens and shows each file being created (see Figure 10-8).
C H A P T E R 1 0 ■ B U I L D I N G E X C E L S P R E A D S H E E T W E B PA RT S |
205 |
Figure 10-8. View the web part creation report in the Publishing Files In Progress dialog box.
When all three files are created, click any of the three gray buttons next to the file names to open the SharePoint document library in Internet Explorer (IE) to view your files.
Adding the Web Part to a Web Part Page
It’s relatively easy to add your custom web part to a web part page. There’s only one trick: even though you need to publish your web part on a SharePoint site, when you import the web part, the text box control won’t allow you to enter a web URL. Before you import the web part, take a minute to make sure your SharePoint site is on the My Network Places list.
Adding Your SharePoint Site to My Network Places
Open My Network Places. (If My Network Places doesn’t appear on your Start menu or Desktop, open My Computer, then choose My Network Places in the Other Places list.) Review the list of Network Places. If your SharePoint site is already listed, you’re all set. If not, follow these steps to add a Network Place:
1.Open the home page of your SharePoint site in IE.
2.Copy the URL in the address bar.
3.Switch to My Network Places.
4.In the Network Tasks pane, click the Add a Network Place link to open the Add Network Place Wizard.