

Beginning SharePoint With Excel - From Novice To Professional (2006)
.pdf156 C H A P T E R 8 ■ U S I N G E X C E L TO Q U E RY S H A R E P O I N T
Refreshing Query Data
You can refresh the query data manually or automatically. To refresh data manually, select any cell in the refreshable query results and click the Refresh Data button on the External Data toolbar. If the Refresh Data dialog box opens, click OK.
To have your query update automatically, click the Data Range Properties button on the External Data toolbar to open the External Data Range Properties dialog box (see Figure 8-7).
Figure 8-7. Set automatic refresh in the External Data Range Properties dialog box.
•In the “Refresh control” section of the dialog box, leave the default Enable background refresh setting if you want to be able to work in Excel while the query data is being refreshed.
•To have Excel automatically refresh the data, enable the Refresh every checkbox and set the refresh frequency using the spin box “minutes” control.
•If your query returns a large data set, you can reduce the file size by setting the query refresh options. Have Excel refresh the query data when you open the file, then discard the data when you save the workbook. In the External Data Range Properties dialog box, enable the Refresh data on file open checkbox. Enable the Remove external data from worksheet before saving checkbox to discard the query results when you save the workbook.

C H A P T E R 8 ■ U S I N G E X C E L TO Q U E RY S H A R E P O I N T |
157 |
You can choose more than one refresh option. For example, you might choose all three options to refresh the query when you open the workbook, then background refresh every 30 minutes while you have the file open. When you’re finished setting the refresh options, click OK to apply the options to the web query.
■Caution Do not uncheck the Save query definition checkbox. You won’t lose the data, but you’ll lose the query definition, so it will no longer be refreshable.
Modifying a Web Query
You can change the data your query returns by editing the query. You can modify the following:
•The web page used by the query
•The data table or text returned by the query
•The type of formatting: rich text, HTML, or none
To edit the query, select any cell within the data returned by the query, then click the Edit Query button on the External Data toolbar to open the Edit Web Query dialog box, which looks a lot like the New Web Query dialog box. To change the web page or data returned by the query, simply choose a different page or data, as you did when you created the query.
Setting Formatting Options
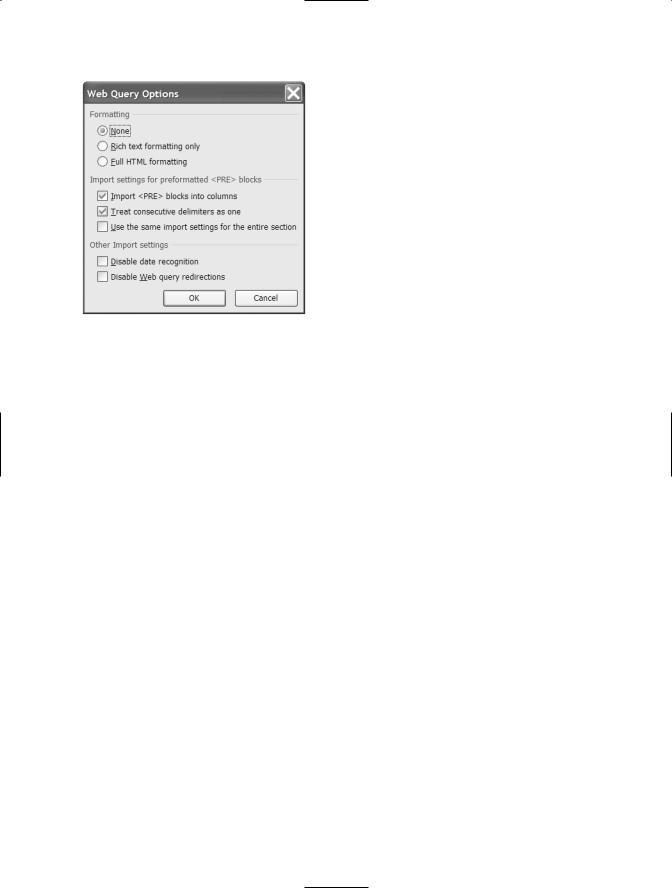
To change formatting, click the Options button in the upper right corner of the Edit Web Query dialog box to open the Web Query Options dialog box (see Figure 8-8).
158 C H A P T E R 8 ■ U S I N G E X C E L TO Q U E RY S H A R E P O I N T
Figure 8-8. Choose formatting options in the Web Query Options dialog box.
The default formatting is None. Some HTML formatting, such as merged cells, creates problems for data analysis in Excel. If you want to use the query results in pivot tables or charts, choose the None option. Choose Rich text formatting only or Full HTML formatting if you don’t need to analyze the data and want to retain the formatting from the web site.
These formatting options are generic options for use with web pages. When you query a list from a SharePoint site, don’t bother to change formatting. Your query doesn’t actually retrieve the text from the web site. SharePoint list pages include a custom HTML tag that redirects the query to the list’s data source, so you’re retrieving XML data in plain text, directly from SharePoint’s database.
Preserving Formatting Applied in Excel
After you run the query for the first time, you’ll want to apply some formatting. However, the default settings discard formatting applied to the cells included in the query results when the query is refreshed. Column formatting—for example, column widths—is retained. To keep the formatting you’ve applied to cells so you don’t need to reapply formatting every time the query refreshes, enable the Preserve cell formatting checkbox in the “Data formatting and layout” section of the External Data Range Properties dialog box.
Setting Date Recognition Options
With the default settings, Excel automatically interprets dates in the query results and presents them in short form. If you have non-date text entries such as 11-12, and you don’t want Excel to convert them to November 12, check the Disable date recognition checkbox.
C H A P T E R 8 ■ U S I N G E X C E L TO Q U E RY S H A R E P O I N T |
159 |
Setting Redirection Options
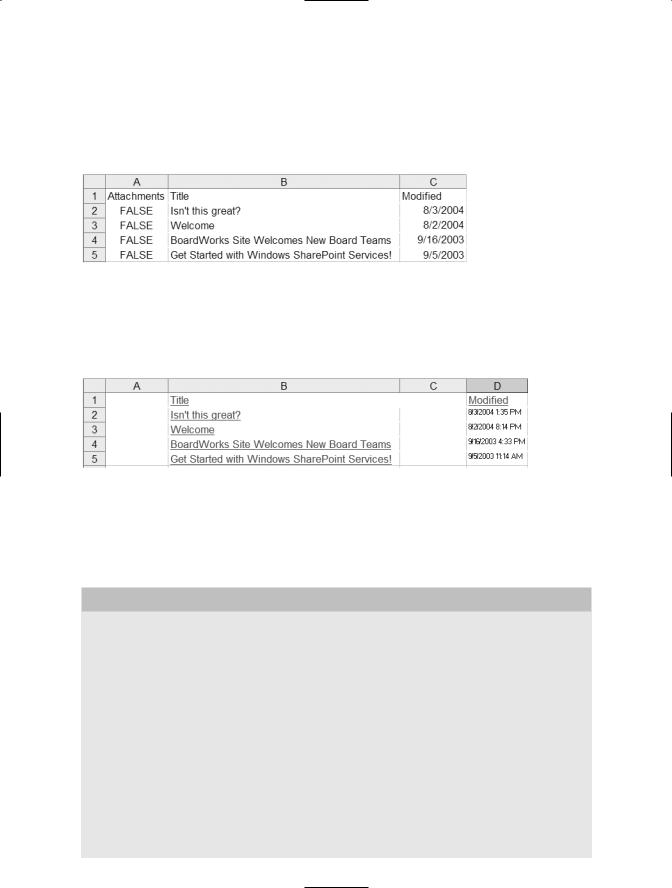
As noted earlier, when you query a SharePoint list, SharePoint automatically redirects the query to the data source. When the query shown in Figure 8-5 runs with redirection enabled (the default setting), it returns the data set in Figure 8-9 to Excel.
Figure 8-9. Query results from SharePoint with redirection enabled
With redirection disabled, the query can’t be redirected to the SharePoint data source for the list. Instead, the query returns data directly from the page, as shown in Figure 8-10.
Figure 8-10. Query results from SharePoint with redirection disabled
After you’ve edited the query, Excel automatically refreshes the query using the new options and settings.
REDIRECTING WEB QUERIES ON YOUR SHAREPOINT SITE
If you include web pages of data on your SharePoint site that weren’t created using SharePoint web parts, you can build redirection into your pages and tables the same way SharePoint does. There are two steps to redirection:
1.In the opening HTML tag of your web page, include the following Microsoft Office namespace declaration:
<HTML xmlns:o="urn:schemas-microsoft-com:office:office">
2.Add the WebQuerySourceHRef attribute to the opening tag of each table you want to redirect (http://datasource is the URL for your data source):
<TABLE ... o:WebQuerySourceHRef="http://datasource">

160 C H A P T E R 8 ■ U S I N G E X C E L TO Q U E RY S H A R E P O I N T
Saving the Query
If you want to use the web query elsewhere in your workbook, you can copy and paste the query range. To save the query for future use in other workbooks, follow these steps while creating the query:
1.With the New Web Query dialog box open, click the Options button and set any options you want to save as part of the query.
2.Click the Save Query button (on the left of the Options button) to open the Save Query dialog box.
Excel automatically selects the Queries folder for the file location.
3.Enter a file name for the query. Click Save to save the query and return to the New Web Query dialog box.
To use the query in another Excel workbook, choose Data Import External Data Import Data to open the Select Data Source dialog box. Choose the query and click Open. Choose a location in the Import Data dialog box and click OK to add the query to the workbook.
Using Web Queries to Manage SharePoint Site Users
Excel is a useful management tool for SharePoint sites, both internal and external. The management of externally hosted SharePoint sites presents its own challenges. If you have a number of SharePoint sites that other users administer, it’s easy to lose track of the number of users on each site. Administrators might forget to remove users when they no longer need access to the site. When a contractor or employee leaves and must be removed from the externally hosted sites, you must remove that person from each site, as well as from the site collection.
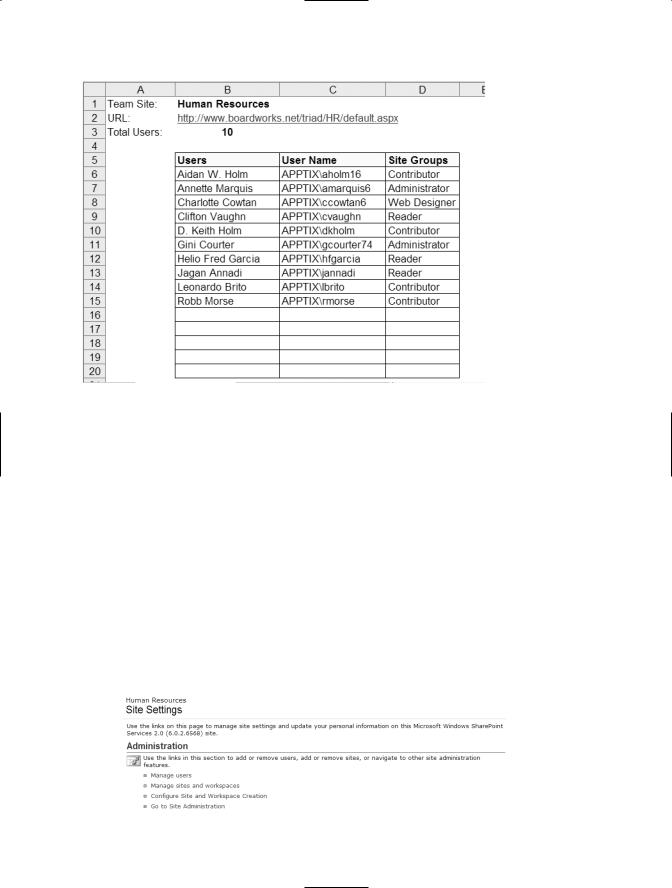
You can use Excel’s refreshable web query feature to monitor a collection of up to 255 sites in a single workbook. The Excel worksheet shown in Figure 8-11 retrieves user information from a Windows SharePoint Services web site. The worksheet also includes a hyperlink to the web site and a calculation showing the total number of users.
C H A P T E R 8 ■ U S I N G E X C E L TO Q U E RY S H A R E P O I N T |
161 |
Figure 8-11. Site management workbook for the human resources web site
You can’t create a web query to a page you don’t have permission to view, so you must be an administrator or have permission to manage the SharePoint web sites that you need to add to the workbook. Follow these steps to create an Excel worksheet that uses a refreshable web query to report the users on a SharePoint site:
1.Navigate to your Windows SharePoint site’s home page.
2.Click the Site Settings link on the top navigation bar to open the Site Settings page. (If there is no Site Settings link, you don’t have permission to manage the site.)
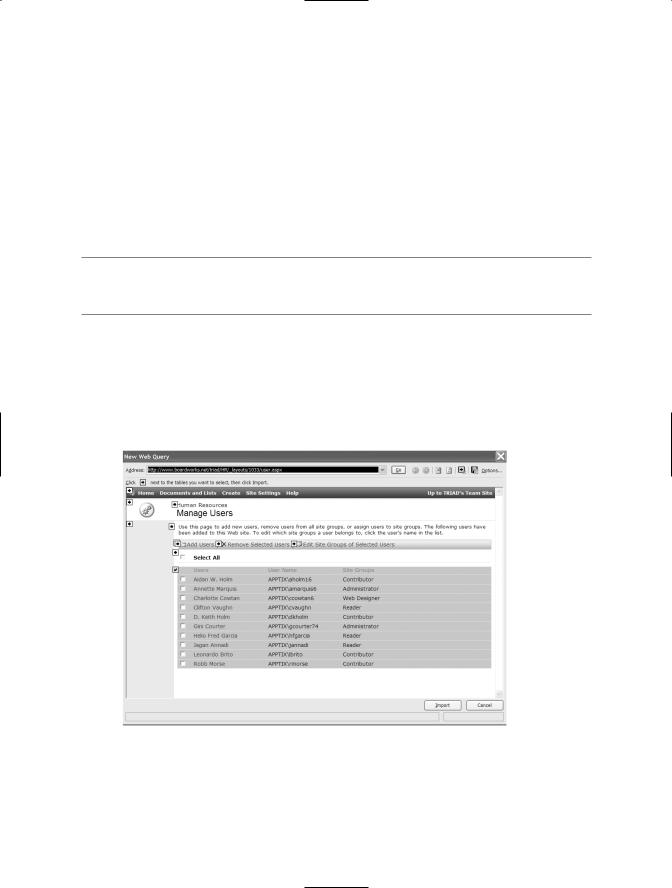
3.In the Administration section of the Site Settings page, click the Manage users link (see Figure 8-12).
Figure 8-12. The Administration section of the Site Settings page
162C H A P T E R 8 ■ U S I N G E X C E L TO Q U E RY S H A R E P O I N T
4.Select the table of users, user names, and site groups. (Select with the mouse; don’t just click the Select All checkbox.)
5.Choose Edit Copy from Internet Explorer menu.
6.In Excel, open a new workbook. Create headings for the Team Site, URL, and Total Users, as shown in Figure 8-11.
7.Paste the SharePoint data below the headings in column A.
■Note The selected table on the Manage Users page has a checkbox in the first column, so column A of the Excel workbook will be blank. The three columns of data will be returned to columns B, C, and D.
8.Click the Paste Options button and choose Create Refreshable Web Query to open the New Web Query dialog box.
9.Choose the table selection icon just below the Select All checkbox to select the user table (see Figure 8-13).
Figure 8-13. Select the user table using the table selection icon.
C H A P T E R 8 ■ U S I N G E X C E L TO Q U E RY S H A R E P O I N T |
163 |
10.Click the Option button and select None in the Formatting section of the Web Query Options dialog box. Click OK to return to the New Web Query dialog box.
11.Click Import to return the user data to Excel.
12.Enter the team’s name in cell B1.
■Note You can link from Excel to any page in the SharePoint site. Choose the page you want to link to (usually either the Manage Users page or the site’s home page) to use as a hyperlink in the Excel worksheet.
13.Switch to the SharePoint site and navigate to the page you want to link to from the Excel worksheet. Select the URL in the IE address bar, then right-click and choose Copy from the context menu.
14.Switch to Excel and select cell B2.
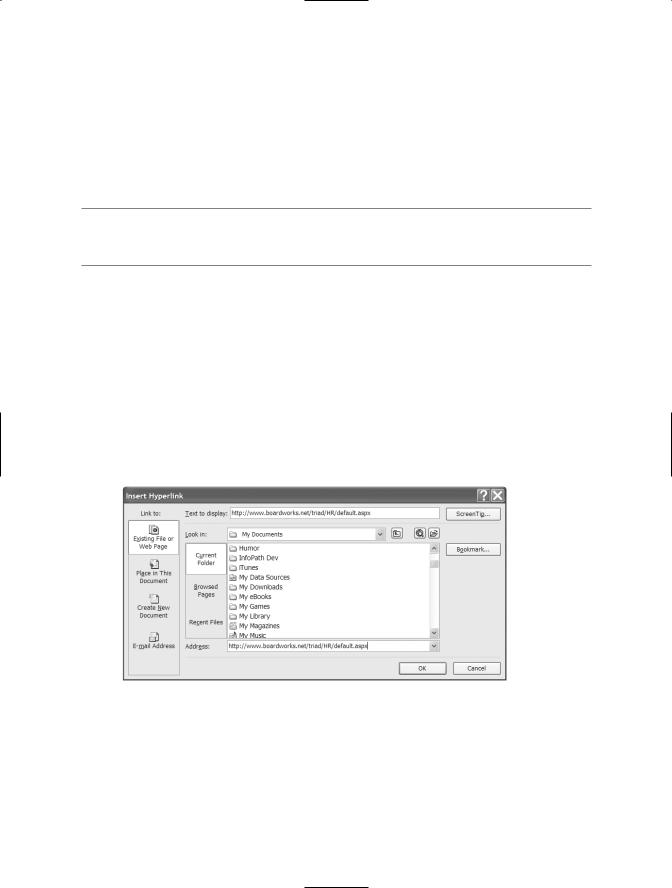
15.Choose Insert Hyperlink from the Excel menu, or hold Ctrl and press K to open the Insert Hyperlink dialog box. Paste the URL into the Address text box (it will be copied to the Text to Display text box) and click OK to insert the URL as a hyperlink (see Figure 8-14).
Figure 8-14. Format the URL as a hyperlink for easy access to the site.

164C H A P T E R 8 ■ U S I N G E X C E L TO Q U E RY S H A R E P O I N T
16.In cell B3, create a formula to count the users or user names in column B or C. The names are text, not numbers, so use the COUNTA function. For example, in our worksheet, the names returned by the query start in cell C6, so the formula is =COUNTA(C6:C65536).
17.Double-click the worksheet tab and name the sheet the same as the site name (in cell B1).
18.Adjust column widths to accommodate the query results. Apply formatting, if you wish, to the column headings in the query.
19.Right-click any cell in the query results and choose Data Range Properties from the context menu to open the External Data Range Properties dialog box.
20.Enable the Preserve cell formatting checkbox in the “Data formatting and layout” section. Click OK.
21.Save the workbook.
With the default settings, you must manually refresh the user list, so you can examine the current user count, then refresh the query to see if there have been any changes. Click the Refresh Data button on the External Data toolbar, or right-click anywhere in the list and choose Refresh Data from the context menu. If you prefer, you can set the refresh options so the query will update automatically.
Now, make a copy of this worksheet for each SharePoint site you manage. Modify the query and heading data for each site’s worksheet, and give the worksheet the same name as the site name in B1. If you wish, you can create a summary worksheet that includes the heading information from each worksheet, so you can view all the sites and their user counts on one sheet.
When you need to remove a user from one or more SharePoint sites, follow these steps to find every site of which the user is a member:
1.Open the Excel workbook. Click in the results for one of the queries.
2.Click the Refresh All button on the External Data toolbar to update all queries. You can watch the refresh progress at the left end of the status bar.
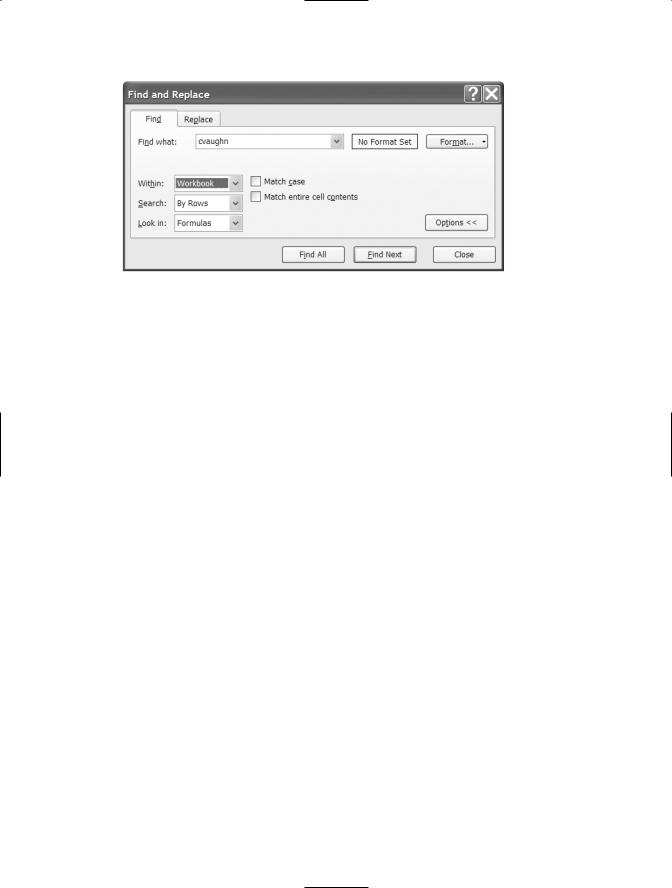
3.When all queries are updated, choose Edit Find on the menu, or press Ctrl+F to open the Find and Replace dialog box (see Figure 8-15).
C H A P T E R 8 ■ U S I N G E X C E L TO Q U E RY S H A R E P O I N T |
165 |
Figure 8-15. Use the Find and Replace dialog box to locfate the sites for the specified user.
4.Enter the user name in the “Find what” text box.
5.Click the Options button.
6.Choose Workbook from the Within drop-down list.
7.Click Find All to return the list of all sites that include this user.
The results in the Find All dialog box are links, so you can click any link to go to the site worksheet. Click the hyperlink at the top of the worksheet to go to the SharePoint site.
Summary
In this chapter, we put Excel’s Web Query feature—created for use with HTML pages—to work returning XML data from SharePoint. If you’re willing to color outside the lines just a bit, web queries can be an invaluable tool for capturing SharePoint data for analysis or presentation.