

Beginning SharePoint With Excel - From Novice To Professional (2006)
.pdf116 C H A P T E R 6 ■ P U B L I S H I N G E X C E L W E B PA G E S F O R S H A R E P O I N T
Table 6-2. Features Not Supported by the Chart Component
Feature |
Description |
Surface charts |
Not supported. |
Graphics and drawing objects in chart |
Discarded. |
Semi-transparent fills |
Discarded. |
Series lines |
Discarded. |
Chart element placement |
Titles, legend, and other elements return to their default |
|
locations. |
Plot visible cells only |
Ignored. All data is plotted. |
Error bars based on a calculation |
Discarded. |
|
|
The data table is only included on the web page when you include interactivity. If you don’t want the data table, publish the chart without interactivity.
Publishing and Using the PivotTable Component
The PivotTable component is underused. Many competent Excel users don’t create pivot tables, often because they don’t know where to begin. If you create the pivot table and publish it as a web page, users will figure out how to use it. Unlike an Excel PivotTable, the Office PivotTable component is almost foolproof. If users make a serious mistake, they can close IE to discard their changes, fire IE back up, and start again. The web page in Figure 6-10 works like the Excel PivotTable report, with zones for a row area, column area, data area, and page area.
Figure 6-10. The PivotTable component lets users interactively analyze data.

C H A P T E R 6 ■ P U B L I S H I N G E X C E L W E B PA G E S F O R S H A R E P O I N T |
117 |
To create the web page using the PivotTable component, follow these steps:
1.Create the pivot table in Excel and apply appropriate formatting to the labels and numeric data, add calculated fields, and set field options.
2.Each pivot table has a default name. The first pivot table in a workbook is named PivotTable1. While you’re working in Excel, you don’t need to pay attention to the name because it’s invisible. This isn’t true in the web page, where the name is proudly displayed directly beneath the toolbar:
To change the name of the pivot table, right-click any cell and choose Table Options from the context menu to open the PivotTable Options dialog box. Enter a name for the pivot table and click OK.
3.Select the table. A tip if you’re new to pivot tables: start in the lower right corner; the cell in the upper left corner contains a button. If there is no data in the Page area, don’t include the page area in the selection. With the table selected, choose File Save as Web Page to open the Save As dialog box.
4.Choose Selection: PivotTable and enable the Interactivity checkbox. If the Selection shows a range (for example, $B$2:$J$8) instead of PivotTable, cancel and start again with the pivot table selection.
5.Click the Publish button and set your options in the Publish as Web Page dialog box (see Figure 6-5).
You don’t need to include every field from the data source in the pivot table. The component includes a Field List button. Clicking the button opens the PivotTable Field List dialog box (shown previously in Figure 6-6), so users can add and remove fields from the table just as they would in Excel.
The PivotTable component doesn’t support every PivotTable report feature. Table 6-3 describes the features that aren’t supported.

118 C H A P T E R 6 ■ P U B L I S H I N G E X C E L W E B PA G E S F O R S H A R E P O I N T
Table 6-3. Features Not Supported by the PivotTable Component
Feature |
Description |
Background refresh settings |
Discarded. |
Calculated fields |
Not supported. Converted to summary functions. |
Calculated items |
Discarded. |
Custom calculations |
Discarded. |
Custom number formats |
Discarded. |
Custom sort orders |
Discarded. |
Error value and empty cell options |
Discarded. Both errors and empty cells are |
|
displayed as blanks. |
Indents |
Discarded. |
Numeric formatting of individual table cells |
Discarded. |
Print settings |
Discarded. |
|
|
Appending to an Existing Web Page
If you have a published spreadsheet and you’d like to add another web component, such as a chart or a pivot table to it, you can append the data to the existing page. To place
a second component on a page, follow these steps:
1.Choose File Save as Web Page and then click Publish to reopen the Publish as Web Page dialog box.
2.Select the existing HTML file.
3.When you click Publish, you’re prompted to replace or add to the page. Choose Add To File to display more than one component on the page.
This is a useful technique, but before you decide to put multiple components on
a single page, skip forward to the section “Displaying HTML Pages in SharePoint” to see how you can use SharePoint web parts to display multiple web parts in a single page.
Automatically Republishing Web Pages
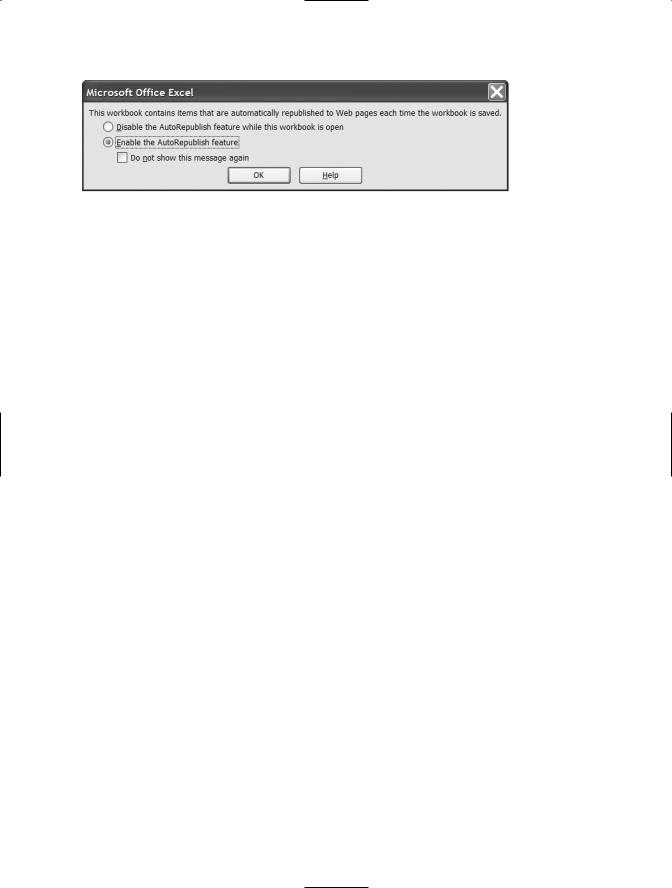
If you change data used to create a web page, you can resave or republish the data to keep the web page up to date. To have Excel automatically republish data when you save changes to the original workbook, check the AutoRepublish every time this workbook is saved checkbox in the Publish As Web Page dialog box. When you save the workbook, Excel displays the dialog box shown in Figure 6-11.
C H A P T E R 6 ■ P U B L I S H I N G E X C E L W E B PA G E S F O R S H A R E P O I N T |
119 |
Figure 6-11. You’re prompted to republish when the workbook is saved.
Normally you’ll choose the second option: Enable the AutoRepublish feature. If you choose to enable AutoRepublish, you can also instruct Excel to bypass the human element in the future by enabling the Do not show this message again checkbox. “Do not show this message again” is Microsoft-speak for “Click here and you’ll never find this option again.” There might be times that you won’t want to republish a file automatically. For example, AutoRepublish is very inconvenient when you’re working offline with a file that has been saved as a web page, or you’re entering “what if” data or an incredibly sensitive piece of information that’s not supposed to be published.
If you don’t enable the Do not show this message again checkbox, you’ll always be prompted to approve the republish operation. If you choose the first option, Disable the AutoRepublish feature while this workbook is open, you won’t be prompted to republish again until you close, reopen, and save the workbook.
To turn off AutoRepublish, follow these steps:
1.Choose File Save as Web Page and then click Publish to open the Publish as Web Page dialog box.
2.In the Choose drop-down list, select Previously Published Items. Select the previously published item for which you want to disable AutoRepublish, and click the Remove button.
3.Close the dialog box and save the workbook.
Displaying HTML Pages in SharePoint
Excel creates an HTML page, not a web part. SharePoint’s Page Viewer Web Part lets you move your charts, tables, and spreadsheet pages front and center. You use the Page Viewer to display data from an existing HTML page, such as the pages we created previously in this chapter.
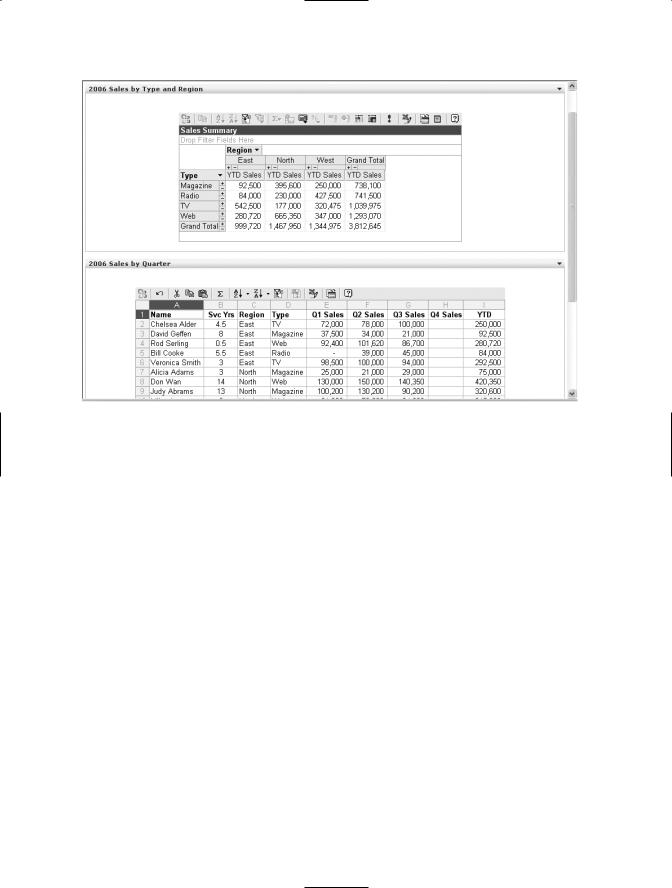
You can use the Page Viewer Web Part on any page. If you want to display several web pages on a single page (like a dashboard), begin by creating a web part page. Figure 6-12 shows a portion of a web part page that serves as a sales dashboard.
120 C H A P T E R 6 ■ P U B L I S H I N G E X C E L W E B PA G E S F O R S H A R E P O I N T
Figure 6-12. This web part page includes two instances of the Page Viewer Web Part.
The first Page Viewer Web Part displays an interactive web page with pivot table functionality. The second Page Viewer Web Part displays a page created using the interactive Spreadsheet component. Users can sort, filter, pivot, and format the two components to create their own analyses and reports.
Creating a Web Part Page
To create a web part page, follow these steps:
1.In SharePoint, click Create on the menu.
2.On the Create page, scroll to the bottom and choose Web Part Page to open the New Web Part Page customization page, shown in Figure 6-13.

C H A P T E R 6 ■ P U B L I S H I N G E X C E L W E B PA G E S F O R S H A R E P O I N T |
121 |
Figure 6-13. Create a web part page to display the HTML pages you created in Excel.
3.Enter a file name and choose a page layout. Choose your layout carefully. There’s no “Change my page layout” button. If you want to change the layout after you click Create you’ll need to use FrontPage.
4.Select a save location for your web page. If you created a webpages folder, this is
a good time to use it. Click Create to create and open the web part page in Design view so you can add web parts.
■Tip The SharePoint Quick Launch bar is reserved for libraries and lists, so you aren’t asked whether the web part page should be added to the Quick Launch bar. Add a link to the web part page somewhere in your site to provide easy access for your users.
Adding and Modifying the Page Viewer Web Part
You use SharePoint’s Page Viewer Web Part to display the contents of a web page. The Page Viewer Web Part is dynamic; when the user opens or refreshes the page, the web part contents are refreshed.
122 C H A P T E R 6 ■ P U B L I S H I N G E X C E L W E B PA G E S F O R S H A R E P O I N T
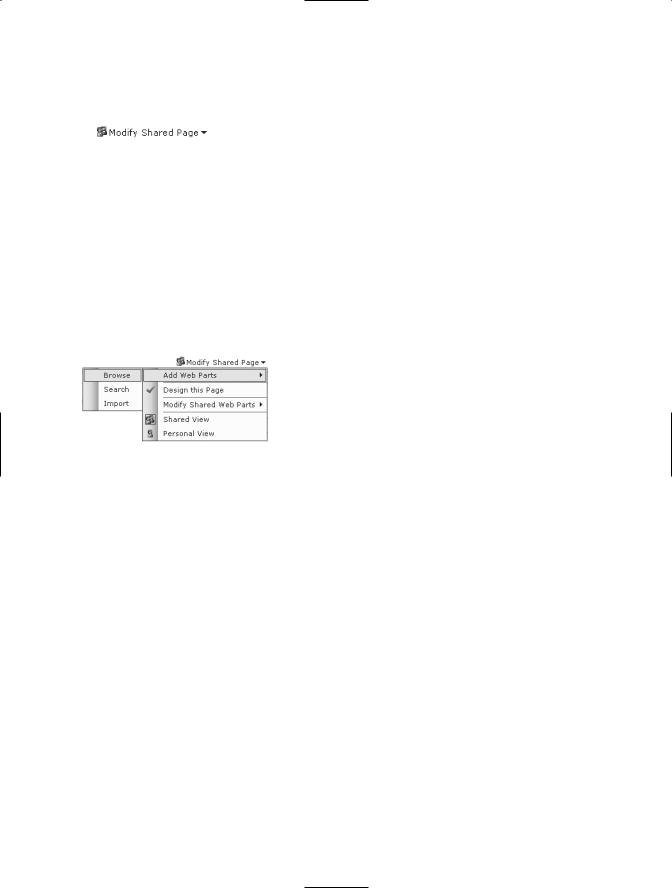
To add the Page Viewer Web Part to a page, click the Modify Shared Page button in the top right corner of the browser window to open the menu.
•If the button shown is the Modify My View button, click the button and choose Shared View from the menu. If you can’t choose Shared View, you don’t have permission to edit the page.
•In SharePoint Portal Server, you must click the Edit Page link in the Actions menu on the left side of the page to display the Modify Shared Page link. If you don’t have an Actions section, you don’t have permission to edit the page.
Choose Add Web Parts Browse as shown in Figure 6-14 to open the Add Web Parts task pane. The list of Web Part Galleries appears at the top of the task pane.
Figure 6-14. Use the Modify Shared Page menu to add web parts to the page.
Understanding SharePoint Web Part Galleries
SharePoint includes four collections of web parts that you can use to customize your web site. The four Web Part Galleries are as follows:
•Online Gallery: The set of web parts that are installed and deployed by the site or site collection administrator and available throughout the site collection.
•SharePoint Site Web Part Gallery: The set of web parts that are available in a specific site, including the built-in web parts (such as Announcements), as well as web parts automatically created by SharePoint when you create libraries or lists. The name of this gallery varies.
•Virtual Server Gallery: The “global” collection of web parts that are available for all sites on the server.
•Web Part Page Gallery: The collection of web parts for the current page. This gallery is populated dynamically, and contains every web part that’s associated with the page, even if the web part isn’t currently displayed. To add a web part to the gallery, choose it from the Add Web Parts task pane. To remove a web part from the gallery, place the web part on the page, then choose Delete from the web part menu.
C H A P T E R 6 ■ P U B L I S H I N G E X C E L W E B PA G E S F O R S H A R E P O I N T |
123 |
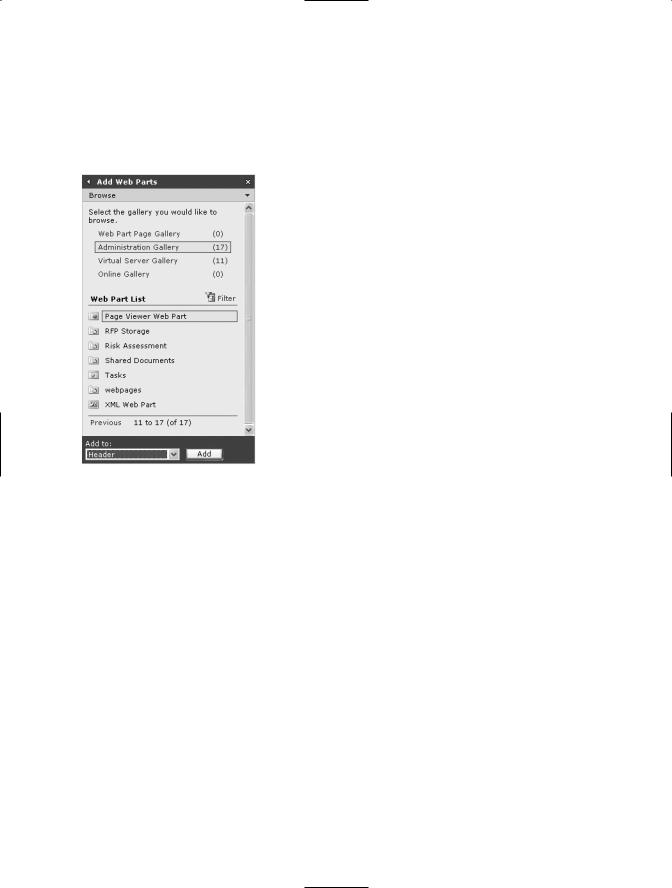
Some of these galleries might be empty. For example, in the task pane shown in Figure 6-15 the Online Gallery has no web parts. You can browse any of these galleries for parts that you can use on the web pages on your site. Choose the gallery in the top half of the task pane, then browse the list of web parts.
Figure 6-15. Browse the Web Part Galleries to locate the Page Viewer Web Part.
Browse to locate the Page Viewer Web Part. Either drag the web part and drop it into one of the zones on your page, or choose the zone in the “Add to” drop-down list at the bottom of the task pane (see Figure 6-15) and click Add to add the part to the zone.
The web part is incredibly unimpressive until you modify it to add content. Click the Open the Tool Pane link in the web part to display the Page Viewer Web Part task pane shown in Figure 6-16.
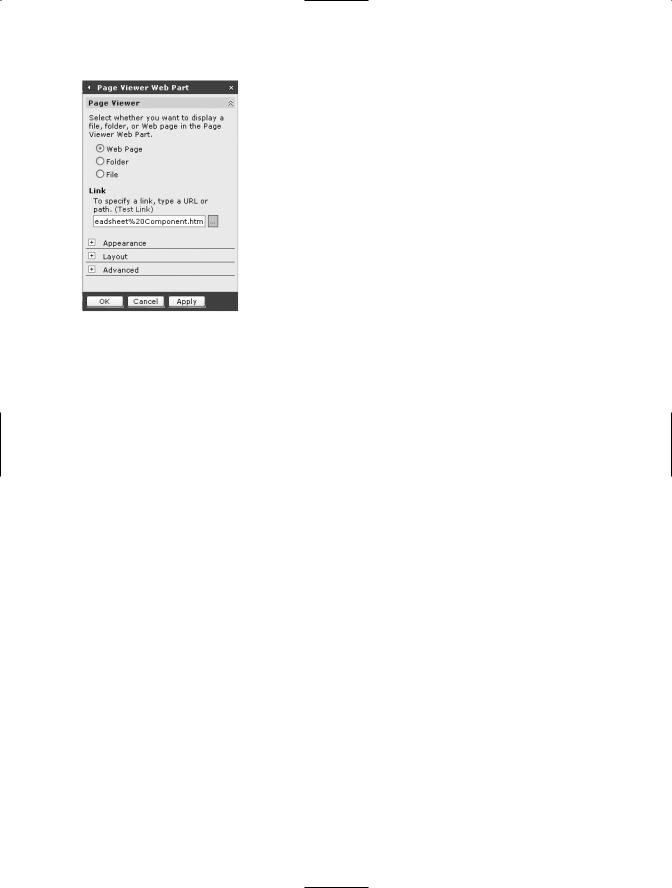
124 C H A P T E R 6 ■ P U B L I S H I N G E X C E L W E B PA G E S F O R S H A R E P O I N T
Figure 6-16. Configure the Page Viewer Web Part in the task pane.
Customizing the Page Viewer Web Part
Most web parts have four sets of properties: views (or content), appearance, layout, and advanced. You use the properties to modify the web part:
•Views/Content: Choose a view for a list or specify the content to be displayed in the web part.
•Appearance: Change the web part’s title, height, width, frame style, and frame state.
•Layout: Hide the web part or change its position on the page or within the zone.
•Advanced: Lock down the web part so users can’t move it, close it, or minimize it.
Before you set the properties for the Page Viewer Web Part, make sure that the web page you wish to display (the page you created earlier in Excel) is stored in a shared location, preferably in a folder on the SharePoint site. If you’re moving the page from another location, make sure you also move the related folder (if any) that Excel created when you saved a workbook, chart, or pivot table as a web page. With all the files in their final location, follow these steps to customize the Page Viewer Web Part:
1.In IE, open the HTML page you created in Excel and copy the URL from the IE address bar.
2.In the SharePoint Page Viewer Web Part task pane, leave the default option, Web Page.
3.Paste the URL (copied in step 1) into the Link text box.
C H A P T E R 6 ■ P U B L I S H I N G E X C E L W E B PA G E S F O R S H A R E P O I N T |
125 |
4.Click the Test Link hyperlink to make sure it opens the correct file.
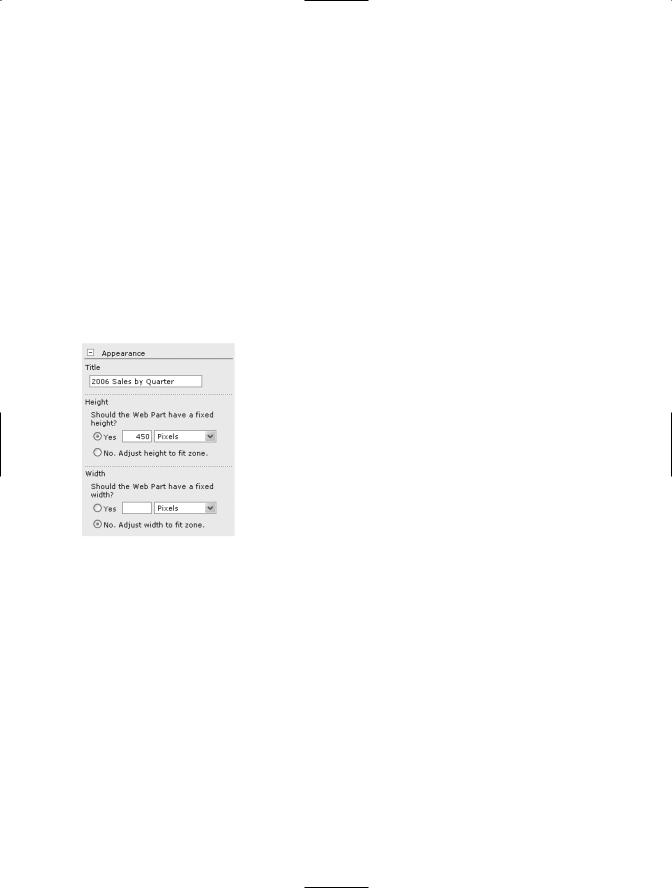
5.Expand the Appearance properties section. Enter a title for the web part.
6.Click OK to view the web part.
You’ll usually need to tweak the Appearance settings for the Page Viewer Web Part to accommodate the contents of the web page you’re displaying. If the height or width of the content area of the HTML page is greater than that height of the web part, the content will be cut off, and the web part will include a scroll bar. The web part’s height and width are Appearance properties. Click the down arrow on the right end of the web part’s title bar and choose Modify Shared Web Parts to reopen the task pane.
Expand the Appearance section and set the height (as shown in Figure 6-17) and/or the width. Click Apply to check your changes. Click OK when you’re finished.
Figure 6-17. Adjust the height and width of the web part to fit the content.
Summary
This chapter has focused on two kinds of HTML tools. With Excel’s HTML web publishing features, you can create Excel reports, charts, and pivot tables for use on the web. Users can access an HTML page directly from SharePoint if you simply add a link from the HTML page to a SharePoint link list. To display your HTML pages on a page with other SharePoint content, use the Page Viewer Web Part.