

Beginning SharePoint With Excel - From Novice To Professional (2006)
.pdf
C H A P T E R 7
■ ■ ■
Building Out-of-the-Box
Business Solutions
In this chapter, we’ll use the features discussed in the previous chapters to build two Windows SharePoint Services and Excel solutions that solve real-world business challenges. The solutions include the following elements:
•Excel lists (described in Chapter 2)
•SharePoint lists (described in Chapter 3)
•SharePoint views (described in Chapter 4)
•Custom calculations (described in Chapter 5)
•Excel Spreadsheet, PivotTable, and PivotChart components (described in Chapter 6)
•SharePoint Page Viewer and Content Editor Web Parts (described in Chapter 6)
As you read through the chapter, if you need additional information about creating or using a specific element or web part, refer to the chapter listed for each element.
Business Solutions Using Lists and Views
You can build myriad business solutions using nothing more than lists and views, and you often don’t need to build the solutions from scratch. Almost every organization has an Excel workbook that would be better presented as one or more SharePoint lists: one person maintains the workbook, and other team members need to e-mail the workbook’s owner to edit the workbook or get details about current data. If you publish this buttoneddown Excel workbook as one or more SharePoint lists and make it available for other team members to use, the team will be more efficient and much happier. In short, you’ll be a hero. This heroism isn’t on the same scale as saving a rainforest, but you’ll still feel good about delivering business value by saving time and improving team morale.
127

128 C H A P T E R 7 ■ B U I L D I N G O U T- O F - T H E - B OX B U S I N E S S S O L U T I O N S
. . . that is the whole meaning of life To be able to look to the heavens
And scream “I have lived. I have lived” —
To have carved epic lives from ordinary moments.
— George David Miller, “Before I Read This Poem”
In this section, we’ll provide an overview of a solution we’ve created for corporate clients: a quick and dirty software issue-and-resolution tracking system. We’ll explain the business scenario (names have been changed to protect the innocent) and build the SharePoint solution using the Excel workbook that the team was already using to manage its data.
The Project Issue Tracking Scenario
The Custom Order System (COS) project is in danger of missing its deadline. During user acceptance testing (UAT), the team discovered that some of the system requirements documentation had been lost during a staffing transition. As a result, COS is missing key functionality. UAT has now been suspended and a “tiger team” is being assembled to design, code, and test the missing screens quickly.
Brian, the project manager, has always used Excel to track issues identified during testing. When a tester needs to log an issue, he or she e-mails the issue to Brian, who enters it in the workbook, shown in Figure 7-1. At the end of each day, Brian e-mails the workbook to developers, who indicate the issues they’ll work on the next day. As a developer resolves an issue, he or she sends an e-mail to the testers and copies Brian, who updates the worksheet. It’s a cumbersome system. Brian has considered sharing the workbook, but updating the log helps Brian keep a “finger on the pulse” of unresolved issues, and he often does some quick analysis using sorting and filters.
Figure 7-1. The Excel issue tracking worksheet

C H A P T E R 7 ■ B U I L D I N G O U T- O F - T H E - B OX B U S I N E S S S O L U T I O N S |
129 |
When UAT was suspended, testers had already logged 55 issues. Brian is also swamped with e-mails from COS stakeholders who want to be kept up to date on the progress of the project. Brian’s Excel issue tracking worksheet is no longer sufficient.
Building the SharePoint Issue Tracking Solution
Simply publishing the issue tracking worksheet as an Excel list would make it easy for testers and developers to enter their information directly. However, built-in functionality in SharePoint Tasks lists would be useful for the COS project team, including the My Tasks, Due Today, and Active Tasks views, and preconfigured alerts for task assignment. Because each issue is a task, it makes sense to modify the existing Tasks list to match Brian’s worksheet, then copy and paste the worksheet data into the Tasks list.
Site permissions will be used to provide stakeholders with read-only information and prevent them from modifying the issue tracking list. Views can be created for stakeholders, developers, and testers to take the load off Brian’s Inbox.
Here are the high-level activities required to build the issue tracking solution:
1.Create a Windows SharePoint Services site—the COS site—for the project team.
2.Modify the columns in the Tasks list to match Brian’s issue tracking worksheet.
3.Modify the All Contacts view to include Job Title.
4.Add testers and developers to the Contacts list.
5.Add tester and developer users to the site, either using copy and paste to grab e-mail addresses from the Contacts list, or using the Outlook address book.
6.Create additional list views:
•Paste a datasheet view used once for importing data
•Completed issues
•High priority issues
7.Import the data from the issue tracking worksheet using copy and paste.
8.Modify the home page and launch the site.
Modifying the Tasks List
You need to modify both the Excel list and the Tasks list so that the data can be copied and pasted. This type of preparation is often necessary when you’re creating a new SharePoint

130 C H A P T E R 7 ■ B U I L D I N G O U T- O F - T H E - B OX B U S I N E S S S O L U T I O N S
site that will include existing Excel data, so we’ll walk through the steps needed to prepare and complete the copy and paste operation.
In Excel, use the Replace feature to change the data in the Priority column to match the choices in SharePoint: Replace High with (1) High, Medium with (2) Medium, and so on. Also, replace the tester and developer initials with the users’ names from the Manage Users page—the same names that will appear in the drop-down lists when users add new tasks to the list (see Figure 7-2).
Figure 7-2. Use the Find and Replace dialog box to replace initials with names.
In SharePoint, rename the Title column to Area. Rename the Due Date to match the Est Compl field in Excel. Remember that the Tasks list has a view called Due Today, which uses the Due Date field. You need to rename Due Date because you want the Due Today view to show tasks where the Est Compl (Estimated Completion) is today.
Delete the % Complete column and add other columns from the Excel list. You need to modify the SharePoint Status column choices to replace Deferred with On Hold, and Not Started with Active.
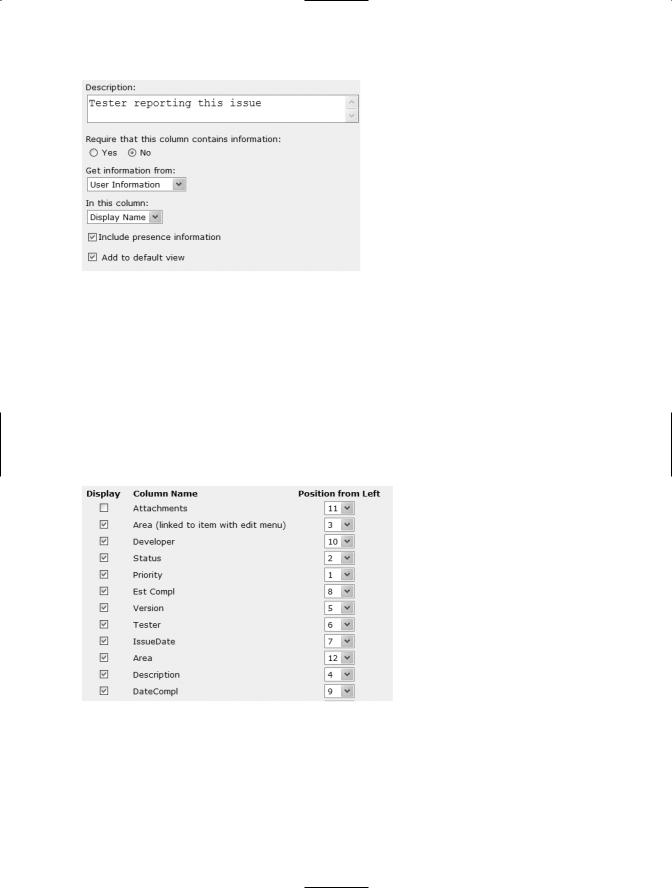
Change the Assigned To column name to Developer, and add a new lookup column, Tester, to the list (see Figure 7-3). You need to add the users to the site to populate these two columns before you import the data from Excel.
C H A P T E R 7 ■ B U I L D I N G O U T- O F - T H E - B OX B U S I N E S S S O L U T I O N S |
131 |
Figure 7-3. Adding a Tester column with user names from the SharePoint site
Finally, you need to create a Paste view, omitting unneeded columns, and with columns in the same order as in the Excel workbook (see Figure 7-4). In the Excel Issue Tracking log, the user has filled in an Issue ID. SharePoint will automatically assign an ID to each task. With Brian’s agreement, you aren’t going to import the ID numbers from the issue tracking worksheet, because the team will use the ID numbers that SharePoint assigns in the future. Therefore, the ID column won’t be included in the Paste view (because you’re not pasting ID data from Excel), but it will be displayed in all other views.
Figure 7-4. The Paste view will be used once to import data from Excel.
Importing Data Using Copy and Paste
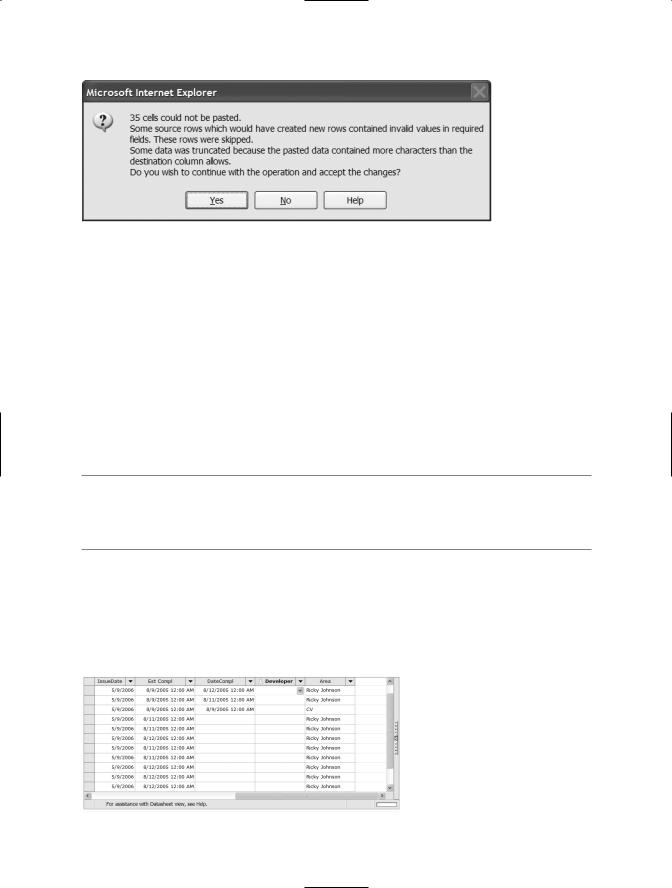
With the Tasks list Paste view open in Datasheet view, you’re now ready to select and copy the data records from Excel, then select the first cell in row 1 and choose Paste. The data doesn’t match precisely (see Figure 7-5).
132 C H A P T E R 7 ■ B U I L D I N G O U T- O F - T H E - B OX B U S I N E S S S O L U T I O N S
Figure 7-5. Paste error message box
The message box lists two kinds of errors:
•New rows containing invalid values: Either your fields don’t match, or you didn’t replace all the Developer, Tester, Priority, and Status values in Excel with the new values that SharePoint requires.
•Truncated data: At least one of the Excel cells has more than 255 characters.
If you choose Yes to continue with the operation, you’ll learn more about the problem. You can look at the data, then discard it, fix the problem, and try again.
■Note There’s only one downside to continuing. SharePoint gives each new task a unique ID, including rows that are later deleted. When you paste the second time, the ID numbers will begin with the next available number, rather than beginning with 1.
Figure 7-6 shows the invalid values problem. The Area column was supposed to be the third column, but it’s at the end of the list (the fifteenth column), so columns four through fifteen are in the wrong place. This can be easily fixed by dragging the Area column header to its correct position.
Figure 7-6. The Area column was out of place, and caused the paste error.

C H A P T E R 7 ■ B U I L D I N G O U T- O F - T H E - B OX B U S I N E S S S O L U T I O N S |
133 |
One of the Descriptions was truncated. You need to check all the Excel descriptions to make sure they’re 255 characters or less. You can use Excel’s LEN function to identify the descriptions that are too long.
There’s a third problem that SharePoint didn’t notify us about. The Issue Date column has a default setting of Today’s Date. When the data was pasted, SharePoint used the default, not the date from the Excel list. For now, you need to change the default setting for the Issue Date column to None. After you’ve pasted the data from Excel, you can change the default back to Today’s Date.
After fixing these issues, copy and paste the Tasks data again.
Modifying the Home Page
You want to turn the home page of the COS site into a dashboard focusing primarily on the information needs of the project’s stakeholders. If business users and managers can get the information they need from the site, they’ll feel more informed and have more confidence in the project team. Project announcements can be posted on the site, allowing the team to handle stakeholder communications proactively rather than reactively in response to individual e-mail requests. Brian will spend less time managing stakeholders and will have more time to manage the project. You’re putting the stakeholder information on the home page so the team doesn’t need to spend time training stakeholders so they can navigate the site.
The home page will meet some developer and tester needs as well. Team members will be able to add and update tasks on the home page. However, team members will primarily use the Quick Launch bar to access custom views, such as My Tasks.
Here are the modifications to the home page:
•Close the Calendar web part—stakeholders don’t need it.
•The COS team doesn’t have a logo, so also close the Site Image web part.
•Change the General settings for Shared Documents and Contacts to remove their links on the Quick Launch bar (Site Settings Modify Site Content Customize).
•Add a Contacts web part to display a list of team members and roles.
•Create an easy way for stakeholders to send e-mail to the team by adding a mailto hyperlink.
•Add three views of the Tasks list to the site’s home page: Active Tasks, Completed Tasks, and Due Today.
134 C H A P T E R 7 ■ B U I L D I N G O U T- O F - T H E - B OX B U S I N E S S S O L U T I O N S
Creating the Mailto Link
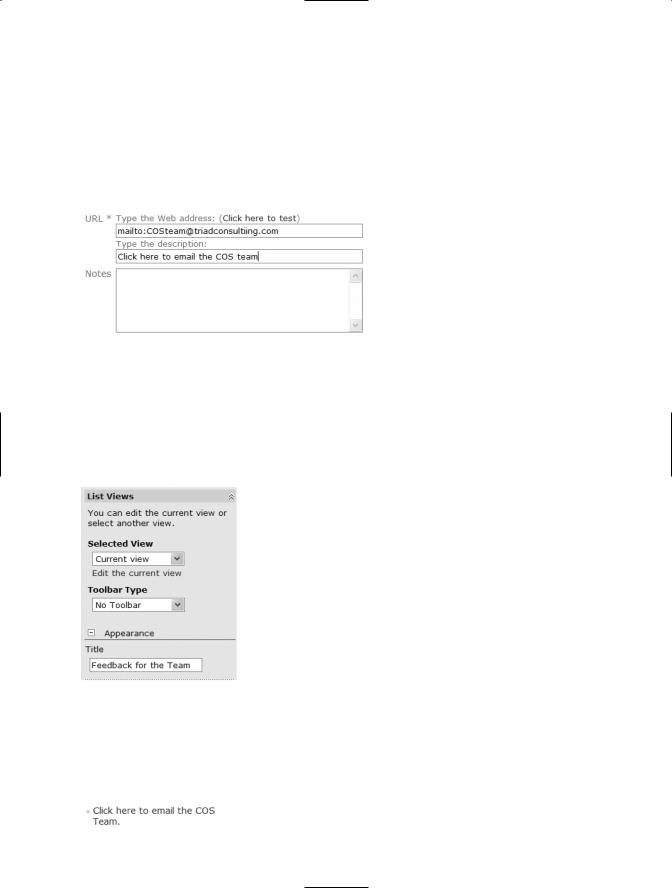
It’s easy to repurpose the Links list to provide a way for users to contact the team. To create a mailto link, enter mailto:, followed by the e-mail address as the URL (see Figure 7-7). When you test the link, it should open an e-mail message form with the e-mail address in the To text box. Provide descriptive text for the link, then click Save and Close.
Figure 7-7. Creating a hyperlink that opens an e-mail message form
Make two modifications to the Links web part: change the Toolbar Type to No Toolbar so that users can’t add a link, and change the title to invite users to click the link to contact the team (see Figure 7-8).
Figure 7-8. Modify the Links web part to hide the toolbar.
Alternatively, you can change the frame style to None, which omits the title bar and leaves a freestanding link on the page:
C H A P T E R 7 ■ B U I L D I N G O U T- O F - T H E - B OX B U S I N E S S S O L U T I O N S |
135 |
Adding Views to the Home Page
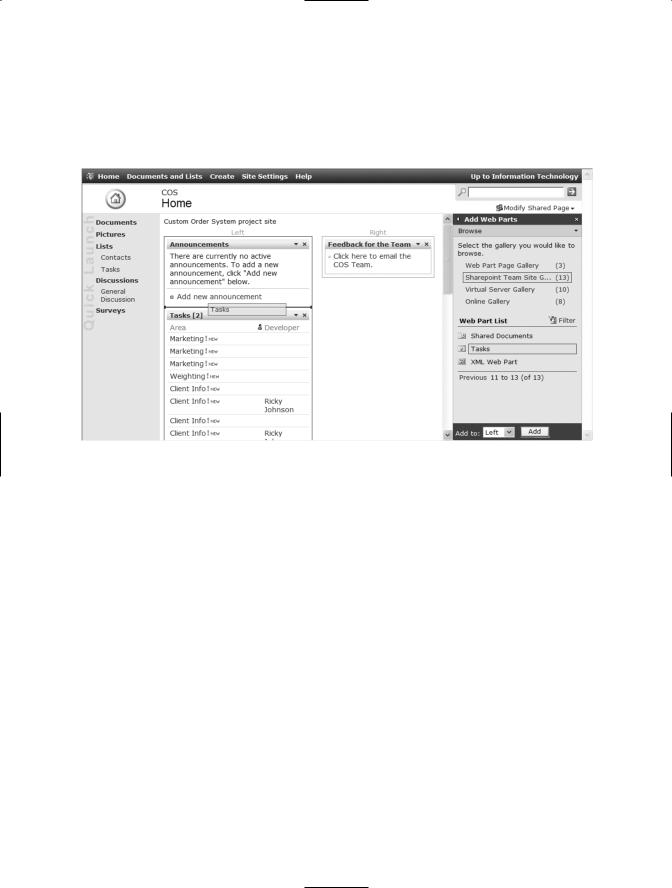
Choose Modify Shared Page Add Web Parts Browse to open the Add Web Parts task pane. Drag and drop the Tasks web part into the left zone three times (see Figure 7-9).
Figure 7-9. Add three Tasks web parts to the home page.
Select the top Tasks web part. Follow these steps to modify the web part to show today’s tasks:
1.Click the down arrow on the top Tasks view and choose Modify Shared Web Part from the menu.
2.In the Selected View drop-down list, choose Due Today. A message box warns that you’ll lose the changes made to this view. Click OK.
3.Click the Edit the current view link (right under the drop-down list) and modify the column selection to include, in order, the following fields:
•Area (linked to item with edit menu)
•Description
•Status
•Priority
•Developer