

Beginning SharePoint With Excel - From Novice To Professional (2006)
.pdf26 C H A P T E R 2 ■ W O R K I N G W I T H L I S T S I N S H A R E P O I N T
Setting List Permissions
To control who has access to a list on a site, you can set varying levels of permissions. These permissions can be identical to, or different from, permissions on the site itself. Permissions to SharePoint lists are managed by adding site groups, user groups (Active Directory groups, for example), or individual users to the list. Groups provide the easiest and most useful method of managing list permissions and are considered the best practice. By assigning individuals to groups, rather than assigning them individual permissions, you have better control over access to each list.
■Note Site groups are custom security groups to which users can be assigned, in order to grant them permissions to a SharePoint site, library, or list. For information about restricting access to lists on an SPS portal using site groups, see “Managing SPS Security” later in this section.
By default, SharePoint sites have five predefined site groups. These predefined site groups have a variety of permissions in relation to the entire site. When applied to a list, these groups have the following list-related permissions:
•Guest: Limited reader access to a specific list without giving access to the entire site. Users cannot be added to the Guest site group. If you allow Guest access to
a list, then any user who has access to the site is automatically given Guest permissions to the list. The Guest site group cannot be customized, but can be removed from specific lists.
•Reader: View items in the list.
•Contributor: View, insert, edit, and delete items in the list. Contributors cannot create new lists, but can add content to existing lists.
•Web Designer: View, insert, edit, and delete items; change list settings, including managing lists.
•Administrator: View, insert, edit, and delete items; change list settings; change list security, including the right to approve list items when content approval is required (see the section “Changing General Settings” earlier in this chapter).
You aren’t limited to these site groups, however. You can mix and match permissions to assure that everyone has exactly the permissions they need and no one has more than they need. To add individual users to a WSS list and set custom permissions for them, while restricting others’ access to the list, follow these steps:

C H A P T E R 2 ■ W O R K I N G W I T H L I S T S I N S H A R E P O I N T |
27 |
1.Click Modify Settings and Columns from the Actions menu on the left side of the page.
2.Click Change permissions for this list in the General Settings section of the Customize page.
3.Select the default site groups that you want to restrict from accessing the list and then click Remove Selected Users. For example, if you want everyone who has access to the site to be able to read the list (Reader site group), but only a few people to be able to edit it, select Contributor and remove that site group.
4.Click Add Users to add the specific people to whom you want to grant unique permissions.
5.Click Address Book to select users you want to add to the list. Note that to access an address book, you must have an address book compatible with WSS, such as an Outlook Address Book, installed. You might have to click Allow Access for 1 minute and then click Yes in the Microsoft Office Outlook dialog box that opens. Click OK when you’ve finished adding users.
6.Select the level of permission you want to grant these users from the standard list, or click Advanced permissions to customize permissions.
7.Click Next.
8.Edit the user’s display name, if desired, to make it a friendlier name.
9.If you want the users to be notified by e-mail that they’ve been added to the list, enter a personalized message to the users in the Body text box.
10.Click Finish.
Individual users are added to the list, and their names appear in the Users list on the Change Permissions page.
Managing WSS List Permissions Through Custom Site Groups
When you want to assign permissions to users of a list that are different from the default permissions on the SharePoint site, you can add individual users to the list and define permissions for each user, as described in the previous section. However, this process can become tedious if you have a large site with numerous users and multiple lists. A more efficient practice is to create one or more site groups that define the permissions you want to use on the list, and then assign users to the relevant site groups. As you add users to the site, it’s then a simple step to assign them to the appropriate site groups for each list you want them to access. Doing this correctly involves some preplanning, but will save

28 C H A P T E R 2 ■ W O R K I N G W I T H L I S T S I N S H A R E P O I N T
time in the long run. More importantly, assigning permissions using site groups provides tighter control over security for the lists on the site. Here are the steps to follow to create and assign custom site group permissions to a site.
Step 1: Identify what permissions you want users to have. You’ll be creating a listspecific site group for each level of permission you want to assign, so it’s important to be thorough in evaluating the needs for each list on the site. Table 2-1 shows the five default site groups, with the addition of two commonly used custom site groups: “Reader with insert” and “Contributor with no delete.”
Table 2-1. Site Groups and Permissions
Site Group |
View |
Edit |
Insert |
Delete |
Change Settings |
Change Security |
Guest |
|
|
|
|
|
|
Reader |
|
|
|
|
|
|
Reader with insert |
|
|
|
|
|
|
Contributor |
|
|
|
|
|
|
Contributor with no delete |
|
|
|
|
|
|
Web Designer |
|
|
|
|
|
|
Administrator |
|
|
|
|
|
|
|
|
|
|
|
|
|
|
|
|
|
|
|
|
■Note In most cases, you’ll focus on creating list-specific site groups related to the permissions associated with the Guest, Reader, and Contributor site groups (view, edit, insert, and delete). Web Designers and Administrators typically have permissions that extend beyond specific lists.
Step 2: Create a site group that includes the name of the list and a description of the type of permission. For example, if your list is named Candidates and you want some users to have Reader permissions to the list, create a site group called “Candidates Reader.” If you want some users to be able to read, insert, and edit items but not delete them, you might call the site group “Candidates Contributor with no delete”. Follow these steps to create a site group:
1.In WSS, click Site Settings on the top navigation bar.
2.Click Go to Site Administration in the Administration section of the Site Settings page.
3.Click Manage site groups in the Users and Permissions section of the Site Administration page.
4.Click Add a Site Group in the Manage Site Groups toolbar.
C H A P T E R 2 ■ W O R K I N G W I T H L I S T S I N S H A R E P O I N T |
29 |
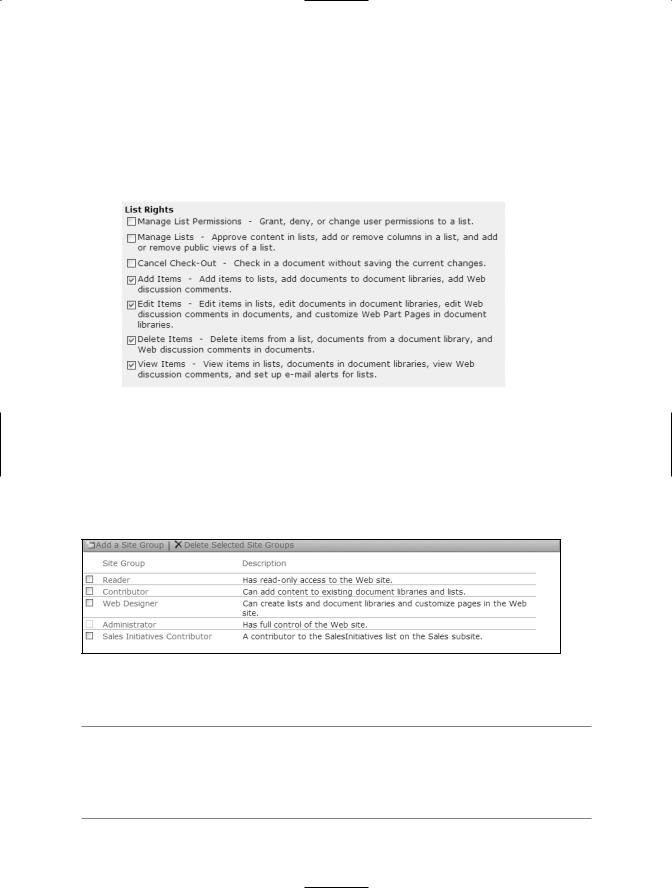
5.Enter the site group name and description in the respective text boxes. Be sure to include the list name in the site group name—for example, Sales Initiatives Con- tributor—so it’s easy to distinguish this site group from others in the site.
6.Select the list rights you want this site group to have (see Figure 2-4). Don’t select rights from either the Site Rights or Personal Rights sections.
Figure 2-4. Select the list rights you want this group to have.
7. Click Create Site Group at the bottom of the page.
The site group is created, and as shown in Figure 2-5, is displayed in the list of available site groups. Repeat steps 4–7 to create additional list-specific site groups.
Figure 2-5. The newly created site group, Sales Initiatives Contributor, appears in the list of available site groups.
■Note To create site groups at the subsite level, the site must be using unique permissions and not inheriting rights from the top-level site. If Manage site groups doesn’t appear in the Users and Permissions section of the Site Administration page, click Manage permission inheritance, select Use unique permissions, and then click OK. Manage site groups should now appear in the list.

30 C H A P T E R 2 ■ W O R K I N G W I T H L I S T S I N S H A R E P O I N T
Step 3: Delete nonapplicable site permissions from the list. This step assures that only users with specific permissions to the list can access it. Follow these steps to remove nonapplicable site permissions:
1.Open the page that displays the list.
2.Click Modify Settings and Columns in the Actions menu.
3.Click Change permissions for this list in the General Settings section of the Customize page.
4.Select the general site permissions; for example, Reader, Contributor, and any other site groups that aren’t relevant to the list.
5.Click Remove Selected Users and then click OK to confirm the deletion.
Now, only users assigned to the custom site groups you created can access the list.
Step 4: Assign users to the custom site groups. In this step, you’ll assign site users to custom site groups to give them appropriate access to the relevant lists. To assign users to site groups, follow these steps:
1.Click Site Settings in the WSS top navigation bar.
2.Click Manage Users in the Administration section of the Site Settings page.
3.Select the users whose site group membership you want to modify.
4.Click Edit Site Groups of Selected Users in the toolbar.
5.Select the custom site groups to which you want the users to be assigned. Be sure to keep their general site group memberships—Reader, Contributor, and so on— so they can still access unrestricted areas on the site.
6.Click OK.
7.Repeat steps 3–6 to assign other users to unique site groups.
Users now have general permissions to the site and custom permissions to specific lists.
Managing SPS Security
SPS security is managed on the area level. To assign unique permissions to a list, you need to create the list in its own subarea. To create custom site groups on an SPS portal, you need portal administrator rights. You can add users and site groups to specific subareas and control access to lists in that way. Before taking any steps to restrict access to a list on the portal, talk with your portal administrator about your needs for unique permissions.

C H A P T E R 2 ■ W O R K I N G W I T H L I S T S I N S H A R E P O I N T |
31 |
Deleting a List
To delete a list from a SharePoint site, follow these steps:
1.Click Modify Settings and Columns in the Actions menu on the left side of the list’s page.
2.Click Delete this list in the General Settings section of the Customize page.
3.Click OK to confirm that you want the list deleted.
The list is completely removed from the site and the data is no longer available.
Working with SharePoint List Data
Regardless of how you create a list, SharePoint offers a number of tools for working with it after it’s created. You can access these tools most easily by switching a list from Standard view to Datasheet view. To switch to Datasheet view, click the Edit in Datasheet button on the list toolbar.
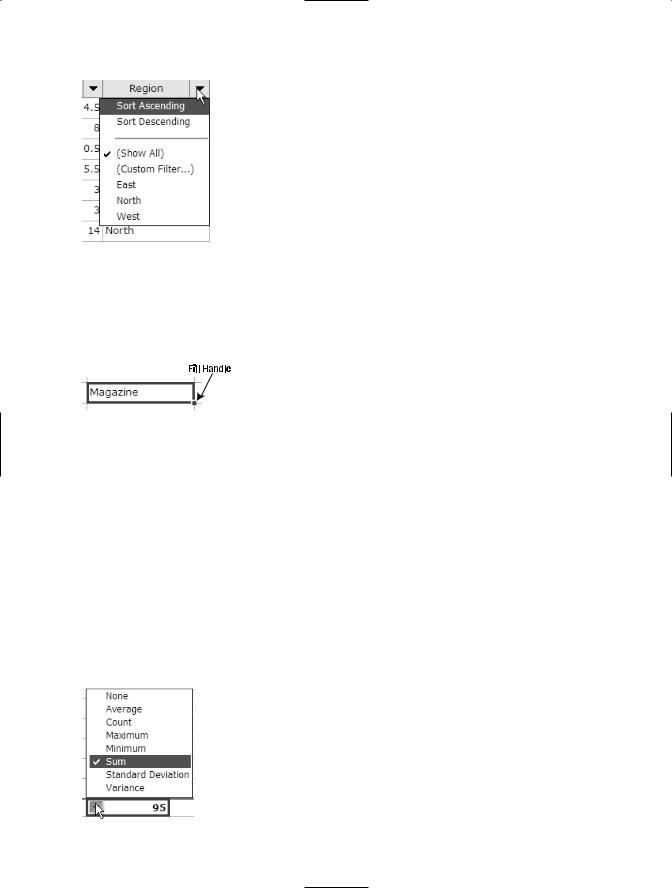
Figure 2-6 shows a list in Datasheet view. Datasheet view resembles a spreadsheet, and has many of the characteristics of an Excel spreadsheet. In Datasheet view, you can sort and filter data, adjust column width and row height, rearrange the order of columns, use fill to copy data, add totals, and export data to Excel and Access.
Figure 2-6. In Datasheet view, a SharePoint list has many of the characteristics of an Excel spreadsheet.
The arrows at the top of each column include sort and filter options, including Custom Filter.
32 C H A P T E R 2 ■ W O R K I N G W I T H L I S T S I N S H A R E P O I N T
Adjust columns and rows, just as you might in Excel, by dragging or double-clicking the cell dividers in the header rows. To copy values up or down in a column, drag the fill handle in the bottom right of the cell.
To rearrange columns in the list, click a column header to select the column. Point to the column header, and when the pointer changes to a four-headed arrow, drag the column to a new position.
Inserting Column Totals
If you want to add totals to any of the columns, click the Totals button in the list toolbar. SharePoint automatically includes totals for any column with numeric values. You can choose from a number of functions, including Average, Count, Maximum, Minimum, Sum, Standard Deviation, and Variance. Select the function you want to display from the drop-down list in the Totals row. If you don’t want a total in a particular column, select None.
C H A P T E R 2 ■ W O R K I N G W I T H L I S T S I N S H A R E P O I N T |
33 |
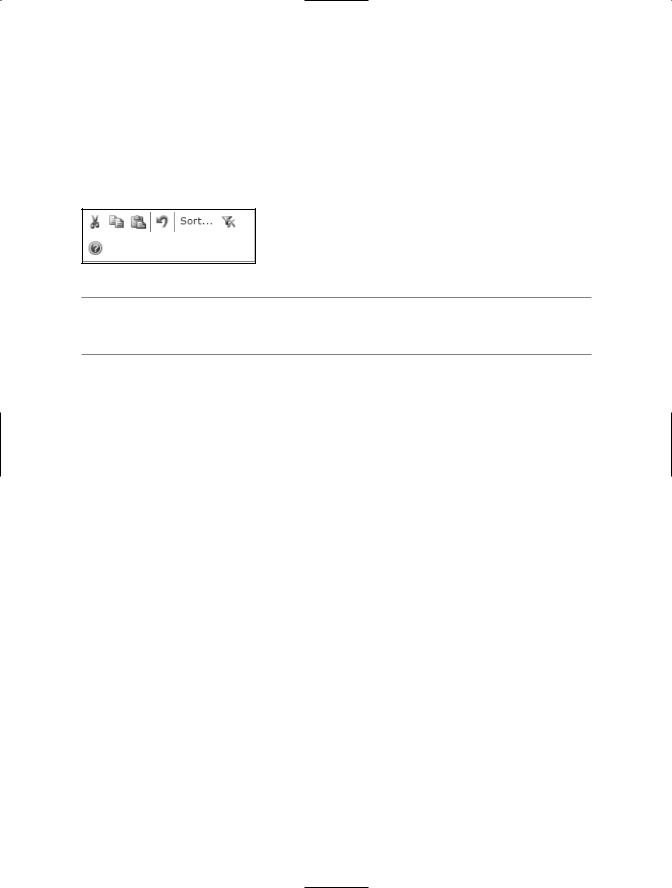
Using the SharePoint Datasheet Task Pane
To access addition tools, click the Task Pane button on the list toolbar, or click the Show Task Pane button on the right side of Datasheet view to open the Datasheet task pane. The task pane is divided into two sections. The top section includes Cut, Copy, Paste,
Undo, Sort, Remove Filter/Sort, and Help buttons.
■Caution The Undo button works only with Cut, Copy, and Paste. If you change data in the list, you cannot use Undo to change it back.
The bottom section, Office Links, has options for working with SharePoint data in Excel and Access. Chapter 3 deals extensively with exporting and linking a SharePoint list to Excel, and using Excel to print, chart, and create an Excel PivotTable report. In addition to these options, you have three choices for exporting SharePoint data to Access:
•Export to Access: Exports the data into Access and creates an unlinked Access table
•Create a linked table in Access: Exports the data into Access and creates a linked Access table
•Report with Access: Exports the data into Access, creates a linked Access table, and generates an AutoReport
By taking the data into Access, you can use Access reporting tools to create sophisticated reports. In addition, you can use the data in the SharePoint list to link to other data in an Access database to create a full relational database.
In all three exporting options, the table that SharePoint generates in Access contains an Edit field, shown in Figure 2-7, that’s linked directly back to the edit form for the list item in SharePoint.

34 C H A P T E R 2 ■ W O R K I N G W I T H L I S T S I N S H A R E P O I N T
Figure 2-7. When SharePoint generates an Access table, it includes an Edit field that’s directly linked to the SharePoint record.
■Caution If the data in either the SharePoint list or the Access table is edited, the Access table must be linked to SharePoint for the data to synchronize. If you choose the first option, Export to Access, the data isn’t linked, so as soon as data is edited, differences will exist in the two data sources.
Publishing an Excel List to a SharePoint Site
The integration of Excel 2003’s list function (see Appendix A for more about creating and using an Excel list) with SharePoint provides a new and valuable way to share Excel data. Publishing an Excel list to a SharePoint site offers several advantages:
•Users can access the list in a centralized repository rather than through a difficult-to- find network share.
•The list and its contents are easily searchable through SharePoint’s extensive search tools.
•You can control access to the list with SharePoint’s powerful security features.
•Users who don’t have access to the corporate network can be given permissions to access the list.
In many ways, it’s the best of both worlds. You can make data accessible while still retaining control of the Excel workbook and all of its functionality.
Publishing Lists with Formulas
Although you can publish any Excel list to SharePoint, formulas cannot be published. Cells that contain formulas are converted to values when the list is published to SharePoint. This is important to remember when deciding whether to publish a list from a workbook or to upload the entire Excel workbook to the list.

C H A P T E R 2 ■ W O R K I N G W I T H L I S T S I N S H A R E P O I N T |
35 |
You can re-create formulas based on columns within one row in SharePoint (see Chapter 3 for more about creating formulas in a SharePoint list). However, formulas based on all the data in a column cannot be re-created, with the exception of totals (see “Inserting Column Totals” earlier in this chapter). For example, you can create a formula in Column C of a SharePoint list that multiplies Column A with Column B. However, you cannot create a formula that calculates a variance based on the average of the data in Column A. If it’s important that users have access to the columns that contain this second type of calculation, it’s probably better to provide them with access to the entire Excel workbook.
■Tip If you’d like some users to access the entire workbook and others to access only pertinent data from the workbook, one option is to upload the Excel workbook to a document library that has restricted access within the SharePoint site, and then publish a more publicly available list from the workbook as a SharePoint list within the same site.
Publishing Excel Lists Using the List Toolbar
To publish Excel data to SharePoint, it must first be a recognized Excel list (see Appendix A). To convert Excel data that exists in a worksheet to an Excel list, activate the List toolbar (View Toolbars List) in Excel if it isn’t visible, and then follow these steps to publish the list:
1.Click List on the List toolbar and then click Publish List. The Publish List to SharePoint Site wizard, shown in Figure 2-8, opens.
2.Enter the address of the SharePoint site to which you want to publish. Open the SharePoint site and copy and paste the root address from the home page, excluding the page reference. For example, copy http://www.boardworks.net/triad/HR/ from the complete address of http://www.boardworks.net/triad/HR/default.aspx.
3.Check the Link to the new SharePoint list checkbox if you’d like to maintain a dynamic link between the Excel list and the SharePoint list.
4.Enter a name and description of the list. Click Next.