

Beginning SharePoint With Excel - From Novice To Professional (2006)
.pdf146C H A P T E R 7 ■ B U I L D I N G O U T- O F - T H E - B OX B U S I N E S S S O L U T I O N S
7.Click the Open the Tool Pane link in the first web part.
8.Paste the URL in the Link text box. Test the link.
9.In the Appearance section, change the Frame Style to None.
10.Enter a title. Even though the title won’t be displayed on the web part (with no frame, there’s no title bar), the title is displayed on menus when you’re modifying the page.
11.Click Apply.
12.Repeat steps 5–11 for the second instance of the Page Viewer Web Part with the SalesTargetChart web page.
13.Click OK to close the Add Web Parts task pane.
It’s unlikely that both parts will display well on the page without some additional tweaking. Modify the parts’ height and width to accommodate the table and chart. Work with the wider part first—the width of the zone is the width of the widest part in the zone. If you tweak the part that needs the most width in pixels first, you won’t need to set the width on the other part.
■Note For more information on tweaking the Page Viewer Web Part, see the section “Displaying HTML Pages in SharePoint” in Chapter 6.
Creating the Web Part Page
The web part page will be used primarily to display other tables and charts, starting with the Category Sales chart and Sales pivot table. If other charts are added in the future, the page will get too lengthy. Users don’t like to scroll more than a couple screens. Therefore, it would be good to choose a format that has at least two zones: one for the Page Viewer Web Parts, and another narrower zone for explanatory text and a future Links list.

C H A P T E R 7 ■ B U I L D I N G O U T- O F - T H E - B OX B U S I N E S S S O L U T I O N S |
147 |
1.In SharePoint, choose Create from the top menu, then scroll to the bottom of the page and choose Web Part Page to go to the page for the New Web Part Page (see Figure 7-18).
Figure 7-18. Choose a web part page layout that will accommodate your charts and tables.
2.Enter a name for the page. The name will be used as the title at the top of the web part page, so you might choose to include spaces in the name.
■Tip If you have FrontPage, you can give the web part page a short name, then edit the Title Bar web part in FrontPage. To edit the page in FrontPage, open the webpages library, select the web part page, then click the Edit in FrontPage button. Alternatively, display the page in Internet Explorer and choose File Edit with Microsoft Office FrontPage from the IE menu.
3.Choose the Header, Right Column, Body web part page layout.
4.Select the webpages document library as the Save Location.
5.Click Create to create and open the web part page.
6.Add a Content Editor Web Part in the right column.

148C H A P T E R 7 ■ B U I L D I N G O U T- O F - T H E - B OX B U S I N E S S S O L U T I O N S
7.Click the Rich Text Editor link in the Content Editor Web Part. Enter brief descriptive text (for example, “Charts and tables on this page are updated daily”). Click Apply.
8.Add two Page Viewer Web Parts to the body, as shown in Figure 7-19.
9.Change the properties on the Page Viewer Web Parts to display the HTML pages for the Category Sales chart and the Sales pivot table.
You can tweak the web part layout and appearance settings as needed.
Figure 7-19. The Sales Performance web part page
C H A P T E R 7 ■ B U I L D I N G O U T- O F - T H E - B OX B U S I N E S S S O L U T I O N S |
149 |
Some Final Tasks
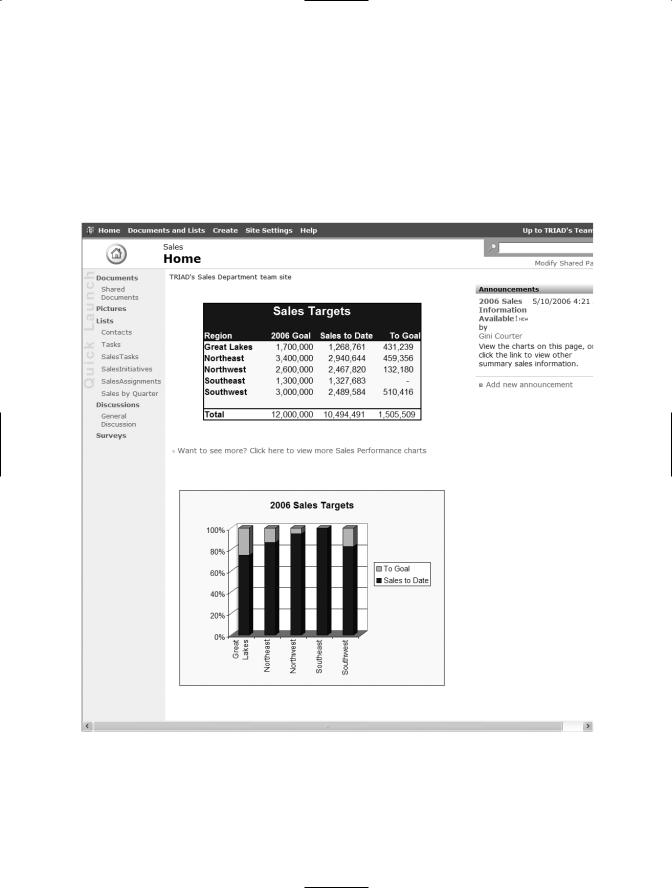
You’re missing one navigation tool: a link from the home page to the web part page. If the Links library isn’t being used, you can add a single link, turn off the toolbar, and choose None as the frame style to create the link. Alternatively, you can use a Content Editor Web Part and add a hyperlink to the web part page. Figure 7-20 shows the new home page for the sales team.
Figure 7-20. The modified home page for the sales team

150 C H A P T E R 7 ■ B U I L D I N G O U T- O F - T H E - B OX B U S I N E S S S O L U T I O N S
Maintaining the charts and tables is easy. Each time Kim saves the Excel workbook, all four HTML pages are automatically republished. Kim will need to find a new reason to stay in touch with the sales staff.
Summary
You don’t need an ASP.NET developer to build web-based reporting and dashboard solutions. You can use Excel worksheets and SharePoint’s custom lists, views, and web parts right out of the box to address business challenges. In the next three chapters, we’ll show you some customizing tools and special add-ins to extend the power of Excel and SharePoint integration.

C H A P T E R 8
■ ■ ■
Using Excel to Query
SharePoint
With the Excel Web Query feature (available in Excel 2002 and 2003), you can retrieve data from any table on an intranet or the Internet, including tables and lists in SharePoint. Windows SharePoint Services back-end lists (for example, the Site Collection users list) don’t include tools to export to Excel. If your WSS sites aren’t part of an SPS solution,
a number of third-party add-ins, from shareware apps to web parts bundled as expensive “suites,” return or display data from SharePoint’s back-end lists.
Other third-party apps capture and archive the current state of site lists. But you don’t need add-ins to retrieve SharePoint list data. An Excel web query is just the implement you need to harvest the banquet of data available on a SharePoint site, even the data that’s stored in the less accessible back-end lists. You can retrieve SharePoint information as static data, or create a refreshable web query.
Creating a Static Query
Create a static query when you want to capture a snapshot of the current state of a list or library on your SharePoint site. For example, at the end of each month you might want to capture the modified date for the documents in a library so you can have aged documents updated by the appropriate members of your team. With Excel, you can create a static web query that includes the hyperlinks to the library documents.
Here’s another scenario: you might want to document progress on uploading documents before launching a site. This query might be more useful with the hyperlinks removed.
To create a static web query of a library, follow these steps:
1.Open the library (or list) in your browser.
2.Select the data you want to copy to Excel.
3.Choose Edit Copy from the Internet Explorer menu.
151
152C H A P T E R 8 ■ U S I N G E X C E L TO Q U E RY S H A R E P O I N T
4.Open Excel.
5.Select a cell and paste the data.
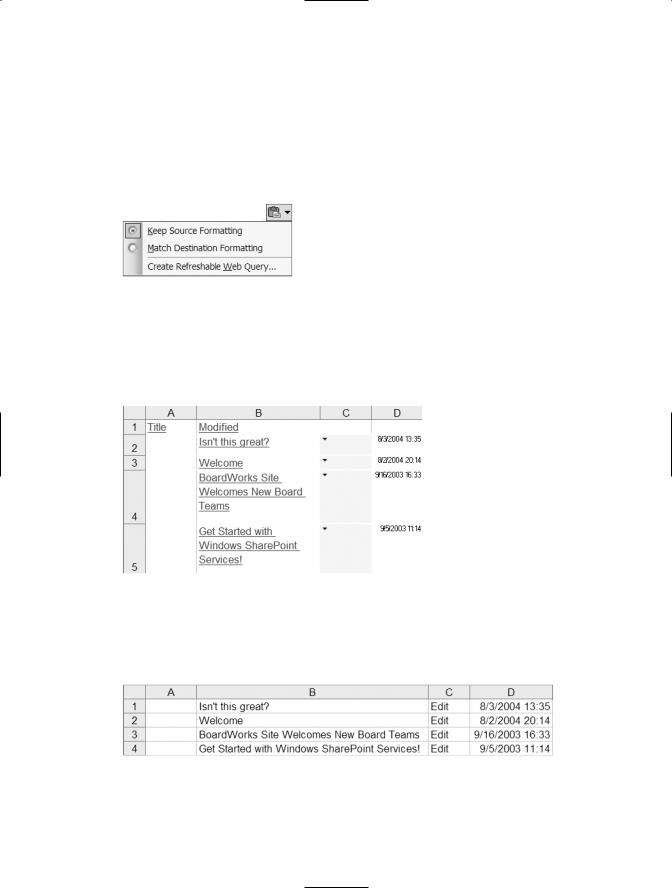
6.Before you deselect the pasted range, click the Paste Options button to open the options menu (see Figure 8-1).
Figure 8-1. Choose an option to retain or remove hyperlinks.
7.To create a static web query with hyperlinks, choose Keep Source Formatting (see Figure 8-2).
Figure 8-2. A static web query, including hyperlinks back to the SharePoint site
8. To remove the hyperlinks, choose Match Destination Formatting (see Figure 8-3).
Figure 8-3. The same static web query with the hyperlinks removed

C H A P T E R 8 ■ U S I N G E X C E L TO Q U E RY S H A R E P O I N T |
153 |
■Note In Figure 8-3, column A is empty. The list view included a column for attachments, which the web query can’t return. To avoid empty columns, create a view that only includes the information you want in the query. For more information on creating views, see Chapter 4.
9. Adjust column widths as necessary.
We’ll discuss the third option on the options menu, Create Refreshable Web Query, in the next section.
Creating a Refreshable Web Query
In a refreshable web query, the data is updated either automatically or when you manually refresh the query. Refreshable web queries can return three different kinds of data, all of which are found in SharePoint: a single table (such as a library or list), multiple tables (from a page with multiple web parts), or formatted or plain text.
To create a refreshable web query from SharePoint, follow these steps:
1.Open the SharePoint library (or list) in your browser.
2.Select the data you want to query in Excel.
3.Choose Edit Copy from the Internet Explorer menu.
4.Open Excel.
5.Select a cell and paste the data.
6.Before you deselect the pasted range, click the Paste Options button to open the options menu.
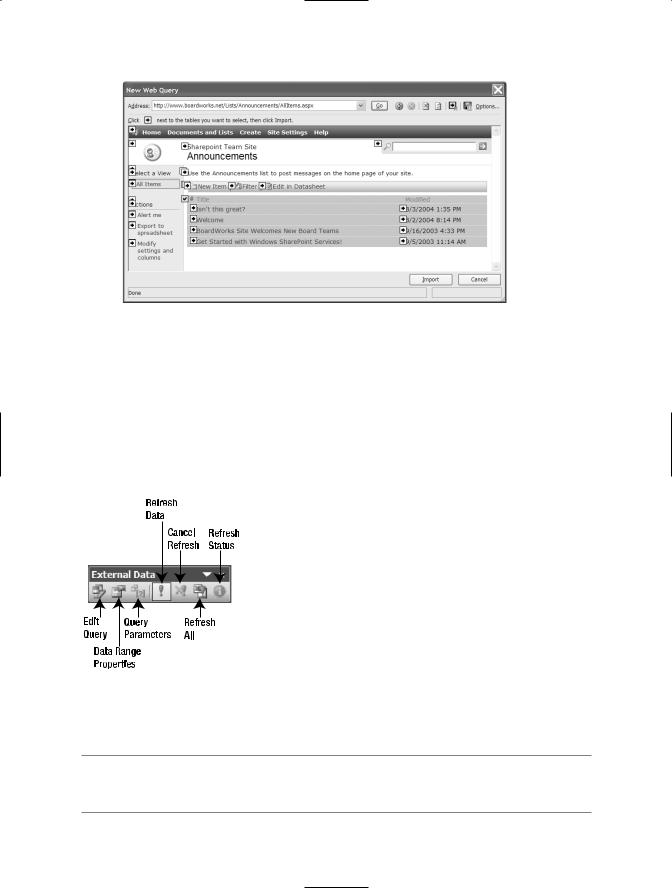
7.Choose Create Refreshable Web Query to open the New Web Query dialog box (see Figure 8-4).

154 C H A P T E R 8 ■ U S I N G E X C E L TO Q U E RY S H A R E P O I N T
Figure 8-4. Use the New Web Query dialog box to identify the data you want to return to Excel.
8.Move the pointer to the yellow table-selection icon at the upper left corner of the data table you want to import. A border appears around the data that will be imported. Click the icon to select the data (see Figure 8-5). The icon changes to a green check mark. You can select multiple ranges for a single query. For more control over positioning, create multiple queries in one worksheet.
C H A P T E R 8 ■ U S I N G E X C E L TO Q U E RY S H A R E P O I N T |
155 |
Figure 8-5. Click the icon to select the range you wish to import.
9.Click Import to open the Import Data dialog box.
10.Choose a location for the query results and click OK to create the query and return the data to Excel.
The External Data toolbar appears when a web query is open in Excel (see Figure 8-6).
Figure 8-6. Use the External Data toolbar to set query options.
■Tip If you prefer, you can choose Data Import External Data New Web Query to open the New Web Query dialog box directly, then navigate to the page using the address bar at the top of the dialog box.