

Beginning SharePoint With Excel - From Novice To Professional (2006)
.pdf
C H A P T E R 9
■ ■ ■
Using SharePoint’s Office
Web Parts
In earlier chapters, we explored three ways to make Excel data available to SharePoint users:
•In Chapter 1, we discussed uploading a workbook to a SharePoint document library and letting users open it directly in Excel. Although this certainly works, it means that worksheet data is one step removed from the SharePoint site— users do their work in Excel and then resave to the SharePoint site.
•In Chapter 2, we showed you how to publish an Excel list to SharePoint. Although dynamically linked Excel lists are extremely useful with spreadsheets filled with text data, they’re more challenging if you need to include calculations. As you saw in Chapter 5, it’s possible to add calculations to a SharePoint list, but the process isn’t as flexible or as intuitive as in Excel.
•In Chapter 6, we demonstrated how to save a worksheet as a web page and upload to a SharePoint site. This gives users access to Excel data but restricts them from editing. It presents a static view of the data.
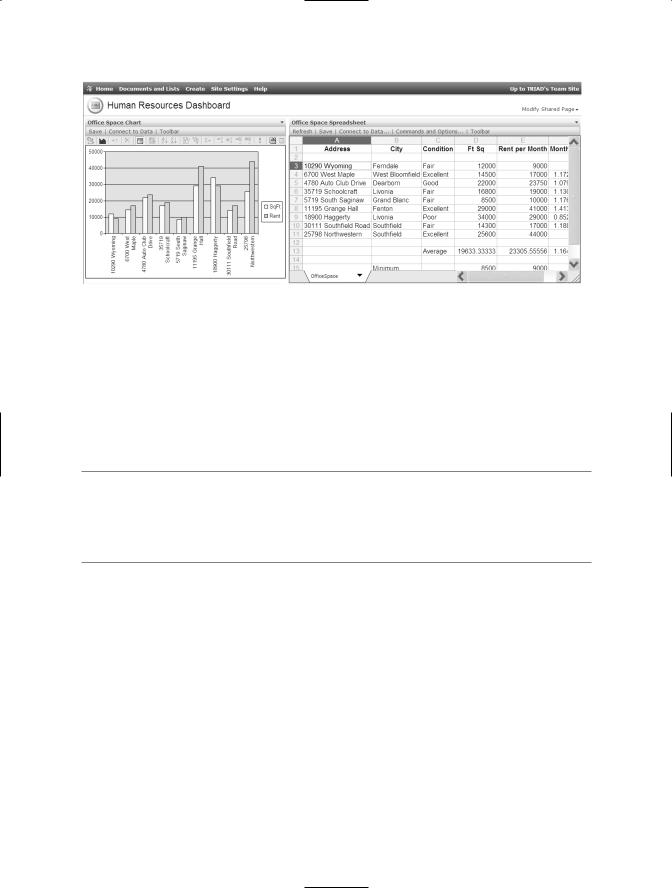
If none of these options give you exactly what you need, you might want to explore adding an Office web part to a SharePoint page. The Office web parts, which include Office Spreadsheet, Office Datasheet, Office PivotTable, Office PivotChart, and Office PivotView Web Parts, give you Excel functionality right on a SharePoint page. You can use the Office web parts to create dynamic dashboards, such as the one shown in Figure 9-1, based on data housed in one of three places:
•In an existing SharePoint list
•In an external data source, such as a SQL Server or Access database
•Entered directly into the Spreadsheet Web Part
167
168 CHAPTER 9 ■ USING SHAREPOINT’S OFFICE WEB PARTS
Figure 9-1. A business dashboard can put critical information at the fingertips of the people who need it. Data entered into the spreadsheet is immediately reflected in the adjacent chart.
See “Connecting Web Parts to Data” later in this chapter for more about connecting to an existing SharePoint list and to external data sources.
In this chapter, we’ll take at look at each of the Office web parts, how to use them, how to connect them to external data, and how to modify them.
■Note The Office 2003 web parts add-in, which includes the Office web parts discussed in this chapter, isn’t installed with the typical installation of Microsoft SharePoint. To make the web parts available, your server administrator can download and install Microsoft Office Web Parts and Components from the Microsoft Download Center (http://www.microsoft.com/downloads). Search for STSTPKPL.EXE.
Using the Office Spreadsheet Web Part
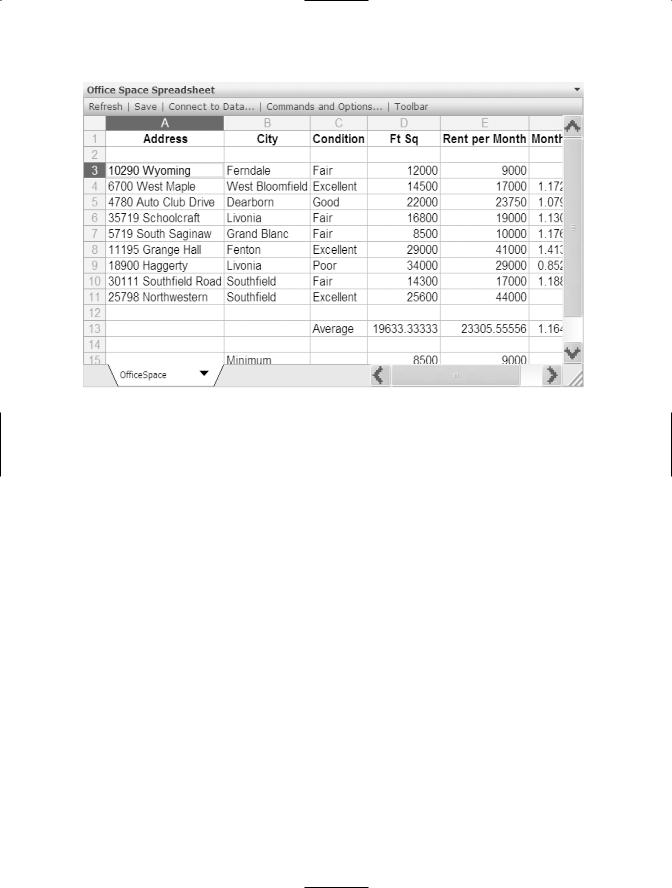
An Office Spreadsheet Web Part, such as the one shown in Figure 9-2, is the closest thing to Excel you can get without opening Excel itself. Users with Contributor rights can enter data into multiple worksheets, add formulas, format worksheets, and sort and filter data. If they want to work with the data offline, users can export the workbook to Excel.
CHAPTER 9 ■ USING SHAREPOINT’S OFFICE WEB PARTS |
169 |
Figure 9-2. An Office SpreadsheetWeb Part gives you Excel-like functionality right in SharePoint.
An Office Spreadsheet Web Part has some limitations. For example, you cannot use Fill to copy formulas, and there is no formula bar. However, it’s so similar to Excel that most Excel users can learn to use it without too much difficulty. It’s an easy way to have multiple people entering data into a central worksheet where everyone can access and work with it without having to launch Excel.
Web parts, as described in Chapter 1, are components designed to display specific information such as an announcements list, a calendar, a document library, or in this case, a spreadsheet. A web part page is a web page that contains preestablished zones where web parts can be positioned. You can add the Office Spreadsheet Web Part to the home page or to any other web page on a SharePoint Portal or in a WSS site. However, some features are restricted if you place the Office web parts on a page that isn’t specifically a web part page.
Let’s first look at creating a web part page; then we’ll add an Office Spreadsheet Web Part to the page.

170 CHAPTER 9 ■ USING SHAREPOINT’S OFFICE WEB PARTS
Creating a Web Part Page
A web part page is one of the elements available on the Create page, along with libraries, lists, custom lists, discussion boards, surveys, and web pages. To access the Create page, follow these steps:
1.Click Create on the top navigation bar on a WSS site or on an SPS page.
2.Click Manage Content in the Actions menu.
3.Click Create. On the Create page, under Web Pages, click Web Part Page. This opens a new web part page.
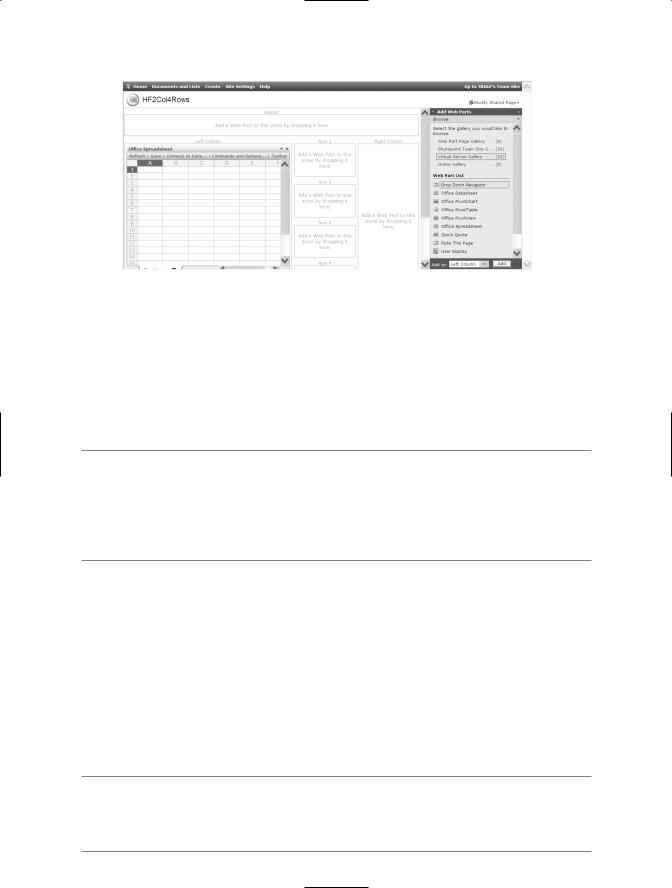
From here, you enter a name for the page and select a layout template. Selecting the right layout template can be a bit tricky. Each of the rectangles in the template preview represents a web part zone. If you plan to add only one Spreadsheet Web Part to the page, then Full Page, Vertical might be perfect for you. It has only one zone. You can put more than one web part in a zone depending on the design of the zone. In other words, you can place a web part in a column above another web part in a single zone, as in the Full Page, Vertical web part page. However, if you want to place two web parts side by side, you need to start with a template that has either side-by-side zones or that has rows, which allow for multiple web parts. Header, Footer, 2 Columns, 4 Rows, shown in Figure 9-3, is an example of a template that allows for side-by-side web parts.
Figure 9-3. Using this web part page template—Header, Footer, 2 Columns, 4 Rows—you can add multiple web parts side by side and in each of the other identified zones.

CHAPTER 9 ■ USING SHAREPOINT’S OFFICE WEB PARTS |
171 |
Web parts expand to fill unused space on the page, so too many web part zones is generally less of a problem than not enough. You cannot add web part zones that don’t already exist in the template, so if you decide you need to position a web part where no zone is available, you might need to re-create the entire page to choose a different template.
Follow these steps to create a web part page:
1.Scroll to the bottom of the Create page and under Web Pages, click Web Part Page.
2.Enter a name for the web part page. Because this is the actual file name, it is best, but not required, to create a short name with no spaces.
3.Choose a layout template from the available templates. Pick a layout that’s close to what you envision you want your page to look like when you’re finished.
4.Select the document library where you want to save the web page in the Save Location.
5.Click Create. SharePoint creates the page and takes you to the design view of the page, which displays the available zones, as shown earlier in Figure 9-3.
Adding the Office Spreadsheet Web Part to a Page
Now that you have a web part page, you can add an Office Spreadsheet Web Part, or any other type of available web part to the page. To add the Office Spreadsheet Web Part, follow these steps:
1.From the upper right-hand corner of the page, click Modify Shared Page Add Web Parts Browse. This opens the Add Web Parts task pane.
2.You can find the Office Spreadsheet Web Part in the Virtual Server Gallery. Click Virtual Server Gallery to display the list of available web parts.
3.Point to and drag the Office Spreadsheet Web Part to one of the available web part zones on the page. When you drag the web part into a zone, a blue line appears to indicate where the top or the left side of the web part will line up. Drop the web part where you want it to appear. Figure 9-4 shows an Office Spreadsheet Web Part in the left zone of a Header, Footer, 2 Columns, 4 Rows template.
172 CHAPTER 9 ■ USING SHAREPOINT’S OFFICE WEB PARTS
Figure 9-4. Drag the Office Spreadsheet Web Part from the gallery and drop it in a zone on the web part page.
If you decide you don’t like where the web part ended up, you can move it to another zone or position within a zone. Point to the title bar of the web part, and when the pointer changes to a four-headed arrow, click and drag the web part to another location.
■Note In the case of web part pages, Header and Footer don’t have the conventional significance, such as a location where page numbering or date and time appear on a hard copy of an Excel worksheet. On a web part page, the terms merely refer to zones at the top and bottom of the page. The Header and Footer zones span the width of a web part page, so use them for web parts that are too wide to display in the left, center, and right zones.
Although you can start adding content to an Office Spreadsheet Web Part while the page is still in design view, it’s a good practice to switch out of design view before you start working with it. First, click the Close button (×) on the Add Web Parts task pane to close the task pane. You’re prompted to save or discard the changes to the web page. Click OK to save them. When the page refreshes, you’re still in design view, but your changes are saved. Now, click Modify Shared Page at the top right of the page again. Then, click Design this Page to toggle it off (it should have a check mark in front of it when you’re in design view). When the page refreshes, you should be in the normal view of the page. You’ll know it because you can no longer see the zones.
■Note When you click Modify Shared Page, if you find that Design this Page is dimmed, double-check to make sure that the Add Web Parts or any other task panes are closed. This needs to happen in order to generate the prompt to save or discard changes before you can switch out of design view.

CHAPTER 9 ■ USING SHAREPOINT’S OFFICE WEB PARTS |
173 |
Working with the Office Spreadsheet Web Part
Entering data into an Office Spreadsheet Web Part isn’t much different than entering data into an Excel worksheet. Click in the first cell in which you want to enter something, and start typing. You can use the tab, arrow, Home, and End keys to navigate around the sheet just like in Excel. By the way, there are 262,144 rows and 18,278 columns (A to ZZZ) in an Office Spreadsheet Web Part’s sheet, as compared to Excel’s paltry 65,536 rows and 256 columns (A to IV). This web part should handle most of your everyday data needs!
Just like in an Excel workbook, each web part can contain multiple worksheets. Click the sheet tab to switch to another sheet (see “Setting Worksheet and Workbook Options” later in this chapter to see how to add, delete, and rearrange sheets).
To access common tools such as Undo, Cut, Copy, and Paste, click the Toolbar button on the toolstrip that’s visible at the top of the web part. The Toolbar button toggles a modified version of Excel’s Standard toolbar. Table 9-1 identifies the buttons on the toolbar. You’ll be familiar with many of their Excel counterparts.
Table 9-1. The Office Spreadsheet Web Part Toolbar
Button Name |
Description |
About |
Contains licensing information about Microsoft Office |
|
Web Components. |
Undo |
Negates the last action taken. Can be used multiple times. |
Cut, Copy, and Paste |
Moves and copies contents of cells or groups of cells. |
AutoSum |
Enters a SUM formula in the active cell for values |
|
above or to the left. |
Sort Ascending |
Sorts the column that contains that active cell in |
|
A–Z or 1–9 order. Click the down arrow on the button |
|
to select another column to sort by. |
Sort Descending |
Sorts the column that contains that active cell in |
|
Z–A or 9–1 order. Click the down arrow on the button |
|
to select another column to sort by. |
AutoFilter |
Activates AutoFilter buttons to filter data in the columns. |
Refresh All |
If the workbook is connected to another data source, this |
|
retrieves the current data (see “Connecting Web Parts |
|
to Data” later in this chapter). |
Export to Microsoft Office Excel Commands and Options
Exports the workbook to Microsoft Excel.
Opens the Commands and Options dialog box for formatting, modifying formulas, searching, and setting sheet options.
Help |
Opens Microsoft Office 2003 Spreadsheet Component Help. |

174 CHAPTER 9 ■ USING SHAREPOINT’S OFFICE WEB PARTS
In addition to entering data directly into an Office Spreadsheet Web Part, you can connect to existing data sources. See “Connecting Web Parts to Data” later in this chapter for information about how to access existing data sources.
Formatting Text, Dates, and Numbers
To make formatting changes to the cells in an Office Spreadsheet Web Part, click the Commands and Options button on the toolstrip or on the toolbar to open the Commands and Options dialog box. On the Format tab, you can change text formatting, including bold, italics, underline, horizontal and vertical text alignment in a cell, font color, font, font size, number formats, fill color, merge and unmerge cells, border color, border style, border weight, borders, and text direction (for languages that read left to right or right to left).
You can leave the Commands and Options dialog box as you select and format different cells, so it makes sense to do all your formatting at one time. Select the cell or group of cells you want to format, then choose the appropriate feature on the Format tab.
Entering Formulas
Office Spreadsheet Web Parts can contain formulas as simple as the sum of two cells, and as complex as you want to make them. You can enter formulas directly into cells by entering an = sign and then constructing the formula just as you would in Excel. There’s no formula bar in the web part, so to see the formula in a cell, double-click it or open the Commands and Options dialog box and click the Formula tab. This shows the formula and the results of the formula in the active cell.
Except for SUM, which is available by clicking the AutoSum button on the toolbar, there is no assistance, such as the Insert Function dialog box in Excel, for constructing formulas with functions. You must enter the formula that includes the function by typing it in the proper syntax. However, there’s an extensive help file that lists all the available functions, their proper syntax, and examples. Click the Help button on the toolbar, then double-click Working with Functions to access the list of available functions by category.
You can use the Formula tab of the Commands and Options dialog box to name cells for easier reference in formulas. To name a cell or range of cells, select the cell or range you want to name, then enter a name in the Name text box on the Formula tab. Use these guidelines to name cells:

CHAPTER 9 ■ USING SHAREPOINT’S OFFICE WEB PARTS |
175 |
•The first character of a name must be a letter or an underscore character.
•Names can contain letters, numbers, periods, and underscore characters.
•Names cannot contain spaces. Use underscores (Net_Sales) or camel case (NetSales) to distinguish words in the name.
•Names are not case sensitive: BUDGET is the same as Budget.
After you name the cells, you can create a formula such as =Budget-Actual rather than the more obtuse =B3-B4.
Dates and times are treated as numbers in an Office Spreadsheet Web Part. However, to use a date or time in a formula, you must put it in quotation marks to designate it as text. For example, the following formula results in –14:
="12/1/2006"-"12/15/2006"
However, the following formula results in 0.00558325 because each / is treated as a division symbol:
=12/1/2006-12/15/2006
If you create a formula that contains cells formatted as dates, be sure the cell that contains the formula is formatted as General.
Searching for Data
As we mentioned earlier, the capacity of an Office Spreadsheet Web Part is much larger than the capacity of an Excel worksheet. You can use the Sheet tab of the Commands and Options dialog box to search for specific cell content. Enter a search term in the Find What text box and click Find Next to search for the first occurrence of the term you entered. Click Find Next again to continue to the next occurrence.
If you want to limit the search to occurrences that use the same case, check the Match case checkbox. To limit to occurrences that match the entire search term, enable Entire cell only. For example, if the search term you enter is Sales, and you enable the Entire cell only checkbox, a cell that contains Net Sales will not be found.