

Beginning SharePoint With Excel - From Novice To Professional (2006)
.pdf206C H A P T E R 1 0 ■ B U I L D I N G E X C E L S P R E A D S H E E T W E B PA RT S
5.In the first step of the wizard, click Next.
6.In the second step of the wizard, select Choose Another Network Location. Click Next.
7.In the third step of the wizard, paste the URL you copied in step 2. Click Next.
8.In the fourth step, enter a friendly name for your Network Place. Click Next.
9.Click Finish to create the Network Place.
You’re now ready to add your web part to a page on your SharePoint site.
Importing the Custom Web Part
You can place your custom web part on any web part page on your site. Follow these steps to add the web part:
1.Navigate to the page.
2.Select a view for the web part from the Web Part Page menu:
•If you’re in shared view and you want to switch to personal view, click Modify Shared Page, then select Personal View. When you add your custom web part, only you will see it.
•If you’re in personal view and you want to switch to shared view, click Modify My Page, then select Shared View. When you add your custom web part, it will be available to everyone who views the page.
3.On the Web Part Page menu, choose Add Web Parts Import to open the Add Web Parts pane, shown in Figure 10-9.

C H A P T E R 1 0 ■ B U I L D I N G E X C E L S P R E A D S H E E T W E B PA RT S |
207 |
Figure 10-9. Use the Add Web Parts pane to import your custom web part.
4.Click the Browse button to open the Choose File dialog box.
5.Click the My Network Places link.
6.Double-click the Network Place that refers to your SharePoint site.
7.Double-click the document library that contains the files for your custom web part.
8.Select the web part definition file (with a DWP extension) for your web part.
■Note If you don’t see your web part files, press F5 to refresh the file list in the Choose File dialog box.
9.Click Open. The Choose File dialog box closes.
10.Click the Upload button in the Add Web Parts pane to import the web part.
11.Drag the web part from the Add Web Parts pane and drop it in place on the page (see Figure 10-10).

208 C H A P T E R 1 0 ■ B U I L D I N G E X C E L S P R E A D S H E E T W E B PA RT S
Figure 10-10. The custom web part installed on the web part page
12.Click the Close button to close the Add Web Parts pane.
13.Test the web part.
Use the drop-down arrow on the web part and choose Modify Web Part to change the title bar text or other web part properties.
ADDING YOUR WEB PART TO THE SITE GALLERY
You can use the imported web part anywhere on the page. If you want to use it on another page in the site, you’ll need to add the web part definition (DWP) file to the site’s Web Part Gallery. Follow these steps:
1.Navigate to the SharePoint page that includes the web part. Click Site Settings in the top navigation bar.
2.On the Site Settings page, click the Go to Top-Level Site Administration link.
3.On the Top-Level Site Administration page, click the Manage Web Part Gallery link.
4.Choose Upload Web Part.

C H A P T E R 1 0 ■ B U I L D I N G E X C E L S P R E A D S H E E T W E B PA RT S |
209 |
5.Click Browse. Select the web part definition (DWP) file. You can enter some metadata about the web part: a group name that you can use later in a view to group, sort, or filter. Click OK.
If you don’t have permissions to add parts to the gallery, you’ll be prompted repeatedly for your username and password. Just click Cancel and consult with your WSS administrator about your permissions.
6. Select the Type icon for the new web part to see a preview of the web part.
Remember that the DWP contains references to other files, so the web part is, in effect, site specific. You can import the web part to another site, but when it runs, it will return the following error:
Unable to connect to the Solution Specification file
If you want to use your web part on another SharePoint site, you’ll need to re-create the web part (from Excel) for that site.
Creating a Web Part That Returns a Data Set
That was a good warm up. Now, you’ll create a web part that returns a data set with information about documents in a SharePoint library. You’ll use the web part on a different SharePoint site. You’ll follow similar steps to return data from SQL Server. Your custom web part, shown in Figure 10-11, will retrieve all the documents that have been created or modified on or after January 1, 2006. Users can sort and filter the data set using the commands on the web part toolbar.

210 C H A P T E R 1 0 ■ B U I L D I N G E X C E L S P R E A D S H E E T W E B PA RT S
Figure 10-11. A custom web part, showing only the documents that have been changed since 1/1/2006
Creating the Data Retrieval Service Connections File
Before you can create a data-bound web part, you need to create a data connection. In this example, you’ll use Excel’s Data Connection Wizard to create a connection to SharePoint’s data retrieval service. The choices that you make in the wizard will be saved in a Data Retrieval Service Connections file. Data Retrieval Service Connections files are saved with the UXDC file extension. Follow these steps to create the worksheet and databound web part:
1.Start with a blank Excel worksheet.
2.Choose Data Import External Data Import Data from the menu to open the Select Data Source dialog box.
3.Double-click Connect to New Data Source to launch the Data Connection Wizard.
4.Select Data Retrieval Services, then click Next.
5.Choose Microsoft SharePoints lists and click Next.
6.In the Data Retrieval Service Location, enter the URL for the Windows SharePoint site that contains the list you want to return. Click Next.
7.Select the data object (list or library) you want to display in your web part (see Figure 10-12). Click Next.

C H A P T E R 1 0 ■ B U I L D I N G E X C E L S P R E A D S H E E T W E B PA RT S |
211 |
Figure 10-12. Choose the list you want to display in your web part.
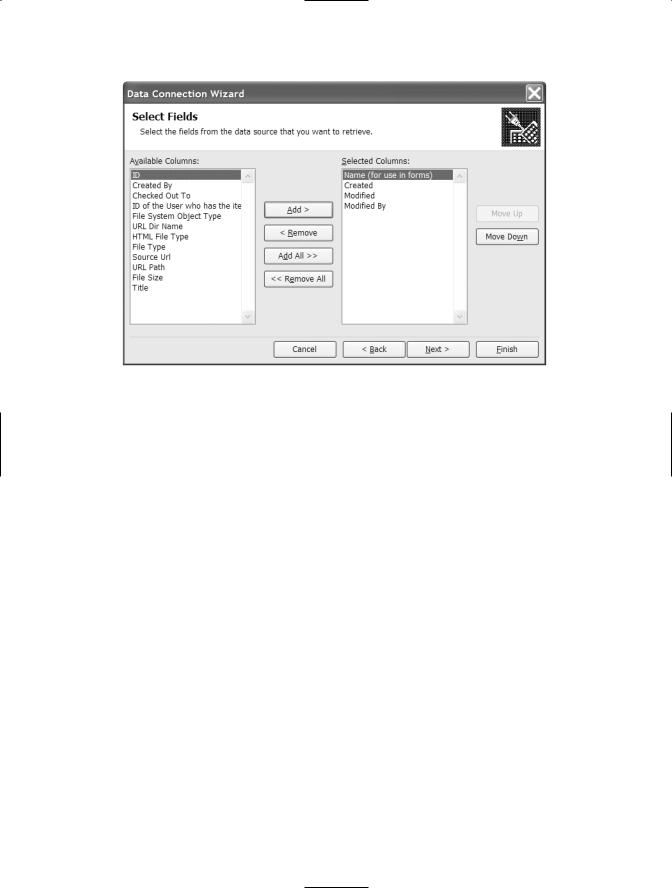
8.Select the data fields that you want to retrieve (see Figure 10-13). Use the Add and Remove buttons to move items to the Selected Columns list. Use the Move Up and Move Down buttons to reorder the list. Click Next.
■Note If you want to connect this web part to other web parts, be sure to include the primary key field— the field that contains a unique value that can be used to establish a one-to-many relationship. In SharePoint lists, the ID column is unique.
212 C H A P T E R 1 0 ■ B U I L D I N G E X C E L S P R E A D S H E E T W E B PA RT S
Figure 10-13. Select the fields you want to display in your web part.
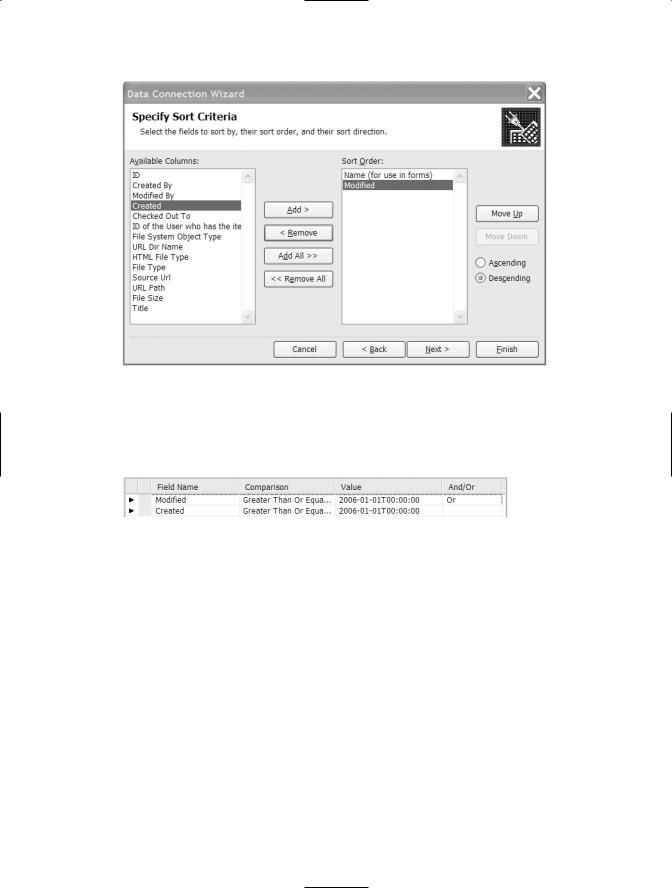
9.Specify your sort criteria. Use the Add and Remove buttons to select sort fields. Select each sort field and choose the Ascending or Descending option. Use the Move Up and Move Down buttons to order the fields, primary sort on top (see Figure 10-14). Click Next.
When you create a filter, the filter criteria must match the data type of the field you’re filtering. For example, SharePoint stores Modified and Created dates using this date and time format: YYYY-MM-DD HH:MM:SS. To filter for documents modified after January 1, 2006, the criteria is Modified, greater than or equal to 2006-01-01T00:00:00 (see Figure 10-15).
C H A P T E R 1 0 ■ B U I L D I N G E X C E L S P R E A D S H E E T W E B PA RT S |
213 |
Figure 10-14. Select the fields you want to use to sort the data.
10. Specify any filter you wish to apply (see Figure 10-15). Click Next.
Figure 10-15. Set filter criteria to apply to the data set.
For extremely large data sets, you might wish to limit the number of rows that will be returned.
11.To limit the number of rows, click Yes, then use the spin box control to set the maximum number of rows. Click Next.
12.Enter a name and description for the Data Retrieval Service Connections file, then click Finish to save the file and open the Import Data dialog box.
13.Choose a location for the data, starting at cell A1 of the current worksheet or a new worksheet. Click OK.

214 C H A P T E R 1 0 ■ B U I L D I N G E X C E L S P R E A D S H E E T W E B PA RT S
Excel creates an XML map (see the XML Source task pane in Figure 10-16) and returns the data as an XML list.
Figure 10-16. The XML source pane displays the schema for the data.
Formatting and Saving the XML Spreadsheet
Now, add formulas or apply formatting before creating the custom web part. To add a formula to every row, follow these steps:
1.Insert a column into the XML list.
2.If necessary, drag the handle at the bottom right corner of the list to include the new column in the list.
3.Edit the column heading name.
4.Enter the formula in the first row, then double-click the fill handle to copy the formula down.
Format the column headings and data as you’d like them to appear in your web part. You can edit the column headings; for example, you can change “Name (for use in forms)” to “Name.”
When you’re finished, save the workbook.
Creating and Importing the Web Part
The instructions for creating a web part and using the web part on a SharePoint web part page appear earlier in this chapter. These steps are the same for every custom web part. Follow the steps in the section “Using the Spreadsheet Add-In” to create the data-bound web part. Follow the steps in the section “Importing the Custom Web Part” to add your web part to a SharePoint web page.

C H A P T E R 1 0 ■ B U I L D I N G E X C E L S P R E A D S H E E T W E B PA RT S |
215 |
In our example, we used the web part on a completely different web site—a relatively easy way to let a group of users view new additions to a document library on another team’s SharePoint site.
Summary
SharePoint’s built-in web parts—such as the Office Spreadsheet and Page Viewer Web Parts—are powerful, but if you want advanced Excel functionality, use the SharePoint Spreadsheet Web Part Add-in. The add-in is still in beta, but it’s an efficient way to provide your users with all the features of Excel without hours of coding: the ultimate in SharePoint and Excel integration.